DEAR POLE BARN GURU: Is concrete included in price? TRACEY in SUMTER
DEAR TRACEY: No, we do not include concrete in the price and here is why:
Most familiar, as well as most available is the Sakrete® general purpose High Strength Concrete Mix. When mixed per the manufacturer’s instructions, this mix affords a compressive strength of 4,000 psi (pounds per square inch) at 28 days.
The instructions are: Empty the contents into a mortar box, wheelbarrow, or mechanical mixer. When mixing by hand, form a crater for adding water. Add water a little at a time. Avoid a soupy mix. Excess water reduces strength and durability and can cause cracking. A 60 lb. bag should be mixed with three quarts of water, an 80 lb. bag four quarts.
Now the realities of using bagged concrete for post frame building footings….
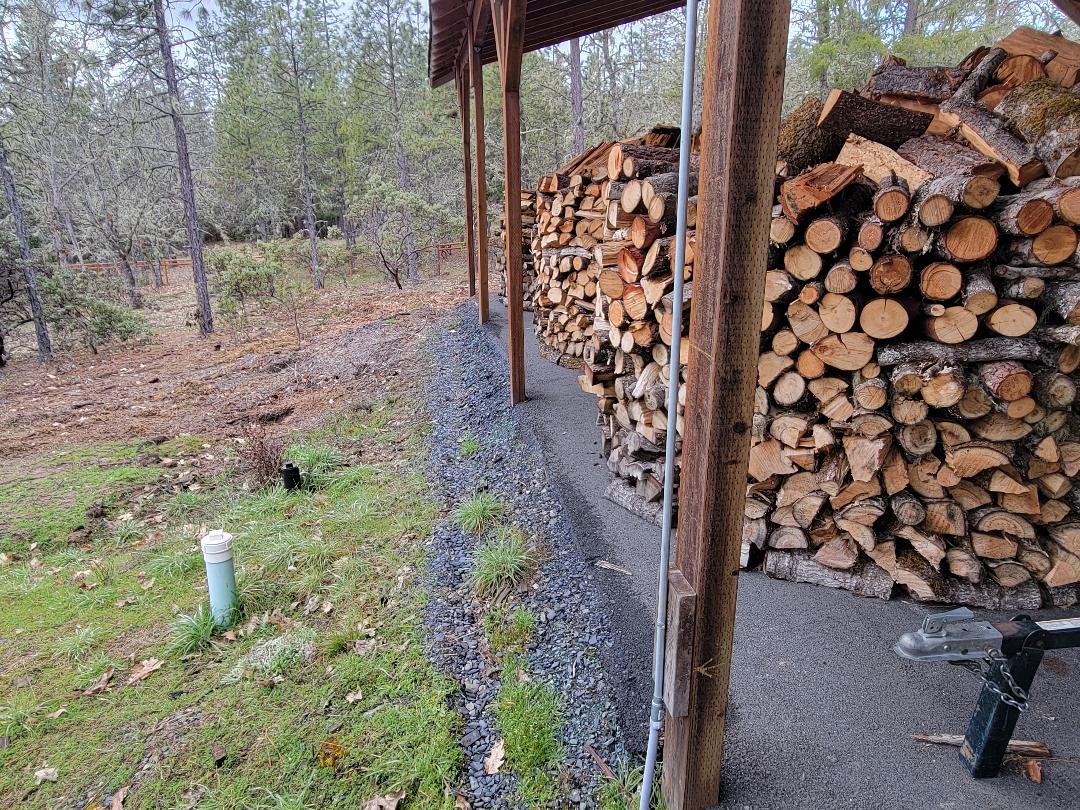
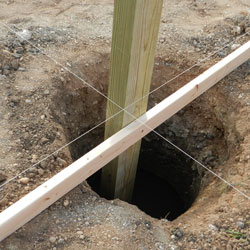 It is not unusual to have concrete encasements of 24 inches or larger in diameter and 18 inches or more in depth, in order to prevent building settling and uplift issues. One hole this size would take 4.71 cubic feet, or about 700 lbs. of concrete! Even a very small building with 18 inches of diameter and depth takes 2.65 cubic feet or about 400 lbs. of concrete.
With either 60 or 80 lb. bags, it is going to take a lot of bags! An average building could easily have 20 posts, and if looking at 700 lbs. of concrete per post, we are talking about 7 TONS of concrete (3-1/2 yards).
Ignoring the huge number of bags involved, there are some other realities.
Ever looked at the pallets of readi-mix bags at the lumberyard? Take a peek, next time. Notice how many of them are broken or leaking.
Due to weight, it may very well mean another delivery and another delivery charge. Trucks do not run for free.
Bags can (and will) break when being handled during delivery, unloading and being moved around the jobsite. It is going to happen, just plan on it.
From experience, lots of projects are not begun immediately after delivery. It is not unusual for delays of weeks, or even months before actual construction begins. Improperly stored, bags can get wet or absorb moisture and become solid before time for use. This equals a total waste of money, other than the chunks of concrete make for solid backfill.
Then there are the builders who insist upon throwing the entire bag (usually including the bag) into the hole. Their idea is ground water will cause the readi-mix to harden. Why does this not resemble the manufacturer’s instructions?
Readi-mix must be mixed thoroughly and evenly. How does mixing over 200- 60 lb. bags of Sackrete® by hand sound? Add too much water (three quarts exactly per 60 lb. sack) and the strength is reduced.
Use too much? As holes are always perfectly round (not), it is going to happen.
Save time, effort and money. Often all three can be saved by having the local pre-mix concrete company deliver concrete for holes (even if a “short load” fee is charged), as opposed to mixing on site.
DEAR POLE BARN GURU: I am building a 36 x 40 pole barn and I’m on a grade that drops approximately 4′ over the span of the building footprint. A home builder friend, a structural engineer, and my concrete guy have recommended traditional foundation with wet set permacolumns, but the builder I’ve contracted with wants to set columns on footers 3′ to 5′ in the ground and not use the permacolumns. The pole barn builder doesn’t think I need a retaining wall and should just have an excavator level what i need with a slope off the back. Seems a retaining wall in the back is better, which my concrete guy will pour, but still recommends foundation to eliminate frost heave. Use for building is car storage and shop with a lift.
Thank you in advance for your time and help. CHRIS in ST. LOUIS
DEAR CHRIS: This reminds me of a joke I once heard – a home builder friend, a structural engineer and a concrete guy enter a bar…….
Oops, kind of off track!
Some of the answer is going to depend upon what you want your yard to look like.
In any case – the actual pad of the building is going to need to be properly compacted (emphasis on proper) so those costs will be fairly even in any case. You’ll want to be reading about proper site preparation and compaction here (it is lengthy): https://www.hansenpolebuildings.com/2011/11/site-preparation/
 What might appear to be the least expensive would be to just order columns long enough to get the required embedment depth as shown on the engineered plans, then fill afterwards, sloping away from the building. In order to keep the fill from sloughing off, it will probably result in a slope next to your building which will stretch out as far as 20 feet. You could easily invest in several hundred yards of fill!! If you can live with the look, might be the answer.
Building on top of a foundation – this is going to be the most expensive and certainly not the choice I would probably be making. It is also going to be tougher to build upon, due to the height of the walls plus the foundation.
Which leaves – build a retaining wall. I like this idea. Columns do not have to be longer (as long as fill is properly compacted).
By the way – there is no reason for ANY of these versions to frost heave as long as the site has been properly prepared. Read more about how to avoid frost heave issues here: https://www.hansenpolebuildings.com/2011/10/preventing_frost_heaves_in_pole_building_construction/
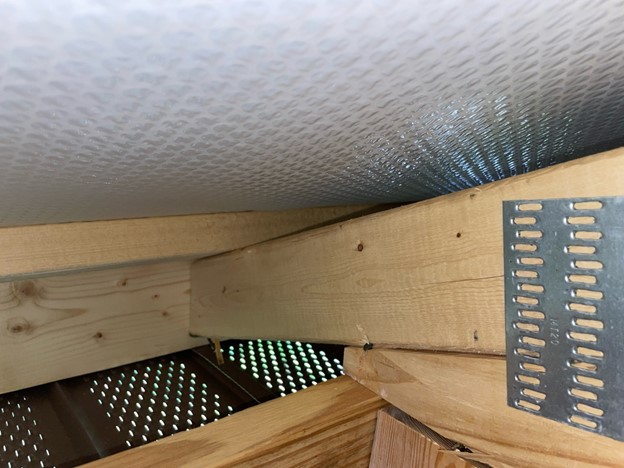
DEAR POLE BARN GURU: How much is the drip stop application for labor/material? Usually it comes already attached to the metal paneling. Do you figure it by square feet? JOSH in MANKATO
 DEAR JOSH: For materials you are going to be looking somewhere in the neighborhood of 53 cents per square foot of roof surface. As a builder, if you are anywhere it is typically windy, I am going to give you a decent discount on my labor for having invested in it, because I don’t have to fight rolls of insulation flapping in the breeze.
 DEAR POLE BARN GURU: I’m in need of financing a 4 bedroom 4 bathroom home. DEBRA in BROOKLET
 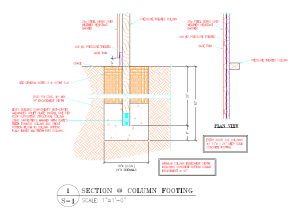 DEAR BRIAN: Hopefully your “laminated” posts will be true glulaminated columns and not 2×6 nailed together. In order to determine footing diameters, our engineers would need to know: Soil bearing capacity at your particular site (a Geotechnical Engineer should be engaged to provide an engineered soils report); Frost depth (soil bearing capacity has an allowable increase with depth of embedment); Sloped roof snow load (Ps). This is calculated from Ground Snow Load (Pg) and can vary due to roofing materials, roof slope, is building heated or not, use of building (True agricultural buildings have a 20% reduction to Ps); Roof dead loads – roofing materials and substrates (OSB or plywood), ceiling materials, as well as roof insulation.
 DEAR POLE BARN GURU: With my kit and installation does this mean move in ready? MARK in CANTON
  DEAR POLE BARN GURU: Do you supply stamped engineering plans for building inspection purposes? DOUG in BENEZETTE
  DEAR POLE BARN GURU: I see buildings with no foundation what is the code for pole barn foundations in Michigan? ANTHONY in GLADWIN
  DEAR POLE BARN GURU: Which would be more economical, to build a 40x64x12 post frame shouse with attic trusses over a 40 x 32 section for an upstairs or to build a 40 x 72 x 12 with no upstairs needed? BETH in CADIZ
  DEAR POLE BARN GURU: I had a question from someone asking about a pole-frame addition to a 1936 stick-frame house. It would be small – under 500 s.f. and only a single-story. With the 2 different foundation and framing types, I am concerned about differential movement between the structures. I am not aware of any similar additions to other stick-framed homes so I am looking for previous examples that may have been done this way. Can the 2 structure types be connected, or should there be a movement joint between them? If a movement joint is required, I am only aware of joints for large commercial construction, like the 6-way seismic movement joints used in CA. MATT in PIERRE
 DEAR MARC: Thank you so much for being a loyal reader! Our post frame home has radiant floor heat downstairs and I couldn’t be happier with it. Nothing like warm concrete. Regardless of how you heat and cool, you should use at least R-10 rigid insulation under (and at edges of) your slab, as well as having a vapor barrier underneath. How you insulate will also play into this – if you closed cell spray foam perimeter, then you will have to mechanically dehumidify, else you are going to experience moisture issues. Reach out to my friends at

 DEAR POLE BARN GURU: I am looking to build a 20ft x 24ft pole barn garage. The footings are going to be drilled and filled with concrete now, with the structure being completed at a future date. My city engineer requires 30″ deep footings. He was not able to say for sure what diameter footing I needed to drill. Do you have any insight to what diameter footing I should expect to need for this size structure? JOE in CINCINNATI
  DEAR POLE BARN GURU: I was fortunate to have acquired enough columns for a building. My question as these are not ground contact columns and I prefer at this time to not pour a concrete floor is it allowable to pour a perimeter of concrete ( 2’x2′,3’x2′?) thickened edge if you will and set the columns to keep them off the ground? I was thinking partially setting rebar perpendicular in the concrete leaving 1-2′ protruding towards the buildings center to tie a future slab possibility into what would be the existing edge ( foundation). This is a cost driven situation as you may have already surmised. Really appreciate your knowledge and time. RICK in TWO RIVERS

 DEAR POLE BARN GURU: I am in preliminary stages of designing a post-frame building, that will serve a multitude of functions such as a home gym, work-shop, and area to host family parties. It is a 30′ x 76′ x 20′ tall, with 2 fully enclosed leans 64′ long on each side that span out 16′. I really like Scandinavian style, which utilizes no overhang. My main concern is how to allow for proper air intake if I do zero over-hang since there will not any soffit. Curious for your thoughts. Would you recommend against ‘zero over-hang’? Or do you think there is some work-around for air intake and gutter attachment? Hoping for a quick answer! Thanks in advance : ) SHANE in HARTLAND
  DEAR POLE BARN GURU: I have a quonset with (2) 15’x14′ sliding doors with 4 cannonball style rollers each that need to be replaced. I’m thinking I’ll have to remove the doors, but what is the best way to do this? CODY in MAYNARD
  DEAR ANGEL: Your strongest and most affordable foundation will be to use true glulaminated columns, embedded in ground. Regardless of what you pick, it will only be as good as ground it is placed upon. A well prepared site, where clays and organic materials have been removed and proper fill has been placed and compacted every six inches, will greatly improve your chances of having a solid foundation. I would encourage you to consider a steel roof, as shingles have a very short life span (read more here:
  Lots of considerations to be taken into account when adding a second floor to an existing post frame building, especially if connecting to current structural framing members.
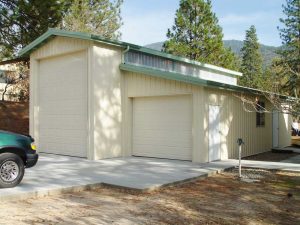 “Hello I am looking to add a lean-to to the side of my pole building on the eave side. I was looking to use a mono truss at with a 2/12 pitch and 8′ to the bottom of the truss/ ceiling height. Existing pole building has 6×6 posts with an 8′ on center spacing. The lean to is going to be 24′ wide by 10′ deep with 4 posts and a beam at the 8′ mark (so it would have a 2′ overhang. to connect it to the existing building we were planning on installing a ledger on to the 4 6×6 post on the existing building to hang the mono trusses off of. My question is do I need more posts on the existing building side and truss spacing or what would you recommend for my application.”
 DEAR POLE BARN GURU: Hey thank you for time. I am wanting to build a 50×100′ shop. I have uneven ground and about a 4-5′ fall in the back. What is the best foundation for a post frame building for that situation. Any help would be greatly appreciated! ANDREW in APPLING
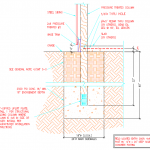 DEAR JOHN: 4×4 posts would not be adequate for even a very small post frame building. I would avoid steel due to its unforgiving nature (everything has to be spot on), challenges of thermal conductivity and connections between structural steel and wood. My preference (in my ideal dream world) would be glulaminated columns, embedded in ground, with a mono-poured concrete footing/bottom collar. This would provide greatest strength and reliability at an affordable price point.
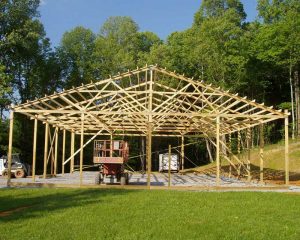 DEAR POLE BARN GURU: I am planning to build a pole barn 36×40 on 10’ centers with heavy duty steel roof trusses on 6×6 posts. The wall height will be 10’ and I would like to have 3’ faux stone for siding at the bottom with the rest of the siding hardi plank cement board. Would the weight be too much for a traditional pole barn style framing? NICK in CROSBY
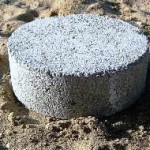 DEAR FRAN: Our engineers typically detail bottom of roof supporting column holes with an eight inch thick concrete footing mono poured with 10 inches of concrete up each side of columns, resulting in a total depth of pour of 18 inches.
 DEAR KURT: Thank you for your investment in a new Hansen Pole Building – be sure to send me lots of progress photos during construction (and of course ones when it is all complete).
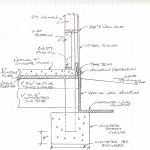 DEAR GREG: Any possible movement would come from either inadequately compacted or loose soil below column footings, inadequate footing diameter, or frost heave. To prevent frost heave, columns footings should be placed at frost depth or deeper and perimeter of slab should be insulated vertically with rigid insulation. In your climate zone, this would entail a four foot ‘tall’ R-10 insulation board. Install on inside face of pressure preservative treated splash plank, with top of insulation even with top of concrete slab. As an alternative, you can insulate slab perimeter per Frost-Protected Shallow Foundation requirements found here (note, slab edge does not have to be thickened or have a stem wall):
  DEAR BRIAN: Regardless of spacing of columns or trusses, a fully engineered post frame building will be designed to meet or exceed a specified set of wind design criteria – speed and exposure. You are better served to increase design wind sped, so your entire buildings is capable of supporting higher loads, than to merely move columns closer together. Provided Code required deflection limitations have been properly engineered for, any purlin sag, over time, should be relatively imperceptible.
 DEAR SHERRY: Properly manufactured inside closure strips are UV resistant and should outlive your building’s steel roofing. Personally, I find them essential, as without them small flying critters have a clear path to enter your building. In order to replace them, you will have to remove screws along your eave line. Once remains of old closures are removed, new ones can be put in place. Old screws should be replaced by both larger diameter and longer screws, to maintain integrity of connections and prevent leaks.
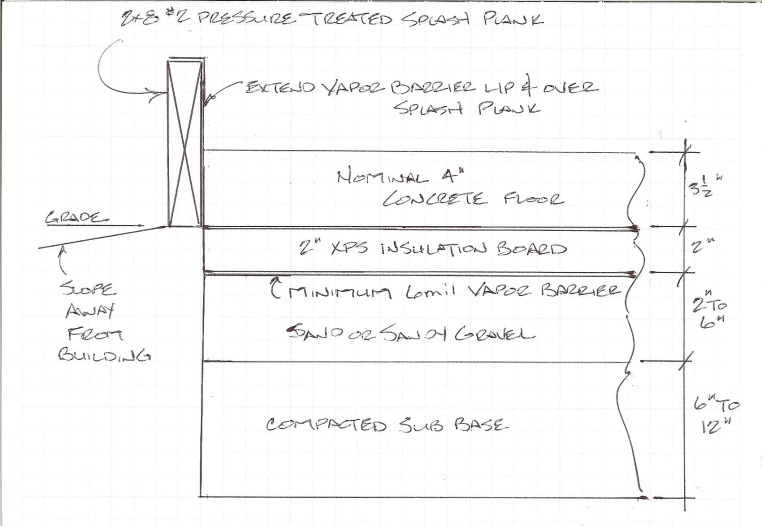

 I’m considering building a pole barn however am concerned because about 30% of the vertical posts would be on a rock ledge at an elevation above the frost line.
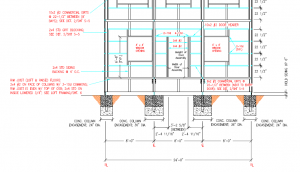 DEAR POLE BARN GURU:
  DEAR POLE BARN GURU:
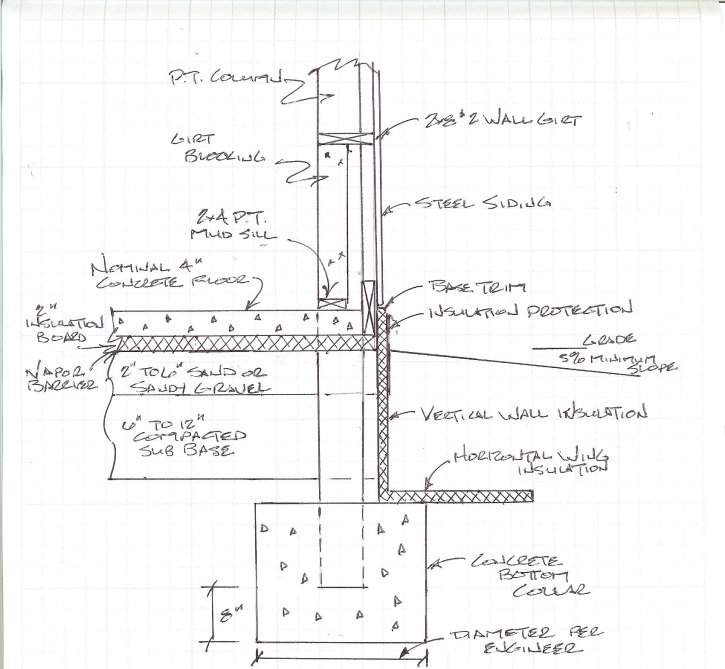
 When completed, the new building would be two stories (8′-10′ of it will be below the foundation of my existing house, with a finished basement with a 9′ floor to ceiling height, and a second floor as the main living floor with a cathedral ceiling whose peak will run the 40′ length of the new addition. Will a pole barn structure work for me? If so, will your company draw up the plans and engineer the project so that I can get it approved by my City Building Department? DENNIS in SEASIDE
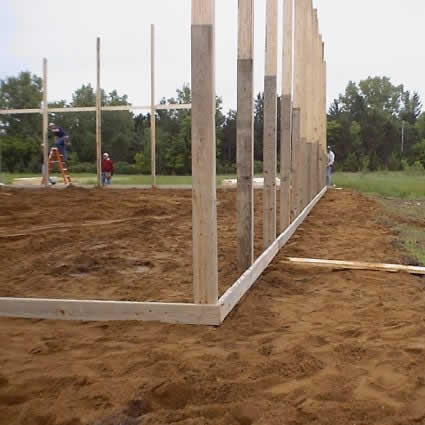

 DEAR POLE BARN GURU: I’m in the early stages of replacing two attached buildings. One building is a 2 car stick built garage, the other is an pole barn for a total size of 24×60 they are attached at the roof. Long story short needs existing vinyl siding/asphalt shingle roof replaced and a couple poles in the barn. Concrete slabs in both are in great shape, we want to bring fill in and raise the grade about a foot. Now my question. Should the existing slabs be demoed and left in place, can we just bring in stone fill and raise the grade and leave slabs intact? BARRY in OWENSBORO
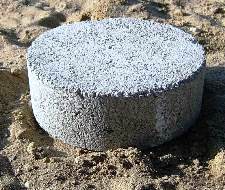 DEAR ANDRE: Those cylindrical blocks are known as cookies (
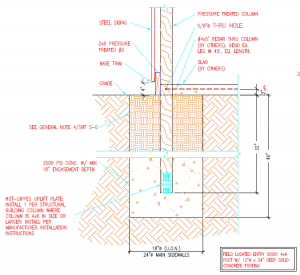 DEAR JAMES: This information should have been clearly indicated on engineer sealed plans you are using for construction. Actual required depth, diameter and amount of concrete required to prevent settling, uplift and overturning is carefully calculated by your building’s engineer, once all factors can be considered. These include, but are not limited to: soil strength at your site, building wall height, roof slope, weight of building itself, snow load, wind speed and wind exposure, seismic considerations, whether building is fully or partially enclosed or is ‘open’, as well as spacing of columns. In most cases, I would expect to see an engineered design of roughly 40 inches in depth, 18 inches in diameter, with a minimum of 18 inches depth of concrete in bottom of hole (a bottom collar) and base of column held up eight inches from bottom of hole. A steel uplift plate is typically placed on columns in concreted area to prevent uplift. All of these factors as well as typical suggestions above should be fully reviewed and sealed by your building’s engineer prior to your moving forward.
 DEAR RON: If I was going to do this I would use 15mil black plastic as 6mil will just not hold up over time. I would seal it to my building’s pressure preservative treated splash plank and make sure to have ground sloping away from my building beneath plastic minimum of 5% (three inches in five feet).
 2015 IBC (International Building Code) ventilation requirements may be accessed here:
 DEAR JAY: A beauty of post frame (pole) building construction would be not needing to have a continuous footing and foundation, thus saving thousands of dollars and countless hours of time.
 DEAR JAMES: I’m in favor of minimizing penetrations through a wonderful weather resistant surface – steel siding. Use a surface mount box (rather than recessed) to a “flat” of siding (between high ribs). Use generous amounts of caulking between box and steel siding and you should be all good. A suggested caulking for steel would be TITEBOND Metal Roof Translucent Sealant available through your local The Home Depot®.
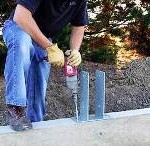 DEAR MICHAEL: Regardless of design solution chosen, it would prudent to have your existing foundation reviewed by a competent local engineer for adequacy. In many areas frost depths are deeper than your foundation, rendering it unable to be reused. There are dry set brackets designed for attaching post frame building columns to existing concrete, however our third party engineers will no longer certify them for use as they will not resist moment (bending) loads. Provided your concrete has sufficient depth and strength, you might be able to have an engineer of your choice specify a connection of columns to concrete.
 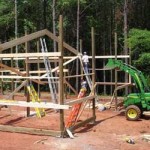 I noticed on your web site you have some buildings in Wyoming. Do you use vendors for regional distribution? I can’t imagine shipping everything from MN. JOHN in AFTON
 DEAR MICHAEL: Second part of your question gets answered first, it would only need to be pressure preservative treated if wood was in contact with concrete. As most commonly available timber sizes are pressure preservative treated, you might very well find treated timbers to be both more readily available and more cost affordable.
 Wikipedia may consider a lean-to a simple structure, however there is far more involved than may meet the eye. Before diving deep into adding a lean-to to an existing pole barn (post frame building) a competent Registered Design Professional (RDP – engineer or architect) should be engaged to determine the adequacy of the existing structure to support the lean-to. Failure to do so can result in catastrophic failures – causing injury or death.
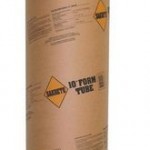 Unless one wants to make a significant investment in concrete filling a very large diameter tube, it is more economically practical to increase the size of the footing (maintaining a smaller diameter tube) in order to properly distribute the downward forces over an adequate surface.


 DEAR SHAWN: I have a client, whom I built a building for back in the 1990’s, who has become a good friend. He operates a high ropes course just north of Spokane, Washington:
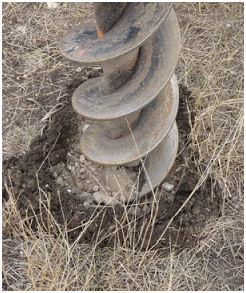
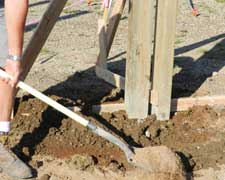 In typical pole building construction, holes are augured into the earth, columns are placed in the hole so concrete can be placed below the column to act as a footing for vertical support, as well as to encase the lower portion of the column. Above this “bottom collar” compacted soil backfill is used to fill the void between the column and the edges of the holes.


