Welcome to Ask the Pole Barn Guru – where you can ask questions about building topics, with answers posted on Mondays. With many questions to answer, please be patient to watch for yours to come up on a future Monday segment. If you want a quick answer, please be sure to answer with a “reply-able” email address.
Email all questions to: PoleBarnGuru@HansenPoleBuildings.com
DEAR POLE BARN GURU: Just one question…for now… the difference in the 11,000 price and the 43,000 price is just the building plans/instructions? SARAH from anywhere USA
DEAR SARAH: I have to admit, this question on your pol barn quote had me initially stumped, until I looked back at the history of quotes you had received from us.
Back in 2011, you asked for a quote on a fully enclosed 60’ x 120’ x 12’ building, with a 12’ wide roof only shed along one side. This pole barn quote included features like a 3’ wide insulated commercial steel entry door, with factory painted steel jambs; a 12’ wide x 11’ tall all metal framed sliding door; polycarbonate eave lights on both 120’ sidewalls; a polycarbonate vented ridge; and roof insulation.
Recently, you asked for a new pole barn quote for a roof only 40’ x 60’ x 12’ building, with a 12’ wide roof only shed along one side. The only other features were the vented ridge and a cupola.
Your first quote was three times the square footage, included a sliding door, eavelights, poly ridge vent and roof insulation….and all sides of the main building were fully sheeted with steel, fully trimmed out.
This is a lesson in why trying to compare price only, ends up being nothing short of confusing for all involved.
For you, or any client, we will happily compare any quotes, to make sure all is apples-to-apples.
DEAR POLE BARN GURU: I have a client looking at a large shop building with a 30 wide 80 long side shed ( 4-12 pitch) that he intends to use for living quarters, BUT…He would like to have some kind of vaulted roof in the side shed. I currently have the shed with shed trusses, so two questions: Can we get scissor shed trusses that may be have a 2-12 interior pitch? How would we recommend that he insulate the roof of the side shed? Do you have any alternate ideas on getting some kind of vaulted ceiling in the living quarters? The building has a 20 psf flat roof snow load. RESEARCHING RICK
DEAR RESEARCING: With the relatively low roof load, you could monopitch scissor truss the side shed, but will probably get a maximum of 1.5/12 slope, unless your client can stand a parallel chord truss which would be about 3 feet deep. If so, then he could have 4/12 slope inside and outside.
With trussed vaulted ceilings, placing unfaced insulation batts between the ceiling joists will be the most effective method of insulating.
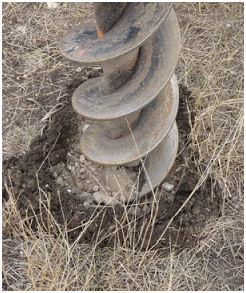
DEAR POLE BARN GURU: Couple of things I’m seeing that I thought was taboo in building a pole building- concrete filling the post holes !!! The pole barn I built 12 yrs ago, and am currently using, I back filled the holes with sand so it wouldn’t heave during winter. Second is my concern with post load using the double trusses on sandy soil with 12 ‘ centers. My current barn (different locations) uses 24″ centers in hard clay. Just a couple things of interest there. Thank you. MOPAR MIKE
DEAR MOPAR: Good questions. And can be addressed with several answers.
First – what is it the embedment of the column really has to do? It must resist uplift, overturning and settling.
These factors are addressed more thoroughly here: https://www.hansenpolebuildings.com/blog/2013/02/concrete-pier/
Next – there is absolutely nothing wrong with properly pressure preservative treated wood in contact with concrete. In fact, the Building Codes require it!
Find about more on this subject at:
https://www.hansenpolebuildings.com/blog/2013/03/footing-2/
Filling holes with sand is not going to prevent frost heave – the sand provides no resistance to heaving.
To read how to prevent frost heave: https://www.hansenpolebuildings.com/blog/2011/10/preventing_frost_heaves_in_pole_building_construction/
The sand also does nothing to address the crucial issue of uplift (the building wanting to be sucked out of the ground).
Here is some “in depth” (yes pun intended) reading on preventing uplift in pole buildings:
https://www.hansenpolebuildings.com/blog/2012/02/concrete-collars/
As to your second concern, you take the load and divide it out across the roof area. I am guessing your posts are not every 24”, but rather the trusses. Whether you have single or double trusses – it ALL gets transferred into the number of posts at whatever spacing you have and then down into the ground. Regardless of how the trusses and posts are spaced, you need a concrete footing large enough to distribute the load. I am not talking about concrete cookies, which I talk about in older blogs. What I am referring to is a monolithic concrete collar around every post designed to support the loads.
As to your concern about the roof loads being transferred through the columns and into the ground adequately – regardless of how the trusses are spaced, the columns carry the roof’s live and dead loads, multiplied by one-half of the truss span (plus any overhangs), times one-half of the distance to the next adjacent columns (in both directions).
Here is a very good article which explains more thoroughly how this works:
https://www.hansenpolebuildings.com/blog/2013/03/footing-2/
DEAR POLE BARN GURU: Do wind braces help support the horizontal beam that they are connected to? CHILLIN’ IN CHOKOLOSKEE
DEAR CHILLIN’: I am going to take a stab at your reference being to knee braces supporting roof trusses, as this would be the most likely answer.
If this is the case, then I would recommend reading this article: https://www.hansenpolebuildings.com/blog/2012/01/post-frame-construction-knee-braces/
In the case of an angle brace supporting any other horizontal member, the greatest dictate as to if it is effective or not is typically the adequacy of the connections. In most cases, the brace ends up being a waste of time and materials.
DEAR POLE BARN GURU: What is the thickness of your exterior steel? CLICKING IN CLINTON
DEAR CLICKING: Most of those who invest in new Hansen Pole Buildings chose 29 gauge steel for their siding and roofing, however there are some who prefer to use 26 gauge. We offer the flexibility for people to select what best meets their needs. For more information on steel gauges and thickness please read: https://www.hansenpolebuildings.com/blog/2012/01/steel-thickness/ and https://www.hansenpolebuildings.com/blog/2013/10/steel-thickness-4/
 DEAR POLE BARN GURU: I’m in need of financing a 4 bedroom 4 bathroom home. DEBRA in BROOKLET
 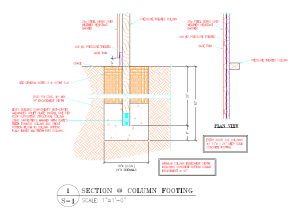 DEAR BRIAN: Hopefully your “laminated” posts will be true glulaminated columns and not 2×6 nailed together. In order to determine footing diameters, our engineers would need to know: Soil bearing capacity at your particular site (a Geotechnical Engineer should be engaged to provide an engineered soils report); Frost depth (soil bearing capacity has an allowable increase with depth of embedment); Sloped roof snow load (Ps). This is calculated from Ground Snow Load (Pg) and can vary due to roofing materials, roof slope, is building heated or not, use of building (True agricultural buildings have a 20% reduction to Ps); Roof dead loads – roofing materials and substrates (OSB or plywood), ceiling materials, as well as roof insulation.
 DEAR POLE BARN GURU: With my kit and installation does this mean move in ready? MARK in CANTON
 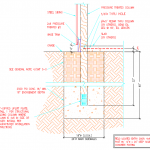 DEAR PETE: Any building is only as strong as its foundation, so this is not a place to be penny wise and pound foolish. Code requires minimum six inch thick concrete footing, or a Code approved alternative (here is an example
 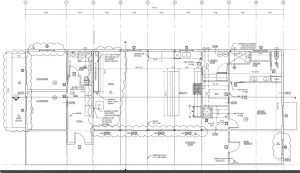 DEAR JOHN: Our floor plan team can add plumbing and electrical for a nominal fee – challenge is, your subcontractors will ignore this entirely. I have always had best results having these subcontract trades submit their own drawings when they apply for their permits (these permits are outside of your structural permit).
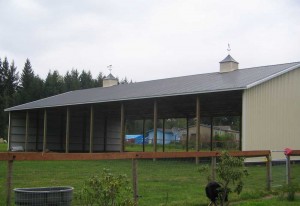 For barns with enclosed sidewalls, enclosed vented sidewall eaves and a vented ridge are critical design elements to allow for passive ventilation. Air enters through eaves and exits through ridge vent with excess moisture.
 2015 IBC (International Building Code) ventilation requirements may be accessed here:
 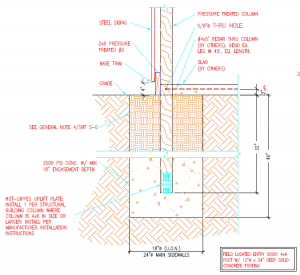 DEAR POLE BARN GURU:
 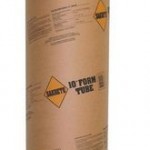 Unless one wants to make a significant investment in concrete filling a very large diameter tube, it is more economically practical to increase the size of the footing (maintaining a smaller diameter tube) in order to properly distribute the downward forces over an adequate surface.
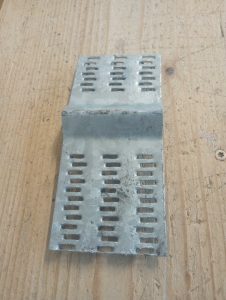 From Pro-Footer® comes the UP-Lift plate, which is an ingenious adaptation of truss plate technology. They are designed to help save time, money and meet or exceed post uplift requirements. The affordable plates are field applied to opposite sides of an embedded column, with just a framing hammer. No special tools are required.
 “I looked at each of the suppliers of pole frame kits and was not impressed with the cookie base with treated pole foundation. I only found one that included a preformed concrete pillar with a top flange. I like this system. A little more labor and a wee bit more concrete but it seems to make for a better quality foundation. Whaddya think?”