This week’s Pole Barn Guru answers reader questions about where to stop metal in relation to concrete, installing a sliding door to a repurposed building, and the proper depth of footings.
DEAR POLE BARN GURU: Where do I stop my metal in relation to my grade board/ bottom stringer. I’ve set the bottom of my lowest stringer to be the top of my concrete. Does the dirt on the outside end at the bottom of said stringer because I would think moisture would penetrate. Thanks for your time and I enjoy your information. SAM in LANCASTER
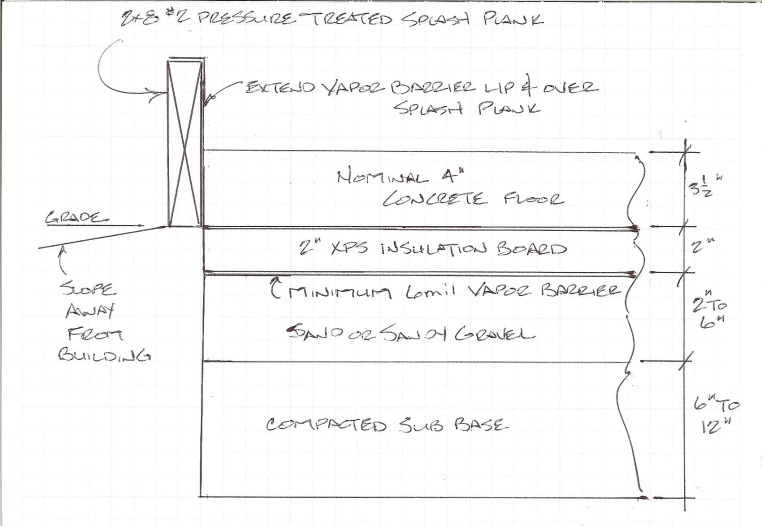
DEAR SAM: Bottom of your pressure treated splash plank (lowest stringer) should be 3-1/2″ below top of your concrete slab.
DEAR POLE BARN GURU: I’m putting up a pole barn on the cheap with mostly repurposed materials. I’ve searched the interweb and find no instructions on sliding door track installation. I’m ready to start putting up the siding-do I need to prep/install the track/flashing/guides/stops etc. now or can I side the structure and do all this later? I have yet to buy any track/rollers/hardware, the doors will be 18′ tall and 10′ wide (high clearance for a stack wagon). Any help/guidance/direction would be greatly appreciated. Thanks, DAVE in ELIZABETH

Figure 27-5
DEAR DAVE: You will want to invest in your track and hardware so you have installation instructions including height of track board. Please do not try to wood frame door itself, invest in a steel frame – it will be far lighter in weight and will not warp and twist like a wood frame will.
Normally you will have a 2×6 #2 track board mounted on sliding door header face across your door opening and in adjacent area door will slide over. Top of track board is usually 10″ taller (above bottom of pressure treated splash plank) than door height. Before you run any siding install header, track boards and jambs. Install 1-1/2″ x 5-1/2″ L trim to cover track board. Hang track and track cover trim. Install J Channel horizontally on solid wall below track board and vertically on solid wall side of each door jamb.
DEAR POLE BARN GURU: Hello I called the number on your website and I was asked to send this question to this email address:
 I’m considering building a pole barn however am concerned because about 30% of the vertical posts would be on a rock ledge at an elevation above the frost line.
I see the section on your website ‘sturdy wall plus concrete brackets’ not sure if that would apply here and/or what type of bracket or detail could be used in the situation?
Thank you! MARK in WEST MILLFORD
DEAR MARK: Building Codes require footings to extend to either below frost line or to solid bedrock. Our third party engineers have worked with similar situations previously and usually come up with a design solution involving “pinning” columns to underlying rock. We would supply you with a column layout and have you indicate how deep you can get at each column location. A steel concrete stake and a sledge hammer are perfect for being able to do this in advance of your plans being completed.
 “I have had the roof and insulated walls on for quite some time and am currently enjoying an almost complete pole building.


