Working With a Building Official for footing designs
Long time readers have read me opine on how Building Officials are our friends: https://www.hansenpolebuildings.com/2012/04/i-like-building-officials/
One of our clients recently received this email from his Building Official and shared it with me (red added by me):
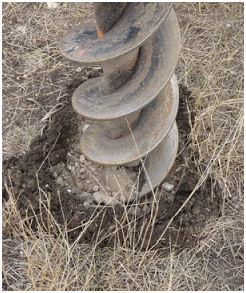
 “The Town of xxxx stopped plan review on your project because pole buildings with the type of foundation that was called out on your plans have a track record of failing in a short period of time in this area and the soil conditions that exist at your location won’t allow piers to be dug as called out in the plans The ground is full of rock. It was our intent to not have you try and build something that was not going to work and cost you a lot of money. With a frost depth of only 18” “T” foundations are the acceptable method of construction in that area and should be a lot less expensive.”
I responded asking for more explanation of wording in red, and heard back:
“We have a few pole barns in xxxx that are much larger in size and in areas that will allow piers to be dug without interference of large rocks below grade. The pier design that they used allows the wood post to sit on a gravel base so any water that might drain down along the side of post after the wood shrinks from age is allowed to drain away.
They also pour concrete up to 3” above the top of the pier and slope the concrete away from the post. Your design traps water at the bottom of post and allows the water to be wicked up by the end grain of the post and promote rot. Although the building codes does allow treated wood foundations to be buried we strongly discourage the use in our jurisdiction.
Thanks for your understanding.”
Thank you very much for your timely response.
I am probably remiss in not having offered a better introduction of myself. I studied architecture at the University of Idaho and have been Technical Director at Hansen Pole Buildings since 2002. I joined ASAE (now ASABE) and ICBO in the mid-1980s. The IBC references ASABE work for post frame buildings which was produced by the structural committee of which I was a member of. I am a frequent contributor as a writer for publications such as Structural Building Components, Frame Building News and Rural Builder magazines. I have also reached out to you on Linkedin, should you wish to know more about me.
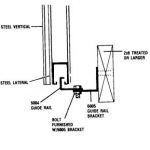
We are currently working with Mr. Bxxx on a design solution to incorporate a continuous footing/foundation or thickened edge slab with bracket mounted columns. We and our engineer had not been advised by Mr. Bxxxr as to the soils/rock conditions at his site until quite late in the game. It is my expectation, with Mr. Bxxx’s continued assistance, to have an acceptable design solution arrived at shortly.
 While an embedded column pier design on a gravel base sounds wonderful, Code does require a concrete or otherwise approved footing below isolated columns in order to properly distribute weight of building and applied loads. Actual testing of pressure preservative treated columns for over 60 years has proven there to be no decay of properly waterborne pressure preservative treated wood even in the most severe climates (this testing is ongoing in Mississippi). UC-4B rated pressure preservative treated wood is rated for structural use in fresh water, so a column being wet would not increase its chances of decay. In order for decay to occur there must also be oxygen, which is only present in the upper few inches of soils.
Please feel free to contact me with any questions or concerns regarding any post frame building structure. I would also invite you to subscribe to my blog, where there are currently over 1800 searchable articles regarding post frame construction.
“Thank you for your comments. The failures we have seen may have quite well been from pour constructions procedures done 10 to 15 years ago. No way to tell.
I will look into your articles and may have to change our policies”
Building Officials are not our adversaries and provided with accurate data policies can be crafted to create a winning solution for all parties involved!
 DEAR KIMBERLY: This brought back childhood memories of my Dad taking me out on a Saturday to a site above Hayden Lake, Idaho where he and my uncles were going to be framing a custom home. Site had been cleared, and there were all sorts of roughly inch and one-half diameter holes drilled into solid rock – they had to blast in order to get a foundation in!
 DEAR POLE BARN GURU: I am in the planning stages for a pole barn build. The building will be 50 ft wide by 40 ft deep by 16 ft high at the eaves, posts spaced at 10 ft centers. This will go on a concrete pad and I am looking into using Sturdi-Wall Plus wet set brackets. My question is in regard to the height of the posts (roughly 16 ft) and the bending moment loads (wind loads) on the side of the building. Have you designed/installed posts with this height or higher before? If so, is there a place where I can point the planning officials to that shows the calcs and what not so they can make a decision as to whether or not this type of application with my situation will work or not?
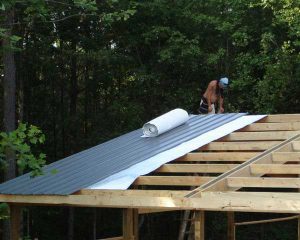
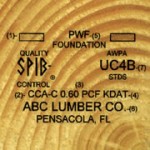 DEAR KRISTEN: Any roof supporting structural columns are pressure preservative treated to UC-4B per International Building Code requirements. This is a greater level of pressure treatment than you can usually find at big box stores or local lumberyards. Any other lumber used in ground contact will be treated to UC-4A and tags will reflect ‘ground contact’. Lumber in contact with steel roofing (roof purlins) are not exposed to the weather, would not typically be pressure preservative treated. We do always recommend a condensation control be used between roof steel and roof framing. The easiest, from an application standpoint, would be a factory applied to roof steel Integral Condensation Control (DripStop or CondenStop). Other alternatives would be a Radiant Reflective Barrier (we can provide this in six foot width rolls with an adhesive pull strip attached for ease of joining rolls together) or to use two inches of closed cell spray foam.
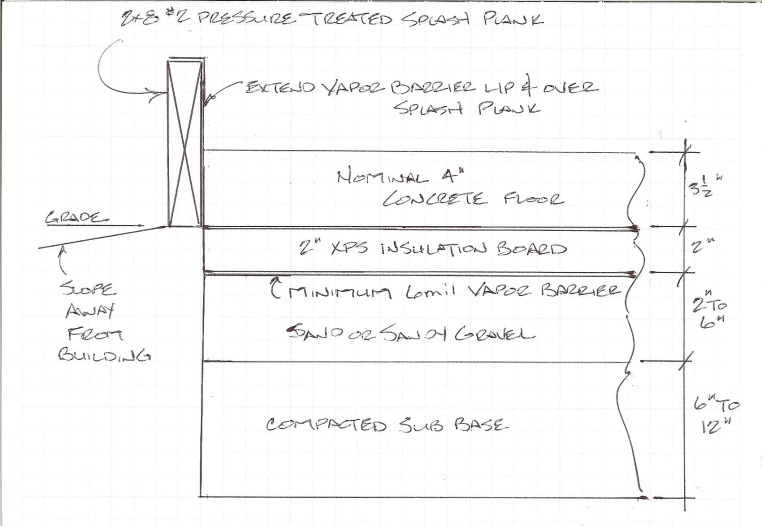

 I’m considering building a pole barn however am concerned because about 30% of the vertical posts would be on a rock ledge at an elevation above the frost line.
 DEAR BRAD: You want to avoid trapping water between Radiant Reflective Barrier and roof steel, as it can lead to premature deterioration of roof steel.
 DEAR POLE BARN GURU: