Tag Archives: inside closures

Bugged by Bugs

Bugged By Bugs

Reader FRANK in ARVA, ONTARIO writes:

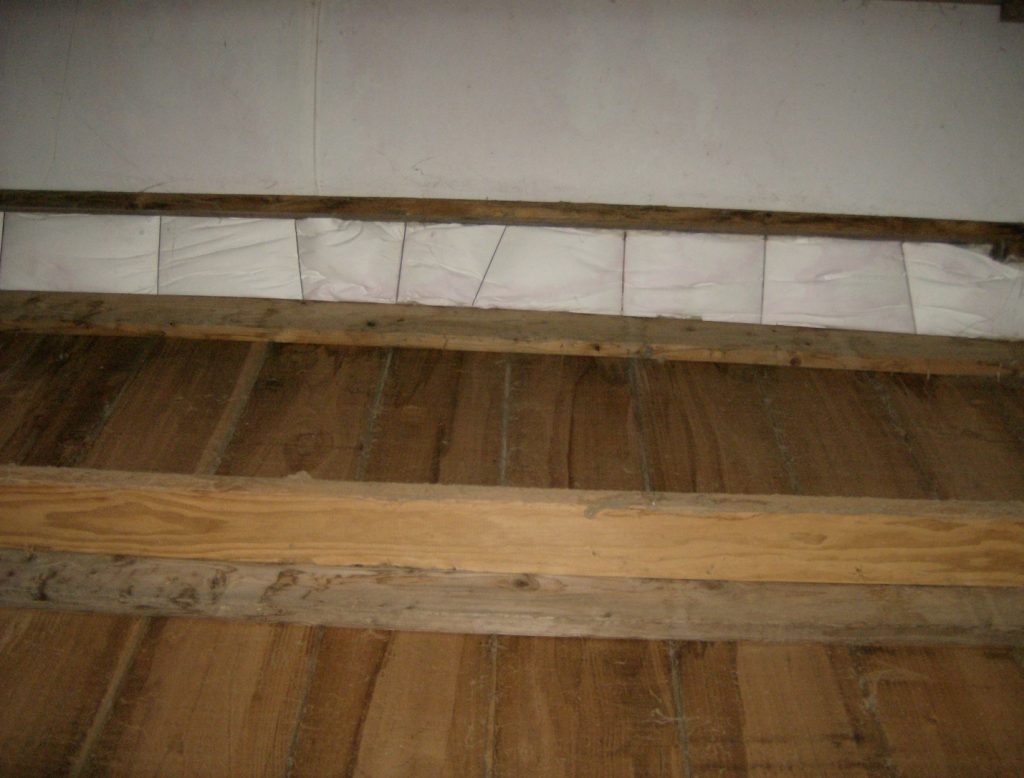
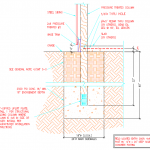
“I am actually in Ontario. How to keep bugs from getting behind the steel wall siding voids in the area left behind where the ribs are? Interior is finished with vapor barrier/batt insulation/osb. Exterior has steel “barn” siding and Tyvek wrap underneath. Z flash at bottom of exterior wall siding at bottom over pressure treated skirt board. Built mid- 90’s by myself. I left 1/16 ” gap from bottom of wall siding to top of skirt board z flash to allow water drainage and so no intimate contact between the wall and flashing to help avoid rust issues. All steel edges had a layer of prime and paint added during build. 30 years later no rust. Lady bugs and earwigs like to accumulate in these rib hollows. Don’t want to caulk bottom of siding…might trap moisture. Any suggestions? Thanks in advance.”

Mike the Pole Barn Guru writes:

In my world it is Asian Beetles getting between wall steel and building wrap. No matter how tightly I have exterior skin sealed, they seem to find a way to migrate in and then expire. I am not sure, as of yet, how to calculate added R-value from their bodies.

Unless your build has some serious issues with poor flashing around openings, you should not have water accumulations between steel siding and your Tyvek. You can check for this by looking for signs of water on your Z flashing at base of wall. Most often, best way to “bug seal” your siding would have been to place inside closures (https://www.hansenpolebuildings.com/2015/12/the-lowly-inside-closure/) at top and bottom of each sheet of walls steel, as well as above and below openings. While this is easy to accomplish at time of construction, it would prove to be a task from where you are now. Chances are these little critters are not going to adversely affect anything, so after 30 years, you may just need to accept they are going to find a home there.

Continuous Foundations, Column Spacing, and Inside Closures

Let’s finish off the week with one more day of Ask the Pole Barn Guru. Today Mike takes on reader questions about connection with a continuous foundation, benefits of 10′ or 12′ column spacing, and replacing inside foam closures.

DEAR POLE BARN GURU: Hello. We are located in Ohio. We would like to build a 24×40 pole building. Zoning says it needs to be attached per their rules so we plan to attach with a simple fabric awning to meet zoning. The county says we need a continuous foundation if it is considered attached. Stupid right? The only thing touching both building will be a fabric awning. I have been told we can have an engineered foundation, or a 6″ by 38″ deep concrete wall poured, wood foundation or a traditional block foundation. Where would I begin to find details for an engineered foundation? I am struggling finding the info and where to start. RALPH in POLAND

DEAR RALPH: In a typical fully engineered post frame (pole) building isolated columns embedded into your ground would be complying and meet Building Code requirements. We would like to see your jurisdiction’s written requirement for mandating a continuous foundation, as often times these ‘requirements’ are just one person’s own feelings of how things should be done, rather than having an actual basis.

Should this indeed be an approved statute, we can have your new building engineered with your continuous foundation of choice. One of our Building Designers will be reaching out to you to discuss further, or dial 1.866.200.9657 for immediate service.


DEAR POLE BARN GURU: Are there any benefits going with 10′ centers over 12′ centers? I was thinking about going with 10′ centers because in my mind it seems like that would be a stronger building and would have less purlin sag over the years but rather go with 12′ centers to gain more parking space for a leanto? Any recommendations? Thanks BRIAN in PARRISH

DEAR BRIAN: Regardless of spacing of columns or trusses, a fully engineered post frame building will be designed to meet or exceed a specified set of wind design criteria – speed and exposure. You are better served to increase design wind sped, so your entire buildings is capable of supporting higher loads, than to merely move columns closer together. Provided Code required deflection limitations have been properly engineered for, any purlin sag, over time, should be relatively imperceptible.


DEAR POLE BARN GURU: Greetings, My metal roof is 15 years old and the inside foam closures have deteriorated.  1.  Are they necessary, and 2. if so, how does one replace them?

I hate to remove the screws along the eaves (or maybe even more screws farther up each panel), but see no other way to get replacement closures under the metal panels.

I’d appreciate any advice

Thanks SHERRY in RIO RANCHO

DEAR SHERRY: Properly manufactured inside closure strips are UV resistant and should outlive your building’s steel roofing. Personally, I find them essential, as without them small flying critters have a clear path to enter your building. In order to replace them, you will have to remove screws along your eave line. Once remains of old closures are removed, new ones can be put in place. Old screws should be replaced by both larger diameter and longer screws, to maintain integrity of connections and prevent leaks.

For extended reading on Inside Closures https://www.hansenpolebuildings.com/2015/12/the-lowly-inside-closure/


Condensation Above Metal Building Roof Insulation

Condensation Above Metal Building Roof Insulation

Only those few long time readers or those who had time on their hands and have read every blog I ever wrote will recall this story about my adventures with metal building roof insulation: https://www.hansenpolebuildings.com/2011/11/metal-building-insulation-in-pole-buildings-part-i/.

Reader JOSH in CORVALLIS is having issues with how metal building insulation is (or in his case is not) performing in his post frame hangar. He writes:

“I am a first time builder and finished a 40×50 Hangar by myself a few years ago. It all came out perfectly with one exception. Every year when the temperatures change rapidly and the moisture is high I get condensation that fills up the roof insulation along the intersection of the roof and the top girt. 

I used fiberglass backed with vinyl laid under the metal roofing. When I installed it I rolled it out from one side of the building up over the peak and down to the other side in a continuous piece. Each piece then was overlapped to the next one, folded over and stapled down to the purlin. I feel that was done well. Where the insulation meets the top girt (purlin) I finished it off there by folding it over on itself and stapled it to the top of the top girt (purlin) so the metal roofing was laid on top of it and screwed down to that top girt (purlin) only touching the vinyl backing. 

At the peak of the roof I have a gap of a few inches between the sheet metal from one side to the other, with the ridge cap covering that gap. I used a duckbill plier tool to bend up the sheet metal along the top edge before installing the ridge cap to help keep out a driving rain but let air flow through. 

The roofing tips I had received from other DIY builders influenced the way I did things and I now question if those things are causing this condensation issue I have. The 3 main things are how I tacked the insulation to the top girt (purlin) by folding it over onto itself. The droop of the insulation between each purlin (about 2 inches droop), now I think that maybe should be taut against the metal. And the bending of the metal sheet up under the ridgecap as I see they sell matching foam insulation strips for this area which would obviously block airflow as well as water. So my question is what did I do wrong here and what can I do to correct it?”

Mike the Pole Barn Guru writes:
I lived for a decade roughly 40 miles northeast of you in South Salem so am vaguely familiar with your weather – two seasons, warm rain and cold rain. Now seriously, it was not so bad, until I moved back to Eastern Washington’s high desert and had to have webbing removal surgery from between my fingers.

I have given your scenario some serious thought since you wrote with your challenge.

My general method of problem solving begins with what is causing this situation, beginning with possible sources.

Usually I would point my finger at roof leaks, however you have narrowed this down to only when humidity is high. Most often increased humidity inside of buildings is due to no vapor barrier beneath a slab-on-grade. If this is your particular circumstance, I would recommend applying a sealant to your concrete floor.

Normally when water is collecting just uphill of an eave strut (aka eave purlin or girt) it is due to a raw insulation edge on top of the eave strut. You have eliminated this, however humidity laden air can still enter your system here unless you place inside closures between your fold over and roof steel (my guess is this is your source) https://www.hansenpolebuildings.com/2015/12/the-lowly-inside-closure/

Using Metal Building Insulation as a Condensation Control usually fails due to seams being poorly sealed. A 100% tight seal is essential for adequate performance. Here is how they should be done:

You have no airflow at your ridge, due to having run insulation continuous from eave-to-eave. I would cut away insulation between your ridge purlins and install vented closure strips under your ridge cap. This will give a point for warm moist air to exhaust from inside your building and prevent any blown rain from entering.

I hope this helps….please let me know how it all works once you apply the remedy.


Avoid Metal Building Insulation

One More Reason to Avoid Metal Building Insulation


Photo isn’t showing the inside of a Hansen Pole Building. This view happens to be inside of an eave sidewall looking up underneath a post frame building roof. White vinyl facing happens to be underside of a product commonly known as Metal Building Insulation, having actual R values so low it should be more appropriately described as Condensation Control Blanket.

For previous words of wisdom in regards to Metal Building Insulation, read more here: https://www.hansenpolebuildings.com/2015/05/metal-building-insulation-3/.

This particular building can be found in Western Washington. 20 years old, construction was done by current building owners. A horse barn, building has a concrete slab floor, other than in horse stalls. Each side of building has open (no soffits) overhangs.
Now our challenge – certain days, with high humidity and fog, building has a problem with water ‘leaking’ along first purlin inside building.

My take regarding the problem’s root cause:
Properly installed in a roof, each roll of Metal Building Insulation should be stretched two inches past eave strut (eave purlin). Fiberglass adhered to vinyl facing should be removed from these two inches, folded back over top of intact fiberglass, then fastened securely to eave strut top until steel roofing installation. This takes a bit more effort than merely cutting rolls off flush with eave strut outside and calling it a day.

My guess, this building’s owners were not given instructions advising how to properly install Condensation Control Blanket, so it was done a quicker and easier way. This leaves a raw edge of fiberglass above the eave strut. When those chilly high humidity days occur, underside of roof steel in eave overhang has condensation collecting. Some of this moisture then contacts raw fiberglass edge and wicks up into building. Please note, in photo the apparent puffiness of insulation between sidewall and first purlin up roof. This would be an indicator water has sat above white vinyl vapor barrier.

A solution exists – remove screws from roofing above fascia and eave strut. Insert form fitted inside closures above eave strut, making certain no fiberglass remains exposed to overhang. More information about inside closures here: https://www.hansenpolebuildings.com/2015/12/the-lowly-inside-closure/)

Replace screws (using larger diameter than original screws). Roofing should be screwed to both sides of high ribs into fascia board. We recommend use of 1-1/2″ Diaphragm screws as a replacement.

It Is Exactly the Same Building: Part II

Well, maybe not exactly the same building.

Yesterday I ran a beginning list of comparison’s between a Hansen Building quote and a quote by one of our competitors espoused to be “exactly the same” by a client of ours.

The saga continues:

Powder coated diaphragm screws vs. #10 diameter painted screws . Those who are familiar with the properties of paint and powder coating know the first is far superior. Some more information on powder coated screws is available here: https://www.hansenpolebuildings.com/2012/08/lobular-powder-coated-screws/. There are structural challenges which occur when using industry standard small diameter screws, which we found out about only when we went to test a building roof: https://www.hansenpolebuildings.com/2012/08/this-is-a-test-steel-strength/.


Recessed purlins vs. stacked purlins. Stacked purlins go over the top of the interior roof trusses, which effectively lowers the truss by the thickness of the roof purlin, hence reducing interior clear height – you get less volume of usable space! Stacked purlins also attach to the trusses via “paddle” blocks, which are highly problematic: https://www.hansenpolebuildings.com/2012/05/paddle-blocks/.

Bookshelf girts vs. flat girts. Wall girts placed flat on the outside of columns rarely meet with the deflection criteria of the Building Code as can be found here: https://www.hansenpolebuildings.com/2012/03/girts/.

Inside closures at eave vs. no eave closures. Inside closures keep the flying critters out of your new post frame building. https://www.hansenpolebuildings.com/2015/12/the-lowly-inside-closure/.

True doubled trusses vs. Single trusses each side of columns. When two trusses are spaced apart by blocking, they no longer act as an integrated pair, each truss functions on its own. In the event of a critical roof load, if the weakest link is a flaw in one of the trusses, the entire roof could easily land on the ground. With true double trusses, they load share – and since the probability of two trusses having the exact same weak point is extraordinarily small, an overloaded roof is more likely to stay standing after the single truss roof has gone boom.

Engineered steel hangers to attach purlins and truss bracing vs. Nailed connection. There is a reason Building Officials like engineered steel connectors – they are a stronger connection! https://www.hansenpolebuildings.com/2013/08/simpson/

Ledgerlocks to attach trusses to columns (eliminates drilling huge through bolt holes) vs. Bolts. We are into providing buildings which are structurally sound as well as easily constructed by the average person who can and will read English. This truss to column connection is both!

Engineer sealed plans and calculations vs. not sealed plans. My long term readers have read my harping on engineered plans. Here is why: https://www.hansenpolebuildings.com/2016/10/engineer-stamped-pole-barn-plans/

500+ page Construction Guide. Let’s face it, it does not matter how good the design or materials are, if there are not explicit instructions on how to get everything together right. I’ve seen plenty of post frame building kit packages instructions in my nearly four decades in the industry. Absolutely nothing compares to what we provide.

Getting a better “deal” on a post frame building than what was quoted by Hansen Pole Buildings? And of course it is “exactly the same building” – let us review any competing quotes you are considering. The service is absolutely free of charge and if it is indeed an equal to or better building, and a better price, we will be the first ones to tell you so!

Dear Pole Barn Guru: Will Treated Wood Rot?

New!  The Pole Barn Guru’s mailbox is overflowing with questions.  Due to high demand, he is answering questions on Saturdays as well as Mondays.

Welcome to Ask the Pole Barn Guru – where you can ask questions about building topics, with answers posted on Mondays.  With many questions to answer, please be patient to watch for yours to come up on a future Monday or Saturday segment.  If you want a quick answer, please be sure to answer with a “reply-able” email address.

Email all questions to: PoleBarnGuru@HansenPoleBuildings.com

 DEAR POLE BARN GURU: I have a pole building reroofed with 1′ overhangs and am wondering if you think I should/need to use closures or something at the eave to seal the ribs. Thanks FREAKING IN FOSTORIA

DEAR FREAKING: I’d recommend the use of form fitted inside closures on top of the eave girt, if you have enclosed overhangs, or on top of the eave girt with open soffits. There should also be form fitted outside closures on top of the roof steel underneath the ridge cap.

This combination will help to keep those nasty little flying critters from joining you inside of your building.

DEAR POLE BARN GURU: water drainage. BUDDY IN HOLLEY

 DEAR BUDDY: Not entirely sure how to best assist you from the two word question.

Assuming your new pole building is not going to be used as a home (in which case I would make entirely different recommendations using a raised wood floor), I’d approach this as for any pole building drainage solution. I would order columns long enough to get the required depth to extend below the frost line, plus make up for any grade change. After the columns were set, I’d bring in good compactable fill to get the elevation of the bottom of any future concrete slab above the highest point of the surrounding grade. Above the high side of the building, a French drain can be installed to divert any natural drainage.

For those who are unfamiliar with French drains, it is when a trench is dug beyond the building perimeter, drain rock is placed in the bottom, then one or more rows of perforated four inch pipe are laid. After placing the pipe, the balance of the trench is filled with drain rock. I hope this helps – if not…please email me more information.

DEAR POLE BARN GURU: My concern with ground contact treated wood is not environmental, it is by experience. Apparently, “treated” can be ambiguous as to what chemical, degree of saturation and retention level the wood has. I had the base of a support structure, in ground contact lumber, show some rot after about 12 years. The structure was on poorly drained soil and that may have been a contributing factor.

I was reading some ag forum topics on pole framed buildings with treated lumber bases and more than one contributor claimed failure at around 20 years, necessitating a restructuring of the foundation. That got me thinking about the concrete footing pillar but perhaps I am being a bit paranoid. MINDFUL IN MICHIGAN

DEAR MINDFUL: Sadly the treated wood, lumberyard and even the pole building industry have not done a very good job ensuring the end users of pressure preservative treated wood get the products which would do the job.

Most “ground contact” treated lumber is really not meant for any type of critical use applications.

I can say I have met or know every major pole barn builder and supplier in the United States, and I have yet to have had a report of any properly pressure preservative treated column ever rotting off. The key is “properly pressure treated”.

Here is an article I wrote earlier which will provide more in depth information:

https://www.hansenpolebuildings.com/blog/2012/10/pressure-treated-posts-2/