Tag Archives: premix concrete

How to Prevent Existing 6×6 Columns From Future Settling and Rotting

How to Prevent Existing 6×6 to Prevent Future Settling and Rotting

Reader BARRY in FREDERICKTOWN writes:

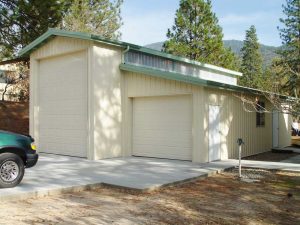
“I recently acquired some property with an existing pole barn “house” on it. It is an unfinished 20’x30′ room with corrugated steel siding, a trussed, steel covered roof and several doors and windows. It was built with a raised floor attached to the 6×6 treated beams set deep into the rocky soil. Before I make any improvements to the inside of the structure to make it livable I am wondering if there is any process I can do now to set the existing 14 6×6 supports on concrete piers or a footing to prevent future settling and rotting. I cannot see any existing concrete surrounding or supporting the vertical 6×6’s. I would hate to invest anything on the inside of a structure that was not set on a good foundation.”

Mike the Pole Barn Guru writes:
If your existing columns are showing no decay signs then they are probably adequately pressure preservative treated. You could excavate around each column, to below frost line. Hole diameter (to provide sufficient bearing surface) should be determined by an engineer, however for sturdy soils and small spans, usually 24 inch diameters will be sufficient.

Drill each column, in both directions using a 5/8” bit, six to 12 inches above column base. Insert a #4 re-bar dowel (#4 is 1/2″ diameter) through each hole.

Galvanized re-bar is recommended. Otherwise, coat rebar penetrating column with an asphalt emulsion, or similar, to isolate re-bar from pressure treated wood.

Seal rebar, into bored holes, at each column edge with silicone caulking.

Before backfilling holes with premix concrete, make sure floor is level. If not, slowly jack floor up to be level with highest point and temporarily brace.

A recent study has shown concrete in contact with pressure preservative treated pine may encourage premature decay by brown-rot fungi. As such, we strongly recommend isolating such columns from concrete starting at splash plank top (roughly 7-1/4″ above grade), to 14 to 18 inches below grade by use of a moisture impervious barrier. Then backfill holes with pre-mix.

If premature post decay is apparent, here are some other options: https://permacolumn.com/pdfs/perma-column-rotted-posts-repair-guide.pdf

Adding a New Lean-to

Adding a Lean-To Shed on an Existing Pole Barn

Reader SAM in CANNON FALLS writes:

Pole barn garage“Hello I am looking to add a lean-to to the side of my pole building on the eave side. I was looking to use a mono truss at with a 2/12 pitch and 8′ to the bottom of the truss/ ceiling height. Existing pole building has 6×6 posts with an 8′ on center spacing. The lean to is going to be 24′ wide by 10′ deep with 4 posts and a beam at the 8′ mark (so it would have a 2′ overhang. to connect it to the existing building we were planning on installing a ledger on to the 4 6×6 post on the existing building to hang the mono trusses off of. My question is do I need more posts on the existing building side and truss spacing or what would you recommend for my application.”
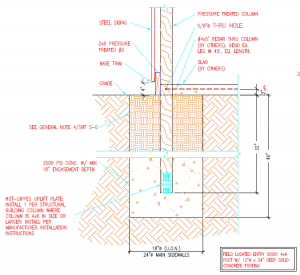
Your situation is one seemingly quite simple, however is fraught with potential for creating more structural problems than it resolves.

Here are some general considerations when adding a side shed:

Inadequate footings

Most (especially ones not designed by a Registered Professional Engineer) post-frame buildings have inadequate footing under their building columns. Often this is a result of having been built by a “professional” builder who sees cheaping out here resulting in adding profit to their bottom line. Use of dry bags of premix (https://www.hansenpolebuildings.com/2012/11/concrete/) or inadequately sized concrete ‘cookies’ fall into this category. If your intent is to attach to existing building columns, then an engineer should be consulted to verify adequacy of existing footings for weight of present building and planned addition.

Drift/Slide off loads

If the high side of your proposed addition is lower than the main building eave, then snow will slide off onto your new shed roof. This can easily result in loads being imposed on new roof system far beyond the design capacity of roof purlins and trusses. In some instances, snow slide off can be great enough to actually fail steel roofing! https://www.hansenpolebuildings.com/2015/05/monitor/

What if the high side of shed and the low eave of the original building are at the same height? Doesn’t this solve potential snow problems?

Well, in a word, no. Now snow has a greater surface to accumulate on (one half of main roof plus added shed roof). When winds blow across the shed and up the main roof, they now deposit a greater pile of snow upon the leeward side of the roof near the peak. While all trusses are (by Code) supposed to be designed to support unbalanced snow loads, there is no way this extra load could have been anticipated – potentially leading to a failure of your main building trusses.

This particular scenario can also result in leaks, if not properly framed and carefully flashed – https://www.hansenpolebuildings.com/2014/10/pitch-break/

Moving on to your proposal…

For an eight foot span from the main building wall to the new row of columns, ordering prefabricated roof trusses is going to be an expensive proposition. Although I love prefab trusses (I spent two decades in this industry, in a past life), unless you intend to create a flat, level ceiling in this shed, it just isn’t worth it. Dimensional lumber rafters are most likely your best option.

A 2/12 roof slope may not be your best choice. Most steel warranties are void on roof slopes under 3/12. Building Codes require sealant tape to be used between under and over laps with steel roofing (again adding to degree of difficulty).

Ledger boards are rarely adequately attached to resist imposed loads (remember snow).

If it was my own building – I would hire an engineer to verify adequacy of design. Provided footings were (or could be made) adequate, I would remove sidewall steel from the main building, so rafters could be attached directly to existing wall columns. Then reinstall steel using J Channel around where rafters protrude through the wall. I would hope to use a single rafter on each end, and one each side of existing columns. Roof purlins would be placed on edge between rafters – joist hung to interior ones and over top of end rafters if there is an end overhang.

Lots of considerations here and you have only a single opportunity to do it right or wrong. Best of success to you.

Pole Building Columns Without Ups or Downs

Post Frame Columns Without Ups or Downs

Once post frame building columns are placed into those holes in ground, there needs to be (or sure should be) a solid plan to keep them from being sucked out of ground, or sinking down into it.

FEATURE: Pre-mix concrete bottom collars attached to columns with pounded in Uplift Plates™..

BENEFIT: Uplift Plates™ supply superior resistance to uplift in attaching a mono-poured concrete collar to column bottoms and are quickly installed. Thickness and area of bottom collars keep building from settling.

EXTENDED READING ABOUT THIS SUBJECT:

Keeping columns from uplifting: https://www.hansenpolebuildings.com/2012/02/concrete-collars/

WHAT OTHERS DO: Here resides another realm with a plethora of possibilities. Simplest of these happens to be doing nothing. Columns are placed to hole bottoms and backfilled with earth. This provides no resistance to settling and very little to prevent uplift.

To prevent settling, throwing a pre-mix concrete sack in bottom of hole is popular with builders, due to being quick and easy. Best this effort results in inadequate thickness and area. Worst – concrete in area closest to bag outside hardens leaving a powdery core.

Sometime a sack or even two of concrete will be mixed with water, either in a wheelbarrow, or, more often, in hole bottom. Again resultant will be a poor design solution due to lack of thickness and diameter.

Precast concrete cookies are popular in some areas. Read about their challenges here: https://www.hansenpolebuildings.com/2012/08/hurl-yourconcrete-cookies/.

Poured in place concrete footings could carry downward loads, however in most cases small volume of pre-mix needed causes a “short load” charge from by concrete companies.

Some are even using a composite FootingPad® to replace concrete footings. Caution, FootingPad® website table covers fairly firm soil and utilizes columns every eight feet. Many areas have soil ½ to 1/3 as strong resulting in required bearing areas two to three times as large.

Uplift becomes an entirely different area. Simple version requires filling holes entirely with pre-mix concrete. Back in the day I did it this way as a post frame builder. Quick and easy to build, however not most cost effective solution for building owners who write checks for concrete!

Concrete collar article previously referenced, does address other uplift solutions.

WHAT WE DID IN 1980: Regardless of building dimensions or loads being applied Lucas Plywood and Lumber didn’t give a thought to either uplift or sinking. Since we didn’t provide plans or instructions, it was left to erection crew imagination.