Tag Archives: concrete cookies

Adding a New Lean-to

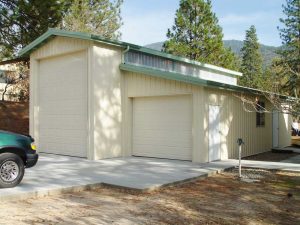
Adding a Lean-To Shed on an Existing Pole Barn

Reader SAM in CANNON FALLS writes:

Pole barn garage“Hello I am looking to add a lean-to to the side of my pole building on the eave side. I was looking to use a mono truss at with a 2/12 pitch and 8′ to the bottom of the truss/ ceiling height. Existing pole building has 6×6 posts with an 8′ on center spacing. The lean to is going to be 24′ wide by 10′ deep with 4 posts and a beam at the 8′ mark (so it would have a 2′ overhang. to connect it to the existing building we were planning on installing a ledger on to the 4 6×6 post on the existing building to hang the mono trusses off of. My question is do I need more posts on the existing building side and truss spacing or what would you recommend for my application.”

Your situation is one seemingly quite simple, however is fraught with potential for creating more structural problems than it resolves.

Here are some general considerations when adding a side shed:

Inadequate footings

Most (especially ones not designed by a Registered Professional Engineer) post-frame buildings have inadequate footing under their building columns. Often this is a result of having been built by a “professional” builder who sees cheaping out here resulting in adding profit to their bottom line. Use of dry bags of premix (https://www.hansenpolebuildings.com/2012/11/concrete/) or inadequately sized concrete ‘cookies’ fall into this category. If your intent is to attach to existing building columns, then an engineer should be consulted to verify adequacy of existing footings for weight of present building and planned addition.

Drift/Slide off loads

If the high side of your proposed addition is lower than the main building eave, then snow will slide off onto your new shed roof. This can easily result in loads being imposed on new roof system far beyond the design capacity of roof purlins and trusses. In some instances, snow slide off can be great enough to actually fail steel roofing! https://www.hansenpolebuildings.com/2015/05/monitor/

What if the high side of shed and the low eave of the original building are at the same height? Doesn’t this solve potential snow problems?

Well, in a word, no. Now snow has a greater surface to accumulate on (one half of main roof plus added shed roof). When winds blow across the shed and up the main roof, they now deposit a greater pile of snow upon the leeward side of the roof near the peak. While all trusses are (by Code) supposed to be designed to support unbalanced snow loads, there is no way this extra load could have been anticipated – potentially leading to a failure of your main building trusses.

This particular scenario can also result in leaks, if not properly framed and carefully flashed – https://www.hansenpolebuildings.com/2014/10/pitch-break/

Moving on to your proposal…

For an eight foot span from the main building wall to the new row of columns, ordering prefabricated roof trusses is going to be an expensive proposition. Although I love prefab trusses (I spent two decades in this industry, in a past life), unless you intend to create a flat, level ceiling in this shed, it just isn’t worth it. Dimensional lumber rafters are most likely your best option.

A 2/12 roof slope may not be your best choice. Most steel warranties are void on roof slopes under 3/12. Building Codes require sealant tape to be used between under and over laps with steel roofing (again adding to degree of difficulty).

Ledger boards are rarely adequately attached to resist imposed loads (remember snow).

If it was my own building – I would hire an engineer to verify adequacy of design. Provided footings were (or could be made) adequate, I would remove sidewall steel from the main building, so rafters could be attached directly to existing wall columns. Then reinstall steel using J Channel around where rafters protrude through the wall. I would hope to use a single rafter on each end, and one each side of existing columns. Roof purlins would be placed on edge between rafters – joist hung to interior ones and over top of end rafters if there is an end overhang.

Lots of considerations here and you have only a single opportunity to do it right or wrong. Best of success to you.

Question About a Pole Building Under Construction

If you are like me, when you hire a professional to do professional work, you expect them to be experts and to do things correctly. Few things in life upset me more than when a builder gives a client a great price and then cuts corners in order to make a profit.

Facebooker CHRIS in TENNESSEE messaged me:

“Question about our 30×40 pole barn that is being built. Our builder set our 6×6 post straight into the ground without any type of base at the bottom and just back filled the hole with dirt. Our plans from the company show a small concrete area at the bottom of each hole but they did not do that. I wanted to reach out to you to see if you can think of any long term issues I’m going to have down the road. Just looking for some education before talking to the company. Thanks.”

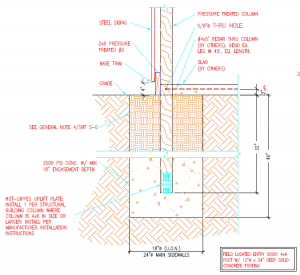
Sigh…..without an adequate footing beneath columns your building is going to sink. A minimum 6″ thick concrete footing needs to be poured under every column. There should also be a provision to prevent uplift. I would recommend no further payments to them until this issue is resolved. They should be providing an engineer certified solution to this.


“They just finished the metal on the building yesterday and it dawned on me I never noticed them putting concrete in the holes. We have a security camera on the corner of the house so I pulled up the video footage and they went straight from the holes being drilled to dropping the post in. Can that even be fixed that they are this far in the build?”

It can be fixed, but it is going to take a lot of work on their part. At this point, any repair should be done only with involvement of a Registered Professional Engineer to design a fix, supply sealed drawings and to sign off on completed work as being adequate. Most important part of your building is its foundation – this is not a place to compromise. Do not get bullied into backing down, you have paid for a good building and should expect to receive one.

“I’ve been confused about how the post should be set after trying to search the Facebook group. I saw people say never use concrete that it will rot the post and cookies are useless.”

There is a lot of bad information out there and a lot of armchair engineers (including builders). Concrete does not contribute to decay of properly pressure preservative treated wood. In most cases cookies are inadequate in both thickness and diameter.

“I just got off the phone with my builder (******** Barn Company) and of course they said they build 100’s of buildings like this and don’t have an issue.”

It doesn’t matter if they have built a million this way. Unless they are willing to provide an engineer sealed drawing (specifically for your building) to confirm it is adequate – call b.s.

You are likely going to get a lot of pushback from them, as they have screwed up and this fix is going to cost them money.

“My drawings show the concrete at the base and I questioned that and I got some story that “Oh, that’s in our software by default and cannot be remove on our plans.””

8 x 12 would not have been adequate anyhow. Again – if what they have done can be verified by an engineer, then okay – reality is it cannot.

Be prepared to have to hire a Construction Attorney and whatever you do, under no circumstances pay them anything more unless this condition is resolved, or your attorney tells you it is okay to pay.

“Thank you for all the professional advice.”

Adding Overhangs, Building Replacement, and Moving a Structure

Today the Pole Barn Guru assists with questions about adding an overhang to an existing structure, replacing two buildings on site, and moving an existing structure.

DEAR POLE BARN GURU: Hi I just saw your blog posts on the web and wanted to ask you my barn has no overhang on the ends and when it rains it comes in under the garage door. Is it feasible to take the last run of roofing off and scab in about 3 ft of rafters and then cover that with more metal or fiberglass and put the trim on.   

The roof Peak is about 18 feet to the floor and the building is 30 by 60 thank you I have attached a picture. WAYNE

DEAR WAYNE: You should have this reviewed by a Registered Professional Engineer, prior to moving forward.

Remove rake trim and slide a 2x4x10 #2 in on top of trusses next to each existing purlin, until truss at eight feet in has been crossed. Carefully screw upwards through truss top chord at an angle into new purlin with two Simpson 9212 drive screws on each side of truss, making sure to not penetrate roof steel. Maximum you can overhang end truss will be two feet, so you should be able to attach a 2×6 fly rafter to ends of your now overhanging roof purlins. I would recommend you enclose overhang underside with some sort of soffit panel to keep flying critters from making homes in your new end overhang.

rebar
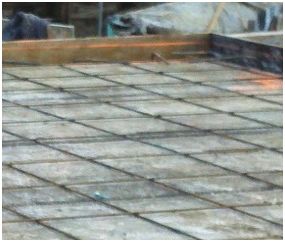
DEAR POLE BARN GURU: I’m in the early stages of replacing two attached buildings. One building is a 2 car stick built garage, the other is an pole barn for a total size of 24×60 they are attached at the roof. Long story short needs existing vinyl siding/asphalt shingle roof replaced and a couple poles in the barn. Concrete slabs in both are in great shape, we want to bring fill in and raise the grade about a foot. Now my question. Should the existing slabs be demoed and left in place, can we just bring in stone fill and raise the grade and leave slabs intact? BARRY in OWENSBORO

DEAR BARRY: Unless you have a void underneath your existing slabs, you should be fine leaving them in place. Use sand or sandy gravel over the top of existing and place a vapor barrier over your fill (I recommend a 15mil plastic).

Although you did not ask, since you are doing potentially significant siding and roofing replacements, you might want to consider using roll formed steel as it will be most durable and cost effective.

DEAR POLE BARN GURU: Had a 40 by 60 pole barn installed 6 years ago. Am taking it down and relocating to a new site. The main 6 by 6 treated posts (of course) had cylindrical blocks about 12 by 4 inches put in each hole, and back filled with dirt (no concrete to my knowledge)

Question: How would you reinstall the posts? Footings, same cylindrical blocks, dirt / concrete? ANDRE in OWOSSO

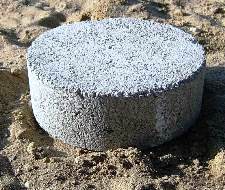
DEAR ANDRE: Those cylindrical blocks are known as cookies (https://www.hansenpolebuildings.com/2012/08/hurl-yourconcrete-cookies/) and are probably woefully inadequate.

Without knowing specifics of your soils conditions and loads, I (or better yet a Registered Professional Engineer) cannot make an informed recommendation as to required diameter, I would imagine a minimum of 24″ however. Holes should be dug to at least frost depth. An engineer would probably come up with a design solution similar to this: install an uplift plate along the lower edge of one side of the column (https://www.hansenpolebuildings.com/2018/12/uplift-plate/), suspend column in hole eight inches off the bottom and pour 18-22″ of premix concrete into bottom of hole and around base of column. Balance of hole should be filled with compactable material (compacted in maximum six inch lifts).


One Pour Pole Barn Post Installation

Reader AARON from CARTHAGE writes:

“Curious to see your thoughts on the Pro-footer one pour bracket. Would attaching these brackets to the post compromise the pressure treating leading to a chance of rot? I’ve seen their footer cages and their uplift brackets but these seem to be a better choice provided they don’t compromise the pressure treating.”

In previous articles I have written about both footer cages: https://www.hansenpolebuildings.com/2014/05/one-pour-reinforcement-cage/ and uplift brackets:  https://www.hansenpolebuildings.com/2013/04/truss-plates-for-column-uplift/ as well as https://www.hansenpolebuildings.com/2018/12/uplift-plate/.

Uplift plates have now become a standard feature for Hansen Pole Buildings third-party engineered post frame building kit packages.

From manufacturer of ONE POUR Foundation Brackets:

“Many Builders currently drop pre-formed concrete pads (pill blocks/cookies) in the post hole to provide the foundation for the post. Pre-formed concrete pads are in many cases inadequate for Post Frame Buildings greater than 32’ in width; unless soil compaction tests indicate otherwise. Wet poured foundations for Post Frame Buildings are another alternative and usually require a two day two-step process.

The first step on day one requires pouring the concrete footers. After the concrete hardens typically on the second day posts are fitted with rebar (uplift restraint) and positioned in place. The concrete truck arrives at the job site the second time to pour the collar ties. Builders know how costly delays can be due to things like rain and having to remove water and mud from post holes.

ONE POUR Foundation brackets are the quicker, better and stronger solution for a pole barn foundation or post frame foundation. ONE POUR Foundation Brackets are available as…..a field applied (nail on) bracket. Both brackets are manufactured with a G90 galvanized coating. Hot-dip galvanizing is available as an option.”

“ONE POUR Foundation Brackets only require a one day process and a single visit by the concrete truck, saving builders invaluable time. Drilling holes in posts for rebar is a time consuming practice of the past. Both Brackets provide far greater engineering uplift values then current building practices.”

Mike the Pole Barn Guru adds:

I certainly agree with concrete cookies being unable to adequately support most post frame building columns: https://www.hansenpolebuildings.com/2012/08/hurl-yourconcrete-cookies/.

Pole Building Columns Without Ups or Downs

Post Frame Columns Without Ups or Downs

Once post frame building columns are placed into those holes in ground, there needs to be (or sure should be) a solid plan to keep them from being sucked out of ground, or sinking down into it.

FEATURE: Pre-mix concrete bottom collars attached to columns with pounded in Uplift Plates™..

BENEFIT: Uplift Plates™ supply superior resistance to uplift in attaching a mono-poured concrete collar to column bottoms and are quickly installed. Thickness and area of bottom collars keep building from settling.

EXTENDED READING ABOUT THIS SUBJECT:

Keeping columns from uplifting: https://www.hansenpolebuildings.com/2012/02/concrete-collars/

WHAT OTHERS DO: Here resides another realm with a plethora of possibilities. Simplest of these happens to be doing nothing. Columns are placed to hole bottoms and backfilled with earth. This provides no resistance to settling and very little to prevent uplift.

To prevent settling, throwing a pre-mix concrete sack in bottom of hole is popular with builders, due to being quick and easy. Best this effort results in inadequate thickness and area. Worst – concrete in area closest to bag outside hardens leaving a powdery core.

Sometime a sack or even two of concrete will be mixed with water, either in a wheelbarrow, or, more often, in hole bottom. Again resultant will be a poor design solution due to lack of thickness and diameter.

Precast concrete cookies are popular in some areas. Read about their challenges here: https://www.hansenpolebuildings.com/2012/08/hurl-yourconcrete-cookies/.

Poured in place concrete footings could carry downward loads, however in most cases small volume of pre-mix needed causes a “short load” charge from by concrete companies.

Some are even using a composite FootingPad® to replace concrete footings. Caution, FootingPad® website table covers fairly firm soil and utilizes columns every eight feet. Many areas have soil ½ to 1/3 as strong resulting in required bearing areas two to three times as large.

Uplift becomes an entirely different area. Simple version requires filling holes entirely with pre-mix concrete. Back in the day I did it this way as a post frame builder. Quick and easy to build, however not most cost effective solution for building owners who write checks for concrete!

Concrete collar article previously referenced, does address other uplift solutions.

WHAT WE DID IN 1980: Regardless of building dimensions or loads being applied Lucas Plywood and Lumber didn’t give a thought to either uplift or sinking. Since we didn’t provide plans or instructions, it was left to erection crew imagination.


Call a Geotechnical Engineer

When is it time to bring in a Geotechnical Engineer?

Reader WES in RAVENNA writes:
“I am building a 36×48 pole barn w/ attic trusses on a piece of property were the water table is quite high. The wettest hole contained about 3 feet of water and caved in to about 5 or 6 feet in diameter before we filled it back in. The bottom of the driest hole jiggled like gramma’s jello mold when we tamped it flat. Obviously I am worried that my barn will sink.

We plan to use sonotubes and a trash pump to get a hole clean enough to drop our 20×6 round footing cookies and 6×6 posts in before filling the hole in with sand. We also plan to double up on the grade board (2×8 on the outside and 2×8 on the inside) to help transfer any load down the line if a post starts to sink.

I am also thinking of running re-bar through the grade board and across the floor to help tie the walls to the slab in hopes that it will help the barn float. Is that a good idea? Do you have any advice on building a pole building on soft, wet ground?

I don’t want to wait till you put your answer in a blog. Please email. Thank you.”

Mike the Pole Barn Guru writes:

Back in the olden days (the 1980’s) we encountered a site in Western Washington where we were going to be literally constructing a building on top of a peat bog. The soil was so weak, one could take a 12 foot long 2×6 and push it vertically into the ground by hand until it disappeared. It is surprising none of the jobsite workers got lost in it! The solution was to set the columns and hurriedly pour a concrete slab on grade which was tied into the columns with rebar. The slab was literally floating on top of the peat. Not the ideal site to build upon.

Okay – you have some challenges going on – high water table and the inability of your soil to support a load. I would highly recommend your next call be to a competent soils (geotechnical) engineer who can do a site investigation to best advise how to solve your problems. You are going to have to do something to remove the water from beneath your proposed building site – as it stands currently I can see nothing but potential problems with frost heaves. You will want to read more on preventing frost heaves here: https://www.hansenpolebuildings.com/2011/10/pole-building-structure-what-causes-frost-heaves/.

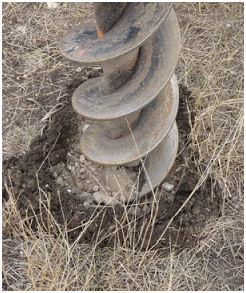
Even with good soil, your proposed 20 inch diameter concrete cookie is not adequate to properly distribute the weight of your building across the soil. Added to the challenge is the use of attic trusses which is going to further increase the loads on the footings. From the sound of it, a registered design professional (RDP – architect or engineer) has not been involved in the structural design of your building itself, as not only is your footing inadequate, but there is no provision made to prevent uplift issues.

Do me a favor and do it right away – call the geotechnical engineer. If you do not, you are going to end up investing a lot of money in a building which will do nothing but sink and heave, until such time as it becomes structurally unusable, or collapses of its own accord.


Pole Barn Design for Free

Please Structurally Design My Pole Barn for Free

This is one of those POLE BARN GURU questions which results with a lengthy enough answer I feel I must devote a whole column to it.

DEAR POLE BARN GURU: Could you please help clarify, for a 40 ft. wide x 64 ft. long x 15 ft. high Pole Barn Building,

What size & kind of posts are needed?
How you would recommend connecting posts to trusses?
Footer depth & construction?
Lateral Wind bracing & Uplift measures?

Would greatly appreciate hearing your recommendations.  Thank you! EILEEN in CENTERBURG

DEAR EILEEN: What you are asking for is to have a building engineered, without knowing the parameters the building is being engineered for.

Without the knowledge of your wind loads (including exposure), snow and seismic loads, any answers I would give to you for your pole barn design would most likely be incorrect.

post-frame-construction-150x150Post frame buildings also work as a system, so individual components or connections might possibly be adequate, however the entire building fails due to a weak link. This is why I always, always (did I say always) recommend ONLY to invest in a building which is designed by a registered design professional (RDP – engineer or architect) – especially for your particular site.

Some general answers to your questions (answered as if I was going to build this building for myself):

Posts

I would use true glu-laminated columns (not nailed up columns), as they have a high strength to weight ratio, are lighter to work with and tend to be less prone to warp and twist.

Trusses

The post to truss connection would have double trusses set into a notch cut into the top of the column. This prevents the trusses from being able to “slide” down the column in the event of a high snow load. To avoid uplift challenges, the trusses can be bolted or a combination of threaded hardened nails and bolts could be used. In high uplift situations, appropriately sized Simpson HST brackets may prove to be the best design solution.

Footer

Footer depth and construction – the holes need to extend at least below the frost line, and I tend to use 40 inches as a minimum depth into undisturbed soil. The columns should be floated eight inches above the bottom of the hole then no less than a total depth of 16 inches of premix concrete poured into the hole. The diameter of the holes will depend upon the loads being placed upon them, as well as the assumed bearing strength of the soil at the site.

Do not attempt to use concrete “cookies” – https://www.hansenpolebuildings.com/2012/08/hurl-yourconcrete-cookies/ or bags of sackcrete – https://www.hansenpolebuildings.com/2012/11/concrete/
Siding

Provided there are not excessive door openings in endwalls, in most cases the utilization of the proper screw for attachment of steel to framing the steel skin should be able to adequately transfer the imposed loads:                                           (https://www.hansenpolebuildings.com/2012/08/this-is-a-test-steel-strength/

Bracing

Here is some reading on bracing which you might find helpful: https://www.hansenpolebuildings.com/2016/03/diagonal-bracing/ and https://www.hansenpolebuildings.com/2012/01/post-frame-construction-knee-braces/

Good luck with your pole barn design.

Mike the Pole Barn Guru

Pole Barn Holes

The Hole Enchilada

Yesterday I began hacking away at my neighbor’s new pole building under construction. Today, I will dig even deeper (pun intended)!

Leroy and his building crew arrived on Thursday to begin building. My bride and I had to take a detour most of the day to go to Fargo to visit grandchildren and assist with cutting a set of stairs for a deck for our son, so we missed some of “the action”. Early action should have included setting up batter boards and stringlines so as to make sure the building holes ended up in the right locations, and that the building was square and columns were in straight lines.

Surprisingly, there was no evidence these steps were followed, read why this is important: https://www.hansenpolebuildings.com/2014/12/setting-pole-barn-posts/

In case you, dear reader, would like to know, I did venture over late in the day and introduced myself to Leroy and found he had been constructing pole barns for the past 43 years. We had some interesting discussion, mostly me asking polite questions and then quietly enjoying the answers while avoiding making snarky comments. After all, I was there to LEARN.

Pole Footing
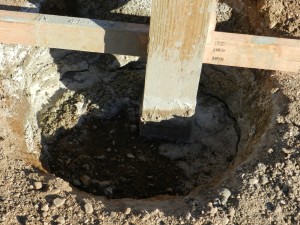
I found it strange – no posts were set on the front endwall of the building until after the balance of the building had been pretty much framed up. When those pole barn holes were dug, I watched as one of the crew members climbed into an overlarge hole to place a post. The hole could not possibly have been three feet deep! So much for frost issues. If you remember from yesterday – the frost depth here is 5 feet. They were only about 2’ short.

I had inquired of Leroy as to what sort of footing they used, thinking they would probably be using concrete cookies. https://www.hansenpolebuildings.com/2012/08/hurl-yourconcrete-cookies/

Well, good news and bad news in the footing department. No cookies (yaay), instead Leroy had his men throwing two bags of non-mixed Sakrete® in the bottom of each hole. Yes, you got that right – dry Sakrete in hopes ground moisture will eventually turn it solid. You can read why this does not work here: https://www.hansenpolebuildings.com/2012/11/concrete/

For those of you who are unfamiliar with the soils of this part of the United States – let me say here in SD is some of the blackest topsoil I have ever experienced. Right here along the lake, it appears to have been created from ancient lake bottom. Great for growing crops, like corn, but not so great for holding up a building. But being generous, we will assume it will support 2000 pounds per square foot. On the building across the street, this means footings of at least 18 inches in diameter. Perfectly formed and properly mixed, if those bags of premix were 80 pound bags, they would have adequately formed a six inch thick footing.  Six inches – 18 inches – it’s close!  (Not).

I asked Leroy what he was doing to keep the posts from lifting out of the ground. His solution is to drive a piece of 3/8 inch diameter rebar through the posts and call it good, although he did admit to having seen more than a few of posts treated this way pulled entirely out of the ground with the rebar bent right over!

Here are a few of my thoughts: https://www.hansenpolebuildings.com/2012/02/concrete-collars/

Come back tomorrow for another segment of the Lake Traverse pole building Saga….

Pole Building Pool Cover

Welcome to Ask the Pole Barn Guru – where you can ask questions about building topics, with answers posted on Mondays.  With many questions to answer, please be patient to watch for yours to come up on a future Monday segment.  If you want a quick answer, please be sure to answer with a “reply-able” email address.

Email all questions to: PoleBarnGuru@HansenPoleBuildings.com

Pole Barn Pool
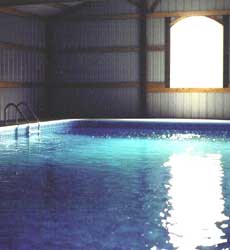
DEAR POLE BARN GURU: I am thinking of including an indoor in-ground pool in my home project. Can a pole barn house be built to also enclose the pool as part of the house? The pool would have to go in first then the structure over it. Then finish the concrete floor around the pool. JOHN IN PENNSVILLE

DEAR JOHN: Yes, a pole (post frame) building would most probably be the ideal solution for an in-ground pool cover.

DEAR POLE BARN GURU: I recently stumbled across your blog after a Google search regarding pole building post footings.  I have since spent the last couple of evenings reading many of your posts! Thanks for all the great information!

But, back to my original search regarding post footings…I found your article from 4/19/2013, “Bonding a Pole Barn Post in Concrete” in which you discuss how the concrete and post bond together essentially providing a larger footprint for the post. I then went on to read some other posts that discussed the use (or reasons not to) of concrete cookies and similar products. In these posts I came to the conclusion that to be code compliant the footing under the post needs to be a minimum of 6″ thick.

This all makes sense to me, my question is pertaining to the use of concrete poured around a post that is sitting on the bottom of the hole as discussed in the above mentioned article.  Due to the bond strength of the concrete to the wood this should provide a sufficient “foundation”. The problem, which I believe you stated in the comments, is simply convincing building officials all over the country that this is sufficient. So finally, the question…Is this method compliant to the IBC even though there is not 6″ of concrete under the post?

Sincerely,
Which foot(er) to stand on ~ Dan

DEAR DAN: Thank you for reading my articles!

The IBC technically requires a concrete footing beneath the columns. Keep in mind, the Building Codes generally create a guideline from which many structures can be designed and built prescriptively, without the need for involvement of a RDP (registered design professional – engineer or architect).

Presuming you were going to construct a pole building which is designed by a RDP, it is very possible they could provide calculations which would meet with the scrutiny of most Building Officials.

Mike the Pole Barn Guru


What Gauge Steel Do I Need?

Welcome to Ask the Pole Barn Guru – where you can ask questions about building topics, with answers posted on Mondays.  With many questions to answer, please be patient to watch for yours to come up on a future Monday segment.  If you want a quick answer, please be sure to answer with a “reply-able” email address.

Email all questions to: PoleBarnGuru@HansenPoleBuildings.com

DEAR POLE BARN GURU: Hi, I came upon your website and found it very well written and informative.  I hope you don’t mind my question, I don’t want to waste your time.  I’m just sort of baffled by steel siding and what I have run across.

To put it as succinctly as I can:

While looking at many companies that provide steel buildings (for me, we’re talking two 20 x 25 foot by 12 foot high “shed” A frames, because my county is very builder unfriendly and they don’t give me a break for agricultural support buildings. Otherwise I wanted a large building), I found that most “popular” online companies sell you 12 gauge steel with a 20 year warranty but will do 14 gauge without a warranty – they’ll only warranty their work, not the metal.

But then I suddenly found a company that was selling 26 gauge steel structures and they DID provide a 20 year warranty.  Finally, I found your site where you explain it all in great detail and you flat out say that typically people debate 26 or 29 gauge but 29 gauge steel is fine.  I am so confused.  It sounds like 26 or 29 is totally strong enough – plus I live in a hot dry area with little wind and no snow so any type of loads are minimal – yet these other folks are telling me I “need” 12 gauge.

Or does this have something to do with whether the building has a wooden traditional frame v.s. a typical steel frame they would sell me?

I’m going to look at what you offer on your site but right now I’m just totally confused by this vast differences in steel gauge.  Thank you for your time.

Best, DRY IN THE DESERT

DEAR DRY: Thank you very much for your kind words.

The 12 and 14 gauge steel buildings are Quonset huts – think if them as being like ants – they have no internal “skeleton”, instead they rely totally upon the steel skin for support. The design of them may or may not meet your needs, due to the curvature of the walls, difficulty to enclose the ends and challenges of condensation control (even in hot dry areas, steel roofing will pose seasonal condensation issues). You might want to read more about them here: https://www.hansenpolebuildings.com/blog/2011/07/quonset-huts/

26 gauge steel structures are most likely an all steel building – structural steel frames and widely spaced steel roof purlins. For buildings of the size you are considering, it is not likely they are an economically viable choice.

The spacing and strength of internal framing members (if any) is going to determine the thickness needs of the steel roofing and siding. Wood frame pole buildings have fairly closely spaced framing members, which lend themselves well to the application of 29 gauge steel.

As you state your county is “very builder unfriendly”, it is highly possible they are going to require RDP (Registered Design Professional – architect or engineer) sealed plans and calculations in order to acquire a building permit. Keep this in mind as you do your building shopping, to make sure whoever provides your new building(s) will be able to supply the correct information needed by your jurisdiction. Good Luck!

Mike the Pole Barn Guru

 DEAR POLE BARN GURU: Hi Mike, I hope I could get your “best guru” advice. I have dug 14 post holes 18 in. x 40in. deep. They fill with water in 16 to 18 minutes. Hole inspection last week did not pass. I read your article on “cookies”,not good?? Do you have any advice on what to do?? Twp. is leaning toward cardboard tubes?? How is a cardboard tube filled with water any better than a dirt hole filled with water?? Thank you in advance. (p.s.barn is 24 x 32 shingled roof) SWIMMING IN SWAMPLAND

DEAR SWIMMING: The first step should be to contact the RDP (Registered Design Professional – architect or engineer) who designed your building, as the ultimate design responsibility rests upon them.

In the event a RDP was not involved with the design – the Building Official now gets to totally call the shots. Sorry, but it the reality – so it may take some convincing him (or her).

In the real life world – Portland cement is a hydraulic cement which means it sets and hardens due to a chemical reaction with water! Consequently, it will harden under water. www.cement.org/basics/concretebasics_faq.asp

When I was constructing pole buildings, we ran into this scenario on an all too frequent basis. You want to place the concrete without incorporating too much extra water. Use a drier than average mix, with less than a three to four inch slump. The concrete should be introduced near the bottom of the pour (if possible). This means using a pump truck so the end of the hose can be placed into the bottom of the hole and pulled upwards as the holes fills with premix. This allows the concrete to rise from below and displace the water out of the top of the holes. This method is done every day, on a plethora of structures, and is usually far superior to “normally” placed concrete because of the available moisture content for proper curing.

If your inspector determines tubes are the “only way” with the idea of keeping the poured concrete out of the water, construct a water tight “cap” for the bottom of the tube, before placing it in the hole.

DEAR POLE BARN GURU: Hi, First off, you have developed an excellent web site which addresses any issue that a person could ever think of regarding post-frame buildings!  Great job.

In one of the blog entries: Evolution of The Pole Barn Guru and his Building Philosophy  Posted by polebarnguru on 06/16/11 @ 8:00 am, there is a mention of the NFBA Design Manual.  I’ve attempted to link to the site, but the manual doesn’t seem to be there.  Would you possibly have an electronic copy of the manual that you could forward me?  Here’s the quote from the blog:

The results of this test are published in the NFBA Post Frame Building Design Manual   https://bse.wisc.edu/bohnhoff/Publications/Copyrighted/NFBA_Design_Manual.pdf

Thanks for the assistance. JUST JEFF

DEAR JEFF: Thank you very much for your readership, as well as your kind words. Like many things on the ‘net, links to articles come and go. Here is a link to the NFBA Design Manual which successfully worked this morning (and can be viewed without having to pay for a subscription – which this particular site suggests): https://www.scribd.com/doc/29750872/Post-Frame-Building-Design-Manual

Mike the Pole Barn Guru

Footings & Dirt

As regular readers know, I’m not a firm believer in the use of precast concrete cookies for footing pads for many reasons.

(for further spirited reading on this very subject: https://www.hansenpolebuildings.com/blog/2012/08/hurl-yourconcrete-cookies/)

Pole Building Footings and Frost DepthIt turns out there are “some” pole building providers who make cookies work on paper, by using an assumed presumptive load-bearing value for the soil of 3000 psf (pounds per square foot).

Chapter of the 2012 IBC (International Building Code) deals with the specifics of Soils and Foundations. With Section 1806 dedicated to Presumptive Load-Bearing Values of Soils.

From IBC 1806.1 Load combinations.

The presumptive load-bearing values provided in Table 1806.2 shall be used with the allowable stress design load combinations specified in Section 1605.3. The values of vertical foundation pressure and lateral bearing pressure given in Table 1806.2 shall be permitted to be increased by one-third where used with the alternative load combinations of Section 1605.3 that include wind or earthquake loads.

At least in the case of pole buildings designed by the Hansen Pole Buildings engineers, the alternative load combinations are used, so the one-third increase is allowable.

IBC 1806.2 Presumptive load-bearing values.

The load-bearing values used in design for supporting soils near the surface shall not exceed the values specified in Table 1806.2 unless data to substantiate the use of higher values are submitted and approved. Where the building official has reason to doubt the classification, strength or compressibility of the soil, the requirements of Section 1803.5.2 shall be satisfied. 

      I bring you, for your reading enjoyment 1803.5:

“Where the classification, strength or compressibility of the soil is in doubt or where a load-bearing value superior to that specified in this code is claimed, the building official shall be permitted to require that a geotechnical investigation be conducted.”

Returning to our regularly scheduled programming:  

Presumptive load-bearing values shall apply to materials with similar physical characteristics and dispositions. Mud, organic silt, organic clays, peat or unprepared fill shall not be assumed to have a presumptive load-bearing capacity unless data to substantiate the use of such a value are submitted. 

Exception: A presumptive load-bearing capacity shall be permitted to be used where the building official deems the load-bearing capacity of mud, organic silt or unprepared fill is adequate for the support of lightweight or temporary structures.

So, if the Building Official doesn’t believe the numbers being assumed, he can require (not request) the hiring of a soils engineer to validate the soil strength.

TABLE 1806.2 PRESUMPTIVE LOAD-BEARING VALUES 

CLASS OF MATERIALS VERTICAL FOUNDATION PRESSURE (psf) LATERAL BEARING PRESSURE
(psf/ft below natural grade)
LATERAL SLIDING RESISTANCE
Coefficient of frictiona Cohesion (psf)b
1. Crystalline bedrock 12,000 1,200 0.70
2. Sedimentary and foliated rock 4,000 400 0.35
3. Sandy gravel and/or gravel (GW and GP) 3,000 200 0.35
4. Sand, silty sand, clayey sand, silty gravel and clayey gravel (SW, SP, SM, SC, GM and GC) 2,000 150 0.25
5. Clay, sandy clay, silty clay, clayey silt, silt and sandy silt (CL, ML, MH and CH) 1,500 100 130


While GW and GP type soils do exist, they most certainly do not predominate. In most instances, 2000 or even 1500 psf soils are much more likely to be the case.

The entire goal is to end up with footings beneath columns which are adequately sized in diameter so the building will not settle under its own weight plus the design snow (or roof) load.

Think of soil strength as being directly the inverse of how easy it is to dig a hole. If it digs easy – the footings are going to be larger in size. If in doubt, play it safe, a few extra yards of pre-mix concrete to increase the diameter of footings, is a small price to pay!

FootingPad System for Pole Barns

FootingPad™ Composite Footing System

In the late 1980’s I was a member of the Board of Directors for the National Frame Building Association (NFBA). Serving along with me was Glen George.

The recent 2014 National Frame Building Expo held in Nashville, TN, was like old home week for me, as I reunited with several people I hadn’t had a chance to talk with in years. One of these was Glen.

My loyal readers have read me rant on about concrete cookies attempting to be used as footing pads for columns in pole buildings. For those who have missed the fun, here is a chance to catch up:

https://www.hansenpolebuildings.com/blog/2012/08/hurl-yourconcrete-cookies/

https://www.hansenpolebuildings.com/blog/2014/03/concrete-cookies/

Welcome back.

I have always respected Glen as being a pretty sharp person. In this case, I was not at all disappointed, as Glen and his team have seen a need and developed an alternative to the infamous concrete cookie.

They have developed a composite footing system which is engineered to provide the fastest and most economical method to support the structural building columns for many pole buildings.

FootingPads have been designed and engineered to replace concrete footings of equal diameter. They have been thoroughly tested and certified by NTA Testing Laboratories and carry the ICC-ES Evaluation Services approval (ESR-2147). (Read more about ESR numbers at: https://www.hansenpolebuildings.com/blog/2012/01/icc-es/)

footing padFootingPads are available in both 16 and 24 inch diameters. They won’t crack like concrete and no extra or special equipment is required.

The one downside is currently mechanical fasteners cannot be used to attach FootingPads to the bottom of a column, which prevents them from being used to prevent column uplift. This requires the RDP (Registered Design Professional – Architect or Engineer) to design an alternative means for resisting uplift forces. Considering most providers who specify concrete cookies appear to entirely ignore uplift – most anything would be an improvement.
In today’s world of “green building” the FootingPad composite footing system makes the most sense in minimizing environmental footprints, while maximizing structural integrity. Each FootingPad is manufactured from 100% recycled composite materials. From manufacturing to transport and installation, every FootingPad is completely eco-friendly!

Concrete Cookies

Client calls into my office at the end of the day Friday and says his Building Official will only accept his new pole building construction with holes 48 inches deep, with six inch thick concrete cookies in the bottom of the hole, and no concrete backfill around the columns.

Here is some background….
The building is a commercial pole building 40’ x 60’ x 14’. The client purchased engineered plans for the building, which includes all of the supporting calculations for the design.

While a hole for a pole building post might seem to be just a hole in the ground, lots of things are happening below the ground. The embedment has to be deep enough to put the bottom of the footing below the frost line. The footing beneath the column has to be large enough in diameter to keep the building from settling. The design must also provide for the resistance for uplift.In this particular building, the downward load on the footing is just over 5400 pounds. The uplift force is 1120 pounds.

Now it is 4:50 on Friday afternoon, so I ask for the phone number for the Building Department, and I quickly set my fingers to dialing, not expecting to find someone this late on a Friday….
Happily, I was immediately connected to a Building Official. The issue turned out to have absolutely nothing to do with any local requirements, and instead came from the client’s builder.

Concrete CookieThe builder insists upon digging the holes with the 12-inch diameter auger he has mounted on the back of his farm tractor. He refuses to set the posts in concrete, because if he doesn’t get a post in the right place, he wants to be able to move it around in the hole. His idea is to dig a four foot deep hole, and drop 12-inch diameter concrete cookies in the bottom of the hole!

I can foresee a myriad of potential problems coming up, even without breaking out my trusty stack of Tarot cards or my crystal ball. Assuming somehow these holes are able to pass the hole inspection (contrary to the engineer sealed plans) – a 12 inch diameter concrete cookie covers roughly 0.76 square feet of surface. Applying a load of 5400 pounds to it, means the soil bearing capacity would need to be somewhere in the neighborhood of 7000 pounds per square foot (psf). Table 1804.2 of the International Building Code gives a value of 4000 psf for sedimentary and foliated rock and 12,000 psf for crystalline bedrock. Neither of these types of soil would be touched by the 12-inch farm tractor auger. The probability of settling issues on one or more of these columns – right darn close to 100%.

The diagonal distance across a 6×6 (actual dimensions 5-1/2” x 5-1/2”) is nearly eight inches. Those 12-inch diameter holes better be pretty much spot on and perfectly plumb, or there are going to be some very interesting looking walls (as in not very straight at the ground line).

This builder does not want to backfill any of the holes with concrete to prevent uplift. With a hole this tiny, there is no way to even begin to attach an uplift cleat to the sides of the columns. There is also no way to adequately tamp compactable materials into the space between the column and the sides of the hole.
A registered design professional has designed this pole building. He has years of experience and has designed literally thousands of successful buildings. At his fingertips are the most powerful computer design programs. This design is nothing short of a work of art. His seal means “you can trust this building to be safe….and sound.”  Ditch the concrete cookies – they are just not going to begin to do what is required by your new pole building.