Tag Archives: pole building concrete

Floating Poles

In an article last year I included a reference to “floating poles”: https://www.hansenpolebuildings.com/blog/2014/05/one-pour-reinforcement-cage/

But how would one go about actually floating poles?

Once all of the column holes have been dug, distribute the poles about the perimeter of the building, laying them perpendicular to the hole they are to be placed in, with one end of the pole directly above the center of the hole. On any columns which are not perfectly square (e.g. a 6×6 is square), make sure to orient them so when tipped into position, the correct dimension is towards the wind.

Columns should also be placed so any “crown” is up (https://www.hansenpolebuildings.com/blog/2014/06/crowns/).

floating-polesUse duplex (double headed) nails, or similar fasteners, to temporarily attach a roof purlin at “column depth below grade” across what will become the interior face of the column when it is placed in the hole. In most instances, with frost depths of 40 inches or less, this will be 32 inches from the end of the pole which is towards the hole.

Prior to placing columns in holes, remove any loose materials or debris from hole bottoms.

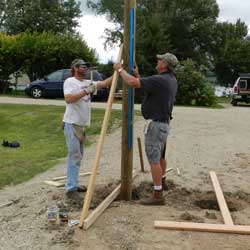
Starting with the four corners, tilt columns up into place. All columns should be set to plumb at grade. Unless the posts are perfectly straight (which could occur, but will be rare) the top of the posts should now be leaning out, due to any column crown or bow being towards the inside of the building. This is contrary to “stick” building stud walls.

Why have the tops leaning out?

Trees rarely grow perfectly straight, so chances of getting a perfectly straight treated timber are fairly small. By having the tops lean out, the roof system can be used to pull the tops in. This will take some (if not all) column crown or bow out, making for a much straighter finished wall.

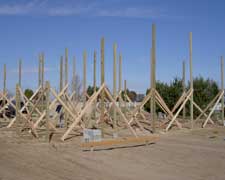
You now have floating poles, and are ready to do a monolithic concrete pour around every column. Once you get started with attaching the temporary braces and tipping them into place, it’s really not as difficult as the directions may first appear. After the concrete hardens, the purlins used as temporary bracing can be removed and put where they are intended – into the roof framing.

Setting Pole Building Posts

We Don’t Always Do Things Perfectly, But We Do Listen

Last summer Hansen Pole Buildings Supplied a pole building kit package to a client who experienced a few challenges and I took the time to address each one of them. This is Part I of a four part response.

First – here is my initial response (same day as received from client) to his initial complaint:

“Mr. xxxxx ~

Thank you very much for taking the time to discuss your issues. Our building kit packages are not only the resulting product of the 16,000+ buildings we have been directly involved in, but also the 100,000+ buildings which have been constructed by builders we have done business with, and (most importantly) valuable feedback from clients just like you.

I will personally be reviewing each of your concerns and responding to them within the next several days. This may very well result in changes to some of our processes, both internally, in our Construction Manual, and with our vendors. We do take all input very seriously.

Please feel free to address any other technical or design issues or concerns directly to me at this email address.

Best regards ~ Mike Momb, Technical Director
Hansen Buildings Technical Support Department”

Here is the email I was responding to:
“On the design flaws, and other issues, here is what I have experienced.

1-The concrete footing on the pole building posts

Standard practice in this area is to have an 8-10 inch concrete pad and the post to be 48″ in the ground.
The concrete collar created some interesting problems.  It is very difficult to place the poles when the bottom of the post is not in contact with anything.
Typically a post is ordered over height and dropped into the hole.  The excess is then cut off.  Suspending the post above the ground was such a time consuming task.  It required each post to be shot with a transit to make sure that it was within the allowable height variation. This took some time.  I know that you recommend leveling the site before the operation gets under way but in my case I had an 18″ drop from front to back and it was not feasible to do the rock work before the posts went into the ground.  It also took a bunch of back breaking work to lift those posts out of the ground and get them suspended and then nailed into supports.
The pendulum effect is very noticeable and a small amount of movement in the bottom of the hole makes a huge difference at the top.  When the concrete gets pumped into the hole it comes in with some force and there was a heck of a time trying to make sure that the concrete did not displace the post at all. (Yes, the posts were staked into the ground.  3 2X6’s for each post, one on the ground, and 2 vertical supports).
Around here the ground water is fairly close to the surface and when digging a hole 36″+deep ground water is going to seep in. There is no way to tell encasement depth when there is water in the hole when the concrete is being pumped in.  I sprayed the posts with Orange paint at the collar height but it was useless.  Once the concrete started flowing you could see nothing as the 4-6 inches of water clouded.  We tried checking it with measuring sticks but could not be sure of the depth.  We ended up just over filling them to make sure there was enough concrete in the hole.
Overall, I think the concrete collar is an unneeded step that does not really aid in the construction process or stability of the building.  If you really believe that it is necessary you can achieve the same thing by putting a couple of sticks of rebar in when pad is poured and gain connection with the rest of the concrete this way.”

My response: I can see how the 18 inch grade change posed a great deal of challenge for you.

Setting the poles is a snapThe Hansen Pole Buildings Construction Manual does address this issue in Chapter 2: “Grade change is ideally checked before placing building order, however this is not often feasible as a practical matter. If grade has not been checked before order placement, do so within 24 hours. Longer posts are far more economical when provided with original lumber delivery.”

Longer pole building posts would have eliminated the delay caused by having to shoot each post in with a transit.

This would also have allowed the column depth to be set as per the installation instructions in Chapter 5, which would have entirely eliminated the “bunch of back breaking work to lift those posts out of the ground and get them suspended and then nailed into supports.”

I’ve personally built more than several buildings – with columns set of top of footings, placed to bottom of the holes and suspended. I frankly like the ease of moving columns into place afforded by them being suspended. When adequately braced, movement (in my experience) has not been an issue.  As recently as this past summer a new self-storage unit was constructed on the Hansen Buildings property by the two owners and myself. We set 125 poles as suspended, and experienced no problems with them shifting, with them adequately braced. Our ground, however, was graded to “level” prior to starting, which was key.

The thickness of the concrete collar is merely the minimum requirement. There is no structural issue with having more concrete in the holes than the minimum.

Structurally the concrete collar makes all of the difference in resisting uplift forces. You can read more here: https://www.hansenpolebuildings.com/blog/2012/02/concrete-collars/

Also read why concrete cookies are not the answer:

https://www.hansenpolebuildings.com/blog/2014/03/concrete-cookies/

Come back tomorrow for part II in my response to this client’s letter…regarding his carport attachment to the main building. Mike the Pole Barn Guru

Twilight Zone Contractor

50 shades of The Twilight Zone, is The Ghost of Rod Serling Somewhere Nearby?

twighlight zone
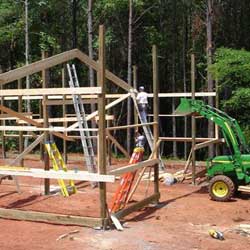
From 1951 to 1955, more than 70 of Rod Serling’s television scripts were produced, garnering both critical and public acclaim. Full-scale success came on Wednesday, Jan. 12, 1955, with the live airing of his Kraft Television Theatre script “Patterns.” Deemed a “creative triumph” by critics, and the winner of the first of Serling’s six Emmy awards, the acclaimed production was actually remounted live to air a second time on Feb. 9, 1955 — an unprecedented event.

Serling went to work on screenplays for MGM and as a writer for CBS’ illustrious Playhouse 90, for which he crafted 90-minute dramas — including both the series’ 1956 debut, “Forbidden Area,” starring Charlton Heston, Vincent Price, Jackie Coogan and Tab Hunter; and the multiple-Emmy Award-winning “Requiem for a Heavyweight,” starring Jack Palance and Keenan Wynn which later was turned into both a feature film and a Broadway play. Remarkably, in a milieu which included such writing legends as Paddy Chayefsky and Reginald Rose, Serling took the writing Emmy again the following year for his Playhouse 90 script “The Comedian,” starring Mickey Rooney.

A critical and financial success, Serling shocked many of his fans in 1957 when he left Playhouse 90 to create a science-fiction series he called The Twilight Zone.

CBS would air 156 episodes of The Twilight Zone, an astonishing 92 of which were written by Serling, over the next five years. His writing earned him two more Emmy Awards. The show went on to become one of television’s most widely recognized and beloved series, and it has achieved a permanent place in American popular culture with its instantly recognizable opening, its theme music and its charismatic host, Serling himself. With early appearances by such performers as Robert Redford, Burt Reynolds, Dennis Hopper and many others, The Twilight Zone became a launching pad for some of Hollywood’s biggest stars.

Many of us grew up with either the original The Twilight Zone or have watched in in reruns. The story below, befits a script written by Serling!

This message actually came from one of our Building Designers, to me at 5:21 on a Friday afternoon:

“His contractors (or concrete people) were looking for a stick framed building which would be bolted to the concrete.  He thought at first this may be what we provided.  I explained the benefits of a post framed building and also the benefits of having the poles in the ground.  The concrete guy keeps telling him to attach to the concrete.  On a side note, he asked the concrete guys for an estimated and they came and started excavating without giving him an estimate.  That being said…the customer is wondering if he could get a pole layout ASAP. (Like this weekend?)  His plan is to dig the holes before they come back and they would have to listen to him.  His worry is that they will come before he has the chance to dig the holes and pour the concrete.  So his question is…if that happens, would he be able to change and attach to concrete (which he does not want due to cost and because he likes the idea of NOT uplifting)”

Now my advice and caution to any client or potential client….

Never, ever let someone start to perform labor or services on your property without an agreement signed by you.

Why not?

Lots of reasons….

Your allowing them to begin work, could be construed in court as your tacit approval. You could easily end up with a huge bill, for work other than what you actually wanted to have done! Or, for work which is so poorly done it has to be redone (and you still have to pay the bill).

If the contractor happens to be unregistered – and while digging damages a power line or worse, you could be held liable. Always call before digging! Read more at: https://www.hansenpolebuildings.com/blog/2013/06/call-811/

In the event the contractor or one of his workers is injured, you and your home owner’s insurance could end up footing the bill!

Do not be bullied by a contractor.

Do protect yourself by thoroughly vetting any contractor:

https://www.hansenpolebuildings.com/blog/2013/07/contractor-6/

That a client would be afraid he’d wake up to find his lot being dug up without his consent – to force the construction of a building in a way he does not want….made me think of the twilight zone….where anything could happen…. without any warning….

Are the Poles Close Enough?

Welcome to Ask the Pole Barn Guru – where you can ask questions about building topics, with answers posted on Mondays.  With many questions to answer, please be patient to watch for yours to come up on a future Monday segment.  If you want a quick answer, please be sure to answer with a “reply-able” email address.

Email all questions to: PoleBarnGuru@HansenPoleBuildings.com

DEAR POLE BARN GURU:How close is close enough for pole placement? After setting and leveling poles to the string, the poles on one side of the barn are 1/2″ off (lengthwise) from the other side. Is this close enough? KARMIC IN KANSAS CITY

DEAR KARMIC: There actually exists a document entitled, “Accepted Practices for Post-Frame Building Construction: Framing Tolerances”. In the document, in Section 6.4: “Wall length. In rectangular buildings, the overall length of opposing walls should not differ by more than 2.0 inches.”

In my humble opinion “only” two inches would be a HUGE difference. Variations such as this need to be hidden somewhere and two inches would be huge.

In your particular case, if the poles are merely placed in the holes and braced, I would recommend adjusting a corner column to get equal overall lengths.

If the columns have been set in concrete, it is best to then make the overall dimensions at the roofline correct. This will make squaring up the roof to install roofing far easier. In the event this circumstance is the choice, when it comes time to do the siding, plumb the corner(s) which are most likely to be noticed.

On the out-of-plumb corners, the edge of the corner trim will not align with the steel ribs (there will be a ½ inch variation from top to bottom). Most people will never see it – but putting it on the least viewed corner reduces the probability.

DEAR POLE BARN GURU: Hi: How do I install fiberglass batts of R 19 in my walls of pole barn without touching the metal walls? Thanks. ART IN ALBION

DEAR ART: The easiest way would be to install a quality housewrap over the outside of the wall girts and under the wall steel before siding it.

In the event your pole building has been sided, there really is not a negative effect in the event the fiberglass happens to be in contact with the wall steel. It IS essential to have a vapor barrier on the inside of the insulation which provides a total seal. If the vapor barrier is not completely sealed moisture will escape into the wall cavity, and be trapped by the steel siding. When the siding is cold enough, condensation will form, saturating the fiberglass and reducing its efficiency.

You may want to read more on climate controlled pole buildings at:

https://www.hansenpolebuildings.com/blog/2012/04/climate-controlled/

DEAR POLE BARN GURU:What about putting the concrete up to the slab level?

CONCRETING IN CANTON

DEAR CONCRETING: I will assume your question is in regards to backfilling the columns. If so, there is no documented negative reason (lots of old wives’ tales) to not fill the holes entirely with concrete – other than cost (concrete can become expensive backfill). It will make your building very resistant to uplift forces.

Concrete Cookies

Client calls into my office at the end of the day Friday and says his Building Official will only accept his new pole building construction with holes 48 inches deep, with six inch thick concrete cookies in the bottom of the hole, and no concrete backfill around the columns.

Here is some background….
The building is a commercial pole building 40’ x 60’ x 14’. The client purchased engineered plans for the building, which includes all of the supporting calculations for the design.

While a hole for a pole building post might seem to be just a hole in the ground, lots of things are happening below the ground. The embedment has to be deep enough to put the bottom of the footing below the frost line. The footing beneath the column has to be large enough in diameter to keep the building from settling. The design must also provide for the resistance for uplift.In this particular building, the downward load on the footing is just over 5400 pounds. The uplift force is 1120 pounds.

Now it is 4:50 on Friday afternoon, so I ask for the phone number for the Building Department, and I quickly set my fingers to dialing, not expecting to find someone this late on a Friday….
Happily, I was immediately connected to a Building Official. The issue turned out to have absolutely nothing to do with any local requirements, and instead came from the client’s builder.

Concrete Cookie
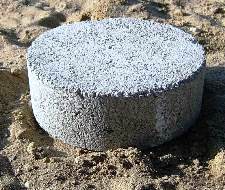
The builder insists upon digging the holes with the 12-inch diameter auger he has mounted on the back of his farm tractor. He refuses to set the posts in concrete, because if he doesn’t get a post in the right place, he wants to be able to move it around in the hole. His idea is to dig a four foot deep hole, and drop 12-inch diameter concrete cookies in the bottom of the hole!

I can foresee a myriad of potential problems coming up, even without breaking out my trusty stack of Tarot cards or my crystal ball. Assuming somehow these holes are able to pass the hole inspection (contrary to the engineer sealed plans) – a 12 inch diameter concrete cookie covers roughly 0.76 square feet of surface. Applying a load of 5400 pounds to it, means the soil bearing capacity would need to be somewhere in the neighborhood of 7000 pounds per square foot (psf). Table 1804.2 of the International Building Code gives a value of 4000 psf for sedimentary and foliated rock and 12,000 psf for crystalline bedrock. Neither of these types of soil would be touched by the 12-inch farm tractor auger. The probability of settling issues on one or more of these columns – right darn close to 100%.

The diagonal distance across a 6×6 (actual dimensions 5-1/2” x 5-1/2”) is nearly eight inches. Those 12-inch diameter holes better be pretty much spot on and perfectly plumb, or there are going to be some very interesting looking walls (as in not very straight at the ground line).

This builder does not want to backfill any of the holes with concrete to prevent uplift. With a hole this tiny, there is no way to even begin to attach an uplift cleat to the sides of the columns. There is also no way to adequately tamp compactable materials into the space between the column and the sides of the hole.
A registered design professional has designed this pole building. He has years of experience and has designed literally thousands of successful buildings. At his fingertips are the most powerful computer design programs. This design is nothing short of a work of art. His seal means “you can trust this building to be safe….and sound.”  Ditch the concrete cookies – they are just not going to begin to do what is required by your new pole building.

Hurl Your…Concrete Cookies

I know none of us has ever experienced this condition, but we all know of someone who has had the hurling issue, often after a period of personal discussion with some of the friends of George Thorogood.

In this instance, I’m not thinking either of the example above, or the tasty oatmeal raisin cookies my grandma made for us when we were kids. I am making specific reference to the pre-cast chunks of concrete usually four to six inches in thickness and 12 to 18 inches in diameter which are sold or provided for footings in pole buildings.

The basic concept is to throw concrete cookies in the bottom of the augered holes and place the building columns directly upon them. The general idea is for the cookies to support the weight of the building, to prevent settling.

My recommendation – RUN, DO NOT WALK, away from this as a design solution.

Why?

They are a failure looking for a place to happen.

Let’s look at what a footing is supposed to do. The dead weight of the building PLUS all imposed live loads must be distributed to the soils beneath the building. Sounds pretty simple, eh?

Concrete Cookie

Concrete Cookie

To begin with, the International Building Codes require concrete footings to be a minimum of six inches in thickness. This eliminates immediately any concrete cookies which are less than this thickness (most of them).

Examine a fairly small example – a 30’ wide building with columns spaced every eight feet. The actual weight of the building (dead load) will vary greatly depending upon the materials used. Steel roofing and siding will be lighter than shingles and wood sidings. For the sake of this example, we will use a fairly light 10 psf (pounds per square foot) building weight. The Code specifies a minimum roof live load of 20 psf. This means each footing must carry the weight of one-half of the width (15 feet) times the column spacing (8 feet) times 30 psf. Doing the math, 3600 pounds.

In many parts of the country soil bearing pressures are as little as 1500 or even 1000 psf. Basically – the easier it is to dig, the lower the capacity of the soil to support a vertical load.

For every foot of depth below grade, the soil capacity is increased by 20%. Other than with 1000 psf soils, for every foot of width over one foot, the capacity also gets a 20% increase.

With 1500 psf soil, and the bottom of the footing four feet below grade, a 12 inch footing will support 2700 pounds per square foot.

A 12 inch diameter footing covers 0.785 square feet, a 16 inch 1.4, 18 inch 1.77, 24 inch 3.14.

The 16 inch footing would support exactly the 3600 pounds from the example above. However – lots of places in the country have snow loads (which the footings must support) and many buildings are wider than 30 feet, or have columns placed over eight feet apart.

Trying a 40 foot span, with a 40 psf roof snow load, same eight foot column spacing, would mean resisting an 8000 pound load! With 1500 psf soils, even a two foot diameter footing would be inadequate.

In most cases, the use of concrete cookies as footing pads proves to be both inadequate and a waste of good money. To insure a building won’t settle, (from inadequate footings), look for a plan produced by a registered design professional who is proficient in post frame building design. He/She will have the history and training to design your building to withstand the loads…which begins with the foundation.

Post Tension Slab

Bob, one of our Building Designers, comes up with some truly great questions. I appreciate him keeping me thinking!

Today Bob writes, “Any reason why a client in Louisiana would not be able to have a post-tension slab installed in one of our buildings? Apparently it’s a slab suggested in his area because of the type of soil and the tendency for slabs to otherwise crack. Sounds like he could erect the posts and roof as usual, and before pouring install additional posts that would be only be used for the post-tension slab along with cables that they would tension before the pour.”

Even though concrete is a very rigid material, it has a natural weakness when it comes to tension. It is limited with respect to what length of floor can be made out of it. One way to be able to build these structures with longer spans than would be possible with ordinary concrete is through a technique called pre-stressing. A post-tension slab is a slab of concrete which has been pre-stressed using a specific method to increase the strength of the concrete.

Several methods exist for pre-stressing concrete, with post-tensioning being a very common one. Before a post-tension slab is poured, high-strength steel strands or cables, called tendons, are laid in a tight grid. These help support and give strength to the slab once it has cured. The tendons are sheathed in plastic so they do not directly touch the concrete. After the grid is made, the concrete is poured, with extra care taken to make sure the tendons remain at the correct depth.

The concrete is allowed to cure to about 75% of the way, at which point post-tensioning occurs. Each of the tendons in the post-tension slab is pulled tight, using a hydraulic jack. The tensing of the cables occurs after the concrete has mostly cured, hence the term “post-tension.” The tendons are usually pulled to a tension of 25,000 pounds per square inch. Once the cables have reached the designated tension, they are anchored in the concrete, and the slab is allowed to fully cure.

This method of pre-stressing concrete is especially useful in areas where the soil expands and contracts relative to weather conditions.

Using a post-tension slab rather than ordinary concrete often makes good economic sense. Because there is a smaller depth of concrete used to obtain the same end result, construction costs are reduced.

When the floor thickness is reduced, so is the weight of the structure. A lighter building means the cost of building the foundation is reduced.

The answer for Bob’s client – there is no reason to not have a post-tension slab in a post frame building.

Concrete Guarantee

When I was a general contractor constructing pole buildings, we provided a fair number of concrete slabs in buildings. We always guaranteed one thing – the floor will crack!

Not the answer people wanted to hear, but it was the truth.

Concrete may be the longest lasting and most economical building material of all time. When placed properly and in the right application it will last a long, long time. In 1997 I traveled to the Rotary International Convention in Glasgow, Scotland. Having never been to the British Isles before, we made the trip into a three week tour. One of the stops was at Bath, where we walked on concrete roadways built by the Romans! Now this is longevity.

However, nothing good lasts forever and concrete is no exception. It will crack; it is just a matter of when. Look at any flat concrete surface – it has cracks.

Some of those cracks appeared within hours of pouring. Others took many years to develop. One might believe technology is such to allow concrete to be made which will not crack.

The answer is seriously complicated.

Cracks fall into one or more of several categories. These are plastic shrinkage, settlement, drying shrinkage, chemical, corrosion and overload. By knowing what causes cracks the severity can be reduced, if not avoided.

Plastic shrinkage cracks occur when water evaporates too quickly from the surface. This causes the top of the slab to dry more quickly than the bottom and they pull each apart. This is more likely to happen when it is hot, windy or there is low humidity. To avoid this use proper curing procedures. The key is to keep the surface moist. This can be done by placing wet burlap, mats or towels on the concrete. Place a sprinkler on the mist setting and let it run. There are also chemicals which can be applied to slow down the water evaporation. The time to begin any of these processes is after the final trowel application and the concrete has stiffened to the point where a wet burlap bag would not leave an impression on the concrete. In very warm weather this may need to be continued for several days. It may seem silly to water new concrete the way one would new grass, but this is exactly what should be done. It is possible on cool, overcast days to not need to take any of these measures.

Settlement cracks occur when the ground under the concrete moves. This can be the result of poorly compacted soil, the wrong kind of soil (sand), water erosion or tree roots. Poorly compactable soil should be dug out and replaced with crushed stone before placing the concrete. Do not plant trees near concrete slabs, over time, the pressure from the tree roots will cause the slab to crack.

Drying shrinkage occurs when a slab which is restrained is drying and shrinking. This usually does not occur on what is called a “free floating slab”. It is more of a problem when a slab is tied into another structure like a wall with rebar.

There are two ways chemical reactions can crack concrete. The first is because the concrete itself contains aggregates or cements which are not compatible. This isn’t something to be overly concerned about, as local premix companies know which issues happen in their geographic area.  In ice and snow country – DO NOT PUT SALT on a slab to melt it away, use sand for traction instead.

Corrosion occurs when concrete containing contains steel re-bar or steel wire mesh gets wet and comes in contact with oxygen. The only way this can happen is when small cracks develop in the concrete due to one of the reasons stated above and channel water into the crack. When water reaches the steel it begins to rust. Rust is expansive. As the steel rusts it pushes out and causes even more cracking. The prevention here is to make sure you treat all little cracks before they become big cracks. See my other blogs for fixing cracks.

Concrete is designed to take a certain load. Most sidewalks and residential driveways are designed to take the weight of a car or small truck. If backing up a loaded tandem axle dump truck or say a tank on a driveway, don’t be surprised if it cracks.

It is important to know the way the pros avoid at least some types of cracks. They use control joints. Control joints are an acknowledgment concrete will crack. The control joints can help to eliminate cracks or channel where the cracks will appear. Notice how sidewalks or driveways have either dividers essentially making several slabs out of one big slab or cuts running through every three or four feet? These are control joints.

Accept the inevitable, cracks happen – and take the appropriate steps to minimize or prevent them when you can.

Hiring for Concrete Finishing

Yesterday I was having an ongoing discussion with a client about concrete finishing and his budget.

From Elko, Nevada, the client was weighing whether he should hire a contractor to “turnkey” his new 30’ x 40’ pole building, or to construct it himself. In this instance, turnkey would include providing the design and materials, constructing the shell of the building as well as concrete and labor for a four inch thick concrete floor.

A local contractor had told the client the concrete finishing would cost about $20,000. The Hansen Pole Buildings material quote was under $11,000 delivered. Here is where it gets to be fun…..

The client assumed, for budgetary purposes, $5100 for material and labor to pour a four inch concrete floor.

Now personally, I hate concrete. I know “hate” is a very strong term. Having prior limited experience with concrete, I am thoroughly convinced I could not pour a 2 foot square of concrete and get it to turn out smooth or level. Call me concrete challenged. I know concrete finishing is hard work, but is it hard enough to justify what they want to be paid?

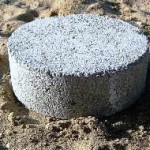
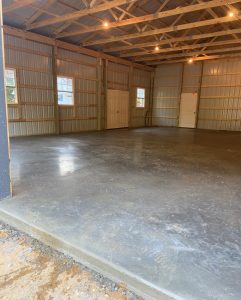
For sake of discussion, let us assume a level, well-compacted site has been prepared in advance. The work of the finisher will be some final fine grading, pour and finish. It should also include saw cutting, or some other type of expansion joint.

With a nominal four inch thick concrete pour, one yard of pre-mix concrete will cover 80 square feet. In the above example, 15 yards of concrete would be required.

I took the liberty to call this client’s local premix provider and found today’s delivered price of “five sack” mix was $100 a yard, plus sales tax (6.85%). In this case, with sales tax, just over $1600. One thing I always recommend to building owners – pay for the pre-mix yourself. This allows a greater degree of control over what is actually being paid for.

Doing some quick math $5100 less $1600 leaves $3500…..hmmmm.

Now granted, I have not been a builder since the 1990’s. The last time I hired a concrete finisher, he charged 35 cents per square foot to finish. He worked by himself and could easily pour a floor this size in a day. 1200 square feet times 35 cents was $420. In my mind, this was a good value. Yes, he worked hard, but he made $50 an hour.

Each individual case is different. Only the actual end user can determine what is a justifiable expense, as well as fair to all concerned. If nothing else, this may provide food for thought and save hundreds, if not thousands of dollars for your concrete finishing alone.

Concrete Sealer to Moisture Proof an Existing Concrete Slab

We were at a vendor event for the DirectBuy in Beaverton, Oregon when a member approached us looking for advice on how to seal an existing concrete floor in her pole barn. It seems the floor is always damp.

I’ve always recommended placing an insulated vapor barrier beneath any new interior concrete floor. I’ve had great results personally with the A2V product available from www.buyreflectiveinsulation.com. For those who are too late, there is a solution.

Concrete floors are notoriously damp, as moisture will pass through concrete. Think of concrete not as a solid, but instead as being a sponge – albeit a very heavy sponge.

When a concrete slab floor is not sealed, the moisture in it becomes added humidity to the inside of your building.  Over time, this will encourage the growth of mold, mildew, rot, and dust mites in your pole building, leading to damage to your building materials along with adding unhealthy allergens to your interior air space.

By sealing the concrete with a penetrating concrete sealer, moisture-related issues with concrete floors can be quickly and easily avoided.

Concrete is a porous material which will accept water, moisture, and water vapor readily from the foundation soils beneath pole barns. This moisture can be passing through in the form of water vapor even when the slab floor doesn’t appear to be damp.

One way to test the amount of moisture passing through a slab floor is to lay a sheet of plastic on the floor for several days. If the surface under the plastic is damp, then there is evidence of moisture penetration through the concrete slab.

Along with moisture, water will bring a small amount of minerals with it. As the water passes into the air, this will be left behind as a mineral salt known as efflorescence, which appears on floors as a white, powdery substance.

A solution is a silane-based concrete sealer. These sealers penetrate deep into the pores of the concrete, activating with the minerals in the concrete to create a glass-like barrier deep within the concrete. They’re safe to use indoors, and contain little or no VOC’s (volatile organic compounds – brand depending).

A silane-based concrete sealer activates quickly, and can be applied to both cured and newly-placed concrete. It will not change the appearance of the concrete, efflorescence and acidity will not harm it, and the concrete floor is able to be painted over with ease. Installation is fast (done with a brush, roller, or sprayer), and they’re middle-of-the-road in overall cost.

There are several disadvantages to consider.  One, a concrete sealer provides moisture control only, thus will not be able to breach cracks or stop flooding water. Second, it’s meant only as a sealer for water vapor which would otherwise pass through the pores of the concrete. Third, care must be used when installing as silane-based sealers cause etching on glass, should they come in contact with it. When installing, be sure to protect and/or avoid glass surfaces. And lastly, when installing be careful to only use enough silane-based concrete sealer to damp the concrete, as too much will leave a white residue behind.

Silane-based sealers are the ideal choice for concrete slab floors which are damp but do not flood, as they are inexpensive, install quickly and subtly, and provide a lasting solution.

Pole Building Structures: What Causes Frost Heaves?

I always give credit “where credit is due” and my next subject is supported by the online writings of a Professional Engineer, Mr. Harris Hyman.  He wrote about frost as far back as July 1994 in Practical Engineering,  Like Mr. Hyman, I too like to dig down deep into why some problem is caused, before I figure out the solution. Today and far into the future, frost heaves are just one of those things we need to be aware of, and plan buildings, (pole buildings or otherwise) accordingly.

This is what Mr. Harris Hyman, P.E. had to say:

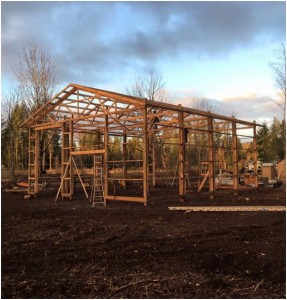
As an engineer, I want to understand a little about the problem before I recommend corrective measures. Research work on frost heaving is somewhat limited, but there is a theory. Around the end of winter in cold regions, the earth develops a characteristic temperature profile: At the surface, the earth takes on the day’s temperature. But a couple of inches below, the ground temperature cools to approximately the February average temperature of the region. As we go deeper into the earth, the temperature rises, until several feet deep it reaches the annual mean temperature of the area.

 The soil usually reaches its coldest temperature in March, when the freezing point reaches down to the region’s frost line. Below this depth, the soil and groundwater almost never freeze. But at the frost line — the 32°F point — the groundwater freezes, forming a thin sheet of ice. In soils that are porous enough to allow moisture to move, more groundwater touches this ice. The groundwater accumulates, freezes, and builds up into a bulge called an ice lens, which might be anywhere from several inches to a few feet across. The bulging ice lens pushes the earth above up into a frost heave. Aggravating the effect is surface melting, which also occurs at the end of March. The snow melt water moves through the ground, touches the ice lens, and adds to the bulge.

 This is why, every spring, rural roads up North develop sinuous dips and dives. The ice lenses form during the winter, pushing up spots on the asphalt surface. When the weather warms sufficiently to melt the ice lenses, the unsupported asphalt sags and leaves low spots and potholes. On major highways, which cost a lot more to build, the base layer is sufficiently permeable to carry away groundwater, so heaves are rare.

Let’s take a break here, reflect on this a bit and what it might mean to  pole buildings – the ice lens pushing up on asphalt concept – means it can also push up on buildings at the frost line.  Come back tomorrow to hear more of what Mr. Hyman may have to say on the subject of frost heaves.