We Don’t Always Do Things Perfectly, But We Do Listen
Last summer Hansen Pole Buildings Supplied a pole building kit package to a client who experienced a few challenges and I took the time to address each one of them. This is Part I of a four part response.
First – here is my initial response (same day as received from client) to his initial complaint:
“Mr. xxxxx ~
Thank you very much for taking the time to discuss your issues. Our building kit packages are not only the resulting product of the 16,000+ buildings we have been directly involved in, but also the 100,000+ buildings which have been constructed by builders we have done business with, and (most importantly) valuable feedback from clients just like you.
I will personally be reviewing each of your concerns and responding to them within the next several days. This may very well result in changes to some of our processes, both internally, in our Construction Manual, and with our vendors. We do take all input very seriously.
Please feel free to address any other technical or design issues or concerns directly to me at this email address.
Best regards ~ Mike Momb, Technical Director
Hansen Buildings Technical Support Department”
Here is the email I was responding to:
“On the design flaws, and other issues, here is what I have experienced.
1-The concrete footing on the pole building posts
Standard practice in this area is to have an 8-10 inch concrete pad and the post to be 48″ in the ground.
The concrete collar created some interesting problems. It is very difficult to place the poles when the bottom of the post is not in contact with anything.
Typically a post is ordered over height and dropped into the hole. The excess is then cut off. Suspending the post above the ground was such a time consuming task. It required each post to be shot with a transit to make sure that it was within the allowable height variation. This took some time. I know that you recommend leveling the site before the operation gets under way but in my case I had an 18″ drop from front to back and it was not feasible to do the rock work before the posts went into the ground. It also took a bunch of back breaking work to lift those posts out of the ground and get them suspended and then nailed into supports.
The pendulum effect is very noticeable and a small amount of movement in the bottom of the hole makes a huge difference at the top. When the concrete gets pumped into the hole it comes in with some force and there was a heck of a time trying to make sure that the concrete did not displace the post at all. (Yes, the posts were staked into the ground. 3 2X6’s for each post, one on the ground, and 2 vertical supports).
Around here the ground water is fairly close to the surface and when digging a hole 36″+deep ground water is going to seep in. There is no way to tell encasement depth when there is water in the hole when the concrete is being pumped in. I sprayed the posts with Orange paint at the collar height but it was useless. Once the concrete started flowing you could see nothing as the 4-6 inches of water clouded. We tried checking it with measuring sticks but could not be sure of the depth. We ended up just over filling them to make sure there was enough concrete in the hole.
Overall, I think the concrete collar is an unneeded step that does not really aid in the construction process or stability of the building. If you really believe that it is necessary you can achieve the same thing by putting a couple of sticks of rebar in when pad is poured and gain connection with the rest of the concrete this way.”
My response: I can see how the 18 inch grade change posed a great deal of challenge for you.
 The Hansen Pole Buildings Construction Manual does address this issue in Chapter 2: “Grade change is ideally checked before placing building order, however this is not often feasible as a practical matter. If grade has not been checked before order placement, do so within 24 hours. Longer posts are far more economical when provided with original lumber delivery.”
Longer pole building posts would have eliminated the delay caused by having to shoot each post in with a transit.
This would also have allowed the column depth to be set as per the installation instructions in Chapter 5, which would have entirely eliminated the “bunch of back breaking work to lift those posts out of the ground and get them suspended and then nailed into supports.”
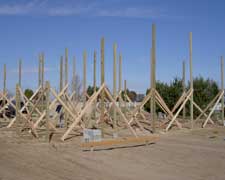
I’ve personally built more than several buildings – with columns set of top of footings, placed to bottom of the holes and suspended. I frankly like the ease of moving columns into place afforded by them being suspended. When adequately braced, movement (in my experience) has not been an issue. As recently as this past summer a new self-storage unit was constructed on the Hansen Buildings property by the two owners and myself. We set 125 poles as suspended, and experienced no problems with them shifting, with them adequately braced. Our ground, however, was graded to “level” prior to starting, which was key.
The thickness of the concrete collar is merely the minimum requirement. There is no structural issue with having more concrete in the holes than the minimum.
Structurally the concrete collar makes all of the difference in resisting uplift forces. You can read more here: https://www.hansenpolebuildings.com/blog/2012/02/concrete-collars/
Also read why concrete cookies are not the answer:
https://www.hansenpolebuildings.com/blog/2014/03/concrete-cookies/
Come back tomorrow for part II in my response to this client’s letter…regarding his carport attachment to the main building. Mike the Pole Barn Guru


I had the Amish rebuild my existing barn I want to convert it to living space I’m in New Jersey
I hope it went well for you.