Tag Archives: pole barn posts

Redwood Columns in Pole Buildings

Redwood for Post Frame Building Columns

Just this week we had a client in the California Bay area interested in a roof only post frame structure. His caveat, he really wanted to have Redwood columns, as opposed to properly pressure preservative treated timbers.

The characteristics of redwood make it a popular choice for outdoor applications. Redwood’s color and grain are attractive even in an unfinished state, but more important is the wood’s pronounced resistance to decay and insects. Yet even though redwood is more resistant to decay, it will eventually succumb to rot.

So what sort of lifespan would a redwood column, embedded in the ground, have?

Luckily, Oregon State University’s College of Forestry has done the research for me!

In 1927, Professor T.J. Starker of the College of Forestry at Oregon State University (OSU) established a “post farm” to develop data on the natural durability of native woods and the effectiveness of various preservative treatments for species used as fence posts. Since the first posts were set on January 7. 1928, OSU has placed 2,662 posts in the farm. Three introduced and 25 native species in untreated condition and 8 Oregon species receiving various preservative treatments have been, or are being, tested.

The post farm is located on College of Forestry land in the Peavy Arboretum about 7 miles north of Corvallis, Oregon, on the West side of Highway 99W. Soil in the test area, located on a well-drained south slopeis Olympic silty-clay loam. The top 8 inches of soil, slightly acid (pH 5.4), have 1/2 inch or less of humus. Its organic matter and nitrogen content are 4.71 and 0.14 percent, respectively. In the past, the test site has been sprayed with herbicides to control brush.

The area typically has dry summers and rainy winters, a generally mild climate which favors growth of wood-destroying organisms throughout the year. During the past 92 years through 1984, annual precipitation averaged 42 inches, 81 percent of which fell from October through March when average monthly temperatures ranged from 39° to 53°F. Only 3 percent fell during July and August when temperatures averaged 66°F. Occasionally the temperature falls below freezing or rises above 85°F. Afternoon breezes from the Pacific Ocean cool the area almost daily during summer months.

Since 1949, various causes of deterioration of the posts at the test site have been identified. Decay-producing fungi or fungi in combination with termites do the most damage. Discarded wings of damp-wood termites have been found at bases of some posts, and entry holes have been detected at or below ground line. However, termites alone have been the primary cause of failure in only a few instances. Carpenter ants and wood-boring beetles also contribute to the deterioration.

It was found the average service life of square redwood posts, was 21 years. This would not meet with even the lowest Risk Category of the IBC (International Building Code), in which the design for snow, wind and seismic events is based upon a once in 25 year occurrence.

These excerpts from the 2012 IBC, specifically address the issue in Chapter 18:

1807.3 Embedded posts and poles. 
Designs to resist both axial and lateral loads employing posts or poles as columns embedded in earth or in concrete footings in earth shall be in accordance with Sections 1807.3.1 through 1807.3.3.

1807.3.1 Limitations. 
The design procedures outlined in this section are subject to the following limitations:

  1. The frictional resistance for structural walls and slabs on silts and clays shall be limited to one-half of the normal force imposed on the soil by the weight of the footing or slab.
  2. Posts embedded in earth shall not be used to provide lateral support for structural or nonstructural materials such as plaster, masonry or concrete unless bracing is provided that develops the limited deflection required.Wood poles shall be treated in accordance with AWPA U1 for sawn timber posts (Commodity Specification A, Use Category 4B) and for round timber posts (Commodity Specification B, Use Category 4B).

As far as strength characteristics, Redwood posts and timbers have a Fb (some discussions about Fb are available here: https://www.hansenpolebuildings.com/2014/08/lumber-bending/) for #2 grade open grain of 750 psi (pounds per square inch), whereas Hem-Fir (the most commonly used western wood for post frame building pressure preservative treated timbers) is only 575 before downward adjustment because it must be incised (what is incising: https://www.hansenpolebuildings.com/2014/08/incising/).

In the end, the design solution for using redwood for building columns would be to mount them into brackets (https://www.hansenpolebuildings.com/2012/09/concrete-brackets-2/) which would prevent them from coming into contact with the ground.

So the ultimate answer is that yes, redwood columns can be used in post frame construction. However, they need to be mounted into brackets above ground rather than into holes in the ground as with most pole building construction, or they will rot.

How to Untwist a Pressure Treated Post

This actually began as an “Ask the Pole Barn Guru” question:

DEAR POLE BARN GURU: We have installed the Pressure Treated Posts  and they were straight when the concrete was poured, now a couple of weeks later we are seeing the poles twist and warp. They are straight at the ground level but about half way up they start warping. We are getting ready to put the Trusses up and want to try to get the twist and warp out as much as possible before the trusses are secured to them. What should we do for this issue? SHERI IN BENTON CITY

Twisted PoleThe series of photos on untwisted pressure treated posts are thank to Tim Fieldsend who had the very same problem back in 2003. Tim is my hero for having saved these photos for a dozen years!

When Tim contacted me with his challenge, I suggested a fix which I had not tried before, but it made some sense at the time.

The first step was to absolutely saturate the pressure treated post with water – soak it and keep it wet. Tim was creative enough to actually wrap a soaker hose around the columns!

Twisted Post
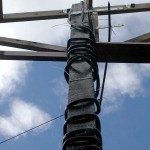
After a few days of being watered, apply significant and steady pressure on at the top of the column, in the reverse direction of the twist. Tim’s solution sure worked, however a substantial steel bar or rod cabled or chained to the top of the column would work as well. If the post is not thoroughly saturated, there is a high probability it will snap off. As the column begins to untwist, continue to tighten the cable attached to the lever arm.

Twisted Post
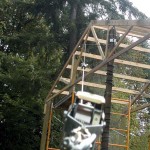
Once the column has been restored to straight, keep the tension on the cable and allow the column to thoroughly dry. Once dry – get the column incorporated into a completed building as expediently as possible.

Setting Pole Building Posts

We Don’t Always Do Things Perfectly, But We Do Listen

Last summer Hansen Pole Buildings Supplied a pole building kit package to a client who experienced a few challenges and I took the time to address each one of them. This is Part I of a four part response.

First – here is my initial response (same day as received from client) to his initial complaint:

“Mr. xxxxx ~

Thank you very much for taking the time to discuss your issues. Our building kit packages are not only the resulting product of the 16,000+ buildings we have been directly involved in, but also the 100,000+ buildings which have been constructed by builders we have done business with, and (most importantly) valuable feedback from clients just like you.

I will personally be reviewing each of your concerns and responding to them within the next several days. This may very well result in changes to some of our processes, both internally, in our Construction Manual, and with our vendors. We do take all input very seriously.

Please feel free to address any other technical or design issues or concerns directly to me at this email address.

Best regards ~ Mike Momb, Technical Director
Hansen Buildings Technical Support Department”

Here is the email I was responding to:
“On the design flaws, and other issues, here is what I have experienced.

1-The concrete footing on the pole building posts

Standard practice in this area is to have an 8-10 inch concrete pad and the post to be 48″ in the ground.
The concrete collar created some interesting problems.  It is very difficult to place the poles when the bottom of the post is not in contact with anything.
Typically a post is ordered over height and dropped into the hole.  The excess is then cut off.  Suspending the post above the ground was such a time consuming task.  It required each post to be shot with a transit to make sure that it was within the allowable height variation. This took some time.  I know that you recommend leveling the site before the operation gets under way but in my case I had an 18″ drop from front to back and it was not feasible to do the rock work before the posts went into the ground.  It also took a bunch of back breaking work to lift those posts out of the ground and get them suspended and then nailed into supports.
The pendulum effect is very noticeable and a small amount of movement in the bottom of the hole makes a huge difference at the top.  When the concrete gets pumped into the hole it comes in with some force and there was a heck of a time trying to make sure that the concrete did not displace the post at all. (Yes, the posts were staked into the ground.  3 2X6’s for each post, one on the ground, and 2 vertical supports).
Around here the ground water is fairly close to the surface and when digging a hole 36″+deep ground water is going to seep in. There is no way to tell encasement depth when there is water in the hole when the concrete is being pumped in.  I sprayed the posts with Orange paint at the collar height but it was useless.  Once the concrete started flowing you could see nothing as the 4-6 inches of water clouded.  We tried checking it with measuring sticks but could not be sure of the depth.  We ended up just over filling them to make sure there was enough concrete in the hole.
Overall, I think the concrete collar is an unneeded step that does not really aid in the construction process or stability of the building.  If you really believe that it is necessary you can achieve the same thing by putting a couple of sticks of rebar in when pad is poured and gain connection with the rest of the concrete this way.”

My response: I can see how the 18 inch grade change posed a great deal of challenge for you.

Setting the poles is a snap
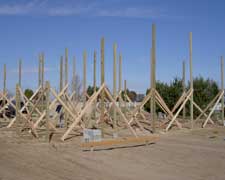
The Hansen Pole Buildings Construction Manual does address this issue in Chapter 2: “Grade change is ideally checked before placing building order, however this is not often feasible as a practical matter. If grade has not been checked before order placement, do so within 24 hours. Longer posts are far more economical when provided with original lumber delivery.”

Longer pole building posts would have eliminated the delay caused by having to shoot each post in with a transit.

This would also have allowed the column depth to be set as per the installation instructions in Chapter 5, which would have entirely eliminated the “bunch of back breaking work to lift those posts out of the ground and get them suspended and then nailed into supports.”

I’ve personally built more than several buildings – with columns set of top of footings, placed to bottom of the holes and suspended. I frankly like the ease of moving columns into place afforded by them being suspended. When adequately braced, movement (in my experience) has not been an issue.  As recently as this past summer a new self-storage unit was constructed on the Hansen Buildings property by the two owners and myself. We set 125 poles as suspended, and experienced no problems with them shifting, with them adequately braced. Our ground, however, was graded to “level” prior to starting, which was key.

The thickness of the concrete collar is merely the minimum requirement. There is no structural issue with having more concrete in the holes than the minimum.

Structurally the concrete collar makes all of the difference in resisting uplift forces. You can read more here: https://www.hansenpolebuildings.com/blog/2012/02/concrete-collars/

Also read why concrete cookies are not the answer:

https://www.hansenpolebuildings.com/blog/2014/03/concrete-cookies/

Come back tomorrow for part II in my response to this client’s letter…regarding his carport attachment to the main building. Mike the Pole Barn Guru

Digging Holes for a Pole Barn

If you didn’t read my blog yesterday – it might help you to back up a day and read where the following blog got started. I nice young gentleman asked me to help him with his boy scout Eagle project – constructing an equestrian barn. So back up a day – then continue here after you get measurements taken and batter boards set up….

Digging Holes

Temporarily remove string lines. If building in an area requiring inspections, call your building inspector to schedule a hole inspection.

This is important! Get off on the right foot with building inspectors. Call for all required inspections!

post hole
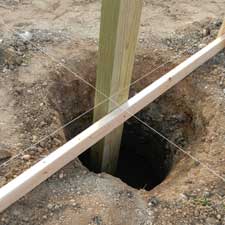
Confirm hole diameter from building plan. While usually 18-or 24-inch diameter, verify from building plans.

Building holes may be made larger in diameter or greater in depth (provided posts are long enough) without adversely affecting building structure. Digging holes which are too small in diameter, or not to depth shown on building plans, could cause a myriad of future structural issues – or even a building failure.

Why would smaller diameter holes be an issue? The building weight, including a “loaded to failure” roof load, must be adequately distributed to soil beneath the concrete around columns. Hole diameters specified on building plans include a sufficient area to resist settling, given stated soil strength. Avoid the temptation to use concrete “cookies” placed beneath columns, as they also do not offer enough surface area to resist settling.

To help prevent frost “heave”, dig holes so width at top is less than width at bottom. This can be done by “belling” out hole bottom with a shovel.

Augering Holes
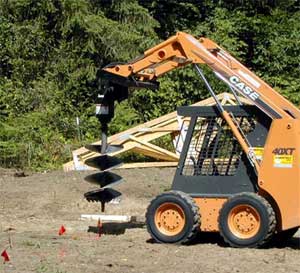
Using an auger mounted on a skid steer, bore holes to depth required on building plans. Holes slightly larger in diameter than auger bit can be created by first digging a pilot hole then offsetting auger slightly from hole center and boring again.

NOTE: High water tables or water in holes will not cause premature decay of pressure preservative treated columns. Treatment is for structural in ground use, which includes being exposed to ground water.

Helpful hint – an auger will NOT remove any rocks larger than half the auger bit diameter.

Pole Trench
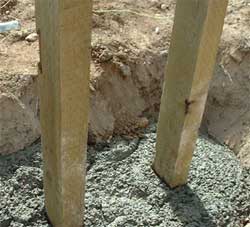
In cases where two adjacent posts will be located in close proximity to each other, the two holes may resemble a short “trench”. This is acceptable.

Holes maybe dug larger in diameter than what is shown on building plans, as well as oblong or rectangular. Dimensions stated on plans are “minimum” requirements.

Do not “over dig” holes! If holes are too deep, extra concrete will be needed and concrete is expensive fill! A visible marker, placed on the auger bit at required depth, is often helpful. If large rocks are present, dig holes with a backhoe, mini- excavator or other similar equipment.

Extend hole depth below area frost line. If unsure about frost depth, ask the local building inspector.

After digging holes, clean any loose material from hole bottoms.

Setting building columns into “sonotubes” or other forms is not recommended. Use will lower the friction coefficient which is created by the concrete encasement cast against native soil. This may adversely affect building performance (or longevity).

Hansen Buildings’ engineers also do not recommend concrete “cookie” placement or pouring concrete “punch pads” at hole bottoms, beneath columns. With column holes properly backfilled with poured concrete, both “cookies” or “punch pads” are usually both structurally inadequate and a needless expense.

There you go – the first big step is done – and you are ready to position columns in the holes. Once again – this may be the time to call your building inspector for a hole inspection.

Good Luck and Happy Digging Holes!

Tuff Posts for Pole Buildings

This is a product review for Tuff Posts,  a product I have never used. Now how can I feel qualified to do such a review? Thanks to the miracle of the internet, a plethora of information can be gleaned on nearly any product.

Tuff Posts are prefabricated columns for use in pole buildings. As a three-ply 2×6, the bases are composed of pressure treated members six, eight and 10 feet in length. The long 10 foot member is in the center. Four ply 2×6 columns use eight, 12, six and 10 foot members, in this order.

All of the lumber used in Tuff Posts is #2 grade Southern Yellow Pine (SYP), which has a base fiber stress in bending (Fb) value of 1000 pounds per square inch (psi). Because three or more members are utilized in the unit, an increase in the design fiber stress for repetitive members (Cr) of 15% is allowed. This gives a design value of 1150 psi.

The base members are pressure preservative treated with Chromated Copper Arsenate (CCA), which (in my humble opinion) is a perfectly fine product – however has been deemed inappropriate for use in certain instances (which include residential construction). With a treatment level of .60 (6/10 of a pound of treatment chemicals minimum added per cubic foot of lumber), they meet the requirements for UC-4B (structural in ground use).

Upper portions of the tuff post columns are untreated, and are placed square ended above the lowers. The members are glued and hydraulically pressed together, then mechanically nailed. After the fastening process is complete, the post is planed on both faces.

Now…the downsides…

Tuff Posts are not true glu-laminated columns. If they were, the uppers and lowers would be joined together in a glued finger jointed splice and there would be no need for nails to be used to connect the members. I surmise the glue being used is merely a construction adhesive, rather than a resorcinol, or similar, glue which is typically used for glu-lams.

Glulam Columns vs Tuff Posts
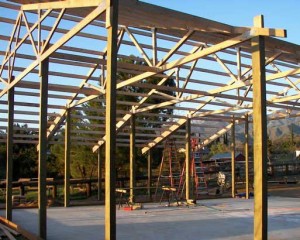
In my opinion, the weak link is the splice. With the nails having to do the work, and twice as many nails into the center member of the three ply unit – my educated guess is (if tested to failure in laboratory conditions) the center member is going to fail nearly every time. Having been involved personally in testing similar columns at the Forest Products lab at Oregon State University, the results are perhaps not quite as optimistic as the product manufacturer might suggest.

My recommendation – solid sawn or true glu-lam columns will provide design solutions without the questions which arise from the type of joint found in Tuff Posts. If looking for a high strength to weight product, then the investment in true glu-lams is most likely the answer.