Tag Archives: glu-laminated posts

What Is Keeping Posts Above Ground Worth?

What is Something Worth?

I can be overly anal. Sometimes I have to really work hard to get around it – I purposefully have conundrums on my desk and for some perverse reason I feel comfortable in them. 

I inherited my maternal grandmother’s counting gene. Even into her nineties, if I called her up and asked what she had been doing, she could tell me she picked 384 strawberries. Passing trains are my worst – if I see it right in front of me I have to work to not count cars.

Back on track – traditionally post frame buildings have been pressure preservative treated columns, embedded in augured holes.  Pretty low tech – as most people have available technology to dig a hole.

I will share a recent Facebook exchange, regarding a drawing posted by a potential barndominium owner:

MK:  “Looks great if its stick built on a poured stem wall.”

Me: “Looks like it would be a challenge to stick build. Those poured stem walls also add significantly to costs.”

Here is an article I had authored on foundation costs: https://www.hansenpolebuildings.com/2011/10/buildings-why-not-stick-frame-construction/

MK: “I imagine $20k extra. But you more than doubled the lifespan of a “AG building” with a wood foundation, which average is 60 years depending on soil. Usually less.”

Me: “Your $20k is probably pretty close. Properly pressure preservative treated columns will last far longer than any of us will be around to witness. https://www.hansenpolebuildings.com/2017/12/will-poles-rot-off/

MK: “I’ve personally seen rotted pressure treated wood. For AG buildings, use perma columns. You won’t catch me building my dream home on a wood foundation. That would fall under the same term as “throw away society”, and what about our children who inherit a house that’s rotting? I understand these shomes are driven by demand, but please inform people about the differences between a AG building and a house.”

Me: “I have seen it also and every single case I have seen documented the pressure treating was unrealistically low what its intended use should have been.

The treating standards in the past were much more lax than today. 30 years ago you could treat wood to “.60 or REFUSAL” with CCA. Lots of really not treatable wood was ‘treated’ – I personally know people who did it. A past employer of mine used to send 6×6 DouglasFir to be CCA treated. DougFir will not take a waterborne treatment except with heat and different chemicals.


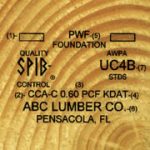
Hansen Buildings only uses properly treated lumber to UC4B. UC4A doesn’t cut it. After over 30 years and 20,000 buildings I have yet to see a member treated to UC4B rot.

I could live in any type of building anywhere in the world I choose. Even though our weather can be brutal, rural Northeast South Dakota has its own charm. We live in a million dollar post frame building by choice and we love it. How much do I believe in our product? Good enough to live in it every day.

If you become a reader of my blog articles, you will find me referring people to Professional Engineers and promoting the use of plans from a Registered Design Professional. A great post frame engineer will design a stronger building, with few(er) materials. It actually costs less to do the job right.

Permacolumns are expensive and difficult to handle – in my humble opinion. It is more economical to pour a pier with a wet set bracket and far easier. If the bottom of the column is an inch above the top of the slab, the columns do not have to be pressure preservative treated even.”

For information on Permacolumns: https://www.hansenpolebuildings.com/2018/04/perma-column-price-advantage/

All of this got me thinking and thinking hard. For four decades I have been standing upon a soap box extolling longevity of properly pressure treated wood embedded in ground. Perhaps I have been making this issue more difficult than it had to be.

In this video: https://www.youtube.com/watch?v=fVwUl4cm8fQ Kyle from Rural Renovators demonstrates how to pour piers and place wet set brackets: https://www.hansenpolebuildings.com/2019/05/sturdi-wall-plus-concrete-brackets/.

I conducted an informal and not overly scientific poll on Facebook:

“Traditionally post frame (pole barn) buildings have been designed with pressure preservative treated columns embedded in holes. Research proves properly pressure preservative treated columns, in ground, should last a lifetime without decay. There are at least two very popular post frame building companies who use only columns above ground, in brackets. We are investigating if there are enough perceived benefits to justify an added investment.

Along with this we would consider going to all high strength glu-laminated columns. These would be stronger than any other regularly utilized post frame columns in the industry. They are also very straight and lighter weight.

Per column, what range do you think is reasonable?”

Out of 22 respondents, exactly 50% felt an added investment of over $100 per column would be reasonable.

The good news is – we can make this happen for about half of this!

Why Not Use 6×6 or 8×8 Posts Up North?

Reader DARRELL in LUCEVILLE asked this question and included photo below.

While this photo is not of a Hansen Pole Building, I can comment upon it. Featured in this building photo are glulaminated columns – they are a great product, high strength to weight ratio, straight, highly resistant to warp and twist. They are strong because they are most generally manufactured from high strength materials, most three ply 2×6 columns have a Fb rating (Fiberstress in bending) of roughly 1900 psi. Your local lumber dealer or big box store will gladly sell you a 2×6 #2 with a Fb rating of anywhere from 1000 to 1170 (depending upon lumber species, with SYP lowest and Douglas Fir highest), so a glulam’s three members start off being about equal to five every day individual 2×6.

What about strength comparisons to solid timbers?

To determine bending strength of a member, multiply Fb X Sm (Section Modulus). A three ply 2×6 glulam would be 1900 X 19.86 = 37,738 in-lb. A 6×6 #2 SYP would be 850 X 27.73 = 23,570 in-lb. A 6×6 #2 Hem-Fir (treated species of choice in Western U.S.) has a base Fb of 575 with a reduction for incising of 20% (X .80). 575 X .80 X 27.73 = 12,755 in-lb.

Clearly, when picking for strength, glulam columns are going to be a better choice.
When it comes to practicality on a jobsite, would you prefer to carry a 20 foot long glulam weighing roughly 100 pounds, or hefting a same length 6×6 tipping your scale at 180 to 300 pounds? Not much to think about there!

Glulams columns are more prevalent in northern states due to locations where they are manufactured – primarily Pennsylvania, Ohio, Wisconsin and South Dakota. We do offer them as an option on any Hansen Pole Building. Give a call to a Building Designer today at 1(866)200-9657 for your post frame building design solution.

Multi-Story Pole Barns

Multi-story Pole Barns
Hansen Pole Buildings has developed a reputation for taking potentially challenging post frame (pole barn) building projects and developing them from concept to fruition. This leads many clients, with an interest in multi-story pole barns, to our doors.

Gambrel roof pole barnMy own post frame building home, along Lake Traverse South Dakota side, features both a second floor and a mezzanine (partial third floor) where my lovely bride has her sewing and quilting projects in various stages of assembly.

Our house Northeast of Spokane has two multi-story post frame buildings. Both of these happen to be constructed upon sites with a significant grade change. One of them has a 22’ x 24’ garage, with a studio apartment below and an office above (located in attic bonus room trusses). Tallest of these has been located near property rear. 40’ x 36’, it has a three vehicle garage space in lowest level, a full second floor, as well as a third floor (and a rooftop deck).

More reading about this building can be found here: https://www.hansenpolebuildings.com/2012/02/grade-change/.

Reader K.F. in ONTARIO writes:
“I would like to build a pole barn with a 10’ lower level and an 8’ upper area, with the dimensions 30×48. I would expect that the poles would need to be around 19-20’ long (above grade). That seems like a very tall pole (3x-2×6). What is the best way to build two levels and how does the upper floor go in?”

In my humble opinion, multi-story post frame buildings should always be designed by a Registered Design Professional (RDP – architect or engineer). Risks are far too great for an average person to safely and competently design a multi-story pole barn.

As to heights, one needs to look to how they desire to best utilize spaces being created. If interior columns are not an issue, a floor thickness of around a foot should be allowed for between levels. Don’t like having to maneuver around posts? Then floor trusses (https://www.hansenpolebuildings.com/2017/01/wood-floor-trusses/) might be a design solution. Roughly allow about an inch of truss depth for every foot of floor being spanned. Obviously, higher than residential weighted floors will necessitate a need for greater truss thickness.

Many multi-story post frame buildings are used residentially. If your proposed building will be climate controlled have roof trusses designed with raised heels (https://www.hansenpolebuildings.com/2012/07/raised-heel-trusses/) in order to provide full thickness of insulation from wall-to-wall. In colder climates, with a R-60 attic insulation recommendation, raised heel trusses could be as deep as 22 inches!

With a clearspan floor and raised heel roof trusses, ceiling heights desired by K.F. could result in sidewall heights of over 22 feet.

Not to fret – glu-laminated technology has allowed for one piece columns to be manufactured up to 60 feet in length. My own South Dakota building has columns as long as 50 feet.
As to how an upper floor goes in, this is where RDP experience comes into play. I have witnessed far too many instances of poor design practices of second floors without an engineer’s knowledge involved.

Looking for a multi-story pole building? Look to a post frame building kit supplier who works with a RDP to provide engineer certified plans for your building. Much better safe and standing, than flattened.

Book Shelving? Ceiling Insulation

DEAR POLE BARN GURU: Do you have to set laminated pole so you see the 1.5 side of the 2×6’s while looking in or out of the building? I was thinking of using 4ply 2×6 post 10′ out of the ground every 8′ while book shelving with 2×6’s in between posts. I thought it would be a lot faster to notch both sides of the post for the 2×10’s to sit in, just cutting out one 2×6 off of each side leaving 2 in the middle seems a lot faster than notching all 3 plays on a standard laminated post. My building won’t be very high and I heard book shelving greatly improves racking from side to side. Was planning on the book shelf being 2’OC didn’t know if going 16″OC would improve this design or if it is just unheard of turning the post sideways. I do understand that this makes the post 5.5″x6″ but the extra .5″ is of no concern since it is for a garage and I will just be sheeting it with 7/16″ OSB anyway.

Thanks in advance Mike CHRIS in DUNCANSVILLE

DEAR CHRIS: If by laminated you mean a true glulaminated column – then you can set it any direction as it has become a true one piece unit. If you are talking nailed up columns, or ones which use nails and construction adhesive (or through wires), those must be set with the 1-1/2″ sides of the 2x6s towards the wind. A 4ply 2×6 glulam will measure 5-1/2 inches by 5-3/8 inches, so there is no extra 1/2 inch to worry about.

Now I will totally upset your apple cart – how about doing away with the truss carriers entirely? And place the columns every 10 or 12 feet, instead of every eight? You can use a double truss system, with purlins on edge between the trusses and eliminate about 50% of the pieces you would otherwise need to handle and install – with the added benefit of not having to drill so many holes!! You can view sample plans for post frame buildings constructed in this fashion here: https://www.hansenpolebuildings.com/sample-building-plans/.

Book shelf girts are going to be far stronger against wind loads, I’ve used them on all of my current buildings and wouldn’t do them any other way. Two foot centers will adequately support far greater loads than will ever be imposed on most buildings.

DEAR POLE BARN GURU: Can a cloth type material like is used with BIBS or house wrap be used as a “ceiling” to hold up the insulation above it, or would there be excessive sagging or other problems? Not so concerned with aesthetics given my needs. Thanks. DAVID in MARYVILLE

DEAR DAVID ~ Depending upon how far you are spanning between trusses or ceiling joists there may be a fair amount of sag – however it should work as long as you can adequately attach the material. I’ve seen people use chicken wire stapled to the underside of double trusses which were spaced every 12 feet to support unfaced insulation batts.

DEAR POLE BARN GURU: How can I become a certified contractor/builder of Hansen Pole Buildings? BRANDON in BALTIMORE

DEAR BRANDON: Here is the link to the application on the Hansen Pole Buildings website, please fill it out completely in order to be considered: https://www.hansenpolebuildings.com/hansen-buildings-contractor-program/.


Tuff Posts for Pole Buildings

This is a product review for Tuff Posts,  a product I have never used. Now how can I feel qualified to do such a review? Thanks to the miracle of the internet, a plethora of information can be gleaned on nearly any product.

Tuff Posts are prefabricated columns for use in pole buildings. As a three-ply 2×6, the bases are composed of pressure treated members six, eight and 10 feet in length. The long 10 foot member is in the center. Four ply 2×6 columns use eight, 12, six and 10 foot members, in this order.

All of the lumber used in Tuff Posts is #2 grade Southern Yellow Pine (SYP), which has a base fiber stress in bending (Fb) value of 1000 pounds per square inch (psi). Because three or more members are utilized in the unit, an increase in the design fiber stress for repetitive members (Cr) of 15% is allowed. This gives a design value of 1150 psi.

The base members are pressure preservative treated with Chromated Copper Arsenate (CCA), which (in my humble opinion) is a perfectly fine product – however has been deemed inappropriate for use in certain instances (which include residential construction). With a treatment level of .60 (6/10 of a pound of treatment chemicals minimum added per cubic foot of lumber), they meet the requirements for UC-4B (structural in ground use).

Upper portions of the tuff post columns are untreated, and are placed square ended above the lowers. The members are glued and hydraulically pressed together, then mechanically nailed. After the fastening process is complete, the post is planed on both faces.

Now…the downsides…

Tuff Posts are not true glu-laminated columns. If they were, the uppers and lowers would be joined together in a glued finger jointed splice and there would be no need for nails to be used to connect the members. I surmise the glue being used is merely a construction adhesive, rather than a resorcinol, or similar, glue which is typically used for glu-lams.

Glulam Columns vs Tuff PostsIn my opinion, the weak link is the splice. With the nails having to do the work, and twice as many nails into the center member of the three ply unit – my educated guess is (if tested to failure in laboratory conditions) the center member is going to fail nearly every time. Having been involved personally in testing similar columns at the Forest Products lab at Oregon State University, the results are perhaps not quite as optimistic as the product manufacturer might suggest.

My recommendation – solid sawn or true glu-lam columns will provide design solutions without the questions which arise from the type of joint found in Tuff Posts. If looking for a high strength to weight product, then the investment in true glu-lams is most likely the answer.

Parallam® Plus PSL

Justine (a Hansen Buildings Project Coordinator) recently needed to order some glu-laminated columns for a pole building kit package. One of our vendors recommended she instead order Parallam® Plus PSL columns instead, insisting they would be as strong as or stronger than glu-lams.

Parallam beamParallam® is the brand name for an engineered wood product developed by Trus Joist MacMillan which is made from veneer strands laid in parallel alignment and bonded with adhesive. It is used for beams, headers, columns, and posts, among other uses.

The rated strength of Parallam®  is greater than the wood from which it is made. This is because knots and other imperfections are removed so strength variability is less than in solid sawn wooden beams.

When I served on the board of directors of the MSRLPC (Machine Stress Rated Lumber Producers Council), we had the opportunity to tour MacMillan’s Parallam® manufacturing plant. Truly an amazing process, as the product is continuously formed – it is extruded, not unlike plastic pipe! This means the maximum length of the beams are limited only by the maximum length capacity of the plant.

The product is produced as a huge rectangular “slab”, which is then cut down to popular sizes – widths of 3½”, 5¼” or 7″ and depths between 9¼” and 18″.

Parallam® Plus PSL columns are typically manufactured in three sizes: 3-1/2” x 5-1/4”, 5-1/4” x 5-1/4” and 7” x 7”. For use as a structural building column, Weyerhauser has simplified product design and specification by grouping the AWPA (American Wood Preservers Association) Use Categories into Service Levels. As such, the Service Level for exposed posts in contact with the ground would be SL 3.

In this application, the Parallam® Plus PSL columns would have a Fb (fiberstress in bending) value of 1344 psi. Multiplying this value by Sm (section modulus of the column) gives a value of 32,413.5.

Most typically, Hansen Buildings utilizes glu-laminated columns as manufactured by companies such as Timber Technologies, LLC, which have a Fb of 1897.5 psi. With a standard 3 ply 2×6 column measuring 4-1/8” x 5-3/8”, Fb x Sm for the glulams equals 37,688.7.

While the Parallam® Plus PSL columns are a great product, the vendor was incorrect in his advice to Justine, as the glu-lam would be over 16% stronger in bending. This is where it pays off to do investigative research on a product, rather than just relying upon what may perhaps be errant information from a vendor.

Do you Need a Pole Building Bolt Stretcher?

One of our clients is currently constructing his Hansen Pole Buildings kit package, in Colorado.

Colorado is one of those unusual geographic locales in the United States where the availability of any pressure treated timbers larger than a 6×6 is pretty much….not at all.

It IS possible to get glu-laminated columns, however. In this particular case, the client has a 16 foot tall sidewall, which put the building into the “glu-lam zone”.

A three ply 2×6 glu-laminated column, measures approximately 4-1/8” in width towards the wind. At the top of the column, a two ply prefabricated roof truss must be notched into the column. Ideally, the double trusses are notched fully into the column, however in this particular case, the client notched away two of the three glu-lam plies (leaving the trusses hanging off the side of the column by about 3/8”).

This left 1-3/8” of column plus the approximate 3-1/8” thickness of the double truss. The trusses are connected to the column by means of a 5 inch long 5/8” through bolt.

Doing some quick math, with 4-1/2 inches of wood, only ½ inch of the bolt will project through the column, without any flat washers in place.  There was no “room left” for the double washers and nut.  This is where I talk about getting out the old “bolt stretcher”.

How to make this work?

Insert the bolt into the hole from the side of the column opposite the trusses, without a washer in place. On the truss side, use a washer and the nut. With a wrench on each side, tighten the nut on the bolt until the washer is recessing itself into the surface of the trusses.  The lumber will “give” leaving an impression for the washer to embed itself and yes, will create more “room” for the nut.

Take the bolt, washer, and nut assembly apart. Reinsert the bolt, placing a washer on each side, and again re-tighten until both washers are fairly flush with the surface of the column and the trusses.  You can put the “bolt stretcher” safely back in its carrying case!