Beyond Code: Preventing Floor Vibration
by Frank Woeste, P. E., and Dan Dolan, P. E
Floor vibration, or bounce, is not a safety issue — it’s a performance issue, and one that’s likely to be impor- tant to homeowners. No one likes to hear the china rattling in the cabinet when they walk across the room. But at what point is the floor stiff enough, and how can a builder predict how the floor will perform?
Unfortunately, there’s no clear-cut rule for a builder to follow, and the physics of vibration are so complicated that it’s no easy matter to design a guar-anteed bounce-free floor (see “Sizing Stiff Floor Girders,” Practical Engineering, 8/97). Also, “acceptable” floor perfor- mance is highly subjective: What’s good enough for one homeowner may not be good enough for another.
The building codes don’t help much in this regard. They’re primarily con- cerned with safety — in other words, the strength of the beam rather than its stiff- ness. The most stringent code limit for joist deflection is 1/360 of the span: For example, a joist with a clear span of 15 feet must not deflect more than 1/2 inch under live load (people and furniture). The dead load — the weight of the floor materials — is not typically included in calculating deflection.
And yet it has been known for decades that a span/360 live-load deflection limit will not necessarily yield floors that are acceptable to everyone when it comes to vibration.
The purpose of this article is to pro- vide some simple rules of thumb for tak-ing the annoying vibrations out of floor systems, whether you’re framing with solid-sawn joists, metal-plate-connected floor trusses, or wood I-joists. There’s no guarantee that every customer will be satisfied if you follow these guidelines, but they should prevent the vast major-ity of complaints.
Some Quick Rules of Thumb
Before looking at specific types of joists, here are some general guidelines for controlling bounce.
✔Shorten the span. In general, shorter spans make for stiffer floors. For exam- ple, if the L/360 span table tells you a joist of a given size, grade, and species will just barely work for your span, shorten the span by adding a girder near the center of the original span. The resulting floor will vibrate less.
✔Increase the joist depth one size. If the code requires a 2×8 at 16 inches on- center, then use a 2×10 of the same grade and species. Or use a 14-inch- deep floor truss when a 12-inch deep truss would meet code requirements. This may not be the most cost-effective solution in every case, but it’s easy to remember and will save time and worry.
Probably the least efficient way to improve floor performance is to reduce the on-center spacing — 16 inches to 12 inches, for instance. Occupants feel “bounce” as a result of a foot impacting an individual joist. But even at 12 inches on-center, the joists are not close enough for the shock of a foot to be car- ried by two joists.
✔Glue and screw the sheathing. Floor sheathing should always be glued down. Screws work better than nails for long- term bounce control.
Design for Solid-Sawn Joists
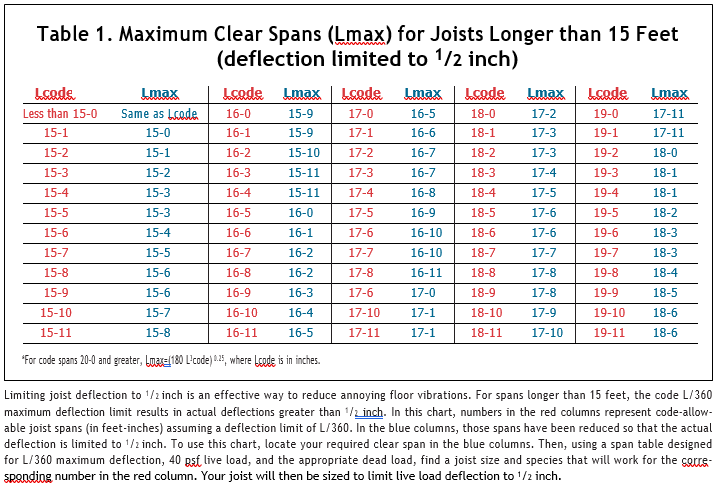
Our recommendation for stiffening solid-sawn floors is a simple modifica- tion of a rule that was published in 1964 by the FHA: For floors up to 15 feet, limit live-load deflection to span/360; for spans over 15 feet, limit the live-load deflection to 1/2 inch (see Table 1, page 69). In adopting this rule, we encourage builders and designers to ignore the reduced live load of 30 psf for sleeping areas, and instead use the standard 40 psf live load for all rooms. After all, a bedroom can become a study or home office, and the traffic may be heavier than in a living room.
Metal-Plate-Connected Floor Trusses
Floor trusses are a unique product in that they accommodate effective strong- back bracing (see On the House, 7/98, for more on strongbacks). The consensus among wood truss professionals is that strongbacks are effective in minimizing annoying vibrations, and that they are well worth the time and money it takes to install them.
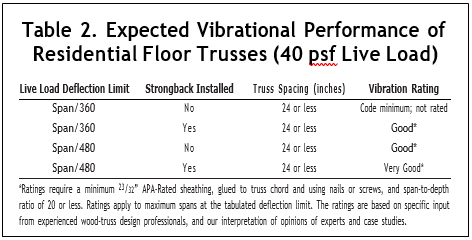
Table 2 illustrates the expected perfor- mance of various floor truss designs, using a 40-psf live load. Table 3 gives guidelines for sizing and installing strongbacks. For best performance, strongbacks should be installed near the center of the span (versus two at the third points) in upright position and attached to a vertical web. The strong- back should also be located at the bot-tom of a vertical web. To be effective, the strongback must be snugly attached to each web, as indicated by the nailing recommendations in Table 3.
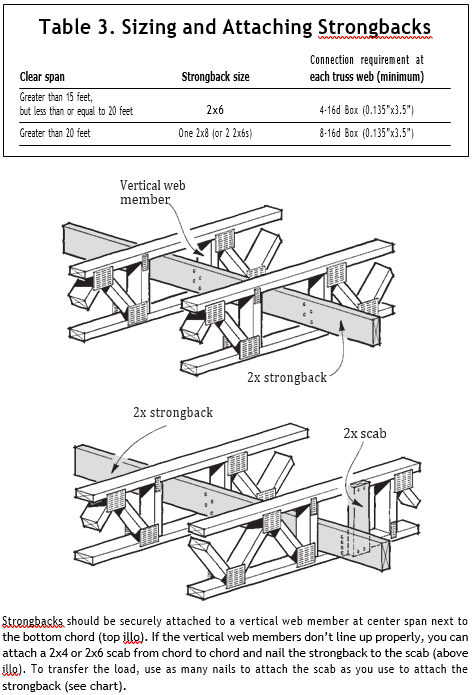
When, for whatever reason, the verti-cal webs don’t line up, you can attach a 2×4 or 2×6 scab to the top and bottom chords for attaching the strongback to the truss (see illustration). The total number of nails used to attach the scabs to the truss chords should match the number used to attach the strongback to the vertical web.
Some of the truss professionals that we interviewed when developing Table
2 had more restrictive rules to offer, but none had less restrictive design advice. Again, no design criteria is guaranteed to totally eliminate vibra- tions, but we believe that following the recommendations in the table will minimize complaints.
Wood I-Joists
When using wood I-joists, a simple way to get good results is to always use the tables designed for span/480 deflec- tion. Any I-joist stamped under the new APA standard for performance rated I-joists is automatically designed to meet the span/480 limit. The stan- dard also uses 40 psf as the minimum live load for any floor. The APA stan- dard is now being used by some I-joist manufacturers to make selection of I- joists easier. The allowable spans for various spacings are printed right on each joist.
Another design system for control vibration in wood I-joist floors is Trus Joist MacMillan’s TJ-Beam software. Trus Joist has done extensive testing of floor performance and has developed its own rating system. Using the software, a user can select a number between 20 and 70, with 70 offering the greatest level of protection against potential floor prob- lems as judged by an occupant. For example, a design that is rated at 55 is expected to be judged as “Good to Excellent” by 96% of the population, while 2% should judge such floors as “Marginal,” and 2% should judge the floor to be “Unacceptable.” This system allows the homeowners, through their contractors or architects, to select the level of floor performance to meet their expectations.
We tested the software for a 16-foot clear span supported by 2×4 walls (16 ft. 7 in. outside-to-outside), with I-joists 16 inches on-center and a residential load of 40/12 (live load/dead load). Using a 9.5-inch TJI Pro-250, the rating was 35. Increasing the depth to a 14-inch TJI Pro-250, the rating was a 53. Tightening up the spacing of the 9.5-inch I-joist to 12 inches on-center increased the rating only to 42 — illustrating that going to a deeper joist at the same spacing is a bet- ter solution.
The TJ-Beam software also provides a relative cost index that tells the user how much extra an improved floor will cost. Often an improved performance design can be obtained with the same or even lower cost than the original design.
 DEAR RICHARD: Hansen Pole Buildings is America’s leader in providing fully engineered, 100% custom designed, post frame building and barndominium kits, with multiple buildings in all 50 states. Your new building kit is designed for the average physically capable person, who can and will read and follow instructions, to successfully construct your own beautiful building shell (and most of our clients do DIY – saving tens of thousands of dollars – need a builder, we can probably help you there too). We’ve had clients ranging from septuagenarians to fathers bonding with their teenage daughters erect their own buildings, so chances are – you can as well! Your new building investment includes full multi-page 24” x 36” structural blueprints detailing the location and attachment of every piece (as well as suitable for obtaining Building Permits), the industry’s best, fully illustrated, step-by-step installation manual, and unlimited technical support from people who have actually built post frame buildings. Even better – it includes our industry leading Limited Lifetime Structural warranty! We would appreciate the opportunity to participate in your new pole building. Please email your building specifics, site address and best contact number to our Design Studio Manager
 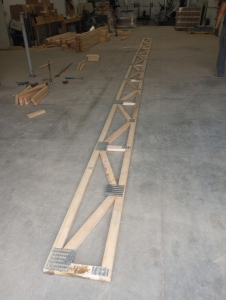 DEAR TROY: We would typically never recommend use of I joists for a floor system. Our experience is they result in an overly spongy floor. If you do opt for a wood floor, we would recommend either dimensional lumber floor joists (using 2400f MSR lumber, as it is stiffer) or engineered wood floor trusses. We do like “feel” of a wood floor, however if you do opt to go this route we would suggest building over a crawl space to take advantage of accessibility to under floor utilities. We have never before seen a system done as you would propose. We have had clients successfully do “plywood” slabs, this would be far less costly than your proposal:
 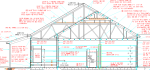 DEAR POLE BARN GURU: I have a set of plans for a that were designed to be conventional built. Would you be able to convert them to a post beam frame? If so what is the charge for that? JASON in BISMARCK
 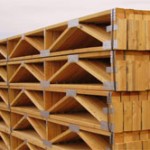 DEAR RICHARD: Thank you for your interest. Need to know use of building – residential, commercial, etc., any specific loading requirements? Deflection limitations, etc.? Spacing (typical is 24 inches on center)? Also, please send me an email of your plans so we can determine end conditions (bearing on top of a plate or walls, or top chord hung). Delivery charges will depend upon if you want them ASAP or if you can be flexible so we can combine them with other shipments heading your direction.
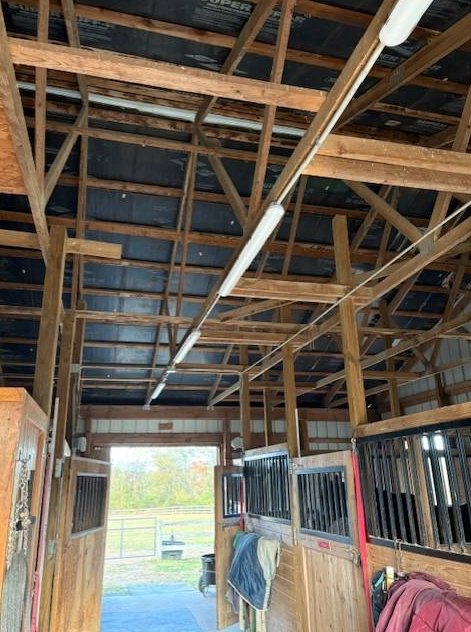

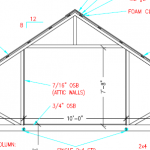
 DEAR RON: Lots of possible design solutions available. To begin with, I would recommend wood trusses – should you ever want to finish a ceiling, or if you want to have a product fabricated under strict quality control standards, then wood trusses are your best choice. On to options…. #1 My favorite. Make your building tall enough to have a full second floor. This will give you greatest usable space and best resale value. By using prefabricated wood floor trusses, you can still have a clearspan floor (no posts below) and it provides an unencumbered space below without columns to dodge. Yes, it will be a greater investment, but one you will probably never regret. #2 Prefab wood ‘bonus room’ trusses. With a steep enough slope (roughly 8/12) you can end up with an eight foot ceiling height at center and a room roughly 10-12 feet in width. For amount of space being gained, this is a fairly costly design solution. #3 Increase sidewall height and use scissor trusses to allow for a central mezzanine supported by columns. While likely to be your least expensive design solution, you will be faced with columns below (unless opting to again add in floor trusses.
 DEAR ANNIE: As you get closest to square, your costs per square foot will decrease slightly. This is due to having less exterior wall surface, although it does not necessarily lend itself best to layout of rooms. For post frame construction, your most efficient use of materials typically comes from multiples of 12 feet in width and length. Work from inside out – do not try to fit your wants and needs within a pre-ordained box just because someone said using a “standard” size might be cheaper. Differences in dimensions from “standard” are pennies per square foot, not dollars. Post frame will always be your most cost effective structural design solution:
  DEAR JEFF: If erecting a roof only “pavilion” style post frame building, column dimensions are often dictated by L/d ratio as there is no wind load on totally open sidewalls. “L” is unsupported length of column (grade or top of concrete slab to bottom of truss connection), divided by least dimension of column. Playing a part in this is a factor known as Ke. Ke is determined by fixity of columns. On a roof only structure, columns act as cantilevers (think of a diving board), so Ke = 2.1. Looking at your 5-1/2″ square 6×6, 5.5″ x 50 / 2.1 = 130.95″ (or just under 10’11”). This means at an unsupported length of 11 feet, a 6×6 would fail. Obviously, truss span, spacing, and loads from dead, wind and any snow must be properly factored into equations to be verified by your building’s engineer. Adding an eave sidewall (or sidewalls) with open endwalls will cause bending forces to fail most 6×6 columns at lesser heights.
 Even with all of my years as a manager of owner of truss plants, 48 feet is as wide as I have participated in – although for our own personal shouse (Shop/house), we wish we would have gone 12 feet wider (no matter what size you build, it is never big enough). Your added investment, for floor itself, between having a myriad of internal columns, or clearspanning is roughly four dollars per square foot. For what it adds in downstairs usability by not having columns or walls to work around, it is worth every cent in my mind. Add to this it allows for all utilities to be hidden from view and they are a winning combination. As we are providing more barndominiums seemingly every day, we have many clients taking advantage of clearspan floor trusses and have never heard a regret from having done so!
 DEAR CHRIS: Closed cell spray foam is a great product, however it would not be my first choice for your climate zone. For best results, closed cell spray foam should be two inches or thicker to prevent condensation, and applied directly to the roof and wall steel. Hopefully you have a well-sealed vapor barrier beneath your building’s slab. With closed cell spray foam, you may experience condensation on your building’s interior, so do not be surprised should you have to mechanically dehumidify. Unless specified as necessary on your engineer sealed building plans, you should not add plywood or OSB to your roof system, as it will add unexpected dead loads to your building system.
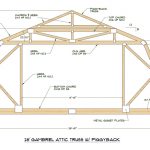 DEAR POLE BARN GURU: Hello. We are wanting to build a 2 story pole barn winery. First floor winery and second would be air-bnb type rental. We aren’t sure if we should use attic truss or complete the build with a traditional second floor. Cost is probably biggest concern. Space second as we know attic truss would be less room. Would you do an attic truss or traditional 2nd floor type build and roughly cost difference between the 2? Building size will be roughly 40×60. Thank you for your time. CRAIG in ROCK CREEK
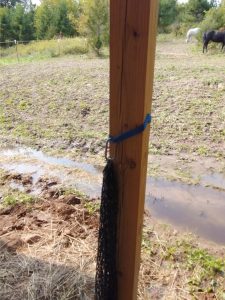 DEAR POLE BARN GURU: I built a pole barn for my r/v a couple of years ago. I used 4×4 for my posts with a metal roof and purlins with no siding. The posts are set 3′ into the soil with no concrete. Posts are 10′ out of the ground. When we get a strong wind the posts bend slightly at ground level allowing the structure to flex. Is there a way to add strength to the posts or do I need to replace with a larger size post and should I embed the post in concrete or will it rot? MARK in BRADENTON
 IBC (International Building Code) Section
  DEAR KIM: Your local Planning Department director gave you good advice. Most post frame (pole) buildings are designed for Risk Category I occupancies (if they were designed at all) – meaning if they collapse chances are good no one will be in them when it happens. They use lower wind and snow loads than what is required for residential purposes.
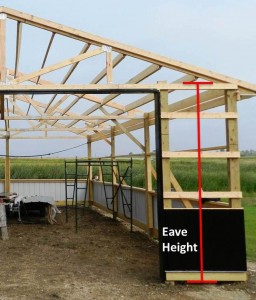
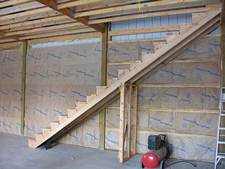 I did not include materials for a bearing wall at the floor truss center. Features listed above ran roughly $6000 more to go two floors. Also, with the two floor version, you will lose 50 square feet of usable floor on each level due to stairs.
 DEAR POLE BARN GURU:
 DEAR POLE BARN GURU: I’m interested in a residential building approximately 20ft x 30ft. How tall would the walls need to be to include a loft bedroom with headspace to approximately 4ft from the sides? JUDE in DUPONT
 I would recommend using premanufactured wood floor trusses between floors (
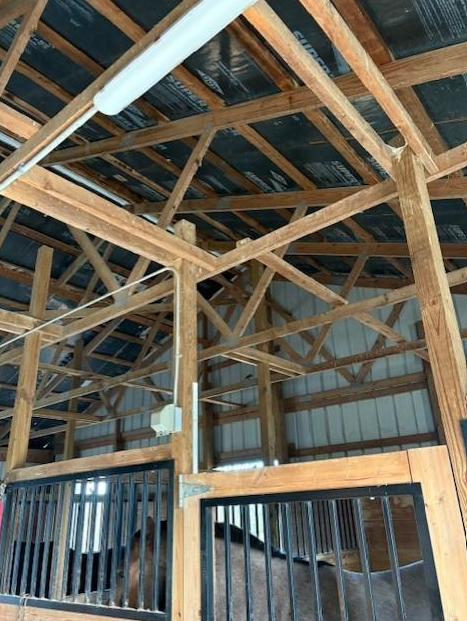
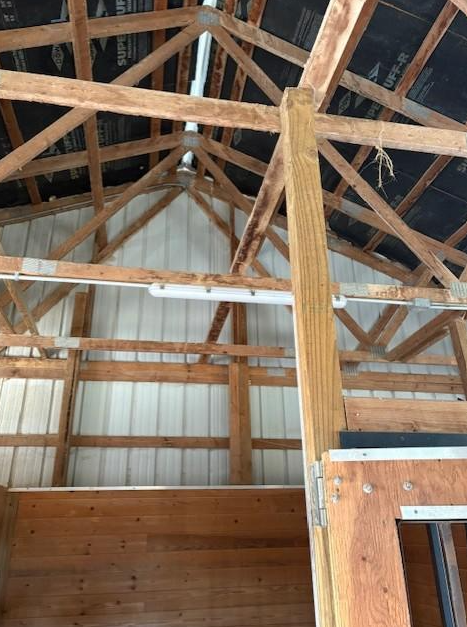
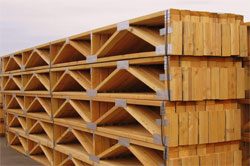 A few years ago, our oldest son Jake needed a new post frame garage at their home near Knoxville, Tennessee. His mom convinced him this plan would be so much better with a mother-in-law apartment upstairs. We used 4×2 (2x4s turned flat) floor trusses to span a 24 foot width!
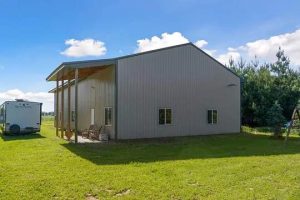
 When we built our gambrel roof style barndominium 15 years ago we were in a position financially where we could have done most anything we wanted to. Our property was over two acres in size, so available space was not a determining factor. After having lived in it every day for going on four years, I have realized there are some things I would have done differently. For sake of brevity, I will only discuss main clearspan portions of our barndominium (it has 18 foot width sidesheds).
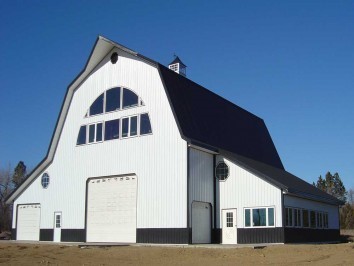 My own post frame building home, along Lake Traverse South Dakota side, features both a second floor and a mezzanine (partial third floor) where my lovely bride has her sewing and quilting projects in various stages of assembly.
 Knowing this building would be very tall, and there would be a 180 degree panoramic lake view, it was planned all along to have a rooftop deck. Adding to design challenges, we wanted this deck to be capable of supporting weight of a hot tub and its occupants!


