Due to our recent storms throughout the country, we thought it might be nice to revisit a blog about building codes.
My Response: Why We Need Building Codes
As promised, here is my response to the Coeur d’Alene Press article of December 5, 2017 (exactly as I wrote in the comments portion following the newspaper article regarding adoption of building codes):
 I will first qualify myself – I attended the University of Idaho in architecture. I was a manager or owner in the prefabricated wood truss business for over 20 years. I’ve been a registered general contractor in four states, In 1987 I joined ICBO (they write the Codes) as well as ASAE (American Society of Agricultural Engineers) and was a sitting member on the committees which established the huge majority of the structural design criteria for post frame (pole) buildings. I have had the privilege of being involved in the structural design of nearly 20,000 buildings in every U.S. state. I am a contributing writer for Rural Builder magazine.
In my humble opinion – anyone who wants to “run bare” without Building Code minimum standards being applied to their new structures is out of their freaking mind.
The Building Codes are designed specifically to protect the safety and lives of those who occupy (or are in the vicinity of) structures. The Code requirements are ‘minimum’ standards, which are just scraping by – however something is better than nothing. For residential occupancies, the risk (under Code) is a once in every 50 year probability of the design loads for a given home to be exceeded! And yet there are some who would do away with even this minimal amount of protection.
I am not at all an advocate of governmental intervention, however only a fool acts as their own engineer. I deal, on a daily basis, with challenges posed from new building owners who have had under designed buildings constructed in jurisdictions which do not require structural plan reviews.
Mr. Tyler’s concern about homes having been built on unstable ground is not the fault of the Code, but the fault of the agencies which issued the permits. A geotechnical study should be done for the proposed site of any new structure – this allows the RDP (Registered Design Professional – architect or engineer) who designs the structure to have adequate information to be able to properly address foundation challenges, before they become foundation issues. The Code does not mandate engineered soils reports.
As to length of warranty provided by builders – an educated new building owner will look for a builder who offers an extended warranty. This, again, is not a function of the Code.
Having accurate information about snow loads is crucial to proper structural design. The 2015 edition of Ground Snow Loads for Idaho was produced by the Department of Civil Engineering at the University of Idaho. Based upon 31 more years of snowfall study than the previously used document – it appears Ground Snow Loads in Kootenai County should range from 43 to 100 psf (pounds per square foot) depending upon one’s location within the county.

Several factors go into calculation of Ps (sloped roof snow load) from Pg (ground snow load) including exposure to wind, is structure heated or not, importance of building, slope of roof and roofing material. In many instances the calculated Ps load is going to be higher than the currently accepted 40 psf. Will this add to construction costs? Yes. Will it help prevent failures and possible loss of life? Yes.
What is the value of even a single life?
Rather than throwing the baby out with the bath water, my advice is to require every single building to be designed per current Code to include plans which are sealed by a Registered Design Professional.
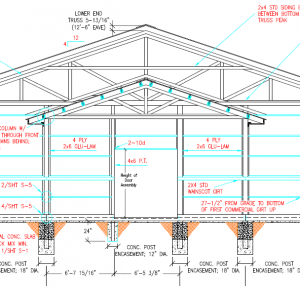 Depending upon span between these two trusses and roof loads 2×4, 2×6 or even larger purlins should be placed edgewise. They will butt into the side of truss against existing building and be attached with hangers. If no endwall overhang, attachment to opposite truss will be the same. If an endwall overhang will be included, then purlins run over second truss and are attached to top of it with Simpson H1 brackets. With an endwall overhang, solid 2x blocking will be placed between purlins, to prevent rotation. Solid blocking should be held 3/4″ out past 2×4 siding backing. With enclosed overhangs, soffit will attach to this solid blocking. With open overhangs, endwall J Channel will butt up against blocking.

 DEAR POLE BARN GURU:
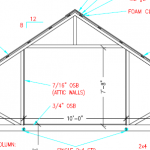 DEAR POLE BARN GURU: I’m interested in a residential building approximately 20ft x 30ft. How tall would the walls need to be to include a loft bedroom with headspace to approximately 4ft from the sides? JUDE in DUPONT
 I would recommend using premanufactured wood floor trusses between floors (
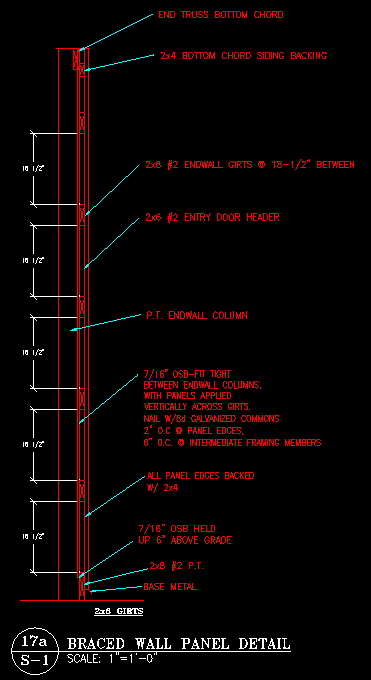 For cases where strength of steel skin is not adequate to support loads, the International Building Code (IBC) provides for wall panels to be braced by adding either Oriented Strand Board (OSB) or plywood. This most often occurs when a wall (or walls) have large amounts of openings (doors and windows) or in cases where buildings are tall and narrow, or very long (usually width of three to four times building length). An engineer can determine the applicability of this as a design solution. Installation of added sheathing is generally fairly simple and requires (in most cases) minimal extra framing materials.
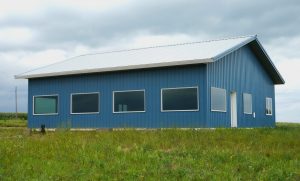
 “Maybe you could have a chapter on how building a new building cost money. And that you shouldn’t expect other people have spent money to just give you their plans and all their knowledge that they spent their own hard-earned money on to get.”
 There is no such thing as a “pole foundation engineering calculator” therefore, there is also no link to one. The design of post frame (pole) building foundations is one which is best left in the hands of RDPs (Registered Design Professionals – architects or engineers). When provided with all the pertinent information about your proposed building, they can design not only a structurally sound column embedment, but also your entire structure (which I whole heartedly recommend).
  The building official is also authorized and directed to enforce the provisions of this code. The building official shall have the authority to render interpretations of this code and to adopt policies and procedures in order to clarify the application of its provisions. Such interpretations, policies and procedures shall comply with the intent and purpose of this code.
 In my humble opinion, a majority of these builders who had to change their construction were probably not building Code conforming structures! Think about this if you are considering investing in a post frame building from ANY builder.
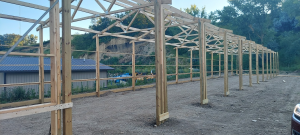 While I appreciate your questions, we as a company and me as an individual do not provide free engineering services. In answer to your questions:
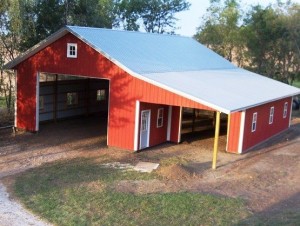 Wikipedia may consider a lean-to a simple structure, however there is far more involved than may meet the eye. Before diving deep into adding a lean-to to an existing pole barn (post frame building) a competent Registered Design Professional (RDP – engineer or architect) should be engaged to determine the adequacy of the existing structure to support the lean-to. Failure to do so can result in catastrophic failures – causing injury or death.
 DEAR DAVE: Rather than working off from the dimensions of a building which best fit some prior client’s wants and needs, you will be far better ahead to work with one of the Hansen Pole Buildings’ Designers to come up with the dimensions and features which will best fit with your budget. If you can do a design which has some or all of both of the narrow (peaked) endwalls enclosed from roofline to the ground, it will normally be the most cost effective.
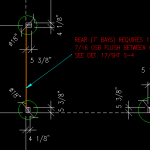 He or she takes into account all of the climactic loads placed upon your building – wind, snow and seismic, along with the allowable soil bearing capacity of your site in making the determination. The other factors they will have taken into account include the spacing of the columns, eave height, roof slope as well as the dead loads the building must support (not only the weight of the building as proposed to be constructed, but also future loads such as wall and ceiling finishes).
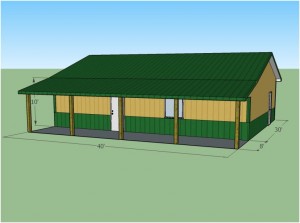 DEAR FAITH: This is a question which is best posed to the RDP (Registered Design Professional – architect or engineer) who designed your building and provided the sealed blueprints for you to build from. I am not aware of an engineered hanger which will do what you are looking to accomplish, however there may be a direction in which to head for a solution. By predrilling holes through the purlins from narrow edge to narrow edge, it might be possible to utilize a number of very long spikes or drive screws which could provide the needed resistance to uplift and seismic forces. In order to have adequate area for connectors, it might take going to a three or four inch wide purlin, which may turn out to work well aesthetically with your timber framed trusses. There will need to be blocking placed on top of the trusses, between the purlins to prevent rotation.
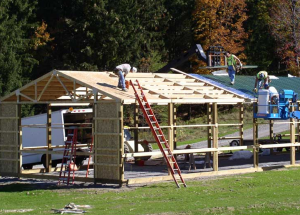 Always (may I repeat Always) construct only post frame (pole) buildings which are designed by a RDP (Registered Design Professional – engineer or architect) specifically for your building upon your site. You will always get piece of mind and usually the RDP will save you more money than what you invested for their design work.
 In the post frame building industry, Hansen Buildings deals with Registered Professional Engineers pretty much every day. It is thanks to years of schooling, field experience, and real life design work these design professionals perform which makes our pole buildings as safe as they are.
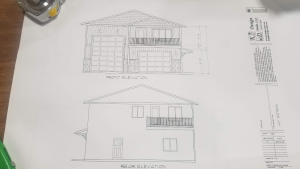 If he wasn’t a building official, it wouldn’t really matter much whether he gets rankled or not. If he was a supplier or subcontractor, fine, take the risk; if he can’t handle it, hire a new one. But you can’t hire new building officials. Get on the wrong side with one and run the risk of installing yourself on the person’s or jurisdiction’s blacklist. Navigating the regulatory quagmire is hard enough without painting a sign on your forehead which says “I am a jerk.”
Trust me on this one – getting into the jerk line at the Building Department is tantamount to waterboarding. Life…will….become….miserable.
I have heard of projects where during construction the engineer of record got calls from the contractor asking for interpretations to the cryptic red marks all over the structural plans. This is alarming because engineers do not release construction plans with red marks on them. If corrections are to be made, engineers make them in the office and reissue the plans. What has happened is an overzealous plans examiner took it upon himself to change the engineered plans via red marks and then issue the plans for construction without bothering to ask or tell the engineer!
In changing the engineer’s design, the Building Department superseded the actual registered engineer as the engineer of record and assumed all sorts of liability. If their risk manager ever got wind of this, heads would roll. And roll they should.
Oftentimes, engineers do nothing about this, especially if it is near an Act of Congress to obtain a building permit in the particular jurisdiction. Sadly sometimes the only way to obtain a permit is via the building department redoing the design and assuming the liability. Raising a stink could cause long delays in the issuance of a permit.
Before questioning the Building Official, weigh the costs. If the building inspector is a reasonable person, ask the question. If, on the other hand, the inspector is seemingly “out to get you”, maybe let the issue pass and then at the end of the project bring it up to his superior.
If you are a Building Official and reading this, please do give me feedback on “smoothing the road”. Trust me; I am on your side. My goal is always the same: To provide adequate support and education to clients to assist them in getting a well-designed pole building which is safe, sound…and built to code.
If he wasn’t a building official, it wouldn’t really matter much whether he gets rankled or not. If he was a supplier or subcontractor, fine, take the risk; if he can’t handle it, hire a new one. But you can’t hire new building officials. Get on the wrong side with one and run the risk of installing yourself on the person’s or jurisdiction’s blacklist. Navigating the regulatory quagmire is hard enough without painting a sign on your forehead which says “I am a jerk.”
Trust me on this one – getting into the jerk line at the Building Department is tantamount to waterboarding. Life…will….become….miserable.
I have heard of projects where during construction the engineer of record got calls from the contractor asking for interpretations to the cryptic red marks all over the structural plans. This is alarming because engineers do not release construction plans with red marks on them. If corrections are to be made, engineers make them in the office and reissue the plans. What has happened is an overzealous plans examiner took it upon himself to change the engineered plans via red marks and then issue the plans for construction without bothering to ask or tell the engineer!
In changing the engineer’s design, the Building Department superseded the actual registered engineer as the engineer of record and assumed all sorts of liability. If their risk manager ever got wind of this, heads would roll. And roll they should.
Oftentimes, engineers do nothing about this, especially if it is near an Act of Congress to obtain a building permit in the particular jurisdiction. Sadly sometimes the only way to obtain a permit is via the building department redoing the design and assuming the liability. Raising a stink could cause long delays in the issuance of a permit.
Before questioning the Building Official, weigh the costs. If the building inspector is a reasonable person, ask the question. If, on the other hand, the inspector is seemingly “out to get you”, maybe let the issue pass and then at the end of the project bring it up to his superior.
If you are a Building Official and reading this, please do give me feedback on “smoothing the road”. Trust me; I am on your side. My goal is always the same: To provide adequate support and education to clients to assist them in getting a well-designed pole building which is safe, sound…and built to code.  An engineer is responsible for the analysis and design of the structure or framing system of a building or building component. While doing the building’s structural design, the engineer will take safety and performance into consideration. For performance or serviceability this is the design for vibrations from machinery, floor vibration or deflection which could cause discomfort, or even building deflection or sway. The occupants of a building might feel uncomfortable if the building sways or moves too much, especially on the upper stories.


