How to Frame a Reverse Gable Porch
Reverse gable porches are an excellent way to protect any door from effects of weather – specifically rain and snow. I personally feel they are an underutilized great feature.
For more reading about reverse gable porches: http://www.hansenpolebuildings.com/2015/07/reverse-gable-porch/.
Today’s article has been sparked by reader DARRELL in ATLANTA who writes:
“How to frame a reverse gable over a door on an existing pole barn. Thank you.”
Mike the Pole Barn Guru responds:
Ultimately this will be a question you will need to have answered by a RDP (Registered Design Professional – architect or engineer) who provided sealed plans for your original structure, as they will have to verify ability of existing structure to support loads imposed by this reverse gable porch.
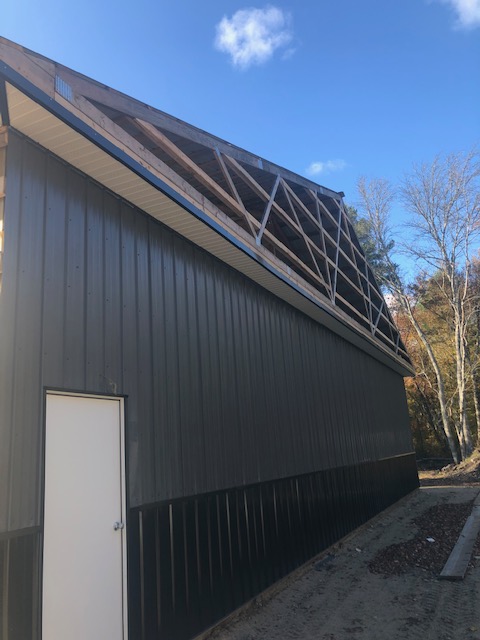
Most reverse gable porches are attached to a wall below the existing roofline. Structural design of new roof system will need to be able to accommodate weight of snow drifting against existing wall or sliding off from roof (depending upon whether reverse gable will be added to endwall or sidewall).
Siding will need to be removed from existing wall in area of reverse gable. A truss will need to be placed against this wall – usually it will be easiest for span of truss (and width of reverse gable) to be from one existing roof supporting column to another. If reverse gable will have overhangs, then this truss against existing wall needs tails 1-1/2 inches longer (measured horizontally) than width of overhang, in order to attach fascia boards. 2×4 (wide face to wind) siding backing needs to be added to this wall, approximately two inches above truss and following same pitch.
Your RDP can specify connection of truss to existing columns. It may be necessary to add a bearing block below the truss heels, in order to adequately support roof loads.
Two new columns will support new gable parallel to the wall including your door. For sake of preventing things from running into them, they should be no smaller than 6×6, and be fully concreted into the ground. A single truss will be notched into face of these columns 1-1/2″ opposite from existing main wall. If reverse gable has no overhang, neither will this truss. If endwall overhangs, this end truss attachment will be lowered (in comparison to main wall truss) by thickness of purlins, adjusted for roof slope. A 2×4 siding backing should be nailed to face of both top and bottom chords of this truss.
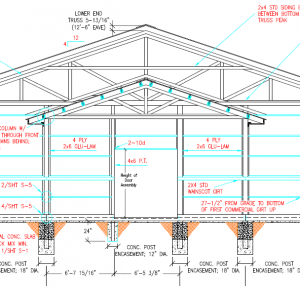 Depending upon span between these two trusses and roof loads 2×4, 2×6 or even larger purlins should be placed edgewise. They will butt into the side of truss against existing building and be attached with hangers. If no endwall overhang, attachment to opposite truss will be the same. If an endwall overhang will be included, then purlins run over second truss and are attached to top of it with Simpson H1 brackets. With an endwall overhang, solid 2x blocking will be placed between purlins, to prevent rotation. Solid blocking should be held 3/4″ out past 2×4 siding backing. With enclosed overhangs, soffit will attach to this solid blocking. With open overhangs, endwall J Channel will butt up against blocking.
Fascia boards and fly rafters of same dimension as purlins will need to be installed, if there are overhangs.