Tag Archives: engineered building plans

Additional Guidance, Steel Trusses, and Kit Inclusions

This Wednesday the Pole Barn Guru answers reader questions about guidance of adding to an existing structure, the practical use of light steel trusses for a pole barn home, what components are included in a Hansen Pole Building kit.

DEAR POLE BARN GURU: If purchasing a kit from Hansen with installation instructions. Assuming it’s a custom kit that is intended to be an addition like a new garage, would you provide guidance as to how to complete the marrying of the new structure with the existing? EVAN in HORICON

DEAR EVAN: Thank you for your interest in a new Hansen Pole Building. Every building we provide is custom designed to meet our client’s wants and needs, as well as being fully engineered for your specific climactic conditions. Yes, we will provide assistance in joining your new building to your existing. Please keep in mind, because we did not design or provide your existing building, our addition will be designed to be totally self-supporting


DEAR POLE BARN GURU: We like the look of the pole barn ceiling, we like the look of the steel trusses. We want to build an open ceiling, open ductwork, residential pole barn home. Are the same trusses used in a residential the same or are they structurally larger? TAMMY in EASTPOINT

DEAR TAMMY: Very few of these light-gauge welded up steel trusses are fabricated to meet mandated Building Code requirements for quality assurance, as they do not have random third-party inspections. Further, they are typically not fabricated by certified welders. You can achieve a very similar look, using parallel chord wood scissor trusses. Prefabricated metal-connector plated wood trusses are subjected to rigorous quality controls, both daily in-house and quarterly by a certified third-party.


DEAR POLE BARN GURU: What is all included in your kits? Just the frame, or siding, roofing etc.? JOHN in SPOKANE

DEAR JOHN: Your new Hansen post-frame building kit includes full multi-page 24” x 36” engineer sealed structural blueprints detailing location and attachment of every piece (as well as suitable for obtaining Building Permits), all lumber, trusses, roofing, siding, doors, windows, etc., to provide a complete ‘dried-in’ shell. Any raised wood floors (lofts, mezzanines, second or third floors) and applicable stairs. Our industry’s best, fully illustrated, step-by-step installation manual, and unlimited technical support from people who have actually built post frame buildings. Even better – it includes our industry leading Limited Lifetime Structural warranty!


Concrete Slabs on Grade for Cold Climates

Concrete Slabs on Grade for Cold Climates

My lovely bride and I have a shouse (shop/house) in Northeast South Dakota, where it can tend to get chilly in Winter. Reader TERRI in DULUTH is in a similar situation and writes:

“What type of slab for cold climates do you recommend?”

Well Terri, thank you for your patience in awaiting a response, your email address was not included with your question, so I was unable to message you back as quickly as I would have liked.

PLEASE – If writing an “Ask the Pole Barn Guru” question include your email address.

Injecting some humor (sadly, I have to point it out as not everyone gets it) – I would recommend a concrete slab.

Before diving into this subject – accept one fact, concrete slabs will crack. If you are expecting otherwise, you are setting yourself up for disappointment.

First key to a successful slab is excellent site preparation: https://www.hansenpolebuildings.com/2017/02/building-site-preparation/

Second – insulate your slab’s perimeter. 2021’s International Energy Conservation Code (IECC) provides guidance to meet energy code requirements for every county within our country. Begin by looking up your Climate Zone: https://codes.iccsafe.org/content/IECC2021P1/chapter-3-re-general-requirements

I will cheat and tell you Duluth (St. Louis County) is climate Zone 7.

Scroll down to Table R402.1.3 to find Insulation Minimum R-Values.

In Climate Zone 7 your slab perimeter must be insulated to R-10 and be four feet in depth. 

Weirdly enough, Minnesota’s Building Code only requires footings to be at 60 inches of depth in your area (https://www.revisor.mn.gov/rules/pdf/1303.1600/2015-01-23%2012:37:31+00:00). 

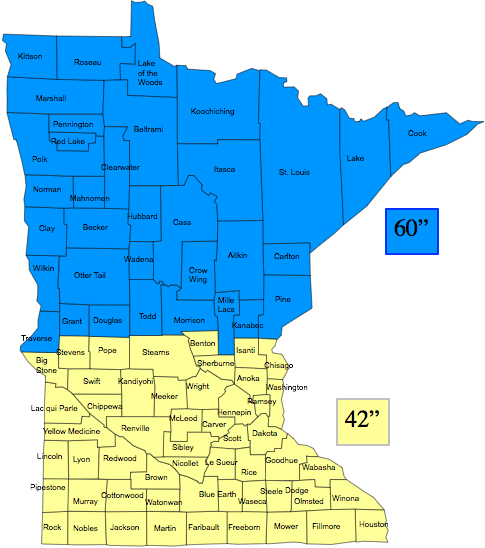
Although actual frost depth in your area is more like 80” in depth:

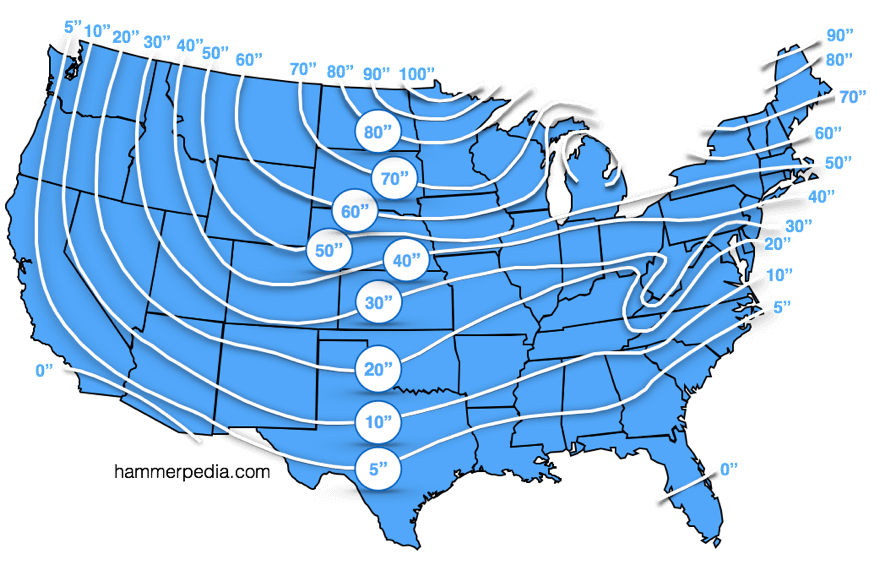
I would probably look at augering holes no less than 72 inches in depth, using a bottom collar of 18 to 24 inches (per your engineered building plans). This would allow you to trench between building columns and install R-10 rigid insulation along your building’s perimeter to a depth of four feet.

If you are going to do radiant in-floor heating you should be placing R-10 beneath your slab and on top of a vapor barrier of no less than 6 mil visqueen (I prefer 15 mil thickness to reduce chances of perforations during pouring).

What Size Posts Should I Use?

What Size Posts Does My Building Need and How Deep Should They Be?

Reader ANONYMOUS in BENTON writes:

“1. If my building has 16 posts and posts are 12 feet apart do I need 4×6’s or 6×6’s?
2. If the plan shows 16 feet above grade how much do I need underground?
3. If the posts are set 12 feet apart will two 2x12s glued together support a truss system with a total length of 36 feet?”

Mike the Pole Barn Guru responds:

While I appreciate your questions, we as a company and me as an individual do not provide free engineering services. In answer to your questions:

1) Without knowing the full dimensions of your building, including roof slope and overhangs (if any), if the columns will be adequately tied into a concrete floor, as well as your site’s snow load, design wind speed and exposure, seismic zone as well as the dead loads which will be carried by your building there is no possible way for me or any RDP (Registered Design Professional – engineer or architect) to be able to answer this.

2) The depth of the columns into the ground should be shown on your engineered building plans (you do mention you have plans). At a minimum the holes should be no less than 40″ deep and must extend below the frost line. Ultimately the depth and diameter will need to be determined by the RDP in consideration of the factors listed in (1) above, as well as designing for the ability to adequately prevent uplift.

3) Since I would use double trusses which bear directly upon the columns, there would be no need to use any other type of dimensional lumber to provide headers for a truss system. Again, this is where your RDP can design to adequately provide an engineered system to support the trusses.

My best advice, since I am guessing you are somewhat floundering in this, is to invest in a fully engineered post frame building kit package which includes plans sealed by a RDP and designed specifically for your building, at your site. It just isn’t worth trying to avoid the small expense into a proper design – especially when the lives of the occupants depend upon it.

Here are some other articles which pertain directly to this subject and should be read: https://www.hansenpolebuildings.com/2014/12/free-pole-barn-plans/ and https://www.hansenpolebuildings.com/2017/11/dont-engineering-fool/


Following Pole Building Plans

Build to Match the Pole Building Plans

Picture this, if you will…..

A monitor style post frame (pole) building. The center portion is 24 feet wide by 48 feet long with a 24 foot eave height. On each side of the center is a 12 foot wide “wing”.

The right wing is a roof snowy-monitor-buildingonly – with a steel covered wall between it and the center portion. The left wing has its exterior walls enclosed, and is open to the center.

For those of you, fair readers, in the majority of the country, a structural permit to build could be obtained without the need for engineer sealed pole building plans (although I am not advocating going without one). Not so much where this building is to be – this particular client’s building is going to require engineering.

Here is where the fun kicks in, as the building is now constructed and the final inspection has been called for. This is what the field inspector found:

On the Left Wing the client’s builder put 2×10’s 16” on center going across to the posts on the main building in order to create a flat ceiling.  The Building Inspector asked if they would put anything up in the top of the triangle which they said “yes, Christmas boxes”.  The inspector will not pass final inspection as he said it is not designed to carry the weight. 

The client asked his Hansen Pole Buildings’ Designer if the engineer could send a letter or something stating it would not affect the structural integrity of the building.

And…..they finished the wall between the left shed and the main building.  The stick (stud) framed wall is supported only by the four inch thick concrete slab.  The Building Inspector told them they needed 6” of concrete as 4” was not strong enough to carry the weight of the wall.

None of these things, by the way, was communicated to our design & drafting team, so was not incorporated into the engineer sealed pole building plans.

My rule of constructing an engineered building is follow the plans exactly and you won’t have issues with inspections!!

As for the 2×10’s, they would act as floor joists with a 40 psf (pounds per square foot) live load and a 10 psf dead load (at least for their part of the action). The unknown is, how are those joists being supported at each end? It appears a 2 ply 2×12 #2 DFir (Douglas Fir) beam might be able to adequately carry the loads, provided they were attached with proper connections.

Of course no consideration has been given for the amount of extra load being transferred to the columns and down to the footings. This is no small issue – as we are talking about 4000 pounds per column of added load!

Leading to the framed wall, which I am guessing is now carrying one end of aforementioned floor joists. Which makes it a load bearing wall. Which means it requires a six inch thick concrete footing.

In the end, my recommendation was to remove all of the non-engineered changes from the building, and call for inspection again. We can’t even make “suggestions” as to a fix or any other solution – those answers need to come from the Engineer of Record, and they do not come for free.