Tag Archives: vented ridge

Knee Bracing, Flying Gable Trim, and Ventilation Needs

This week the Pole Barn Guru answers reader questions about the removal of knee bracing to install interior ceiling and wall steel, a question about a special rake trim for a flying gable, and the possibility of adding ceiling liner panels to a structure and the need for a vapor barrier and proper ventilation.

Pole Barn Knee Braces
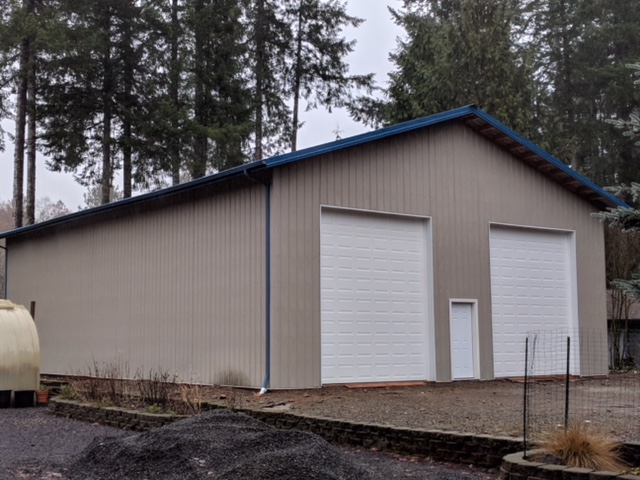
DEAR POLE BARN GURU: Can I remove my knee bracing from the pole barn and put up interior ceiling and wall steel. I have a 60×104 pole barn on an 8″ wide 4′ high concrete wall with wet set braces (6×6 laminated beams. 8′ on center) ceiling is 16′ from floor my knee bracing takes up too much wall storage space. They brought them too far down the wall. About 6′. SEAN in MONTPELIER

DEAR SEAN: While knee braces generally cause far more structural harm, than good, they should never be removed without written authorization from whomever your building’s engineer is. If your building was not engineered (hopefully it was), then you should at least request written authorization from your provider including verification their removal will not affect any structural warranty.

In this article, another person dealt with similar issues: https://www.hansenpolebuildings.com/2015/11/can-i-take-out-knee-braces/


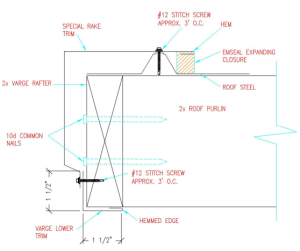
DEAR POLE BARN GURU: How do I trim out a metal ribbed roof panel on a barn with a widows peak? How do I make it match up with the rake trim? While maintaining proper drainage. KEVIN in LINCOLN

DEAR KEVIN: Your building kit provider should have had delivered to you one or more ‘special’ rake trims (one long side like a standard rake/corner trim, other flat with a hem) and some Emseal expanding closures. Here are your installation instructions: https://www.hansenpolebuildings.com/2016/05/9-steps-constructing-widows-peak/


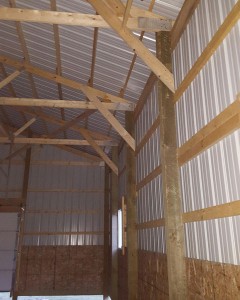
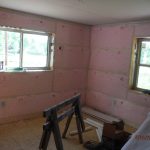
DEAR POLE BARN GURU: I have a pole barn with a scissor truss (interior sloped ceiling) at 8′ on center. The builder placed insulation between the trusses and are kept from sagging by perpendicular metal straps approximately 2′ apart. When the breeze blows into the shop, the insulation batts float up and down like waves. I was thinking of installing a metal ceiling. I am concerned about the 8′ span between trusses and the possible need for a vapor barrier. What do you recommend? GREG in HUDSON

vented-closure-stripDEAR GREG: Hopefully you have vented eave soffits and ridge cap in correct ratios as lack of ventilation or too much or too little in wrong places can cause challenges (please read more here: https://www.hansenpolebuildings.com/2018/03/adequate-eave-ridge-ventilation/).

In your Climate Zone a ceiling vapor barrier should prove unnecessary. While I would not span eight feet with ceiling liner panels, I do see it being done successfully by many builders and specifiers.


Ceiling Addition, Drywall Orientation, Ridge Vent Replacement

This week the Pole Barn Guru addresses reader questions regarding the ability to hang a ceiling addition in a Hansen Building, if it is better to hang drywall parallel or perpendicular to framing, and if Hansen can replace a ridge vent in Buffalo, NY

DEAR POLE BARN GURU: I purchased a 25′ x 35′ kit from you and was wondering if I can hang a ceiling in my pole barn? I have 11′ or 12′ trusses on center and was worried about the strength of the trusses to hold more weight. THOMAS in NEW TRIPOLI

DEAR THOMAS: Your building’s roof trusses are designed to support a five (5) psf (pounds per square foot) dead load from the bottom chords. This would be sufficient to carry 2×6 ceiling joists 24 inches on center on hangers between bottom chords, as well as 5/8″ gypsum wallboard (drywall) and blown in or batt fiberglass insulation.

Please note – in your provided photo wall girts have been externally mounted, they have been engineered to be placed bookshelf style, as externally mounted girts on 11′ and greater spans will fail due to bending and will excessively deflect. They should be removed, trimmed and placed to match engineered plans. Also – end trusses are to be notched into columns 1-1/2” to provide proper and adequate bearing. They should be carefully removed, notches cut, then properly placed.


DEAR POLE BARN GURU: I got my final inspection last week, so I have finished the workshop according to the county. Now I am working on the insulation and interior wall and ceiling finishing. For insulation, I am using R-19 craft faced batting for both walls and ceiling and might later add blown in above the ceiling to further increase the R value.

I have a question on the best orientation for the drywall for ceiling and walls. It seems that running the sheets perpendicular to the ceiling purlins and commercial girts would provide greater strength than parallel. What is your experience? I am planning on using 5/8 inch board.
Thanks, LEE in HUNTSVILLE

DEAR LEE: For best installation you will want to run drywall perpendicular to framing (e.g. vertically on walls) https://www.hansenpolebuildings.com/2019/09/11-reasons-post-frame-commercial-girted-walls-are-best-for-drywall/
Ideally, you should use unfaced insulation in your ceiling, this allows any warm moist air within your building to escape into attic space and be properly exhausted through ridge vent.


DEAR POLE BARN GURU: You’re listed as building pole barns in Buffalo, NY. I want to find someone that can replace my ridge vent that goes the full length of the building. Who do you recommend in the area and what choices do you have for a new vent for me? GARY in BUFFALO

vented-closure-stripDEAR GARY: If your steel panels are 3′ wide, with 5/8″-3/4″ high ribs every 9″ we can provide form fitted ridge closures, if so, please reach out to Materials@HansenPoleBuildings.com with your zip code and length of ridge line for pricing and availability.

Most of our clients are DIYers, should you need an installer, we would suggest your try posting in your nearest Craigslist under “GIGS”.

Vapor Barrier for a Ceiling

Reader GEORGE in LOUISVILLE writes:

“I am looking to install tin on the ceiling of my 54 X 75 pole shed. I was wondering if 6 mil plastic sheeting with all seams taped would work for a vapor barrier? My concern is not to have it rain in my building after the tin is up and the heat is on.”

Mike the Pole Barn Guru:

Well George, this answer is not going to be nearly as simple as your question.

Prevention of internal rain (condensation) is going to be a function of several aspects.

#1 Controlling source – if there is not a well-sealed vapor barrier under your concrete slab on grade, you should be planning on two coats of a good sealant for it. If you do not know if there is a vapor barrier under it or not, leave a wrench on it overnight. Next day, pick the wrench up and if there is a dark place on the floor surface where the wrench was, you have no under slab vapor barrier.

#2 Source of heat – some heat sources add significant amounts of water vapor into your internal air (propane being a prime offender). Know what you are getting into before it becomes a challenge you do not want.

#3 How are you currently controlling condensation? If your building has a thermal break between purlins and steel roof – excellent. If not, your best solution is going to be two inches of closed cell spray foam applied to the underside of roof steel. This is not an inexpensive solution, but it is more practical than removing roofing, adding a thermal break, and reapplying roofing (plus roofing never goes back on as well as it was originally installed). Plan on $4000 to $4500 for closed cell spray foam.

vented-closure-strip#4 Ventilation – you are going to create a dead attic space above an insulated ceiling. If it is not adequately vented you are going to have problems. Best combination is vented eaves and ridge. Your building will require at least 1944 square inches of net free ventilation area (NFVA), distributed equally between eave and ridge. If this is not possible (building has no sidewall overhangs), then your choice is limited to gable vents and it will take many of them to provide adequate NFVA.

#5 You are in Climate Zone 5. This means a Class I or II vapor retarder is required for the interior side of framed walls. This could be 6 mil polyethylene (Visqueen) or Kraft-faced fiberglass batt insulation. For your ceiling a plastic vapor barrier should only be installed in vented attics in climates with more than 8,000 heating degree days. In Nebraska, heating degree days for a normal year is 6322.

Barndominium: One Story or Two?

Barndominium: One Floor or Two?

Welcome to an ongoing debate about whether it is more cost effective to build a one story or two story barndominium. Commonly I read people advising two stories is less expensive than a single story. Reader TODD in HENNING put me to work when he wrote:

“I’m curious why “Going to multiple stories will be more expensive than building the same amount of finished square footage on a single level”? Everywhere I read it says it’s cheaper to go up than out. For example wouldn’t there be more cost with bigger footprint of concrete, in-floor heating, roof trusses, and more steel on roof? Thanks.”


Mike the Pole Barn Guru writes:

It turns out Todd has requested a building quote from Hansen Pole Buildings, so I was able to work scenarios from his requested 40 foot wide by 48 foot long scenario. I arbitrarily merely doubled his building length when looking at a single story. It may have been more cost effective to have done this exercise by going greater in width and less in length (as one gets closer to square, there is less exterior wall surface to side, insulate and drywall).

Included were colored steel roofing and siding, commercial bookshelf wall girts to create a wall insulation cavity (https://www.hansenpolebuildings.com/2011/09/commercial-girts-what-are-they/), dripstop/condenstop under roof steel to minimize or eliminate condensation (https://www.hansenpolebuildings.com/2017/03/integral-condensation-control/), ceiling loaded energy heel trusses (https://www.hansenpolebuildings.com/2012/07/raised-heel-trusses/) with ceiling joists for sheetrock, 24 inch enclosed vented overhangs, vented ridge and one entry door. In the two story version I added floor trusses and a four foot wide set of stairs.

In order to maintain eight foot finished ceiling heights, two stories requires a 21 foot eave and single story 10 foot. Engineered plans and delivery were included.

I did not include materials for a bearing wall at the floor truss center. Features listed above ran roughly $6000 more to go two floors. Also, with the two floor version, you will lose 50 square feet of usable floor on each level due to stairs.

In this particular instance best overall buy could come down to what you pay for your slab and in-floor heating. Labor to erect a single story will be less expensive (I would predict at least a $3000 difference). Some other thoughts – two story has 1/2 as much attic insulation and 45% more wall insulation. Two story (excluding interior walls) has 30% more wall to drywall. This added exterior wall surface will likely result in more windows.

Personally, I own three multiple floor post frame buildings, these are my considerations:

Accessibility roughly 10% of all Americans will spend time in wheelchairs in their lifetimes. My wife is a paraplegic and we cannot get into one of her son’s homes because it is a split entry. Two of her other sons have built ramps for her, but they also have multi-story homes and it greatly limits areas she can have access to. In our own shouse (shop/house), we added an elevator after her injury (elevators are NOT cheap).

Stairs in general – you are probably much younger than my 62 years, going up and down stairs gets to be a chore as we age.

Heating and cooling – unless each floor is on their own system, one floor is always either too cool or too warm. I put one of my own buildings on two separate heat pumps for this very reason.

In conclusion, whether one story or two, go with what best fits your wants and needs and your property. Love what you build and it will result in a happy ending.

Post Frame Condensation and Insulation Challenge

Solving Yet Another Post Frame Condensation and Insulation Challenge

Long time loyal readers will sigh as yet another post frame building has been erected without thoughts to how to properly insulate and control condensation. Had our new friend invested in a Hansen Pole Building, chances are good we would not be having this question and I would have had to write about something else today! Our Building Designers follow with these recommendations: https://www.hansenpolebuildings.com/2019/11/post-frame-building-insulation/.

Our new friend COREY in POST FALLS writes: 

“I have a 36×48 pole building with trusses on 12’ with BCDL 5psf, the roof is plywood sheeted with composition roofing with ridge vent and gable vents. The wall Purlins are on the exterior of the poles and there is no vapor barrier. I would like to install a ceiling with insulation and insulate the walls. I am looking for vapor barrier and insulation recommendations. Was thinking of installing 2×4 on 24 centers to bottom of trusses and installing OSB and blown in insulation, and then framing in between poles adding batt insulation and sheeting with OSB, but am unsure of controlling vapor. Thank you.”

Mike the Pole Barn Guru responds:

Small world, many years ago I graduated from Post Falls High School!

A vented ridge relying upon gable vents as an air intake is usually very inefficient. You should make sure your vents in each end are located in the top half of your attic and have at least 415 square inches of net free ventilating area on each end. This means you are probably going to have to add more vents. Effective ventilation of this area is essential to preventing mold and mildew in your attic.

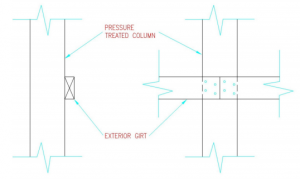
Wall girts flat on column exteriors are inadequate to carry imposed loads and will not meet deflection limitations. I would suggest you reinforce each of them to create either an “L” or a “T”. Assuming you have 6×6 wall columns, you could place a 2×8 bookshelf style girt on top or bottom of each girt, nailing through 2×8 into existing girts with a 10d common nail at say 12 inches on center. This will create an insulation cavity and allow for easy interior finish.

For ceiling joists between your trusses, 2×4 will not be adequate you should use 2×6 #2 with joist hangers on each end.

Unless you have a Weather Resistant Barrier (https://www.hansenpolebuildings.com/2016/01/determining-the-most-effective-building-weather-resistant-barrier-part-1/) between framing and wall steel, my recommendation would be to have two inches of closed cell insulation spray foam to the inside of wall steel. Then fill balance of wall cavity with BIBs insulation: https://www.hansenpolebuildings.com/2011/11/bibs/ with a well sealed vapor barrier towards the inside space.

A Free Post Frame Building Critique

A Free Post Frame Building Critique

I am going to offer a free critique of this post frame building.

From a design aspect, I wouldn’t consider investing in a residential (or residential accessory) post frame building without overhangs. Not only do they make buildings look far less industrial, they also afford weather protection above doors and push runoff or slide off away from walls. With overhangs building walls stay cleaner and large snow piles sliding off roof are far less likely to dent siding and overhead doors.

Enclosed overhangs, in combination with a vented ridge, provide for adequate air flow from eave to ridge to assist in preventing condensation. 

Note there is a very small space between top of overhead door openings and roofline. This means these particular overhead doors will need to have low headroom tracks in order to open. In many cases this precludes an ability to have a remote garage door opener. Low headroom also tends to not open as smoothly. Certainly it would be impossible to have a ceiling installed at a future date (provided trusses were loaded to be adequate to support extra ceiling load).

For virtually no extra cost, overhead door openings could have been dog-eared – a 45 placed in opening upper corners. This makes building again look more like it fits in one’s backyard, rather than an industrial park.

Look at wall bottoms. There is maybe two inches of pressure preservative treated splash plank showing. Due to this, when entry door landings or aprons in front of overhead doors are poured, to avoid having concrete poured against steel siding, there will be a significant step. There is also no base trim (aka rat guard) at the base of walls to stop critters from venturing in through steel siding high ribs.

It is very easy to see nearly every roof and wall steel panel overlap. When properly applied, these laps should not show. This is a craftmanship (or lack thereof) issue.

Missing from sidewall tops is any sort of trim. Even though steel siding and roofing is manufactured (in most cases) on machines with computer controlled cutoffs, there is some slight variance. This variance is going to show either at the base of walls, or at the top. By having trim at wall tops, any slight differences can be hidden.

Structurally – wall girts flatwise on column outsides on spans such as these fail due to not meeting Building Code deflection limitations. https://www.hansenpolebuildings.com/2012/03/girts/

All of these items mentioned above would not be an issue with a new Hansen Pole Building. We seriously lay awake at night thinking of ideas to prevent clients from making crucial mistakes – we want to avoid you owning a building you will hate forever! 

Looking for a building done right? Call 1(866)200-9657 to speak with a Building Designer today – call is free and there is no obligation or charge!

Reader Put Up a Competitor’s Shed

We Put Up a Competitor’s Shed

Sadly not everyone does adequate research to realize how outstanding of a value added a Hansen Pole Buildings’ post frame building kit package truly will be. Long time readers of these blog articles (nearly 1600) and questions answered in Monday’s “Ask the Pole Barn Guru™” column (around 1000) have come to understand most problems solved by me come from other people’s buildings.

How serious am I about our value:
I am offering to shop for you. Yes you heard me right. You give me up to three names of competitors to Hansen Buildings, where you can purchase a complete wood or steel framed pole building kit package, and I will shop them to get quotes for you.
Now I say three, because frankly, some people just are not very prompt or cooperative when it comes to getting back with price quotes.

Why would I do this? Comparing “apples to apples”, I know our price will beat theirs, every single time. I am doing this for your peace of mind. I guarantee other prices will be higher. And I will provide you with documentation to prove it!

There is a catch…..before I go shopping, you have to place your order for your new Hansen Pole Building kit….. subject to me “proving my point” by going shopping. Your payment to us will not be processed for ten calendar days. Within seven days of order, you’ll have competitive quotes in hand, or my documentation of having hounded them every week day for a week trying to get pricing for you (seriously, if you have to hound someone for a price, what kind of service will you get after they have your money?).

After I email you proof, if you seriously want to purchase from one of these competitors, just let me know before ten days from your investment and we tear everything up and go away friends.

Ask The Pole Barn GuruReader DAVE in ROBERTS apologizes for buying from a competitor and writes:
“Sir. Your blog has been most helpful. We put up a shed not one of yours but a competitor. (sorry). Shed size is 36×48. First mistake was we did not put a barrier under the concrete. Our plan now is R 19 in walls. One inch of foam plus R 39 in ceiling. I wired in two ceiling fans to move air with natural gas heat. Does this sound like a good formula, oh wise one?

Mike the Pole Barn Guru says:
Start by sealing your building’s concrete slab. This will be a possible solution: https://www.hansenpolebuildings.com/2018/11/siloxa-tek-8505-concrete-sealant/.

I am just not a fan of natural gas heat as it adds a tremendous volume of water vapor into your building. You’re going to have to find a way to exhaust all this water, else your building will have humidity issues.

Although now too late for you, there would have been alternatives: https://www.hansenpolebuildings.com/2016/12/modern-post-frame-buildings-geothermal/.

Let’s discuss your ceiling. I am hopeful you have trusses designed to support a ceiling load of five psf (pounds per square foot) or greater. Also hoping you have ventilation covered with enclosed vented eaves and a vented ridge. Unless you specifically asked for it, your building’s roof trusses probably do not have raised heels to allow for full insulation thickness above walls and in area closest to sidewalls.

Provided your trusses will support weight of gypsum wallboard, install any necessary framing to reduce drywall spans to two feet or less. Place 5/8” Type X sheetrock across bottom of ceiling framing. If you do not have a vapor barrier under your roof steel, spray two inches of closed cell foam insulation across the entire underside. Once you have paid for this, you will regret not having made other condensation prevention decisions.

While spraying foam – have it added to area closest to eave sidewalls (spraying onto top of ceiling drywall). Make certain to leave an inch of airspace minimum above foam, so air can flow in from eave vents. Foamed area should continue towards center of building until it reaches at least a six inch thickness. Balance of ceiling should have no less than R-45 and ideally R-60 of fiberglass insulation blown in.

For walls, I am hoping you have placed a Weather Resistant Barrier (WRB – like Tyvek) between framing and siding. If not, you have a couple of choices. You can remove wall steel from a wall, install a WRB and reinstall steel (repeat for each subsequent wall), or spray two inches of closed cell foam to inside of siding. Unless your building has full thickness bookshelf girts, install framing across inside of walls to eventually support wall finish (I recommend sheetrock). Fill entire insulation cavity with BIBs https://www.hansenpolebuildings.com/2011/11/bibs/.

Glue two inch thick closed cell rigid insulation panels to inside of wall framing, sealing all joints. Glue sheetrock to inside of insulation. Now you have a truly well insulated post frame building.

The Drip, Drip, Drip of Condensation

Reader JIM in HOODSPORT writes about condensation issues:

“New Completed 40’ x 60’ pole barn with 16’ side walls and 24’ peak. Walls and ceiling insulated, 60’ long ridge roof vent. Full cement Pad with plastic vapor barrier under it. Cement was 60 days old when barn was completed.. rained just about every day. No windows or vents, using for RV storage and Shop. 2 – 12’x14’ roll up doors. 1 entry door. Will eventually have some sort of heat and ceiling fans installed.

Live in Hoodsport, Wa. Very near Olympic Mtns.

Issue is that the barn does not want to dry out … getting condensation on ceiling insulation…had contractor come out and clear out excess insulation that may have been blocking vent and make sure ridge is secure and no blowing rain can get in….had entire roof check for holes…

Still dripping..thought the vent and insulation would take care of the issue?

Afraid if I start putting vents all over the place I would be wasting the heat while I work in shop.

On a warm day should I open doors and get large fans and vent area of excess moisture? Get heaters in to dry out? Don’t propane heaters put moisture in the air?

Please Help…”


The short term solution is to open up the overhead doors and leave them open until it dries out.

Why you have the problem – your concrete floor is poured over a vapor barrier (excellent choice), however it does not allow any moisture to escape into the ground. You have a vented ridge, which will not work as it needs an air intake in order for air to escape from it. Your building should have had enclosed vented soffits – which would have allowed for airflow in at the eaves and out at the ridge.

Now – let us address the bigger and long term problem – you want to heat this building. As it stands currently, you might as well just put a heater out in the yard and expect it to warm your building. The “insulation” you have is nothing more than a condensation control blanket – it has an R value right close to absolute zero every time it crosses a wall girt or roof purlin. If your plan is to try to take the chill off a bit for an hour or two using a space heater, then you might as well plug up the ridge vent, which isn’t working anyhow.

If you want to be able to do a decent job of heating, you have some work to do.

First, get an engineered repair to upgrade your roof trusses to support at least a five psf (pounds per square foot) ceiling load. This can be obtained at a nominal charge from the company which manufactured your trusses.

Second, remove all of the wall steel. Take off the condensation control blanket in the walls and throw it away.

Third, install enclosed soffits with level returns on the eave sides. This will entail having to shorten the wall steel and adding some framing. Now the ridge vent will actually work. Put housewrap (think Tyvek) on all of the walls and reinstall the wall steel.

Fourth, after repairing the trusses, install ceiling joists between the trusses (2×6 #2 every 24 inches with joist hangers), install 5/8″ drywall on the underside and then blow in 15-20 inches of fiberglass insulation, making sure to allow at least an inch, if not two, of clear air flow at the eaves so you do not block the vents. This will mean a lesser R value at the sidewalls. You could have four inches of spray foam insulation placed on top of the drywall in the two feet closest to each sidewall, which would help.

Lastly the walls – fill the insulation cavity completely with unfaced insulation, cover with 6 mil clear visqueen, then gypsum wallboard.

Oh, another sidebar, please check the engineered truss drawings for your building – there may be some truss web bracing which is missing, most likely on the diagonal webs going up from the bottom chord at the center of the trusses.