Tag Archives: visqueen

Vapor Barrier for a Ceiling

Reader GEORGE in LOUISVILLE writes:

“I am looking to install tin on the ceiling of my 54 X 75 pole shed. I was wondering if 6 mil plastic sheeting with all seams taped would work for a vapor barrier? My concern is not to have it rain in my building after the tin is up and the heat is on.”

Mike the Pole Barn Guru:

Well George, this answer is not going to be nearly as simple as your question.

Prevention of internal rain (condensation) is going to be a function of several aspects.

#1 Controlling source – if there is not a well-sealed vapor barrier under your concrete slab on grade, you should be planning on two coats of a good sealant for it. If you do not know if there is a vapor barrier under it or not, leave a wrench on it overnight. Next day, pick the wrench up and if there is a dark place on the floor surface where the wrench was, you have no under slab vapor barrier.

#2 Source of heat – some heat sources add significant amounts of water vapor into your internal air (propane being a prime offender). Know what you are getting into before it becomes a challenge you do not want.

#3 How are you currently controlling condensation? If your building has a thermal break between purlins and steel roof – excellent. If not, your best solution is going to be two inches of closed cell spray foam applied to the underside of roof steel. This is not an inexpensive solution, but it is more practical than removing roofing, adding a thermal break, and reapplying roofing (plus roofing never goes back on as well as it was originally installed). Plan on $4000 to $4500 for closed cell spray foam.

vented-closure-strip#4 Ventilation – you are going to create a dead attic space above an insulated ceiling. If it is not adequately vented you are going to have problems. Best combination is vented eaves and ridge. Your building will require at least 1944 square inches of net free ventilation area (NFVA), distributed equally between eave and ridge. If this is not possible (building has no sidewall overhangs), then your choice is limited to gable vents and it will take many of them to provide adequate NFVA.

#5 You are in Climate Zone 5. This means a Class I or II vapor retarder is required for the interior side of framed walls. This could be 6 mil polyethylene (Visqueen) or Kraft-faced fiberglass batt insulation. For your ceiling a plastic vapor barrier should only be installed in vented attics in climates with more than 8,000 heating degree days. In Nebraska, heating degree days for a normal year is 6322.

A Real Life Climate Controlled Post Frame Wall

Reader BRANDON in WICHITA writes:

“Hello Mike!  I am in the engineering field and we are just about to put up a personal climate controlled post frame building.  I have followed many of the teachings of Dr. Lstiburek on wall and roof assemblies.  I also enjoy your very detailed write ups.  I am conflicted in our assembly a bit.  Most builders here install a thin (1/8″) foam product with Aluminum foil towards the outside to act as a vapor and radiant barrier between the metal sheathing and wood frame.  That seems well and good if no additional layers are added to the wall/roof assemblies.  However, many quickly learn about the false and ridiculous R value claims of these products and add more insulation later.  Usually glass batts.  This largely concerns me because there is always another air/vapor barrier faced on the batts that would be in the interior, which creates a double vapor barrier.  

Due to this, and realizing it is nearly impossible to totally eliminate ‘some’ condensate from forming on the underside of the sheathing, we were going to use Typar house wrap on the walls AND roof between the sheathing and purlins/girts.  The product has a perm rating of about 11.  What we are targeting is an ‘air’ barrier, that is liquid proof, but still has ‘some’ permeability since some vapor would eventually get in the cavity and we need a way for it to escape.  Our assembly would follow up this building wrap with unfaced glass batts to roof/walls, then covered with the same reinforced white facing they typically use that is a vapor/air barrier and has an aluminum facing towards the outside.  

One issue faced here is the big question about climate!  Our state, as with many, have both hot/humid summers AND cold dry winters.  

I am not an advocate of Typar but selected it due to it’s toughness during install, and very low perm rating.  Not to be confused with big box store ‘generic’ wraps which are just perforated plastic! 

I have a test piece sitting with water on it right now on a paper towel and after hours, it still has not penetrated the product.  Our intention with its use is to create an air barrier on the outside as all the metal seams and corrugations can create wind washing through the glass batts, and to shed water droplets.

Your thoughts would be greatly appreciated!  We have the columns currently up so a timely response would great!”

Thank you for being a loyal reader. Your views on usage of Radiant Reflective Barriers for wall applications are spot on. Other than if people are 100% certain they will never, ever add insulation to their walls (and who can be certain about future building users/owners?) it is just an incorrect product to be used. A good, well-sealed Weather Resistant Barrier would be appropriate to use, followed by filling your insulation cavity with unfaced batts. For interior face, there is really no benefit to going to the expense of an aluminum faced product. A well-sealed 6mil clear visqueen will do everything you need it to do.

For more information on this subject, please read my Ultimate Guide to Post Frame Building Insulation https://www.hansenpolebuildings.com/2019/11/post-frame-building-insulation/.

Stilt Home Barndominium

Stilt Home Barndominium

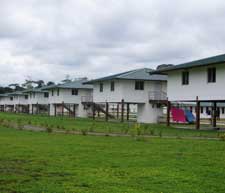
For many challenging building sites (those with grade change, in flood zones or close to oceans or seas) stilt homes are a viable and practical design solution for barndominiums.

Reader DAVID in EMINENCE writes:

“We are planning to build in southern Missouri a 30′ x 36′ x10′ post frame home on a rocky slope terrain. We want it on stilts. It would be 3′ on one end and 7′ on the other end approximately. We are planning to put reflective bubble wrap on the floor joists with the subfloor on top then place down rock wool and another subfloor on top. We have 99% humidity most of the year (10 months for sure), lots of rain. We do not want a crawl space; we know the horrors of the crawl space. We may enclose the high end using a simple temporary enclosure to dry it out as needed. We are going to use a mini split heating system and composting toilets. No worries about placement of the utilities and pests. Would this be a sound construction system?

We would like to know your viewpoint on this since you are the wise guru.”

Mike the Pole Barn Guru writes:

Thank you for your kind words. Stilt houses are very easily done using post frame. I have a post frame combination garage/studio apartment/office at our home near Spokane, Washington on 14 feet of grade change and built it as a stilt building. Has been great for going on 30 years and would have been the only practical way to build on this site (for extended reading on stilt houses: https://www.hansenpolebuildings.com/2017/09/stilt-houses/).

Not sure why you are considering two layers of subfloor. I would be inclined to use either steel or an exterior rated sheathing product on the underside of my joists (with a Weather Resistant Barrier between). Rock wool is a good choice for insulation between joists as it is not affected by moisture. Place a vapor barrier on top of joists and then your subflooring. A radiant reflective barrier (bubble wrap) can be used as a vapor barrier, but will not provide any benefits you wouldn’t get from well-sealed visqueen – and would be far more expensive.

Ceiling Vapor Barriers in Post Frame Construction

Ceiling Vapor Barriers in Post Frame Construction

A ceiling vapor barrier or no, in post frame (pole building) construction? Good question.

For most of my life I have lived where it tends to get chilly in winter. Here in Northeast South Dakota it can not only be chilly, but downright frigid. It has been drummed into my head for decades to never have a vapor barrier between a conditioned area (think heated) and an attic space above.

Well, there are some instances where, when considering proper modern construction practices, this will not be a best answer. Because I learn new stuff every day – this may contradict some prior advice I have given.

Credit to reader STEVE in DEXTER who piqued my interest when he wrote:

“I am adding a tongue and groove cedar plank ceiling to a heated room in my pole barn. I am attaching the planks directly to the bottom of trusses. Should I have a vapor barrier between the planks and the blown in insulation. I am concerned with air/dust /dirt leakage between the planks. I am considering putting up Poly or tyvek.”

Mike the Pole Barn Guru responds:

Plastic vapor barriers (Visqueen) should only be installed in vented attics in climates with more than 8,000 heating degree days. You can calculate your own heating degree days for free here: https://portfoliomanager.energystar.gov/pm/degreeDaysCalculator.  Vapor retarders (kraft faced insulation, or gypsum wallboard with latex ceiling paint) should be used in all other climates except hot humid or hot dry climates. In hot humid climates, attics should not be vented and vapor retarders should not be installed upon interior of assemblies. In hot dry climates a vapor retarder should also not be installed, but attics can be vented.

All vented and unvented attics should have an air barrier (such as MemBrain™ or Intello® Plus) regardless of climate.

Controlled mechanical ventilation should be used to control and limit interior moisture levels in severe cold, cold and mixed climates, as well as to limit other interior contaminants in all climates. In other words, all conditioned post frame buildings require controlled mechanical ventilation in order to “breathe”. This necessary air change should not happen via construction of a leaky attic ceiling (or leaky walls) and installation of attic vents. Hence requirement for an air barrier and controlled mechanical ventilation in all conditioned post frame buildings regardless of climate.

Some moisture load in conditioned post frame buildings can be relieved via diffusion (hence a vapor retarder in a ceiling rather than a vapor barrier) through a roof assembly able to handle it (example – a vented attic in a moderately cold climate or mixed climate). Understand these are climate specific recommendations. In a well-insulated attic in a severe cold climate (more than 8,000 heating degree days) not enough heat loss occurs into an attic from conditioned post frame building to allow attic ventilation to remove much moisture. Attic ventilation requires heat loss to remove moisture from attics. Cold air can’t hold much moisture. Ventilating a heavily insulated attic with outside air in real cold weather does not remove moisture. We do not want any moisture in an attic in a severe cold climate for this reason. In not so miserably cold locations this changes, leading to a recommendation for a vapor barrier in severe cold climate and only a vapor retarder in most other locations.

In olden days, in severe cold climates, when attics were poorly insulated, it was okay to omit a ceiling plastic vapor barrier. Heat loss from building warmed the attic sufficiently to allow attic ventilation to remove moisture from the attic. Cold outside air was brought into attic and warmed up by escaping heat loss giving this air capacity to pick up moisture. Attic moisture was then picked up and vented to exterior. This approach worked great until large quantities of attic insulation were added. With added insulation, attic and ventilating outside air both stayed cold unable to effectively remove attic moisture. Hence a need to reduce moisture flow into the attic and add a vapor barrier.

One other complication needs to be stated. Vapor moves two ways, by diffusion through materials, and by air leakage through gaps and holes in building assemblies. Between these two, air leakage moves far more moisture than vapor diffusion. A vapor barrier in an attic assembly in a severe cold climate in absence of an air barrier will likely be ineffective. Conversely, an air barrier in absence of a vapor barrier can be effective. We complicate things when we install plastic in ceilings and assume it provides an air barrier. For plastic to be an air barrier it needs to be continuous.


Plastic Under Roof Steel?

Plastic Under Roof Steel?

Reader Loren is persistent, he wanted to ask a question in regards to placing plastic under roof steel to prevent condensation, however the wonderful world of technology was making it a challenge. Thinking – Loren emailed me directly.

Here are Loren’s own words:

“I’ve been trying to submit a question to the pole building guru for a while now with no success. Website keeps saying ‘invalid form’?  So, I was hoping this email could find its way to Mike, I’d really like for him to weigh in on it. Thanks!

I’ve been scouring your blog for weeks now looking at how to handle water vapor and condensation in my soon to be garage. I know to use Tyvek or similar between the metal siding and purlins, my question is in regards to the roof. I plan to insulate the ceiling (most likely blown in) in the next year or two, so would a good heavy plastic (6 mil) between the roof metal and purlins work for my moisture barrier rather than the foil bubble insulation?  Since I’ll have a finished/insulated ceiling and a well vented attic I was hoping to skip the insulative properties of the foil bubble and go straight plastic. Will that work in my case?  Or would this even be a good application for the felt backed roof metal?  I’ll also lay a well sealed plastic barrier under my slab. Thanks for all of your help via previous posts, just couldn’t find anything about using plastic under roofing.  I’m trying to build this garage the right way, but also keeping budget in mind. Thanks again!”

Mike the Pole Barn Guru responds:

Technology is great, when it works. Thank you for the heads up on the error message, our IT team is working on a fix now.

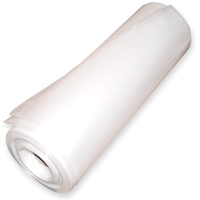
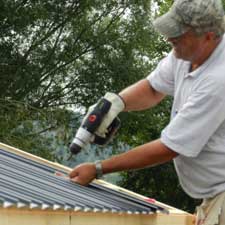
Plastic (visqueen) under your roof steel will not solve the condensation challenges. Instead you will have condensation on the underside of the visqueen. (to read up on the history of Visqueen and why not to use it under wall steel: https://www.hansenpolebuildings.com/2013/07/moisture-barrier/)  In order to minimize (or ideally eliminate) potential condensation it requires airflow (vented eaves and ridge being the best combination) as well as a thermal break. While a reflective radiant barrier (aka – foil bubble, which is NOT insulation no matter how hard someone tries to convince you) will do the job as long as it has properly sealed overlaps and will be very cost effective, if it was my own building I would be looking at felt backed roof steel (Condenstop or Dripstop) due to the ease of installation.

For more information on Condenstop: https://www.hansenpolebuildings.com/2014/07/condenstop/.

Make sure to order trusses with raised heels, so you get the full attic insulation thickness across the entire ceiling. Take desired R value, divide by three and add two to get the height of the truss heels.


Retro Insulation, Cost of a Hipped Roof, and Slab Prep!

Today Mike the Pole Barn Guru answers questions about Retro Insulation, Cost of a Hipped Roof, and Slab Prep!

DEAR POLE BARN GURU: Retro Pole barn wall insulation: should a person put plastic or some sort of vapor barrier against outside tin on interior, then put fiberglass blanket up? Which Is a better option faced or unfaced (do you need a moister barrier on interior between unfaced and wall material? Thanks MIKE in PALYMRA

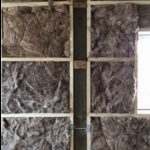
DEAR MIKE: You should remove the wall steel, a wall at a time, placing a well sealed quality building wrap (like Tyvek) over the wall framing – then reinstall the steel siding. Use unfaced fiberglass blanket insulation, thick enough to entirely fill the wall cavity, then a 6mil clear visqueen vapor barrier on the inside before installing the gypsum wallboard on the interior. Make sure to tape all seams, tears or rips in the visqueen.


DEAR POLE BARN GURU: I have a quick question. I am wanting to build a 40 x 60 shop. It will be cheaper to build it pole barn style but one of the contractors I was going with said if I wanted to do a hip style roof I would be better off stick framing it. Is this true? Is it really that much more to do hip roof. He said it doesn’t work well with post framing. Another contractor said they can do it and it will only be $3800 more to order hip roof trusses. I don’t know what to think. Thanks for your time. PRESTON

DEAR PRESTON: I hate to break this to you, but contractor number one is clueless – post frame (pole barn) style is going to be less expensive than stick frame, for a full hipped roof (or any roof style). The $3800 more for a set of hipped roof trusses sounds fairly steep unless you are somewhere with a significantly high snow load. My recommendation – order a fully engineered post frame building kit package and then have a competent contractor assemble it for you (or save some real money and assemble it yourself).
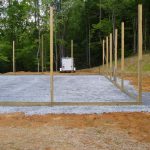
 

DEAR POLE BARN GURU: Sand or crushed concrete under slab in pole barn? RON in LEONARD

DEAR RON: Prior to pouring, 2” to 6” of clean and drained sand or sandy gravel is spread below where concrete is to be poured. Mechanically compact fill to at least 90% of a Modified Proctor Density, so as not to cause slab to sink. Install a good vapor barrier below any interior pour, to stop moisture from traveling up into slab through capillary action. Place 3” to 4” of clean and drained sand on top of the vapor barrier, to decrease differential drying shrinkage and floor curling. This sand over the vapor barrier will facilitate water drainage during curing time and accelerate installation.


Spray Foam Insulation with Dupont Tyvek House Wrap

Hansen Pole Buildings Designer Rachel asked me about this today:

“I have more and more builders say they put Tyvek® on the walls and roof and then spray foam.  This is so they can replace the siding/roofing in the future.  Do you find any downfalls with this?  I thought this was a pretty good idea.”

Having just written an article about spray foam insulation (https://www.hansenpolebuildings.com/2016/07/advantages-spray-foam-over-batt-insulation/), this is a well timed question.

Tyvek and all house wraps are NOT (I repeat NOT) vapor barriers. They are weather barriers: https://www.hansenpolebuildings.com/2016/01/determining-the-most-effective-building-weather-resistant-barrier-part-1/.

Spray-Foam-Insulation-150x150
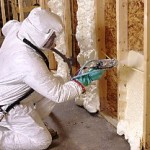
In doing my research on the whys and why-nots I found apparently there are some spray foam insulation contractors who will not spray foam against house wraps, apparently from not being able to guarantee their product would properly adhere to the house wrap.

In one particular case – the spray foam insulation contractor tried to persuade the client to use BIBS® insulation (read about BIBS® here: https://www.hansenpolebuildings.com/2011/11/bibs/) due to the potential adhesion issues.

There apparently is an adhesive additive for spray foam, which will assist in the foam being able to stick to house wraps or other slick surfaces.

As closed cell spray foam is a vapor barrier, and is resistant to moisture passing through it in either direction, adding a weather barrier to the outside becomes redundant.

If the idea is to use a product to allow for easy residing or reroofing, then a product such as clear visqueen (https://www.hansenpolebuildings.com/2013/07/moisture-barrier/) might prove to be as effective, as well as less costly than a weather barrier. This is, of course, providing the spray foam installer is willing to spray over it.

As a good, high quality steel roofing and siding should last the life of the building – installing any product between it and the siding, under the premise of making future replacement easier, it sounds much more like someone trying to make a feature into a benefit, than it does something which will add value to the client as a benefit!

Moisture Barrier: A Bad Place for Plastic

Eric, one of the owners of Hansen Buildings, was chattering with me today about the number of interesting telephone calls he fields. Many of these are probably due to this blog, as well as “Ask the Pole Barn Guru” – the weekly advice column for those with pole building questions, concerns, or who just are looking for free therapy.

A gentleman had recently erected a pole building, and placed six ml (0.15 millimeter thick) clear plastic visqueen as a vapor barrier between his sidewall girts and wall steel.

clear-plastic-wrapVisqueen is a brand of polyethylene plastic sheeting produced by British Polythene Industries Limited, and has become a generic description for any plastic sheeting (think Kleenex). Because I know lots of near worthless trivial information, it is important to know Visqueen was first produced about 1950 by the Visking Corporation, a company founded in the 1920s by Erwin O. Freund for the purpose of making casings for meat products. Visking investigated the post-World War II emerging technology of polyethylene, and developed manufacturing techniques to make pure virgin polyethylene film. Originally spelled VisQueen, the film is an excellent moisture barrier and was marketed to many industrial, architectural, and consumer applications, such as moisture barriers, plant seedbed protection films, building fumigation barriers, drop cloths, case liners, and tarpaulins.

Anyhow, in the application above, there isn’t any problem….until the building owner wants to insulate the building walls, then place another vapor barrier on the inside of the walls.

Every Fall, when I was a youngster, my grandmother would make massive quantities of apple sauce, at their lake cabin. All of the wonderful smelling boiling concoction put lots of water vapor into the air of the kitchen. When this warm moist air met the nice cool window glass, it became condensation. The same happens with any surface or material which stops vapor. For example, the painted surface of the drywall will also prevent most moisture from passing through …. which is why higher gloss paint is used in kitchens and bathrooms. If the drywall were not painted, the moisture / vapor would simply absorb into the drywall material. So think of the paint as a type of moisture barrier to protect the drywall.

But vapor can occur even without obvious introduction of moisture into the air. Wherever warm air meets cold air there will be a high concentration of vapor in the area. So wherever the vapor barrier is placed in a wall is where the condensation will occur.
Think of it as a cold and warm weather front meeting inside a wall …. and the forecast is rain.

The condensation held by the vapor barrier will eventually go back into the air once the volume of vapor decreases. This is allowed to happen only if there is good ventilation on both sides of the barrier.

Vapor will penetrate any material in its way until it hits a barrier, this is why it is important to position vapor barriers on the warm (inside) side of walls. When warmer air meets colder air condensation will develop. Imagine the damage to insulation if the barrier was on the outer side of the insulation? Warm air (and/or moisture) would create condensation on the vapor barrier which would eventually absorb into the insulation causing all kinds of water damage and possible mold growth.

Our friend would have been so much further ahead by having used a house wrap between the wall girts and the steel siding, as house wrap is permeable (it allows excess moisture to pass through).

My expert advice would be to slice holes in the visqueen to allow any accumulated moisture to pass through.