Storage of Steel Roofing and Siding at the Job site
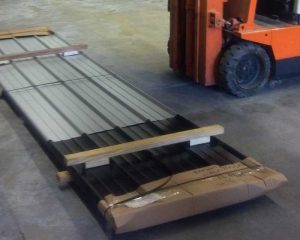
All steel roofing and siding panel bundles are inspected and approved by manufacturer’s quality control inspectors before shipment. Inspect panels for any moisture content or shipping damage upon delivery and advise the materials carrier immediately.
Bare (non-painted) Galvalume sheet, like galvanized, is subject to wet storage staining and turns gray to black if moisture is trapped between coil laps, cut length sheets, or roll formed parts during shipping and storage. Steel mills treat Galvalume sheet to delay wet storage staining; however, take precautions to keep Galvalume sheeting dry at work site.
Jobsite storage of steel building panels (provided by Building Products Technical Committee of National Coil Coaters Association):
Two Rules to Live By:
1) Keep job site storage time to a minimum with proper scheduling
2) Keep panels dry.
“Moisture trapped within panel bundles can cause the finish to soften and become more susceptible to erection handling damage. Panels stored wet for extended periods in humid conditions will oxidize (rust). Such damage is avoidable with proper planning and practice.
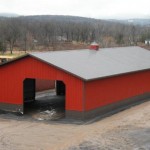
 Panel bundles should be stored under a roof or at least, out of direct sunlight. Bundles should be slanted at an angle [from end to end] sufficient to facilitate drainage and high enough off the ground for good air movement all around. Do not use tight-fitting plastic-type tarpaulins as panel bundle covers. While they may provide protection from heavy downpours, they can also delay necessary ventilation and trap heat and moisture causing the so-called “greenhouse effect” that accelerates corrosion. Long panels must have additional support to prevent sagging and potential water accumulation in the sag.
If panel bundles arrive wet or become wet at the job site, break them open and allow them to dry completely.”
When moisture is found, besides breaking apart bundles, drain each panel and wipe dry. After dried, carefully re-stack panels and loosely recover allowing for ample air circulation.
Extended panel storage in a bundle is not recommended. Prevent bundled sheets from being in contact with accumulating water. Under no circumstance store sheets near or in contact with salt water, corrosive chemicals, ash, or fumes generated or released inside a building or nearby plants, foundries, plating works, kilns, fertilizer, and wet or green lumber.
Steel Roofing with Condenstop or Dripstop And Jobsite Storage
Warning: Storing panel bundles prior to installation could allow moisture to become trapped between panels and may cause damage to panels. This moisture can originate from a variety of sources such as rain, high humidity or condensation. Panels should be stored in a dry location and installed as quickly as possible when arriving at the job site to prevent damage. If this is impossible, proper consideration should be given to separate panels to allow for air circulation prior to installation. Allowing moisture to become trapped within panel bundles can void all panel warranties.
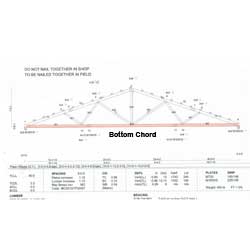 DEAR LYNNE: Transportation can often be a limiting factor. In order to avoid pilot cars and over width permits, maximum truss height is limited to 102″ (8’6″). A 50′ span, 4/12 slope truss will normally be roughly 108″ tall, plus any overhang “tails”. So, this would entail an over width permit. Now most truss companies purchase year-long over width permits for their trucks, so this cost is negligible. Most states do not require pilot cars, unless loads are 12 foot or greater in width. This allows for 60 foot span trusses to be hauled without expensive pilot vehicles. As to procurement, while you will pay more per lineal foot of truss as spans increase, you will also need fewer trusses. For an agricultural building, I always encourage clients to build as large as they can economically justify and have space to build on, as it will never be too big. Keeping your building length to three times building width will also help with your budget, as these ratios are typically within shear load carrying capabilities of properly fastened steel roofing and siding.
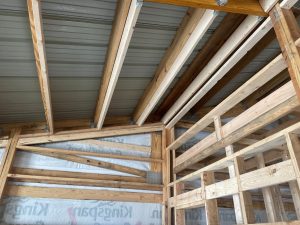 DEAR POLE BARN GURU: Building a 50x36x12 pole barn with 4:12 roof pitch. Attic space will be unconditioned with blown in cellulose insulation in ceiling and batten on walls. Attic will be vented with soffit and ridge vent. Walls will have exterior house wrap under metal panels. Question is, what to put under the roof panels? Just a vapor barrier or a dual purpose vapor/radiant barrier? I hear different opinions on placing radiant barrier under roof. STEVEN in SUGAR LAND
 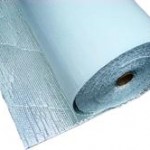 We’ve provided literally millions of square feet of reflective barriers however they basically function as little more than a condensation control, provided they are properly installed. There is just no realistic way to achieve totally sealed dead air spaces to take advantage of their ability to reflect.
 While there does exist an actual ANSI (American National Standards Institute) definition of Eave Height – most builders and vendors are unawares or just plain choose not to use it. Somewhere your agreement should spell out what is proposed or provided so all have a clear understanding. (Please read more here:
  Entry door width and heights, is door wood, steel, aluminum, vinyl covered, fiberglass? Jambs wood, steel, aluminum, vinyl covered wood? Doors and jambs finish painted or primed only? Crossbucks? Raised Panel? Glass? Wind rated? R value? Keyed lockset, dead bolts?
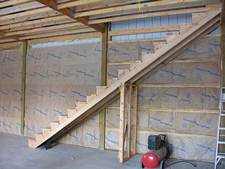 I did not include materials for a bearing wall at the floor truss center. Features listed above ran roughly $6000 more to go two floors. Also, with the two floor version, you will lose 50 square feet of usable floor on each level due to stairs.
 Yes we can provide plans with a third-party engineered design for bracket set columns, as well as brackets.
  Although our buildings are designed for an average literate English speaking person to successfully construct their own building (most of them do, and do a wonderful job – because they will read and follow instructions), for those who do need an erector, in many areas we can provide contacts for you to vet.
 Plastic (visqueen) under your roof steel will not solve the condensation challenges. Instead you will have condensation on the underside of the visqueen. (to read up on the history of Visqueen and why not to use it under wall steel: