Tag Archives: porch

Kind Words and Questions From a Future Client

Kind Words and Questions From a Future Client

Reader and future client CHRISTINA in HAWLEY writes:

Firstly, I’m not going to lie. It was YOU (Guru) that kept me more interested in doing business with your company than with others. Even more so than Pioneer Pole Barns here by me and that’s who everyone goes to around here. The knowledge you give out freely to genuinely HELP the public is what stood out to me. Then I met Carson and that was way, way back. Super easy to talk to and he just and still does roll with the punches. I told Caleb he had a winner in Carson. 


We started off with a commercial design and that tanked and then it flipped to residential and now here we are. So, since I’m loyal and Carson stuck it out with me Hansen is getting the business although I’ve had others try to sway me. I feel its right to see this through together with Hansen. Red iron just called last week and nope, not changing.

So now…Can I bug you some more???

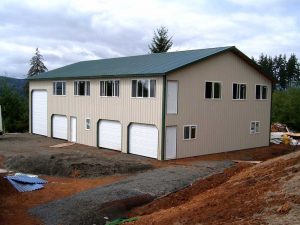
I’m meeting with an “erector” named Joe from JLS Constructions, yes, with an “s” at the end (idk). He hasn’t ever put one of these babies up yet but he is eager to learn. I can see that clearly. My question(s) is what would be the right charge to erect my home (3500 sq. ft., 2 rectangle boxes, simple design), how long to do it for a newbie and how deep into winter is too deep to erect? I need that shell up before the first frost, I’m thinking. This way the guys are shielded from inclement weather. Carson has the final if you’d like to take a look.

That’s what I have for questions right now.

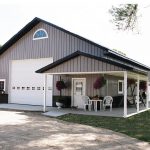
*Carson, got your email about the underside of the shed/porch. Gonna ask you maybe a stupid question…if we decide on either metal or wood how do we finish the underside? Are there some sort of layers underneath first before we close it up? Drilling screws into the rafters or some other way? Going to price out both material options. Wood and metal.

With warm regards and appreciation.”

Mike the Pole Barn Guru responds:
Thank you very much for your kind words, they are greatly appreciated. More than anything,    my goal is to assist good people from making crucial errors they will regret forever – whether      they happen to invest in a Hansen Pole Building, or not.

You (or anyone) should feel free to ask me questions at any time – I never feel as though I am    being ‘bugged”.

In my mind, fair market value to erect a post frame building shell should be roughly half of        material’s costs, with client to provide concrete required for holes and builder to provide any nail gun nails. To get a rough idea of “person-hours” required for a build – for a person with limited or no construction experience, divide material cost by 60, for an average builder divide by 120, for a highly experienced builder 180-240.

As Joe has never erected a post-frame building, I would highly recommend he invest in one of  our Construction Manuals (he can reach out to Bonnie@HansenPoleBuildings.com to acquire   one). At over 500 pages in length, it covers most instances one would ever encounter and is     designed to guide an average DIYer.

Time frame wise – I always liked to begin at first frost. Holes can still be easily dug, and it is a    comfortable temperature to work at. It avoids both sweltering heat and frigid cold. Post frame     shells go up quickly and this sort of timing works out nicely for being able to work inside all        winter, then have things wrapped up come Springtime.

For finishing underside of porches – most clients opt to use trusses when they intend to finish    porches out. With ceiling joists installed between truss bottom chords, this makes for a nice        level surface to work from, without having to work around other framing members. As long as    provisions are made for condensation control on roof steel underside (e.g. an Integral               Condensation Control – like Dripstop or Condenstop), there are no other special provisions         required.

How to Avoid Your Barndominium Being Kicked to the Curb

How to Avoid Your Barndominium Being Kicked to the Curb

Welcome back from last Thursday!

When it comes to resale value, you want your barndominium’s curb appeal to add to value, not kick you to the curb.

There are things you can do during design and build phases to improve appeal and good news is, many of them are relatively inexpensive.

Free – color choices. Try to avoid trendy or garish color combinations, as well as colors prone to rapid fading (reds are worst). For most steel siding and roofing colors, an upgrade to Kynar paint will keep colors looking close to new and minimize chalking for decades. Faded steel makes your barndominium look years older than its true age.
Utilize wainscot panels to break up walls (especially tall ones). If a wainscot panel gets damaged it can easily be replaced.

Roof slopes can dramatically improve curb appeal. Rather than a warehouse like a near flat roof, use 4/12 or greater roof slopes to increase interest.

Overhangs not only provide protection to your barndominium’s siding and shield southern exposed windows from extreme summer rays, but also take away industrial and boxy looks. Functionally they provide a great source of air intake for venting interior enclosed attic spaces.

Driveways and walkways oriented to provide obvious pathways to your main doorway are always good for favorable impressions. Protect your barndominium’s front door by either a recessed entry, or having an extended reverse gable roof to provide shelter for those who are awaiting an invitation into your home.

Avoid building a big box. Garage/shop areas can be shifted in relationship to living areas, breaking up what would otherwise appear to be a long, straight wall. Consider creating an “L” in living spaces. With a single level home and a tall shop space, turn shop roofs 90 degrees to run roofline opposite house roof.

Garage door openings with 45 degree ‘dogears’ in upper corners cost little and add lots. Utilize raised panel residential overhead doors, rather than commercial doors.

Porches have become popular barndominium features. To avoid them appearing dark (as well as blocking lines of sight), utilize trusses spanning across not only living areas, but also out across your porch. Consider wrap around porches to increase function as well as curb appeal.

It is well worth investing in services of a design professional. Someone who can take all of your ideas, those wants and needs and actually craft a floor plan and elevations to best melding them with the realities of construction and an attractive curb appeal.

Hansen Pole Buildings has just this service available and it can be done absolutely for free! Read all the details here and we look forward to continuing to walk with you in your journey to a beautiful new home: http://www.hansenpolebuildings.com/post-frame-floor-plans/?fbclid=IwAR2ta5IFSxrltv5eAyBVmg-JUsoPfy9hbWtP86svOTPfG1q5pGmfhA7yd5Q

Beginning a Shouse Journey in Washington State Part I

A shouse (shop/house), barndominium or post frame house project may seem daunting, however by doing lots of reading, research and asking questions, an average individual can craft for themselves a home they love, tailored to meet their family’s wants and needs.

Loyal reader ROBERT in OLYMPIA writes:

“Hello to the Pole Barn Guru or whoever reads this!

​I came across Hansen Buildings a few years ago when I first became interested in pole barn homes, and have been following the content posted by the Pole Barn Guru in various places online- always great information!  I am finally zeroing in on purchasing a piece of land and I would like to get some more information on going the “Hansen route,” either for a shouse or a house and detached shop, or for just a shop.​

I’ve spoken with my county’s planning department and was informed that there would be no problems building what I want.  The land is already improved with water and septic, is nice and flat, is south facing, and is zoned accordingly.  There is actually a building permit currently active from the previous owner’s stick built project (who passed away, and never further than the dig out for his foundation).  They told me that I could bypass some of the headaches (such as the Pocket Gopher review process) if I renew the permit before it expires (4/2020) and submit the new site plans…​

My ideal setup would be:​

– 50x90x(16 or 18) building​

-around 1200 square feet of living space, 2 bath, 2 bed, 1 “office”​

-3300 square feet as shop space with 1 bath and 1 utility sink.  Wired with electricity & lighting.​

-Very energy efficient (insulation, doors, windows, leakage).  Prefer spray foam if budget allows.​

-ERV?​

-1 large garage door/bay, 3″ thick​

-All large windows to be south facing with appropriately-sized overhangs (passive house principal).  These overhangs could potentially be in the form of a covered porch.​

-Enclosed overhang with vented soffits, but only on the eaves & vented ridge cap.  Solid gables.​

-Concrete piers with post brackets.​

-slight outward slope in concrete where garage doors meet concrete to make water drain away from/out of shop.​

-at least 2 drains in concrete – 1 near door, and one near a corner​

-insulated concrete slab w/ hydronic heating, sealed concrete flooring throughout (no other floor covering)​

-Possibly add ductless heat pump mini-split for additional heating if necessary. ​

-No cooling system necessary.​

-modestly finished interior​

-Ikea or similar non-custom kitchen​

-self-sourced appliances​

Questions:​

Someone at the Thurston county planning department told me that while the project definitely is doable, it might make more sense to build the home and shop as separate structures.  He mentioned that because they were attached, the whole building would have to meet WA energy code.  I guess he was implying that it would be cheaper to construct the shop separately if it didn’t have to meet that code?  Because I would like the shop to be insulated, does this really apply to me?  I’ve heard that insurance could potentially be cheaper with a detached setup, but I can’t seem to find anything concrete about that.  Have you found that to be the case?​

As I mentioned I would like to do hydronic radiant heating (probably by Radiantec) throughout the home and shop.  From my research that seems like the most cost efficient way to heat (mass rather than air).  However, the shop doesn’t necessarily need to be kept at “living temperature” all the time.  I would like it to be comfortable while I’m in there, but beyond that I just need it to stay above about 40 degrees.  I’m interested to hear your input on this.  In reading, it seems like whenever people opt for something like a radiant tube heater or mini-split for the shop, they always regret not going with radiant floor heating.  Natural gas is not available at this location, so my options are propane, oil, wood, or electric.

Because I’m very new to the world of home building, I’m not sure what other requirements there would be in building this.  I know that there are some pretty detailed drainage plans that exist for the previous project on the property, and I’m wondering who is in charge of creating new drainage plans for my project?  Does Hansen do that type of thing?  Or someone local to me?​

Pricing/plans:  Is it possible to get some sort of idea about costs/cost breakdown for the type of building I described?  How about for separate structures?  I love the idea of doing some of the work myself, I’m just not sure how realistic that really is with my work schedule, especially in the summer.  I would probably need contractor(s) to take care of the majority of the major work.​

Do you have any floor plans similar to what I’ve described?  I have a few different ideas on different floor plan ideas but it’s probably easier/cheaper to just use some existing plans.​

I love the “Shouse” idea but I find it a little overwhelming because there is not a “turn key” option like what exists from traditional home builders like Adair Homes in Olympia.  So to get the job done would require basically managing the project with a crew of different contractors to finish the shell, concrete, insulation, electrical, plumbing, finishing, etc……I just would really prefer something a little different and more energy efficient than standard construction.​

As of right now, I think those are all of the questions that I have.​

Thank you very much for your time and I look forward to hearing back!​”

Mike the Pole Barn Guru responds:

Come back tomorrow for Part Two.

Solutions to Porch Overhang Clearance Issues

Recently KIM in STRATFORD posted this question to a Facebook Barndominium discussion group I am a member of:

“I am trying to finalize my plans today. Is it possible to have 8′ side walls and still have a 6′ overhang open porch on the eave side of the house? I have a 5/12 pitch on the house portion and actually wanted two separate roof lines, one for the house and a separate one for the porch overhang. House is on a slab so no built up foundation walls. I’m not sure if this porch will be too low with the porch roof UNDER the house roof and with a slight slope for water drainage…. Any experts out here?”

Mike the Pole Barn Guru responds:

For starters, most steel roofing suppliers will not warrant steel placed on slopes of less than  3/12. Continuing out from your main wall six feet at a 3/12 slope will place underside of your overhang at roughly six feet and six inches. Not only could this become a head ringer (at least for my son who is 6’6” tall in his bare feet), but it is going to block clear view out windows in this area. It is also just plane going to feel low.

I did some researching, however I’ve been unable to find a Building Code requirement for clearance below an overhang, however I would have to believe seven foot to be a bare practical minimum. 

You could:

(a) Build over a crawl space, instead of a slab – raising elevation of home and affording a more comfortable surface to live on (https://www.hansenpolebuildings.com/2019/03/slab-on-grade-or-crawl-space/) ;

(b) Increase house wall height – you could maintain an 8′ finished ceiling and have raised heel roof trusses to allow for full depth attic insulation from wall-to-wall (very good idea) https://www.hansenpolebuildings.com/2012/07/raised-heel-trusses/ ;

(c) Use roof trusses wide enough to span from opposite wall to outside edge of porch, with a pitch change at junction between porch and home.

Dial 1(866)200-9657 and ask to speak to a Building Designer. Your call is free and we have great solutions for you.