Tag Archives: enclosed overhangs

Not a Hansen Pole Building

From a Distance Every Pole Barn Looks About Equal

Earlier this year I shared back and forth several conversations with a potential client (who eventually did not invest in a Hansen Pole Building).

He shared with me photos of his brother’s beautiful new pole barn shop and intended to have one built by this same builder.

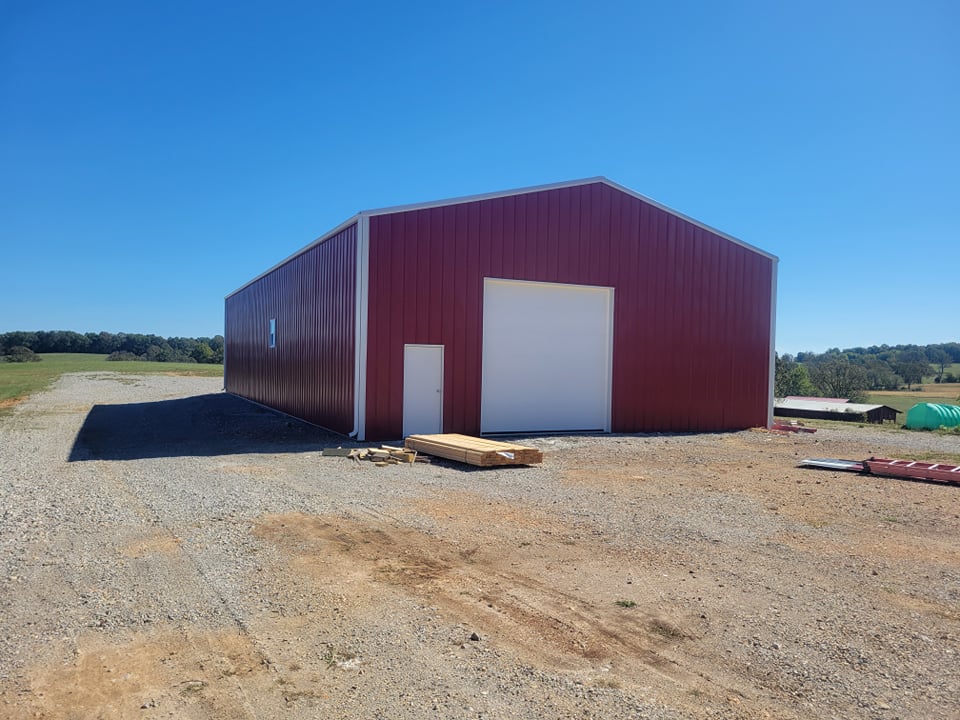
Although a plain rectangular box, with absolutely no frills (things I look upon as being important – like wainscot and enclosed overhangs), from a distance it appears as though it would be highly functional.

Notice, if you will, a lovely view for a distance – meaning this building site is Exposure C for wind (See here for an explanation: https://www.hansenpolebuildings.com/2022/06/wind-exposure-and-confusion-part-iii/). How does Exposure C impact (literally) a building? It must structurally resist a 20% greater force than an Exposure B (protected) site.

Now this potential client was impressed also, because his brother’s building was fully insulated. Let’s go inside and take a look….

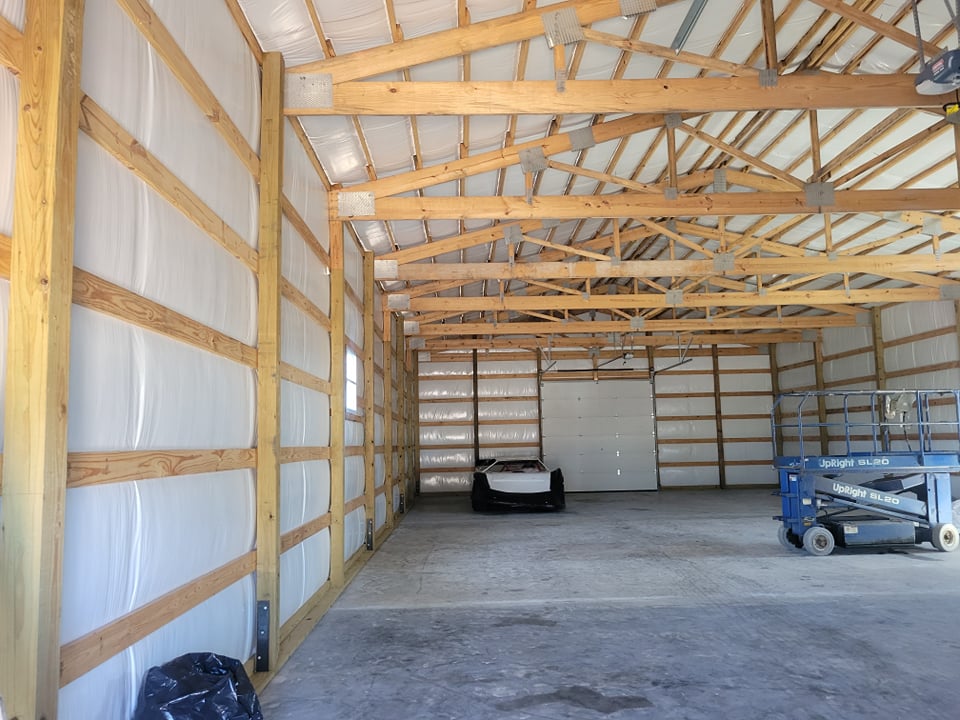
Well, yes – it has Metal Building Insulation, a very poor investment in a very small effective R value. Please read more here: https://www.hansenpolebuildings.com/2011/11/metal-building-insulation-in-pole-buildings-part-i/ and https://www.hansenpolebuildings.com/2011/11/metal-building-insulation/.

Nice insulated overhead door in one end – although it is insulated, don’t expect much true performance from an insulated overhead door https://www.hansenpolebuildings.com/2020/07/barndominium-high-r-value-overhead-doors-part-i/ and https://www.hansenpolebuildings.com/2020/07/barndominium-high-r-value-overhead-doors-part-ii/.

There is also nothing to lead me to believe this overhead door is wind-rated. https://www.hansenpolebuildings.com/2014/12/wind-load-rated-garage-doors/

With an Exposure C site, my guess is one morning after a 60 mph (miles per hour) or so overnight wind gust, this door will be laying flat on ground outside of the building.

This building utilizes home-made dry-set brackets to mount columns to slab. Even though these brackets have no ICC-ESR Code approval (and dry set brackets, in general, have no ability to resist moment – aka bending forces), there is one significant challenge. Only every other sidewall column has a bracket!

https://www.hansenpolebuildings.com/2014/12/dry-set-column-anchors/

Somewhere, somehow, some body neglected to install any roof truss bottom chord bracing (aka rat runs). For single trusses, this would be required no more than every 10 feet. I would imagine at least the longest diagonal truss web (as well as maybe vertical at center) should be braced as well.

In this Exposure C site, externally mounted 2×6 #2 wall girts are likely to be overstressed https://www.hansenpolebuildings.com/2012/03/girts/

Both sound engineering practice and Building Codes require roof purlins on edge to be restrained from rotating at bearing points. Solid blocking between purlins going over top of trusses, or purlins joist hung between truss top chords would accomplish this.

This story has a moral similar to “Don’t look a gift horse in the mouth”. If this building was an absolutely free gift, then it was a heck of a deal (provided it is well insured), but to have paid hard earned money for a building unlikely to survive more than a few years – not such a great deal.

Here is where I reiterate my mantra – always build from fully engineered, site specific plans.

A Free Post Frame Building Critique

A Free Post Frame Building Critique

I am going to offer a free critique of this post frame building.

From a design aspect, I wouldn’t consider investing in a residential (or residential accessory) post frame building without overhangs. Not only do they make buildings look far less industrial, they also afford weather protection above doors and push runoff or slide off away from walls. With overhangs building walls stay cleaner and large snow piles sliding off roof are far less likely to dent siding and overhead doors.

Enclosed overhangs, in combination with a vented ridge, provide for adequate air flow from eave to ridge to assist in preventing condensation. 

Note there is a very small space between top of overhead door openings and roofline. This means these particular overhead doors will need to have low headroom tracks in order to open. In many cases this precludes an ability to have a remote garage door opener. Low headroom also tends to not open as smoothly. Certainly it would be impossible to have a ceiling installed at a future date (provided trusses were loaded to be adequate to support extra ceiling load).

For virtually no extra cost, overhead door openings could have been dog-eared – a 45 placed in opening upper corners. This makes building again look more like it fits in one’s backyard, rather than an industrial park.

Look at wall bottoms. There is maybe two inches of pressure preservative treated splash plank showing. Due to this, when entry door landings or aprons in front of overhead doors are poured, to avoid having concrete poured against steel siding, there will be a significant step. There is also no base trim (aka rat guard) at the base of walls to stop critters from venturing in through steel siding high ribs.

It is very easy to see nearly every roof and wall steel panel overlap. When properly applied, these laps should not show. This is a craftmanship (or lack thereof) issue.

Missing from sidewall tops is any sort of trim. Even though steel siding and roofing is manufactured (in most cases) on machines with computer controlled cutoffs, there is some slight variance. This variance is going to show either at the base of walls, or at the top. By having trim at wall tops, any slight differences can be hidden.

Structurally – wall girts flatwise on column outsides on spans such as these fail due to not meeting Building Code deflection limitations. https://www.hansenpolebuildings.com/2012/03/girts/

All of these items mentioned above would not be an issue with a new Hansen Pole Building. We seriously lay awake at night thinking of ideas to prevent clients from making crucial mistakes – we want to avoid you owning a building you will hate forever! 

Looking for a building done right? Call 1(866)200-9657 to speak with a Building Designer today – call is free and there is no obligation or charge!

Monitor Barn-Heights of Wings and Raised Center

Monitor barns have a tall center portion (usually clearspanned with trusses) and lower single slope (knowns as sheds or wings) roofs on each side. Barns may actually be a misnomer, as many monitor style post frame buildings are used for things like homes and event centers.

Reader DANIELLE in SUMMERSVILLE writes:

“Is there a minimum distance between patch breaks? I would like the upper level of the main pole barn to have exterior riser walls of 4 feet high with scissor truss (for attic feel). The side shed sections are 10 feet wide and would have 4/12 pitch. This would put the lower pitch break extremely close to the upper. Can’t go with lower roof pitch for shed because of winter snow. I could go with 5 foot riser walls but was hoping to minimize drywall waste and keep exterior loft walls short. Picture attached is just for concept but gives good idea of style we want to build. Please advise.”

If you were considering a monitor style roofline without any overhangs (not a good idea in my humble opinion) then height difference between wing upper side and eave of raised center could be as little as a few inches.

Once overhangs are added to raised center portion, then everything changes. It is far less an issue of structural soundness, than one of practicality to assemble.

You might have noticed I wove in “structural soundness”. In snow country monitor style rooflines need to be analyzed by a RDP (Registered Design Professional) in order to account for weights of snow sliding off upper roof and impacting the wing roof. Drifting loads also play into RDP’s structural design.

If you do happen to be in snow land and decide to proceed without involvement of a RDP, then it is possible you are a fool and deserve what you get when your building’s roof collapses around you.

Assembly practicality comes into play with aforementioned overhangs. There needs to be enough room to operate a screw gun. With an open (no soffits) overhang it might be able to be accomplished within a foot. With enclosed overhangs there should be at least a foot between bottom of soffit and top of wing roof.

Keeping those “riser” walls short can prove to be literally a pain in your head. Our home has a four foot height wall. This has resulted in numerous cases of noggin’ smacking. For usefulness I would recommend this wall be no less than six feet in height.

Ready to plan your new monitor style post-frame building? Call (866)200-9657 to speak with a Hansen Pole Buildings’ Designer.

Cardboard (or Plastic, Foam, Metal) Eave Baffles

Cardboard (or Plastic, Foam, Metal) Eave Baffles

The model building codes (IBC and IRC – International Building Code and International Residential Code) require enclosed attic spaces, in most cases, to have ventilation. The most efficient ventilation design solution is to have enclosed vented soffits at the eaves as an air intake, and a vented ridge as an air exhaust.

In order for this system to work effectively a minimum of a one inch air space has to be maintained from eave to ridge across the top of the attic insulation. For traditional stud wall frame buildings with trusses or rafters every two feet, this air channel can be maintained by prefabricated eave baffles which block the insulation from tumbling into the soffits. There are numerous materials used for these baffles, each of which has its own good and bad points.

But what about post frame construction? With trusses at a myriad of different spacings, due to engineering design or builder preference, there is not a one size fits anyone solution to maintain airflow.


Energy efficiency is a high priority for new building owners, making arriving at solutions which are as painless as possible a prime directive for post frame designers.

In order to maintain full insulation depth from outside of wall to outside of wall, it is most advantageous to use raised heel trusses (https://www.hansenpolebuildings.com/2012/07/raised-heel-trusses/). Now, how to keep the insulation where it belongs?

High R rigid insulation sheets can be cut to fit between the trusses, extending from the soffit supports to no less than one inch below the roof sheathing. A minimum one inch space must also be left between the inside of the eave strut and the insulation sheet.  Product dependent, of course, the high R boards can offer an R value of approximately six per inch of thickness.

Plywood or OSB (Oriented Strand Board) can also be used as a baffle, however either product is going to be heavier to work with, as well as not affording more than a minimal R value.


It Is Exactly the Same Building Part I

Well, maybe not exactly the same building.

In April of this year we had a client invest in a brand new 36 foot wide by 60 foot long post frame building kit package with a 16 foot eave height. Three months later, the building has been delivered, and one of the group which ordered the building sends us a quote on “exactly the same building” from a worthy competitor. And, of course, the competitor’s quote is way less expensive!

Now the competitor’s sales person advised the client the quotes were exactly the same, other than he had quoted a 25 psf (pounds per square foot) roof snow load, whereas we provided a 40 psf load, which is 60% more snow carrying capacity!

Turns out there were maybe a couple of other differences as well……

Things we have and they do not:

4/12 roof slope vs. 3/12 The steeper roof slope will look less industrial as well as more readily will shed snow.

C wind exposure vs. B wind exposure (for a detailed explanation of wind exposure please read here: https://www.hansenpolebuildings.com/2012/03/wind-exposure-confusion/).  The benefit of an Exposure C wind load is it makes the building roughly 20% stronger in resisting wind forces, than the B exposure.

12″ enclosed overhangs vs. 18″ open overhangs. Not only are enclosed overhangs far more attractive, they provide ventilation and eliminate the wonderful nesting locations for flying critters which are provided by open overhangs.

12’x14′ residential overhead door vs. 14’x12′ commercial overhead door. If the client wants to get something taller than 12 foot through the other guy’s door, it just isn’t going to fit no matter how big a run one gets at it. Residential overhead doors come with “dog eared” openings and a far more attractive in a residential setting. Here I discuss why 14 foot wide doors are not what they are cracked up to be: https://www.hansenpolebuildings.com/2016/05/14-foot-wide-doors/.

One more entry door. Insulated commercial steel entry doors with steel jambs do not come cheap, especially when they are four foot wide!

Integrated J Channel on windows. So much easier to install than having to cut four pieces of steel trim to fit around a window and have them not leak!

The reflective radiant barrier with pull strip attached adhesive tab on one side vs. Metal Building Insulation (MBI) under the roof steel to minimize condensation challenges. My personal horrors of installing MBI can be visited here: https://www.hansenpolebuildings.com/2011/11/metal-building-insulation-in-pole-buildings-part-i/.

Lifetime paint warranty on steel vs. 40 year pro-rated. Your post frame building is going to be around for a long time, might as well have the best paint warranty available to minimize the effects of fade and chalk.

Base trim – keeps those creepy crawling critters from entering the building through the high ribs of the wall steel.

Top of wall trims – Even though roll formed steel siding lengths are controlled by a computer, they do vary slightly from panel to panel. The bottom of the panels should be kept at the same height as “stair steps” at the base of the walls is quite noticeable. Easiest way to hide any variants is to place the top edge into a piece of trim which covers any fluctuations.

Jamb trim on Overhead Door– exposed wood overhead door jambs are very popular in some parts of the country, however they do turn grey and then eventually black if not kept painted.  The idea of a steel covered post frame building is to minimize future maintenance. Having to paint raw exposed wood does not meet with this criteria.

Heard enough? No? Then come back tomorrow for Part II. You won’t be disappointed!

F Channel and Enclosed Soffits

My early days of post frame (pole) buildings came in the Pacific Northwest. In the early years, rarely did buildings have any overhangs…at least not beyond a few inches of roof steel extending past the siding.
When building did have overhangs, they were always “open”. Open, in this sense, did not mean birds and other critters could fly into the building through them, but rather they had no soffits.

With an open overhang, when one stands beneath and looks up at the underside of the overhang, the supporting substructure framing is visible, as is the underside of the roof steel, or roof sheathing.

A decade later and a transition from a provider of post frame building kit packages, to being a pole builder and clients began requesting their buildings to have enclosed overhangs. With a minimal investment over open overhangs, plus the advantages of being very attractive and limiting locations for nests of both barn swallows and wasps – it was (in my mind) a no brainer.

In researching how others were installing soffits, I found the majority use a piece of trim called an F and J up against the building sidewall.

f channel
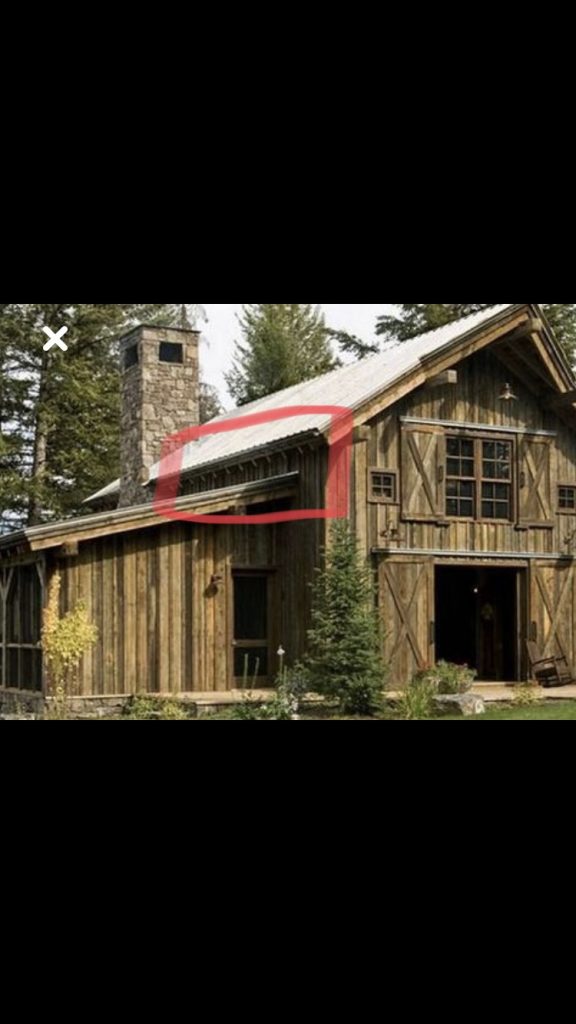
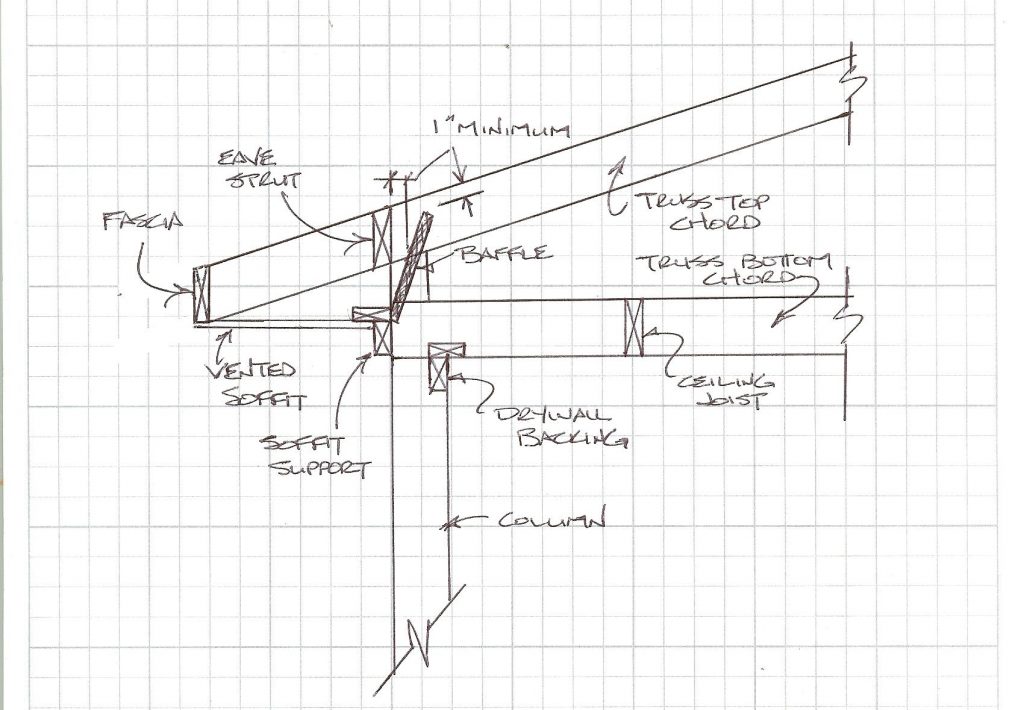
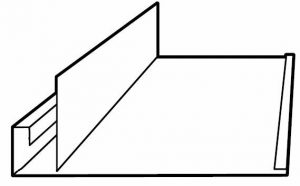
Picture an F channel with the downward leg being attached to a horizontal piece of wall framing, usually by nails. The horizontal “legs” of the F receive the soffit material – usually vinyl, steel or aluminum. From the end of the short (and lower) horizontal leg of the F channel, is another downward leg (envision an inverted J). The sidewall steel then slides up into the J from below.

All of this appears to be a quick and easy install. Nail a single 2×4 against the outside of the columns, attach the F and J to it and slide the soffit panels into the F channel.

Now the problem with this (as happens with quick and easy) – the soffit panels are not attached to the F. When the breeze begins to blow, the soffit panels vibrate in the F channel, making noise. As wind speeds increase, the soffit panels can actually be blown out of the F – creating all sorts of challenges.

So how did we solve the challenge?

Instead of a single 2×4 nailed to the face of the columns, we took two 2x4s and nailed them together to form an inverted L. The short leg of the L now gives something solid to attach the soffit panels to. Below the soffit panels an inverted piece of J channel trim is installed, easily attached to the vertical leg of the 2×4 L.

I’ve now experienced several thousand soffit installations using this procedure and have yet to have a report of a single soffit panel being blown out!

Success.

No Not F Channel

Hansen Pole Buildings Designer Rick recently asked me this question about overhangs and F Channel:

A question came up about soffit support. 

The client is a builder trying to close a garage for his client.  He asked about soffit/enclosed overhangs. 

He asked why we do not use an F channel trim to hold the soffit in place on the wall side instead of wood frame soffit support, commenting that the F channel is less time consuming and more material efficient.”

F Channel
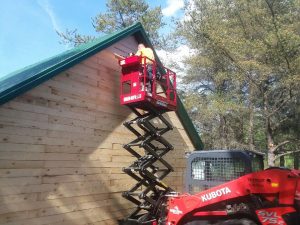
In typical stud wall construction, vinyl (aluminum or steel) soffit panels are typically held in place against the wall, by means of nailing a piece of trim known as “F and J’ to the wall of the building. This piece of trim has two “receiving” points, one horizontal to accept the soffit panels and the other below and vertical to accept the siding.

This makes for quick installation for the installer, as no fasteners are needed to be placed into the edge of the soffit panels, against the wall of the building – the F channel trim is relied upon to hold the soffit in place.

A stud wall is going to obviously be fairly rigid in the horizontal direction. All of those studs (whether 16 or 24 inches on center) are not going to bend.

In post frame (pole building) construction, regardless of how close together the columns are spaced, there is going to be a fair distance between them. There are numerous suppliers and builders who ignore this, and will place a single (usually 2×4) framing member flat on the outside of the columns.  They try to get by with attaching F and J trim against it, just like they would in stick frame (stud wall) applications.

The downside of this application is the single framing member is going to have a fairly large amount of flex. In an extreme wind situation, the member could easily flex far enough to allow the soffit panels in the middle of the span to fall out of the receiving end of the trim. Not good.

From years of experience (and finding out the hard way what doesn’t work), we came up with a solution which has eliminated the deflection issues. Against the pole building columns, we place two 2x4s nailed together to form an “L”.

This L, keeps the edge of the soffit closest to the building wall from being able to flex either up and down, or in and out. It provides a solid anchorage point – keeping the soffit panels where they belong, securely attached in place.

Hutyaharapast Szorevel: Overhangs, yes!

Had you going with the title, didn’t I?

Kutyaharapást szőrével is Hungarian for “The hair of the dog”. The English saying “the hair of the dog” dates back to the days of Shakespeare, and deals with curing a hangover with even more alcohol!  Similarly, I want to cure the lack of building overhangs, with information allowing potential building owners to make informed decisions.

Once it had been decided to utilize overhangs as a building feature (good choice) and an overhang size has been determined, the real nitty-gritty of overhangs begins.

Paraphrasing Shakespeare’s bard Will, “To be open, or not to be open, that is the question”.  Overhangs can either be open (which has nothing to do with allowing flying things like birds and Rocket J. Squirrel into the building) or enclosed. With “open” overhangs, as one stands beneath the overhang and looks straight up, the wooden framing which supports the fascia board, fly rafter and overhanging roof sheathing is exposed to the eye. The overhang IS, however, completely closed to letting the outside weather (insects/birds) into the building.  It’s the overhang area which is not enclosed…no horizontal soffit panels.

With enclosed overhangs, soffit material of steel, aluminum, vinyl, wood or cement (the most common materials) is placed so as to cover the underside of the framing.

Open overhangs will be slightly less expensive than enclosed. They do not afford the ability to ventilate the building, and wood members, while not exposed to the weather, will age and grey with time. Open overhangs also provide a favored nesting place for yellow jackets and other wasps, as well as barn swallows. Places where open overhangs do look appropriate is on the low sidewall eave overhangs of roof only sheds, buildings with one or more sides open, or roof only “pavilion” type structures.

Enclosed overhangs are generally accepted as being far more attractive, as well as maintenance free. The least expensive (and least functional) solution for soffits is with non-vented materials. Most common with steel covered buildings are one piece trims which cover both fascias and the soffit, or the use of steel roofing/siding panels for soffit material. The first tends to “oil can” or appear wavy with from expansion and contraction due to heat and cold cycles. The second, in the opinion of many, just looks cheap.

Aluminum soffit is not favored as it can create electrolysis issues from dissimilar metals in contact with each other. Vinyl and steel soffit panels come in a wide array of colors, both to match and compliment the balance of the building colors. Both are available as vented, which allows air flow into the building, reducing issues of condensation, as well as stagnant air in animal housing. The ventilation holes are small enough, so as to prevent flying insects to enter through them. In combination with an adequately vented ridge, vented overhangs can provide for an effective passive ventilation system.

Ön élveznek kinyúlása, or “enjoy your overhang”.