Tag Archives: clearspan

Wide Clearspan Barndominium Floors

Wide Clearspan Barndominium Floors
Multi-story post frame barndominiums are embracing a great feature found in better stick framed homes – engineered prefabricated wood floor trusses.
Loyal reader RICK in MONTICELLO writes:

“First off, thanks for sharing your knowledge and experience in the blog and answering questions regarding post frame construction with us laymen!
It is very educational and enlightening.

Kicking around ideas currently. Have a 50ish x 80ish building in mind.
And since you suggest working in 6 foot multiples. We’ll go with a 54′ x 84′ two story building.

Thinking about 12′ clear inside height grade level and living upstairs (actually a lake house so to speak).
You mention you have 48′ free spanned with floor trusses.
I’m curious how deep they are and what centers they are installed at.
As I’d like to clear span the 54′ if possible.

My questions and curiosities are:
• You aware of any fabricated wood floor trusses spanning longer than the 48’ you have?
• Would the floor trusses be prohibitive, as far as cost and losing a lot of height due to the required depth they would need to be?

If I free spanned the whole building at 12” centers I’d need 82 of them.
Working from an assumption they would have to be on 12” or 16” centers raises the below questions:

• How is this done in post frame?
• Would I require regular stud walls between each post that first 12’ of building height for the floor trusses to rest upon to transfer the loads to the ground/ foundation?

Hopefully not too lengthy.

Thanks in advance”

Mike the Pole Barn Guru says:
Thank you very much for your kind words, they are greatly appreciated.

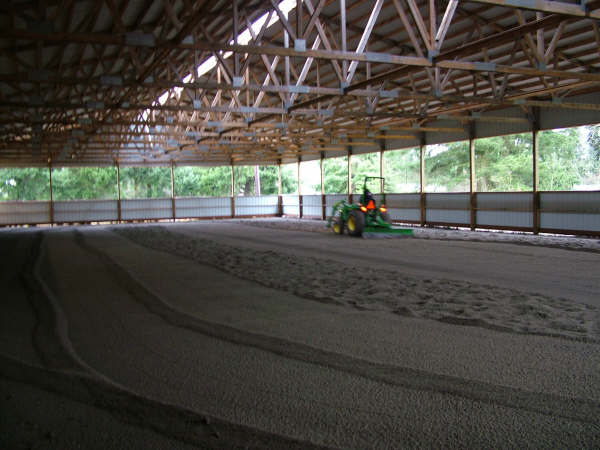
With typical residential live loads of 40 psf (pounds per square foot) and dead loads of 10 psf, normally floor trusses are spaced every two feet and their depth will be roughly an inch per every foot of distance spanned. 54 foot clearspan is certainly well within range of prefabricated wood floor trusses.

Even with all of my years as a manager of owner of truss plants, 48 feet is as wide as I have participated in – although for our own personal shouse (Shop/house), we wish we would have gone 12 feet wider (no matter what size you build, it is never big enough). Your added investment, for floor itself, between having a myriad of internal columns, or clearspanning is roughly four dollars per square foot. For what it adds in downstairs usability by not having columns or walls to work around, it is worth every cent in my mind. Add to this it allows for all utilities to be hidden from view and they are a winning combination. As we are providing more barndominiums seemingly every day, we have many clients taking advantage of clearspan floor trusses and have never heard a regret from having done so!

Most usually floor truss ends are supported from beams attached to wall columns. This eliminates having to have load carrying stud walls between columns, as well as thickened slab edges or continuous footings and/or foundations. In order to maintain ceiling heights, your building will have to be made taller. In most instances, adding a few feet to a building’s height is relatively affordable.

Avoiding Being Driven Crazy With Barndominium Questions Part II

Part II of a two part series. If you didn’t see Part I, go back one day.

Mike’s answers are in italics.

 In each house at ends of the “L” layout, I plan to have 1/3 open plan at two stories, for our great room, with nice windows for great views.

The other 2/3 areas will have 2 bedrooms and maybe a sitting area on the second floor.

  • Do  really need 6” * 6” poles in this area for the 2nd floor?
  • I was planning on building the upstairs like you do in a stick built house which would be use the 1st floor wall as load supporting, use 12” floor joists and  add a beam where needed and then use steel adjustable poles. (Cover poles later)
  • Is this OK to do?
  • Would the steel poles need to be on thicker concrete?
  • Would the 1st floor walls that will load support the 2nd floor need to be on thicker concrete?
  • You are free to say, “Greg if you had a decent floor plan, we should add a few poles, as it would be so much stronger, better, and other”.
  • Thoughts? Mike: Personally I would clearspan your second floor using prefabrciated wood floor trusses. There would be supported by LVL beams attached to your perimeter columns. This allows for walls to be placed anywhere without having to create bearing walls or have interior columns. All mechanicals can then be run through this floor truss system. If you were to approach your second floor as if it was traditional stick frame – you would then be faced with how to support it at exterior walls, since they are horizontally girted. Any bearing walls would have to have thicker concrete below and adjustable steel pole locations would probably require some sort of concrete pier (or at least slab being thicker and perhaps requiring some extra rebar). If using adjustable steel poles, I would want them to at least be wrapped with two layers of 5/8″ Type X sheetrock so in event of a fire they would not lose their temper, deform and collapse. 

Wall Girt System questions:

  • If the posts are 6” * 6” what width are the horizontal girt boards?  Are they 2” * 6” *  X’ or 2” * 8 “ * X’? Mike: For glulams of 2×6 you would have 2×8 girts, for 2×8 columns, 2×10 girts. These will project 1-1/2″ outside of your perimeter building columns.
  • If they are the 2 * 8’s, is there a little board you would put on the post, between the post and the outside metal? (This little stuff drives me crazy too!) Mike: Blocking would be placed on column exterior faces, aligned with wall girts to provide a continuous line for attaching steel siding with screws.
  • Are the vertical spacer boards nailed to the side of the post as shown on the attachment, so horizontal bookshelf girts can be nailed vertically into the spacer to avoid toe-nailing all of the girt boards? Mike: Bookshelf girts will be supported at each end with solid blocking against columns – no toe-nailing of girts to columns.

Does the lowest board on the posts, (Grade Board?), does it actually contact the dirt floor before pouring the floor? Mike: Bottom of pressure preservative treated grade board/splash plank is set at grade, so it is in contact with ground.

So the board will have 4” – 5” of cement contact? Mike: Top of your concrete slab would be 3-1/2 inches above bottom of splash plank.

How far does the siding cover the lowest board? Mike: Bottom edge of steel base trim drip leg will be at four inches above bottom of splash plank. This allows for any exterior concrete (walkways, approaches, door landings) to be poured against treated splash plank rather than against steel siding or trims.

Do you ever use a composite board for the grade board? Mike: Splash planks are used to transfer wind shear loads from siding to columns and into the ground. Composites are not structural and do not have an ability to transfer these loads.

Sorry for all the dumb questions. Mike: Only a question not asked would be considered as being dumb.

I appreciate all the effort from Hansen Pole Buildings.

Thanks

Wood Truss Span

How Far Could a Wood Truss Span if a Wood Truss Could Span With Wood?

Yes I had a great deal of fun making this title fit, but it is Saturday afternoon and Saturdays are my relaxing day – I sleep in past 6:30, take my time getting to work (usually takes several hours on Saturday) to answer questions from potential clients, those currently building, or those who made a mistake and invested in someone else’s building or are piecemealing and now need help.
(For my rant about piecemealers please read: https://www.hansenpolebuildings.com/2014/03/diy-pole-building/) This gets followed by 2-1/2 hours of workout – free weights, planks, crunches and four miles of treadmill, sauna and shower. Now it is time for work!

Reader NATHAN in IOWA writes:

“Are trusses with steeper pitches easier to make a longer span? And could Hansen do a 100ft truss (not picky about pitch) in north-eastern Iowa? Would also be sheathed with 5/8 OSB and standing seam roofing.”

Steeper roof slopes can (to a certain extent) make wider wood roof trusses spans easier to accomplish. Another method (can be combined with slope) is increasing truss end heights – creating a raised heel. 

In reality very few people actually need to have clearspans over 80 feet. In 40 years and roughly 20,000 buildings I have provided all of three. These were a 100 foot span for a riding arena in Cowlitz County, Washington when I was a post frame building contractor; 92 foot trusses for my own prefabricated wood truss facility in Spokane 25 years ago; and some mid-80 foot span trusses for a Hansen Pole Buildings’ riding arena.

When I was last a truss fabricator, we had quoted 117 foot trusses for a proposed ice arena at Joe Albi stadium in north Spokane. With our plant’s jig setup, we could easily have built 140 foot trusses however we could not have gotten them out of our yard!

With careful early morning measuring (to avoid traffic) we did determine we could just get a trailer load of them out of our gate, we then had only one right hand turn to make and it was straight across town from there! Everything looked rosy until funding fell through.

A consideration for any roof truss is most manufacturers cannot build and ship any truss of more than 12 feet of height, although there are some who can do 14 feet. When I was jack-of-all-trades at Coeur d’Alene Truss (late 1970’s) we built and totally illegally delivered a set of 24 foot span 12/12 slope trusses with two foot overhangs (they were close to 17 feet tall).

Occasionally I see PEMB (pre-engineered Metal Building) or weld up steel building barndominium shoppers who shied away from post frame buildings with an idea we could not do what they felt were wide spans (36 and 40 foot does not feel wide to me) with wood roof trusses.

In answer to your question Nathan, Hansen Pole Buildings can supply your 100 foot clearspan building in north-eastern Iowa.

Another Post Frame Builder Blunder

Another Post Frame Builder Blunder

In our last exciting installment of “As The Builder Burns” I shared a photo of a prefabricated end truss deeply in need of a sky hook in order to remain suspended in space.

Today, it gets even better, with this very same builder showing off his ability to pretty well completely ignore engineered building plans, not to mention not considering opening our Construction Manual.

A typical Hansen Pole Building has widely spaced columns – most often every 10 or 12 feet, with ganged trusses (in this case three ply due to 60 foot width clearspan and a large snow load). Between those ganged trusses, on edge and attached with joist hangers, would be purlins.

I admit, I had to look long and hard at this photo to believe it. I would look away, ponder it, then look back again. 

It wouldn’t go away. This is bad, very, very bad indeed.

My first thought was how did they ever get roofing on without those flatwise purlins buckling under an installer’s weight? You could not have paid me enough to have risked my life on this roof!

Now I do have to admit having 5-1/2 inches of width to drive a screw in makes for a very large and inviting target. Chances are good no purlins were missed with screws.

On every other purlin, they did make an attempt to stiffen things up by forming a “T”, with one purlin vertical and one flat on top of it. Even if combined Section Moduli of these two members would make them adequate to carry a load from four feet of roof (because unreinforced purlins laid flat epically fail, so “T”s have to carry all roof loads), vertical “web” of these “T” purlins would need to be supported at each end by joist hangers. As placed, under a load, deflection will cause nails joining these two members to withdraw from the vertical member causing yet another failure point.

Of course all of this has left me wondering….what did this builder think all of those boxes of joist hangers were for?

Swinging Doors for a Post Frame Building

On Facebook I am a member of a group “Pole Barns and Buildings”. Recently a group member posted this question:

“I’m new to the group so thanks for letting me in. I’m having a 30’x48’x16′ pole barn built for a shop that will be insulated with a concrete floor. I am also putting an enclosed pull through lean-to on it for our fifth wheel with a sliding door on one end and am planning on double swinging barn doors on the other end. I can’t put a sliding door on both ends since the roll up door on the shop wouldn’t allow for the track across the front. My question is since each door is going to be 14’x7′ has anybody made swinging doors this big and what issues have you ran into? Any tips on the door construction? I’m planning on 4 12″ t hinges per door with a chain pull latch at the top, a cane bolt at the bottom and an old fashion 2×4 bar across the inside on z brackets (there is a walk through door from the shop). Sorry for the long post but I want to make sure I get this right the first time.
Thanks!”
A disclaimer, this is NOT a Hansen Pole Building.
Our friend is actually looking to cover this open shed end with a 14 foot by 14 foot door, made of two seven foot width leaves. If I had been designing this building, I would have made some recommendations to head off this challenge before it began.
But, why not use swinging doors?
Unless they are made from a welded steel framework, it is going to be fairly difficult to eliminate sag. And (very important for most) a remote operated garage door opener is just not going to be practical.
My design suggestion would have been to construct a 44 foot width building all at 16 foot eave. This would allow for a 12 foot side by 14 foot tall overhead door instead of dealing with swinging doors. It would also eliminate a pitch break currently shown between main clearspan and shed. When all is said and done, my option would most likely have been less expensive and more practical.

Barndominium is Popping Up Everywhere

Back in 1981 Barbara Mandrell recorded and released a hit song written by Kye Fleming and Dennis Morgan, “I Was Country When Country Wasn’t Cool”. Well Barbara certainly has it over me in the looks department and I doubt I will ever have a Top Ten hit with, “I Had a Barndominium When Barndominiums Weren’t Cool”.

Read more about barndominium here: https://www.hansenpolebuildings.com/2014/02/barndominium/.

My first personal barndominium, built in 1994, was actually more of a shouse – a 40 feet wide by 36 feet deep, but not rectangular, post frame building! Seriously, it was built as a parallelogram 14 degrees out of square to follow property lines of a very narrow lot. Shop portion is on the ground floor – a garage level with three overhead steel sectional doors 9’ wide x 8’ tall, 10’ wide x 11’ tall and 8’ wide x 7’ tall. I would never recommend the latter of these for an automobile, but it works superbly for motorcycles and our log splitter.

Gambrel roof pole barn
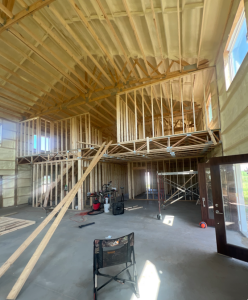
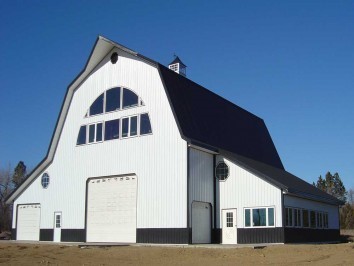
This building is entirely clearspan – no interior columns to have to work around. Second floor has a 10 foot wide step-down by four feet. This area has its own vaulted ceiling at a 7/12 slope and is used for exercise equipment. With a series of nine windows overlooking a beautiful lake, it takes one’s mind off the agonies of treadmilling and lifting weights.

Upper level is only 30 foot by 36 foot, however it has a vaulted ceiling with a 4/12 interior slope. Another set of nine windows for lake view and a cantilevered deck facing eastward – perfect for a BBQ, with access from a sliding glass patio door.

A June 11, 2019 article by Becky Bracken and provided by www.realtor.com tells a story of bardominiums for sale from coast-to-coast: https://m.chron.com/realestate/article/Barndominiums-Blooming-The-Popular-Style-Is-13967497.php.

Ready to make your custom home dreams into an affordable reality? Then a post frame barndominium or shouse might be exactly what you need. Call 1(866)200-9657 to discuss your wants and needs with a Hansen Buildings’ Designer today.

Lean To or Not to Lean To?

Lean To, Or Not to Lean To?

Over my post frame building career I have seen a plethora of buildings designed with an enclosed clearspan enclosed space plus a shed roof (or lean to) for one or both sides. Most often just a roof, a lean to provides shade and not much else for whatever it covers.

But, does just a roof provide a best design solution from practicality and economic standpoints?

I suppose I have been awaiting a reader to ask this question, as my radar has seen it coming! Thanks to DAN in OREGONIA who writes:

“I want a barn 40X64 enclosed with 14’ high overhead doors in the ends i also want a 15’ lean to down one 64’ side. I am trying to maintain RV height in the lean to. Would it be more cost effective to use a 55’ span truss designed to enclose 40’ and leave the 15’ open with a ceiling as the lean to, or make the enclosed area taller to continue the pitch to 14’ at the end of the 15’ overhang? I guess that would make the building walls 19’ tall.”

Before we dive into pool’s deep end, a couple of notes in regards to this building Dan ponders. In order to have a 14 foot tall overhead door, an eave height of 16 feet (and more probably 16’6”) will be necessary. More often than not, a roof slope of 4/12 (read about roof slope here: https://www.hansenpolebuildings.com/2018/09/roof-slope/) proves most cost effective. This means across his 15 foot overhang, there will be a five foot difference in slope.

Hansen Pole RV StorageAs an alternative to a five foot elevation drop, a pitch break could be used between main clearspan and lean to roof. I usually try to avoid going steeper-to-flatter as it adds to construction complexity, adds to costs and provides a place for accumulation of debris (tree leaves and needles) as well as snow sliding off the enclosed portion.

Given a five foot difference and wanting to have RV height in the lean to, puts eave height of main portion of structure up to 21 feet or more! Certainly doable, but probably not affording many benefits unless one contemplates a mezzanine area. And while height increases are relatively affordable, they are not free by any means.

Most people view their new post frame buildings as ways to protect their valuables from not only elements, but also theft, vandalism and critters. Just a roof only partially accounts for only one of these.

In most cases, least expensive, easiest to construct and most practical design solution involves a  clearspan of entire area and placing walls around perimeter. This keeps everything securely within a space of adequate headroom – without having to increase heights just to allow for clearance within the lean to.

Considering a barn or shop with an attached lean to? Give some thought to enclosing it all with a clearspan. Affordability might prove surprising and plus you gain practicality benefits.