My regular “day job” is as Technical Director for Hansen Pole Buildings. This is a fancy title for, “the guy who solves problems when things go astray”.
DIYers are frankly hilarious, as they come holding hat-in-hand saying things like, “You wouldn’t believe what I’ve done wrong, it has to be the worst mistake ever!”
In my 1990’s past life, I was a post frame contractor, running as many as 35 building crews at a given time across six Western States. To the DIYers, I let them know, “Even though I had some really great post frame builders, if a construction error could possibly be done, chances it is named after one of my crews.”
Now recently it was posed to me, “What one question do post frame builders most often ask?”
This was an easy answer, but perhaps one most would not expect, it is, “Why is my wall steel ____ (fill in the blank with amounts anywhere from 3 to 12 inches) too short?”
Usually this is quickly followed with something from a client or builder resembling, “You guys are stupid and your engineer is an idiot!”
 A few years ago the ASABE (American Society of Agricultural and Biological Engineers) set out to establish a standard for uniformity in terms used in the design, construction, marketing and regulation of post frame building systems. This document, approved as an American National Standard (ANSI/ASABE S618) in January 2011, provides definitions and classifications associated with post-frame building systems.
On the surface, it would seem this standard should have kept my $64,000 question from being asked.
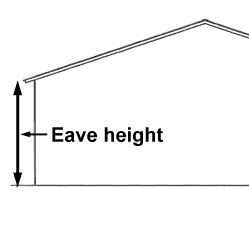
Here are some highlights, which would address “eave height” which ultimately could influence how long the wall steel should be:
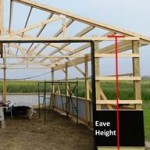
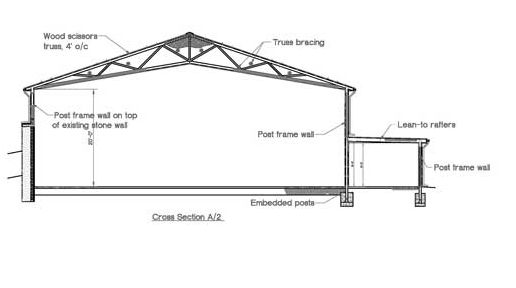
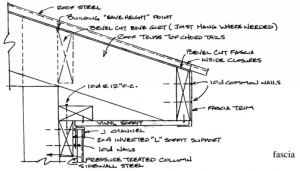
“10.11 Eave height: Vertical distance between the floor level and the eave line.”
“10.2 Floor level: Elevation of the finished floor surface. In the absence of a finished floor, the floor level is taken as the elevation of the bottom edge of the bottom girt.”
NOTE: Bottom girt may also be known regionally by terms such as: Grade girt, Splash plank, Skirt board or similar.
“10.3 Eave line: Line formed by the intersection of the plane formed by the top edge of the purlins and the plane formed by the outside edge of the sidewall girts.”
Some of this is going to be open to interpretation (otherwise known as “clear as mud”). Does this mean a 14’ eave height building designed without a concrete floor, becomes a 13’8-1/2” eave height if a nominal four inch thick concrete floor is later poured using the bottom girt as a concrete form? Some post frame building kit package providers show on their plans excavating below the bottom edge of the bottom girt to allow for a future concrete floor – where is eave height then measured?
There are some who design buildings with the wall framing inset so the outside of the wall girts are in the same plane as the face of the structural columns. Others place bottom girts, wall girts and other wall framing members on the face of the columns (making the framed up building in this case three inches greater in width and length). How this 1-1/2” of framing change is accounted for can vary the length of wall steel by ½” at a 4/12 roof slope – with the difference becoming greater as the roof slope is increased.
In our case – we crafted what we felt was a clarification of how to measure eave height as, “The vertical measure from lower edge of bottom girt to intersection of underside of roofing and outside edge of sidewall columns”. I’ve counted and this description is on each of our blue prints at least seven times (across three different pages).
Last year Justine, the materials coordinator in our office, got a call from a builder who was constructing one of our building kits. The gist of the call being, “your wall steel is eight inches too short!”
Now this post frame builder did admit to having framed the building three inches taller than he should have. His reasoning – to compensate for the building having end overhangs (the thickness of the end overhang happening to be six inches). Obviously, this made far more sense to the builder, than to have followed the building plans and instructions.
Justine astutely asked him to measure the height of the building, from bottom of the pressure treated splash plank, to the top of the eave girt at the sidewall columns. Of course she knew the answer was supposed to be 14 feet, so she wasn’t overly surprised when the builder told her 14’9”!
The correct measure of eave height is shown on almost every page of the plans (along with text description of how to measure it) and also stated repeatedly in the Construction Manual provided with every purchase. Besides diagrams and photos with clear marking of dimensions, comes written encouragement for anyone not understanding eave height to call us.
In almost every case the difference to be corrected is 3-1/2” (where the builder had the idea he needed this added to compensate for the thickness of the nominal four inch thick slab), 6” (height got measured to the bottom of the truss from the bottom of the bottom girt) and 9-1/2” – when both errors are made.
As I tell DIYers and post frame builders, there is no problem which cannot be solved. This is no different.
The no cost in lumber or steel solution is to remove the bottom girt and move it up the post by the distance needing to be made up. This does result in lots of fill needing to be added to bring grade up to the bottom of the bottom girt. There is a side benefit to relocating the bottom girt, as the building is far less likely to have water pouring into it, in the event of a deluge or tremendous snow melt.
Add another wall girt directly on top of the bottom girt. If it is going to be exposed to the weather, it needs to be pressure preservative treated. This result may not be aesthetically pleasing to new building owners, however, as it leaves a great deal of treated lumber exposed.
Or, more expensive solutions, which include:
Add a piece of custom trim at the top of the wall;
Cut the wall steel off shorter and add wainscot panels;
Replace the wall steel.
Of course the best solution is to avoid the problem. Plans vary greatly from provider to provider and engineer to engineer. Rather like the “measure twice, cut once” adage, a few minutes spent perusing provided building plans and installation instructions can avoid embarrassment as well as expense.
 DEAR KAL: You are in Climate Zone 5A, so a ceiling vapor barrier is not required by Code. Building scientist and founding principal of Building Science Corporation Joe Lstiburek states, “Plastic vapor barriers should only be installed in vented attics in climates with more than 8,000 heating degree days.” (More on degree days here: https://www.hansenpolebuildings.com/2022/11/what-is-degree-day/).
 DEAR JONATHAN: We have had several clients provide their own pre-cast Permacolumns and they can be incorporated into our engineered designs. There is, however, a less costly option to explore: https://www.hansenpolebuildings.com/2018/04/perma-column-price-advantage/
 DEAR POLE BARN GURU: Hello, my question, which I can’t seem to find a straight answer anywhere online. Is anything needed between interior PVC panels, closed cell spray foam and the exterior metal siding? The pole barn is located in southern Indiana. It’s used as a shop and being heated occasionally with a wood stove. BENJAMIN in INDIANA
  Mike the Pole Barn Guru writes:
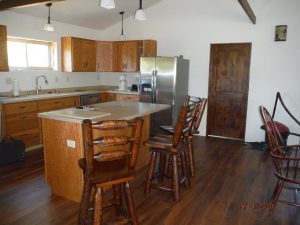 DEAR POLE BARN GURU: Once I save up the funds, I plan to have you guys design me a 28′ x 48′ pole barn with 12′ walls and 6/12 roof. Due to various reasons I will be foregoing metal siding and utilizing wood sheathing and siding for the exterior. I know you measure wall height from the bottom of skirt board, but is it possible to have 12′ walls from top of concrete floor to bottom of truss so as to efficiently utilize sheet goods on the interior walls? Also is 12′ post spacing possible? Thanks TROY in HONEOYE FALLS
 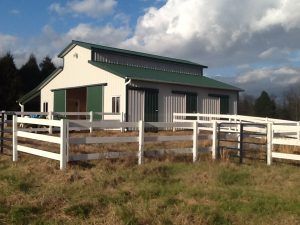 DEAR JOSHUA: Our fully engineered post frame (pole barn) kits include: Mutli-page full size (24″ x 36″) engineer sealed structural plans, specific to your building, on your site, detailing location and connection of every structural member. Includes foundation design. Engineer sealed calculations to verify adequacy of each member and connection. The industry’s best fully illustrated Construction Manual. Unlimited Technical Support from a team who has actually built post frame buildings. All columns, pressure treated splash planks, wall girts, blocking, headers, jambs, roof trusses (and floor trusses where applicable), truss bracing, roof purlins, joist hangers, specialty connectors for trusses to columns, steel roofing and siding (or alternative claddings), steel trims, UV resistant closures for eaves and ridge, powder coated diaphragm screws to attach steel, doors and windows. In a nut shell – everything you need to successfully erect your own beautiful new building other than concrete, rebar and any nails normally driven from a nail gun.
 DEAR TOM: While shear walls (and/or bracing) can make your building shell stiffer, they do not eliminate moment (bending) loads having to be transferred through those brackets and bolt connectors. Your best bets are to either build with columns outside perimeter of existing slab, or cut out squares at each column location for either embedded columns (best design solution) or to pour wet-set brackets into piers.
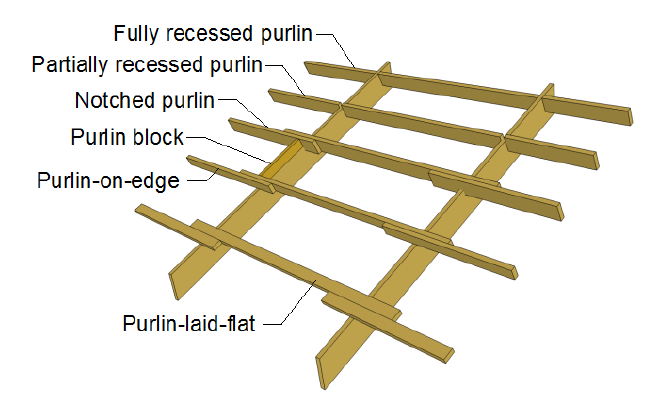
 EAVE HEIGHT
 APPROPRIATELY SIZE SPACES
 Rather than having to make your enclosed building portion significantly taller, I would recommend you approach this with an idea of it basically being a 40 foot square building, with one sidewall ‘pulled in’ 10′. If you went with say a 13 foot eave height, you could have 12 feet of interior clear height both inside, as well as under your roof only portion. This will allow for plenty of headroom both inside (where you could have a vehicle lift) and outside for your camper. With a 4:12 roof slope your overall building height would be 19’8″ under this scenario.
 DEAR POLE BARN GURU:
  DEAR RAYMUNDO:
 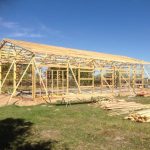 DEAR RAY: If your building is still under construction (in framed up stage) you should be able to stand in middle of roof and rock building back and forth by several inches, just by shifting your weight. Here is where temporary diagonal bracing of wall columns comes into play (especially if some or all of your building columns are not backfilled with pre-mix concrete.
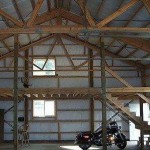 “I am planning a 45×56 pole barn, with ~16ft deep mezzanine on the end wall. The zoning rules limit the building height to 25 ft. It seems the best options are scissor trusses with 1) 4:12 roof pitch and 2:12 ceiling pitch which puts the eave height around 16ft or 2) a 3:12 roof pitch with ~1:12 interior pitch which puts the eave height around 17.5. With a 9′ 4” Mezz Floor height and a roughly 16inch thick floor, the height under the mezz will be just under 8ft, and the min/max heights above the mezz will be roughly 1) 6 -10′ or 2) 8- 10′. The space below will be used for vehicle storage (or possibly a pool table), and the Mezz will be used as a recreation area in the center with offices on either side wall. The whole building will be insulated and climate controlled.
  DEAR POLE BARN GURU:
 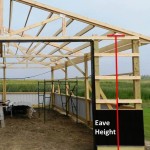 DEAR POLE BARN GURU:
  DEAR SARA: Our oldest daughter Bailey is a highly successful Walking Horse trainer in Shelbyville, Tennessee. She is having a new home constructed currently on acreage and had asked Dad to check out arena prices for her. I priced 60′ x 120′, 70′ x 140′ and 80′ x 160′ buildings, all with identical features. Surprisingly to me, they were all within pennies per square foot of being equal! Being as you are in a more snow sensitive area, I would suspect your pricing curve to have more of a gradual increase as spans increase from 60 feet.
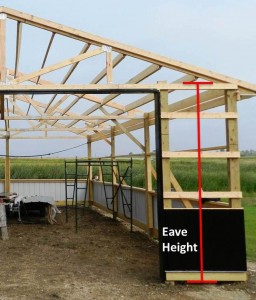
 DEAR POLE BARN GURU: Can you do a 48×48 gambrel style pole, 18-20 ft high? PAMELA in CASPER
 As an alternative to a five foot elevation drop, a pitch break could be used between main clearspan and lean to roof. I usually try to avoid going steeper-to-flatter as it adds to construction complexity, adds to costs and provides a place for accumulation of debris (tree leaves and needles) as well as snow sliding off the enclosed portion.
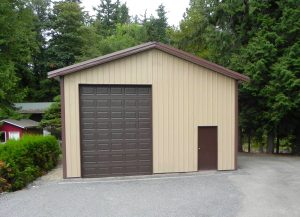 DEAR JIM:
 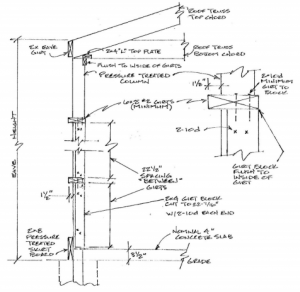 DEAR POLE BARN GURU:
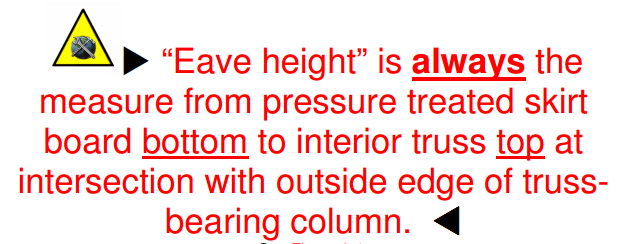
 DEAR STEVE: I’d be contacting local installers of closed cell spray foam insulation. You will get close to R-7 per inch of foam (again, must be closed cell) and do not have the ventilation issues posed by using batt insulation between purlins. You will need to block off the eave and ridge vents for this to be an effective solution.
 DEAR BRYAN: Indeed, s
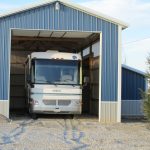 If you are planning on climate controlling the building and having a ceiling (smart choices), then the eave height will need to be further increased by the amount of roof truss heel height greater than the most common six inches.
 In your neck of the woods (Oregon), the vast majority of post frame (pole) buildings are constructed with a single truss mounted on each side of a sidewall column, with purlins (usually 2×6) run over the top of the trusses. With a 2×6 top chord roof truss and a fairly common 4/12 roof slope, the combination of the trusses and purlins is going to chew up 11-7/8” of space. A nominal four inch thick concrete slab is another 3-1/2” thick. After these two deductions, your 18 inches of distance from top of door opening to eave ends up being all of 2-5/8”clear.

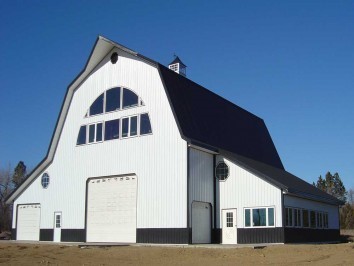
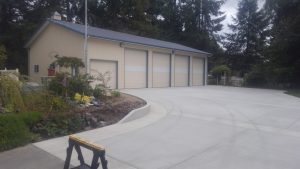
 One of the more popular ones is clients who want a 16 foot tall eave height and a loft (either a full or partial second floor).
 Case in point – the building in this photo. Looks great, doesn’t it? I am sure the building will function to well meet its designed needs.
 Personally, when I get specific unusual requests, I usually try to dig to the root of the request. Asking a question such as, “Do you mind sharing with me why adding or using “X” is important to you?” If you hear this question from me, it is only my wanting you to be a satisfied client. I am not criticizing, just trying to figure out what the “gain” is.


