Tag Archives: truss heel height

Truss Notch Locations and Heel Height

Truss Notch Locations and Heel Height vs. Purlin Dimensions on Overhang End

Hansen Pole Buildings’ DIY clients BENJAMIN and COURTNEY in DEER LODGE write:

“Hello, I’m trying to understand the difference of a quarter inch between my end wall overhang  purlins and my heel heights. My interior truss has a heel of 19 3/8” and my exterior truss has a  heel of 13 9/16”. My plans call for 2×6 recessed purlins. Assuming the end wall purlins are         perfectly level, wouldn’t that leave about a quarter inch gap between my end wall top chord        truss and the bottom of my purlin?”

Mike the Pole Barn Guru advises;

For those of you following along at home, sitting on your couch with a bag of popcorn….typical Hansen Pole Buildings utilize widely spaced columns (in this instance 12 feet), with a truss pair aligned with each column. Ends of building have a single truss. Roof purlins are on edge (1-1/2” face towards sky) and recessed so top of interior trusses and purlin tops are in the same plane. To     support end overhangs, end truss top chords are lowered to allow purlins to pass over top.

This is one of those mysteries confounding builders for centuries. It has resulted in many post frame buildings where the roofline goes up slightly at each building end.

If your roof had absolutely no slope, then end truss heel heights would be 5-1/2″ less than interior truss heels in order to maintain both a flat level ceiling, as well as a smooth roof plane, with 2×6 purlins on edge. When purlins are placed at a slope, however, heel heights need to be adjusted downward in order to appropriately compensate.


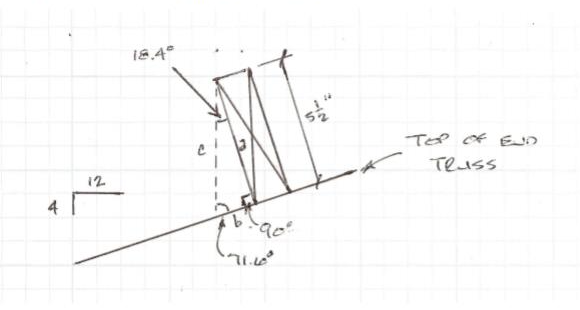
Amount of difference required to achieve smooth planes can be found by determining what we refer to as “slope factor”.

In your case with a 4/12 slope we take 4″^2 + 12″^2 = 16 + 144 = 160

Square root of 160 = 12.649 divided by 12 = 1.054

Take slope factor x dimension of purlin = 1.054 x 5.5″ = 5.798″ (or 5-13/16″)

Set the bottom of all trusses to the same height, your purlins will be in firm contact with top of end trusses and your roof plane will be smooth and ready for steel.
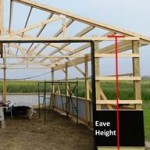
Basic Stats for Post Frame Home Floor Plans

Basic Stats for Post Frame Home Floor Plans

If there is a single commonality among us humans it is this – we are dimensionally challenged. This situation is even more so crucial when it comes to planning your new post frame home.

Here are a few tips to help you out:

EAVE HEIGHT

Measure from the pressure treated splash plank bottom, to intersection roofing underside at sidewall columns. This is not to be confused with ceiling height (also known as interior clear height).

HOW TO GET AN EIGHT FOOT FINISHED CEILING

For discussion’s sake (and as most post frame homes are concrete slab on grade), set a “zero point” at exterior grade (pressure treated splash plank bottom), slab top will be at +3.5 inches.

To create eight foot finished ceilings requires 8’ 1-1/8” (allows for 5/8” sheetrock on ceilings). This puts us at 8’ 4-5/8”.

Now allow for roof system thickness. With recessed (joist hung between trusses) roof purlins, 6-1/16″ for truss heel height with 2×6 top chord at 4/12 slope (provided you are using closed cell spray foam insulation between purlins).  Minimum eave height would then be 8’ 10-11/16”. If using blown-in insulation truss heel height should be insulation R value divided by 3 plus 2″ to allow plenty of eave to ridge air flow above insulation.

What about two floors?

In order to be able to run utilities (e.g. plumbing and ductwork) through second floor supports, I highly recommend 4” x 2” prefabricated wood floor trusses. Generally truss depth will be about an inch for every clear span foot with a 12 inch minimum.  Adding an arbitrarily chosen 16” deep floor truss and 8’ ceiling on second floor to example in previous paragraph puts eave height at 18’ 4-9/16”.

Stairs challenge even many experienced builders. Finished width must be no less than three feet (if planning allows, four feet is so much nicer), allow for drywall on each side when determining interior framing of stair opening width. In most jurisdictions maximum tread rise is 7-3/4” and minimum run is 10”. In above example, second floor top is 9’ 5-7/8”, so stairs would need at least 14 treads, taking up at least 140” (11’ 8”) horizontally. At stair top and bottom a space, in travel direction, equal to stair width must be provided. Headroom along every point of finished stairs must be no less than 6’8”.

ALLOW FOR WALL THICKNESS

Different providers measure their building footprints differently – some use wall girt outside at ‘call out’ while others use column outside and are three inches greater in width and length, this will need to be accounted for in room dimensions.

Exterior walls with bookshelf girts will be wall column thickness plus 1-1/2” for girts protruding outside of columns. With 3 or 4 ply 2×6 glulams or 6×6 columns allow 7-1/4” plus interior sheetrock thickness. Interior 2×4 walls with ½” sheetrock on each side end up 4-1/2” thick.

APPROPRIATELY SIZE SPACES

Below are popular post frame home rooms and their average square footage, in three categories (listed as small/medium/large):

Entry Foyer (65/89/138)
Kitchen (193/275/423)
Walk-In Kitchen Pantry (17/31/51)
Great Room (487/481/680)
Dining (148/196/281)
Living (256/319/393)
Family (311/355/503)
Recreation (216/384/540)
Entertainment/Media (140/192/280)
Master Bedroom (231/271/411)
Master Bathroom (115/144/210)
Secondary Bedrooms (130/139/178)
Other Bathrooms (93/146/313)
Laundry (67/87/145)
Utility/Mud Room (30/48/80)

Always allow adequate space for hallways (same minimum width rules apply as stairs).