Welcome to Ask the Pole Barn Guru – where you can ask questions about building topics, with answers posted on Mondays. With many questions to answer, please be patient to watch for yours to come up on a future Monday segment. If you want a quick answer, please be sure to answer with a “reply-able” email address.
Email all questions to: PoleBarnGuru@HansenPoleBuildings.com
DEAR POLE BARN GURU: Hello,
I came across the link below while investigating Pole Barn House kits, but since we don’t want a concrete slab, I was wondering about how the poles work in conjunction with a crawl space.
https://www.hansenpolebuildings.com/blog/2013/03/crawl-space/
GNASHING IN NASHVILLE
DEAR GNASHING: The easiest (and most affordable) way to create a crawl space is to construct in typical pole building style, with an elevated wood floor. This now creates a crawl space which can either have an insulated perimeter, or the floor may be insulated leaving an unconditioned area. A far more expensive route would be to pour a continuous footing and foundation, mounting the columns to poured-in-place brackets on top of the foundation walls. We’ve done them both ways, so it’s client’s preference.
DEAR POLE BARN GURU: I’ve hired a contractor to assemble a Hansen Pole Building kit package for me. He says he is short on trims to cover the fascias. As he was explaining to me, is that the triangle cut part of the end needs to be covered by the ‘L’ trim. Does that make sense? It does to me looking at it, but hard to write out! WRUNG OUT IN WASHINGTON
DEAR WRUNG: Your building requires 30’3” of trim to cover each fascia, when installed to match the instructions provided in our Construction Guide. A total of 63 feet was shipped to your building site, so there was plenty provided.
It appears, what has happened, is your installers have made an assumption of how to correctly apply the trims, rather than having thoroughly reviewed the directions provided. Failure to follow the step-by-step detailed instructions does occur every once in a while. Hopefully your project is not past the point of no return (where trim was improperly used).
DEAR POLE BARN GURU: What is the purpose of bracing the webs of roof trusses? Why do some webs need braces while others don’t? MYSTIFIED IN MISSISSIPPI
DEAR MYSTIFIED: The internal members of roof trusses are referred to as webs. The permanent braces sometimes required on roof truss webs are called continuous lateral braces, or CLBs. They’re typically required on a web which is in compression. The truss web bracing is intended to keep the truss web from buckling in the weak (skinny) direction.
To explain why they’re sometimes necessary, imagine pushing down on a yardstick which extends vertically to the floor from the palm of your hand. It doesn’t take much pressure for the yardstick to buckle.
Now imagine taking your other hand and restraining the yardstick halfway up from the floor. If you press down now, it takes a lot more pressure to make the yardstick buckle. In effect, you’ve added a CLB to the yardstick.
The web of a truss is much like a yardstick. It can withstand a certain amount of compression without bracing. The amount of compression a web can withstand depends partly on its size, species, and grade. But the biggest factor in determining truss web bracing requirements is the overall length of the web.
In some cases, webs can require two rows of bracing rather than one. This design is most often seen in very tall trusses.
Single trusses are only 1-1/2 inches wide and require far more web bracing than does a double truss system, where the two individual trusses are nailed directly together so as to form a three inch width member. Doubling the thickness makes the webs twice as stiff against buckling.
If one CLB is required on a web, it should be roughly in the center of the web. If two CLBs are called for, they should be at one-third points on the web.
Continuous lateral bracing won’t do any good if it’s not anchored to something solid. The CLB will just transfer the buckling, and the whole set of webs will buckle in the same direction. Typically, CLBs are anchored with diagonal braces to rigid points such as the top chords of trusses, or to a building endwall.
In pole buildings, it is not uncommon to have trusses spaced eight feet or more apart. CLBs begin to become impractical, as they eventually become so long they will buckle between the trusses. In no case should a single 2x (1-1/2 inch wide) CLB used with a length over 10’.
So how to apply truss web bracing of widely spaced trusses? By applying a 1×4 or larger brace to the top or bottom (if two CLBs are required, to both top and bottom) of the web needing to be braced, for at least 90% of the length! These braces act as a strongback, restraining the web from buckling in the weak direction. The braces should be attached with 10d common nails, placed at a spacing as recommended by the RDP (Registered Design Professional – engineer or architect) for the project.
To determine if you need CLBs, look at the drawings accompanying the trusses; they should have the locations of any CLBs on them. Many truss manufacturers also put tags on webs which require braces. For more information on trusses, visit the Wood Truss Council of America’s Web site at: https://www.sbcacomponents.com/
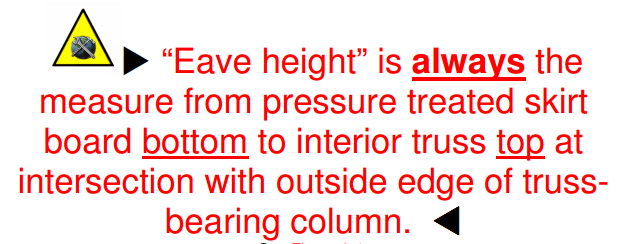 For more insights into eave height please read: https://www.hansenpolebuildings.com/2015/02/eave-height-2/.
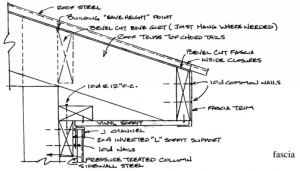 And the “soffit nailer”? On the plans it is only described as the distance it is located down from the eave height – which is now 3-1/2 inches higher than the plans show. No, the distance from grade did not change, however it did move this distance down from the eave height, in order to make all of the wall steel work.
 The building is 24 x 32 with 1 foot overhangs on the front, right side and rear wall, with a 4′ cantilever on the left sidewall.
 Well it is bad, and it is bad due to installation issues, which could easily have been avoided.


