Tag Archives: Mike the Pole Barn Guru

Where Have You Gone?

Where Have You Gone, Joe DiMaggio?

From the third verse chorus of Simon & Garfunkel’s 1968 “Mrs. Robison” from “The Graduate” album:

“Where have you gone, Joe DiMaggio

A nation turns its lonely eyes to you

Woo, woo, woo

What’s that you say, Mrs. Robinson

Joltin’ Joe has left and gone away”


“Where have you gone, Joe DiMaggio?” — the line in Simon and Garfunkel’s 1968 No. 1 hit “Mrs. Robinson” — annoyed the Yankee legend until he understood it.

Paul Simon, a Yankee superfan, told Fran Healy for MSG’s “The Game 365” that the line in the song came to him out of nowhere and that he never expected he would have to explain its meaning to DiMaggio himself.

“I happened to be in a restaurant and there he was,” recalls Simon. “I gathered up my nerve to go over and introduce myself and say, ‘Hi, I’m the guy that wrote “Mrs. Robinson,” ’ and he said ‘Yeah, sit down . . . why’d you say that? I’m here, everyone knows I’m here.’ I said, ‘I don’t mean it that way — I mean, where are these great heroes now?’ He was flattered once he understood that it was meant to be flattering.”

When Simon met Mickey Mantle on “The Cavett Show,” the Mick asked him why he didn’t use his name instead of DiMaggio’s. “Wrong amount of syllables,” Simon told the Yankee star.

Simon continues: “Can you imagine, just the irony of it, I write this line, I don’t know where it comes from, about a ballplayer who I know is really famous but he’s not my favorite guy — and I end up, number one, writing one of the main obituaries . . . and then singing the song in centerfield at Yankee Stadium. I mean, our attachment was so powerful because of that song.”

My loyal long-time readers have probably noticed my articles are no longer appearing on Tuesdays and Thursdays. Please let me reassure you – I have not gone away. And, I am far from having a shortage of future topics to opine upon. You will continue to see my “Ask the Pole Barn Guru” columns every Monday, where I answer three construction questions from readers. Every Wednesday and Friday there will be articles on post frame construction.

When possible, I will be doing my 2 p.m. Central time Wednesday Facebook Live “Ask the Pole Barn Guru” sessions – so be sure to turn in. I will also be continuing with my podcasts, frequently featuring guests from throughout our fascinating construction industry.

Again – I have not gone away.

So (you may ask) what are you doing with all of your spare time, Mr. Pole Barn Guru?

As amazing as it may sound, I do have a life beyond post frame buildings.

……..we will resume once you have recovered……

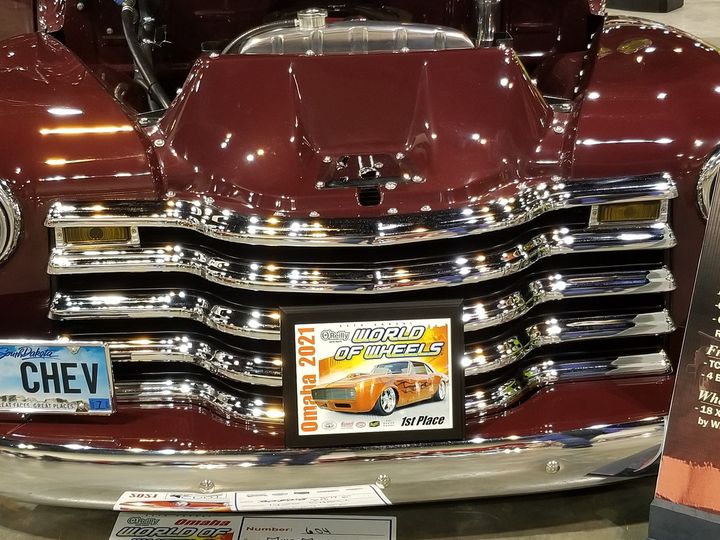
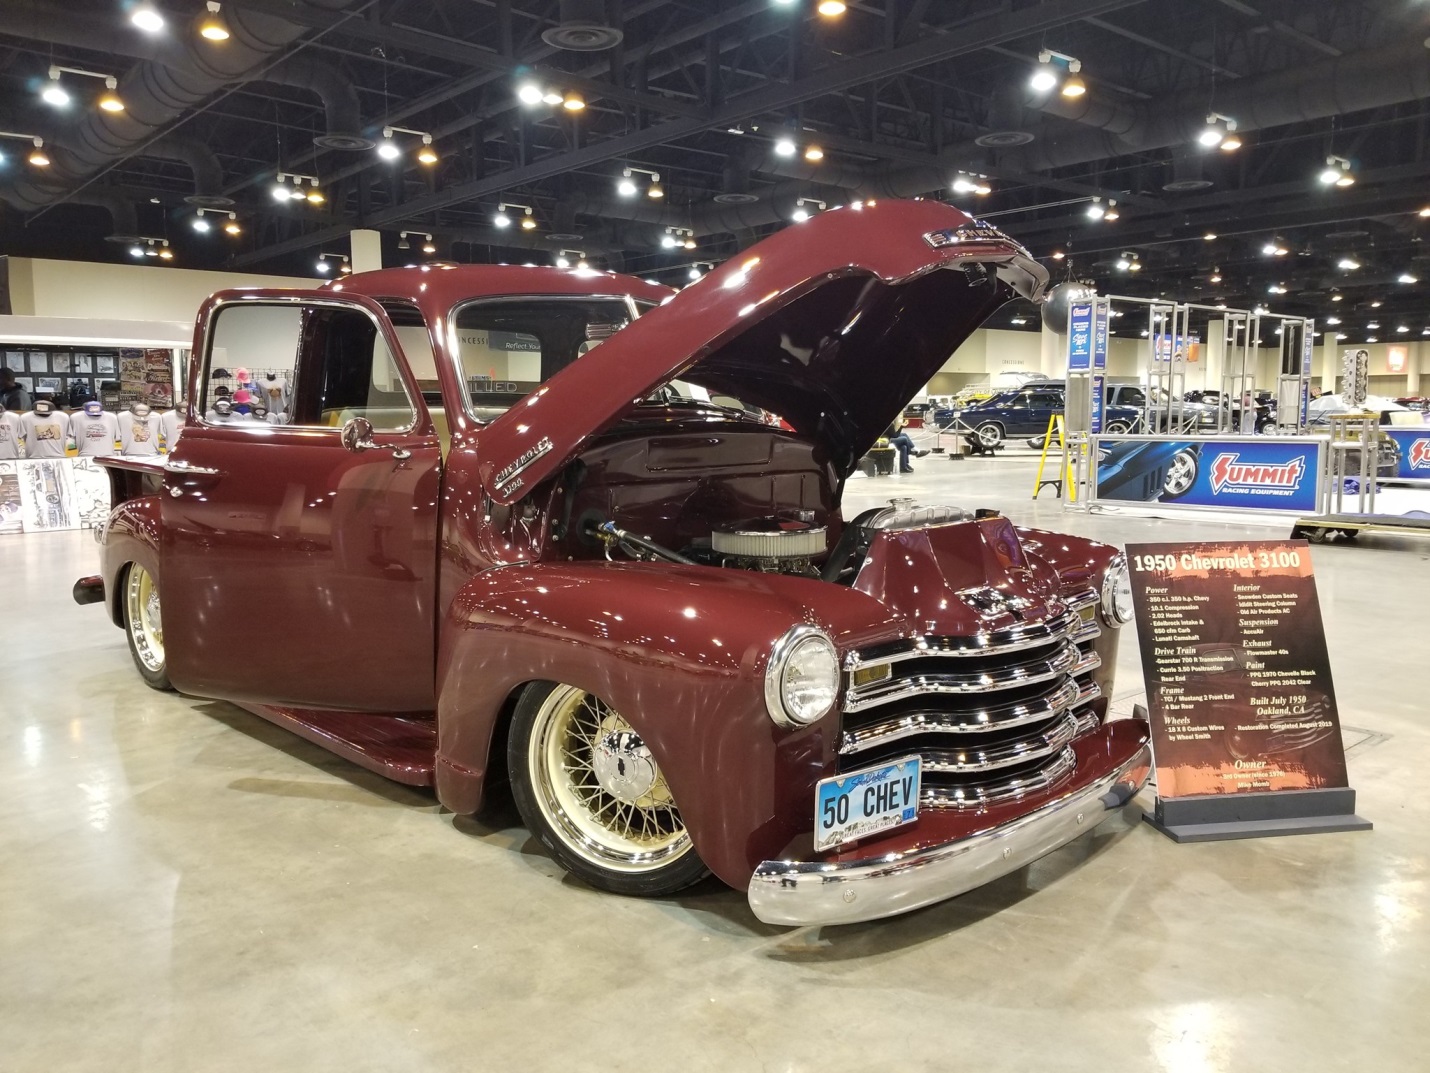
Most weekends from March through October I can be found with my 1950 Chevrolet 3100 ½ ton pickup at classic car shows across America. Last weekend we were at World of Wheels in Omaha.

Yes, I gave my truck similar detail attention as I do post frame buildings.

For those of you who are curious, this truck was manufactured in Oakland, California in July 1950. I acquired it from its second owner 45 years ago for $150, with its best features being it would start and run! I brought my first daughter, Annie, home from being born in this truck in May 1976 – so it has great sentimental value to me. My younger brother (and only sibling) Mark did much of this current restoration version’s work and it was completed in August 2019.

Hopefully I will continue to be writing articles and attending car shows for many years to come! If you see me at a show, please stop by and say hello.

Save Me, My Trusses Do Not Fit!

Here is a case where investing in a post frame building kit from people who have actually constructed buildings is a huge asset (am surmising this is not the case, since this person sent the Hansen Pole Buildings Technical Support email address a plea for help).
Reader James writes: “I have a 24 x 60 pole barn. I pulled my outside dimensions from outside of skirt board now on my trusses are an inch and a half long on each side how can I fix this?”

Dear James ~

Since I do not know who supplied your post frame building kit package, I will have to do some guessing as to how your post frame building was designed. Typically questions like this can be answered by whomever provided your plans and materials – and if it is an engineered building, the building engineer should be consulted as well.

A quick solve for anywhere in the country and any method of construction – to the eave outside of all corner and sidewall columns, attach a pressure preservative treated 2×6 from grade, up to the level of the trusses. In most cases two 10d galvanized common nails spaced every nine inches will be an adequate connection. As these 2×6 will be in contact with the ground, they should probably be treated to at least a UC-4B standard. Your building’s skirt board and any other exterior mounted framing can now be attached to the face of these 2×6. Using this method allows for siding to be installed normally, without any undue compensations to get it to lay out properly.

Another possibility – provided the heel plates of the prefabricated light gauge metal connector plated trusses are not in the way, you could cut 1-1/2″ off of the end of each truss, making them 29’9″ to match the width of your building from outside of column, to outside of column. In no case cut through a steel truss plate.

Or, (in cases with recessed or joist hung purlins) attach the eave girts between the overhanging 1-1/2″ of each truss. The end connections end up being a bit trickier here as it requires nailing through the end of the truss, into the end grain of the eave girt.

With stacked purlins, the eave girt can be nailed to the outside face of the columns above the truss.

If the chosen path is any of the last three choices, when the endwall steel is placed, start the first panel of steel 3/4 inch PAST the corner of the building. The corner trim will cover this and it eliminates having to do a lengthwise rip on the last sheet of steel on the opposite corner.

Mike the Pole Barn Guru

Blog Review by an Expert

I’m a seat of the pants journalist – my training was as editor of the Post Falls High School newspaper back in 1975! This blog is one of several finalists in the 2017 Best Construction Blog competition. In the event you have been entertained or have learned from my articles, your vote would be appreciated at: https://constructionmarketingideas.com/the-pole-barn-guru-blog-how-to-combine-business-and-technical-insights/ (scroll to bottom of page).

Mark Buckshon of www.constructionmarketingideas.com penned this review of my blog, which I will share with you:

The Pole Barn Guru blog: How to combine business and technical insights

By Mark Buckshon

March 8, 2017


The Pole Barn Guru blog

Mike Momb‘s Pole Barn Guru blog for Hansen Pole Buildings, LLC demonstrates how a business can combine marketing, technical support, and business insights into an effective blog.

This Minnesota-based business specializes in prefabricated kits for “pole buildings,” which can economically serve as barns, garages, storage sheds, and even homes. It just takes a few weeks from order to delivery — the website offers several standard models for shipping, and a custom-design ordering service.

Blog topics include follow-up customer service reports, technical question answers, and some business insights and history.  I especially enjoyed reading Momb’s description of how he got the business started in the early 80s just as the major Reaganomics recession at least temporarily virtually ground the housing business to a halt (when interest rates soared above 20 per cent).

This post describes how Mike Momb started the business from scratch.

With my final paycheck, I was able to pay our family bills current and had $50 left over. The local “free advertising” paper would allow me 3 weeks of credit, if I paid for the first week’s ad up front.  I decided I couldn’t do any worse than the people I had worked for, and right then decided I was going into the pole barn kit business. Now granted, I had no business location, no inventory, no truck, no anything….all I had was an ad in the local free newspaper!  The first week I sold three buildings, got down payments from the clients and… I was in business! One of my friends was in real estate and located six acres of highway frontage on Highway 99E just north of Canby, Oregon which could be rented reasonably.  Paying first and last month’s rent, I now had a place. The Chevrolet dealership had ordered a lumber delivery truck for the local yard, who had not taken delivery on it. With a small down, they got me financed on the balance and I could deliver. M&W Building Supply Company was a reality!

This entry has had more than 50,000 views to date. The top post (with more than 100,000 views) is Pole Barn Truss Spacing.

A recent post describes an interaction with a client concerned about the building’s capacity for load bearing and wind. in Panic Mode, We’ve All Been There, Momb provides clarity in explaining the standards and that the building will meet the requirements — but if the purchaser wants to pay more, the higher load factors could be accommodated for an upgrade fee. What I like here about this example is how he takes a real situation that may apply to others and demonstrates thoughtful and comprehensive research and knowledge in answering the questions.

Overall, this blog does what it should: I’m sure certain entries/posts have good search engine traction; leading potential clients to the company to begin the relationship. And if you already are a client, the blog reassures you of the business’s values, traditions, and service focus.

You can vote for The Pole Barn Guru blog and others of your choice on the ballot below. Voting concludes March 31.

The kindest of your vote here is greatly appreciated: https://constructionmarketingideas.com/the-pole-barn-guru-blog-how-to-combine-business-and-technical-insights/

Widow’s Peak Construction in 9 Easy Steps

What distinguishing physical feature do Leonardo DiCaprio, John Travolta, Marilyn Monroe, Elvis and Ronald Reagan all share?

I said, “physical feature” so all of them having been movie stars is not the answer we were looking for.

They all have widow’s peaks!

The expression widow’s peak dates from 1849, and the term stems from the belief hair growing to a point on the forehead is suggestive of the peak of a widow’s hood and is an omen of early widowhood.

When it comes to barns, the widow’s peak is the pointed overhang on the front of a barn roof. Originally it was provided with a pulley wheel underneath, for hauling up hay. Most modern widow’s peaks are to provide shelter for a loft door or to add rustic charm.

Having a widow’s peak on your new post frame (pole) building is both fairly simple and affordably done when it comes to planning for it in advance. I happen to have one on the building I live in on a daily basis.

Having provided a significant number of them over the years and actually never having had to supply any special instruction for their installation, I was surprised recently when a professional builder was stymied on what to do with the one on the gambrel roof barn he was assembling.

They had the framing part successfully completed, so I wrote out the instructions and forwarded them via email.

For those of you who are considering a widow’s peak on your new pole building, here are the steps to successful steel roofing and trimming – to provide an idea as to whether you could do it yourself.

Step 1. Cut roof steel at widow’s peak to match outside edges of varge rafters (also known as fly rafters).

Step 2. Place widow’s peak rake trims over top of roof steel, with the flat edge on top of the roof. These rake trims are similar to standard rake and corner trims on one side and the opposite edge is flat with a hem.

Step 3. Lightly place a mark (felt tipped pen works great) on top of roof steel at edge of the flat face of the widow’s peak rake trims.

Step 4. Cut and install rake trim on standard overhanging (or no overhang) portion of roof – high end on “face” (street view) should extend until it hits widow’s peak varge rafter.

Step 5. Run roof side of standard rake trims long by a couple of inches on the uphill (towards peak) end.

Step 6. Cut widow’s peak rake trim to overlap the previously installed standard rake trim, but do not install yet.

Step 7. Take expandable closure strip (https://www.hansenpolebuildings.com/2016/03/emseal-self-expanding-sealant-tape-closures/) and place on widow’s peak side of previously drawn line (normally hold it about 1/4″ to 1/2″ away from line, just keep it straight).

Step 8. Install widow’s peak trim, using stitch screws through expanding closure into tops of every rib it crosses.

Step 9. Stand back and admire your handiwork!

Some of you fare readers may be aghast – as I have shared, ‘super secret’ information with builders and competitors. Do not fret, it is all for the betterment of our industry. Better pole buildings, make for more a demand for better pole buildings!

Hansen Pole Buildings Owner is Back!

Hi! This is one of the founding owners of Hansen Pole Buildings, and for whom the company is named, J.A.Hansen. I thought we’d take a break from the usual Friday “rerun” blogs, for me to tell you a story. Bear with me here…

It was September 26th of last year, 2015. I was on my 2004 Yamaha 1100, a sweet little ride if there ever was one. It fit me perfectly. My partner in crime and loving husband, the one and only Mike the Pole Barn Guru, was on his 1986 Yamaha Venture Royale, 1300. We were on our way from South Dakota, where the main office of the company is, to Newman Lake, WA, (Spokane suburb near the Idaho border). That is home for Mike and I, whenever we haven’t been on the road over the past several years. But that, as they say, is “another story”.

We’d made that trip several times over the past many years, and this was my third trip riding cross country on my own bike. It was wonderful to learn to ride my own bike. Besides the thrill of riding in the wind, there is a lot more to see than the back of my husband’s helmet!

Today was extra special. It was the middle of an absolutely beautiful day. Sun was shining, but we’d started early enough to stop “early” if and when the sun got in our eyes. It was early yet, maybe 1:30 in the afternoon. We were headed for Bozeman, MT, our next gas stop. I was riding lead, my husband behind, close enough to “shield” me from other traffic, but not so close as to be able to stop….should he need to.

Now the next part is missing details….because quite honestly, I simply don’t have them. I’ve dreamt about it, relived it, and no way will what happened prior to the next part will come back to me. And no, I didn’t have a stroke or pass out. If I had, I’ve had dropped my bike right then and there. (Yes you experienced bikers, I probably should have just “laid it down”. Hindsight is….).

A curve was coming up, and as is my habit, I slow for curves. I am careful of my speed whenever I can’t exactly see the entire road ahead of me. Interstate was 75mph and I know I had already slowed to 70. When for some unexplained reason, my bike would not throttle down more. I turned the handle WAY down, or at least tried to, and tried to carefully brake. I went to the side of the road, so to signal Mike something was wrong with my bike and we’d be stopping. I could hear him through our headsets, calmly asking me “what’s wrong?”.

The next part went so fast, in the flash of seconds. Apparently Mike could see I was in trouble as he hollered into my ears, “Slow down! Slow Down!” I didn’t hear anything after that. I do remember going over the edge of the high side of a left hand curve, and thinking “just ride it out, ride it out”. That came from my 40 years of snow skiing experience. And so I did ….for a time. The next part was relayed to me several days later. Mike tells me I DID ride it out….until my back tire hit some loose dirt and then I went end over end….with me ON the bike. And finally, I flew off….still at a very high speed.

I do remember hitting the ground on my chest. It was, um…not pleasant! (I broke most of the ribs on my right side.) Immediately I knew I was paralyzed at least from the waist down. My feet felt then, as they do today, “frozen”. But more than frozen. It’s similar to when you hit your “crazy bone”. They felt…numb, cold, and tingly.

An ambulance ride to Bozeman, helicopter to Billings to place titanium rods in my back and be told I am a T-6 Paraplegic. Four days after surgery, I went by Leer Jet from Bozeman to Craig Hospital and Rehab in Denver, CO which came up as the #1 place in the U.S. when my husband looked for the “best rehab” for SCI (spinal cord injury). Three months at Craig, another 3 weeks recently at Mayo Clinic in Rochester, MN for a “tune up”, and I finally am starting to get back to work. Today.

What did I do as the company chief officer? Lots of things, including editing and posting the blogs that Mike The Pole Barn Guru writes. More importantly, to YOU as a consumer, what am I going to do NOW?

Good questions. I am not sure of the “details”, but I am sure of one thing. I am still at the forefront, cheering on our staff, being there to advise, direct, and make sure ALL of our clients get…Your Building. Your Way. Yes, that’s our tagline. It was my brain storm and I’m sticking to it….to give you the best we have to offer. The very best custom designed building, at a reasonable price.

During my convalescence, “new” blogs were reduced from 4 a week to 3 a week, with “re-runs” posted on Fridays. During those 7 months Mike the Pole Guru not only was at my bedside every single day (and often nights), but he was at YOUR side as well. He reviewed building plans, assisted Clients and Contractors with tech support questions, answered Pole Barn Guru queries, and yes, was still writing blogs.

Our general manager, Eric, also took on quite a bit of my work, and was one of my best “cheerleaders” in my recovery. I am happy to say, he has also recently become a major partner in owning Hansen Pole Buildings. Along with Mike, Eric shares my vision and the future of Hansen Buildings to be the “best darn pole building company money has to offer”.

So – I’m back…and no more “re-runs” on Fridays. You are free to enter a search term if you feel there is something we may have discussed before, or something “new” to you, but may or may not have blogged about in the past.

We are open to researching ideas for custom designs for pole buildings….pole barns to some. To us, they are anything you want your building to be, as long as we can design it structurally safe and sound, and aesthetically pleasing to any eye.

It feels good to be back…thank you for your patience and we look forward to hearing from you.

Judy A. Hansen, owner

The Builder Gene

Children are interesting – especially as they arrive at adulthood and we start to truly recognize what “genes” they have inherited.

My Dad was a builder and his father before him was a builder as well – not much question I had inherited the “builder gene” from them. Our nearly 21 year old daughter Allison has the builder gene as well. When she and her younger brother Brent were in middle school, she did his shop projects – otherwise he never would have gotten through them. My Dad was also mechanical. Me – not so much, Allison certainly not at all – she couldn’t find a fuse or the dipstick on her pickup for love nor money. But my son, Brent – he has the mechanical thing down.

Hansen Storage
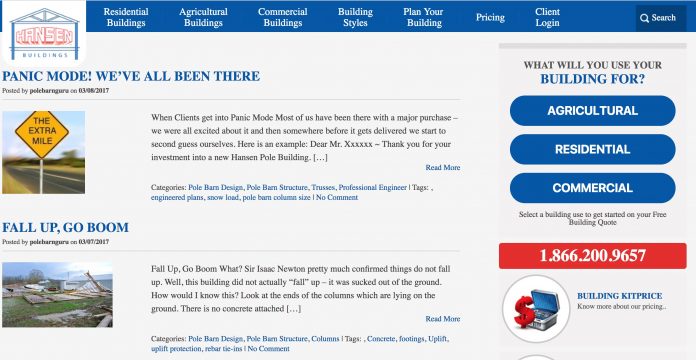
A week ago Saturday we starting constructing a 42’ x 120’ self-storage pole building for one of the Hansen Pole Buildings owners. The building will have five 12’x27’ and five 12’x22’ units for boats. The building site is along Lake Road on the South Dakota side of Lake Traverse. It also has five each 10’x20’ and 10’x15’, as well as two 10’x10’ and three 5’x10’ units for people to put their excess “stuff” in.

My bride suggested we fly our son out from Spokane to have him help. While he has no building experience, at 6’6” he is a weight lifter, is in phenomenal physical condition and is really smart – so it sounded like a good choice to me

He arrived Sunday evening. Monday morning, on the way to the building site, I encouraged Brent to ask questions about everything.

Besides myself, my younger brother Mark, and cousins Kim, Randy, Scott and Steve all worked on construction projects with my Dad and his brothers. My cousin Kim had coined the term for our generation as being the MEI (Momb Enterprises, Inc.) slaves – and proudly posted a plywood sign to the effect at our jobsites. While our elders were superior builders, they were not very good at actually explaining to us the “Why” of doing things – our job was to do as we were instructed and not ask questions about it. Far too often I got myself into trouble with one of the uncles as I was the child who just had to know “why”. On everything. And the answer I got was something akin to “get to work” – to not waste time asking questions.

I didn’t want my son to have the same experience. He may never build anything again in his life, but at least he will learn some things on this project.

Interestingly, I did learn something fairly quickly from watching Brent work the first day – he can drive nails equally well with either hand! I could no more drive a nail left handed, than I could fly to the moon without a space craft! I did recall both Allison and Brent having decided at one point they were going to become more left handed – as they did everything they could left handed for several years when they were younger. How it is kids get ideas in their heads is beyond me, but in Brent’s case, this one worked.

Monday afternoon and yesterday morning we (Brent and I) had to put what seemed like a zillion 1-1/2” joist hanger nails into the rafters for the new building. It gave us time for some learning moments.

Brent will be here for two weeks to help, I will try to share some of what he is learning with the loyal readers of this column.

Pole Barns in the News: Lean-to’s

The following article appeared in the Madison Journal Today (Madison County, Georgia) June 7, 2014:

“Madison County commissioners plan to exclude pole barns, carports and lean-tos from permitting requirements.

 But working out the policy on making this happen has not been an easy matter. And the board will once again discuss the issue at its June 2 meeting.

Madison County planning commission chairman Wayne Douglas said the planning commission aimed to “resolve what appeared to be an inequity” in county guidelines, the fact that some structures required a permit but not others. He said the planning commission aimed to have no permitting required for carports, pole barns and lean-tos.

A couple of county commissioners have also spoken out in favor of no permitting for such structures, saying they don’t want someone who simply wants a place to store his tractor to have to seek a permit for it.

Commissioner Mike Youngblood said he has an issue with how the measure was pushed by the planning commission, noting that building inspection director Eddie Pritchett and county attorney Mike Pruett weren’t consulted before the matter was brought to the board.

He added that he “wasn’t happy with some of the comments” at a recent planning commission meeting, after listening to the recording of the meeting. He told Douglas that his name was “Mike Youngblood” and he named each commissioner, saying that they are not “that bunch” as he heard on the recording. He told Douglas that he needs to have greater control over the tone of planning commission meetings.

Madison County commissioners heard from building inspection director Eddie Pritchett, who said he doesn’t think eliminating permit requirements is a good thing. He said permits are issued for safety reasons and that not requiring permits could open the door for unsafe structures in the county.”

 Personally, I believe the less government is involved in the everyday lives of the individual, the better. However, in this case I agree totally with Director Pritchett and for exactly the reasons he cited.

The Building Code does allow for “pole barns” and other low risk structures such as lean-tos, which would be unlikely to cause injuries or fatalities in the event of a failure to be designed to a lesser set of standards than frequently occupied buildings.

Pole Barn Lean ToAllowing carports, pole barns and lean-tos to be constructed without a structural plan review is inviting disaster. The tractor storage barn of today, could easily be converted to another use in the future – one which could result in a tragedy due to a building which has been cobbled together. I’ve seen pole barns converted into businesses with hundreds of clients walking through the doors daily, and even as far fetched as a “ski-through” where snow skiers can enter one open side and exit another – via a lift chair. Do you really want to not have these buildings subject to being built to code?

In my humble opinion, every building, regardless of use, yes including lean-tos, should be designed by a registered design professional (architect or engineer) as well as being subjected to a structural plan review prior to a permit to build being issued.

Rural Builder Magazine

Rural Builder MagazineFor those of us in the post frame (pole building) industry, Rural Builder magazine is a must read. Published seven times a year – I always await receiving my Rural Builder in the mail with a degree of anticipation and excitement. I have probably not missed reading (and rereading) an issue in three decades.

Until 2002, Rural Builder, was published by Krause Publications of Iola, Wisconsin.

My late father was an avid coin collector and would have greatly appreciated what Krause is best known for its – Standard Catalog of World Coins, a series of numismatic catalogs commonly referred to as Krause-Mishler catalogs. They provide information, pricing, and Krause-Mishler (KM) numbers referring to coin rarity and value. Krause-Mishler releases a yearly catalogue of world coins with values and KM numbers. Krause-Mishler numbers are the most common way of assigning values to coins.

In 2002 Krause Publications was acquired by F+W Media, Inc., a New York City media and publishing company founded in 1913.

Recently I was asked to be a contributing writer for Rural Builder and my first article can be found here:

https://www.constructionmagnet.com/rural-builder/behind-the-hammer-with-mike-momb-common-post-frame-failures-and-how-to-prevent-tem

Interestingly enough, the article has since been picked up and reprinted in Structural Building Components magazine:

https://www.sbcmag.info/news/2014/may/insurance-company-eyes-disproportionately-new-post-frame-construction-collapses

I’ve written for Structural Building Components magazine previously (in May 2011):

https://www.hansenpolebuildings.com/it-isnt-your-grandpas-barn.htm

Free subscriptions to Rural Builder magazine are available to qualified individuals:

https://secure.palmcoastd.com/pcd/eSv?iMagId=07621&i4Ky=IA01

Look for future articles written by me in Rural Builder. I hope my loyal blog article readers will enjoy reading them, as much as I enjoy writing them.

Dear Pole Barn Guru: Why Do I Need Truss Web Bracing?

Welcome to Ask the Pole Barn Guru – where you can ask questions about building topics, with answers posted on Mondays.  With many questions to answer, please be patient to watch for yours to come up on a future Monday segment.  If you want a quick answer, please be sure to answer with a “reply-able” email address.

Email all questions to: PoleBarnGuru@HansenPoleBuildings.com

DEAR POLE BARN GURU:  Hello,

I came across the link below while investigating Pole Barn House kits, but since we don’t want a concrete slab, I was wondering about how the poles work in conjunction with a crawl space.

https://www.hansenpolebuildings.com/blog/2013/03/crawl-space/

GNASHING IN NASHVILLE

DEAR GNASHING: The easiest (and most affordable) way to create a crawl space is to construct in typical pole building style, with an elevated wood floor.  This now creates a crawl space which can either have an insulated perimeter, or the floor may be insulated leaving an unconditioned area.  A far more expensive route would be to pour a continuous footing and foundation, mounting the columns to poured-in-place brackets on top of the foundation walls.  We’ve done them both ways, so it’s client’s preference.

DEAR POLE BARN GURU: I’ve hired a contractor to assemble a Hansen Pole Building kit package for me. He says he is short on trims to cover the fascias. As he was explaining to me, is that the triangle cut part of the end needs to be covered by the ‘L’ trim. Does that make sense? It does to me looking at it, but hard to write out! WRUNG OUT IN WASHINGTON

DEAR WRUNG: Your building requires 30’3” of trim to cover each fascia, when installed to match the instructions provided in our Construction Guide. A total of 63 feet was shipped to your building site, so there was plenty provided.

It appears, what has happened, is your installers have made an assumption of how to correctly apply the trims, rather than having thoroughly reviewed the directions provided. Failure to follow the step-by-step detailed instructions does occur every once in a while. Hopefully your project is not past the point of no return (where trim was improperly used).

DEAR POLE BARN GURU: What is the purpose of bracing the webs of roof trusses? Why do some webs need braces while others don’t? MYSTIFIED IN MISSISSIPPI
DEAR MYSTIFIED: The internal members of roof trusses are referred to as webs. The permanent braces sometimes required on roof truss webs are called continuous lateral braces, or CLBs. They’re typically required on a web which is in compression. The truss web bracing is intended to keep the truss web from buckling in the weak (skinny) direction.

To explain why they’re sometimes necessary, imagine pushing down on a yardstick which extends vertically to the floor from the palm of your hand. It doesn’t take much pressure for the yardstick to buckle.

Now imagine taking your other hand and restraining the yardstick halfway up from the floor. If you press down now, it takes a lot more pressure to make the yardstick buckle. In effect, you’ve added a CLB to the yardstick.

The web of a truss is much like a yardstick. It can withstand a certain amount of compression without bracing. The amount of compression a web can withstand depends partly on its size, species, and grade. But the biggest factor in determining truss web bracing requirements is the overall length of the web.

In some cases, webs can require two rows of bracing rather than one. This design is most often seen in very tall trusses.

Single trusses are only 1-1/2 inches wide and require far more web bracing than does a double truss system, where the two individual trusses are nailed directly together so as to form a three inch width member. Doubling the thickness makes the webs twice as stiff against buckling.

If one CLB is required on a web, it should be roughly in the center of the web. If two CLBs are called for, they should be at one-third points on the web.

Continuous lateral bracing won’t do any good if it’s not anchored to something solid. The CLB will just transfer the buckling, and the whole set of webs will buckle in the same direction. Typically, CLBs are anchored with diagonal braces to rigid points such as the top chords of trusses, or to a building endwall.

In pole buildings, it is not uncommon to have trusses spaced eight feet or more apart. CLBs begin to become impractical, as they eventually become so long they will buckle between the trusses. In no case should a single 2x (1-1/2 inch wide) CLB used with a length over 10’.

So how to apply truss web bracing of widely spaced trusses? By applying a 1×4 or larger brace to the top or bottom (if two CLBs are required, to both top and bottom) of the web needing to be braced, for at least 90% of the length! These braces act as a strongback, restraining the web from buckling in the weak direction. The braces should be attached with 10d common nails, placed at a spacing as recommended by the RDP (Registered Design Professional – engineer or architect) for the project.

To determine if you need CLBs, look at the drawings accompanying the trusses; they should have the locations of any CLBs on them. Many truss manufacturers also put tags on webs which require braces. For more information on trusses, visit the Wood Truss Council of America’s Web site at: www.sbcindustry.com

Should a Treated Post Look Treated all the Way Through?

Welcome to Ask the Pole Barn Guru – where you can ask questions about building topics, with answers posted on Mondays.  With many questions to answer, please be patient to watch for yours to come up on a future Monday segment.  If you want a quick answer, please be sure to answer with a “reply-able” email address.

Email all questions to: PoleBarnGuru@HansenPoleBuildings.com


DEAR POLE BARN GURU: I am currently constructing a pole building. I’ve drilled holes through the columns for rebar hairpins to be inserted to tie the columns into the concrete floor. It appears the post isn’t treated all of the way through. What can I do? DRILLING DOUG

DEAR DRILLING: Pressure Preservative Treated lumber does not have to be treated all the way through to be properly treated. As long as the column is tagged as being UC-4B, the column is adequately treated for structural in ground use.

For rebar hairpin holes, after properly marking on every treated post, drill each one using a 5/8” bit. Galvanized re-bar is recommended. If not available, coat rebar penetrating column with an asphalt emulsion, or similar, to isolate re-bar from the pressure treated post. NOTE: #4 re-bar is ½” diameter. Cut re-bars into 5’ long segments and insert one through each column, centering the five foot length in hole. Bend rebar legs, by hand, to a 45 degree angle with skirt boards. Seal rebar, into bored holes, at each column edge with silicone caulking.

DEAR POLE BARN GURU: I read your articles on both reflective heat barriers and vapor barriers.  It seems they conflict somewhat in that for the vapor barrier article you suggest putting the vapor barrier between the purlin and the metal roof, but for a heat barrier you recommend a gap between the roof and heat barrier.  So how do I combine the two?  Would putting a double aluminum sided closed cell barrier like Prodex on the inside of the purlins (creating a substantial gap from the roof) work best?  Thanks in advance for your expertise. TRYING IN TENNESSEE

DEAR TRYING: Thank you very much for reading my articles. As long as the reflective radiant barrier is totally sealed, it should work quite well for both insulation and condensation control.

Mike the Pole Barn Guru: My Humble Thanks

When Mike the Pole Barn Guru blog was first begun two years ago, I had it in my mind it might be possible to write on say 100 or so topics, provided I really put my mind to it.

For those who are keeping track, this happens to be blog #500!! And yes, there are those who do keep track. I’ve received emails from clients who have referenced blogs by number – “remember back in blog #253 when you said….”

Besides you, who reads my posts? Co-workers; others in the post frame, lumber and construction industry; past, current and future clients; Building Officials; Registered Design Professionals (architects and engineers), the list is seemingly endless.

I have to give thanks to these thousands of subscribers who read my posts every single work day. Networkedblogs.com has Mike the Pole Barn Guru Blog ranked as the fourth most followed construction blog – ON THE PLANET!!

And never would I have guessed some of my posts would have been read by 70,000 people. I am overwhelmed.

Why do I keep writing?

Because I get feedback, support and comments about the posts on an almost hourly basis. As long as I can continue to keep readers entertained and educated, then it is worth the effort.

sticky notes of blog topicsThe most difficult part for me, is how to decide what to write about next! At last count (remember I thought I might make it to #100), I have over 700 topics yet to write about. My darling bride laughs at me when she sees me dragging out my huge stack of “topics” written on post it notes.

Even though I have so many topics to write about now, I am always on the lookout for more. Have a topic you would like to have addressed, feel free to shout it out to me. Chances are, if one person has an interest, hundreds more will as well.

Thank you to all readers…for your continued support and inspiration.  And mostly – for contributed so much of the “fun” factor in my job.

Onward towards #1000!

Write to me at: PoleBarnGuru@HansenPoleBuildings.com


Ask The Pole Barn Guru: Where Can I Buy Concrete Brackets?

Greetings…and WELCOME to my new blog Feature – Dear Pole Barn Guru!

Starting today….each Monday I will post questions submitted to me about pole buildings and pole barn construction, products for use in pole buildings, along with my answers.  Scroll to the bottom if you have a burning question for the Pole Barn Guru, and look for the answer in an upcoming Monday segment of Dear Pole Barn Guru.

Concrete Bracket - Drill-SetDEAR POLE BARN GURU: Where can I buy the post to concrete heavy duty brackets? – DETACHED IN SOUTH CAROLINA

DEAR DETACHED: There are numerous brackets to attach pole building columns to concrete foundations. We’ve found only one which is capable of withstanding the moment (bending forces) which are introduced into the building columns by the wind. Contact Eric at Hansen Buildings (866)200-9657 for delivered pricing on concrete brackets.


DEAR POLE BARN GURU: When is the concrete floor installed and by whom?—FLAT IN LIVINGSTON

DEAR FLAT: If the pole building has a door or doors tall enough to get the premix truck inside the building, I prefer to have all of the roofing and siding on. This allows the pour to be done, without the threats of weather (baked by the sun, or whipped by winds which cause curing too fast, or rained upon). If this is not possible, at least have the building roofed, prior to the concrete floor being poured inside a pole building. For some reason, when slabs are poured with only the columns set and the pressure treated splash planks (splash boards) installed, the columns tend to grow bull’s-eyes (which are seen only by pre-mix trucks).  More than once, I’ve had a column knocked out of plumb by a truck during the pour.

 As to whom? I personally have an aversion to finishing concrete. If this is outside of your skill set, most pre-mix companies can furnish a list of finishers who service your area. My recommendation is to always purchase the pre-mix yourself and pay the finisher only for labor. I’ve seen estimates of 40-50 square feet of finished floor per finisher hour. This feels very low to me, as I know of several finishers who have no problems finishing 800-1000 square feet in a day by themselves.

 While flatwork is hard work, I’d have a hard time paying more than about 50 cents per square foot in labor costs.


DEAR POLE BARN GURU: Are the supports set in or on concrete pilings? – DIGGING IN TEXAS

 DEAR DIGGING: In an ideal scenario, holes are augured into the ground (in most cases a skid loader with an appropriate diameter augur bit will dig them), the pressure preservative treated timber columns are placed in the holes and then pre-mix concrete is poured to flow both below and around the columns. This is going to be the least expensive and most structurally sound scenario. Temporarily nailing a couple of 2×4’s horizontally to the post will help to keep the columns at the required distance “floating” above the bottom of the hole until the concrete is set.

Alternatively, the holes could be completely filled with pre-mix and engineered wet-set brackets are placed in the concrete to mount the columns to.


HAVE A QUESTION FOR THE GURU? https://www.hansenpolebuildings.com/ask-the-pole-barn-guru.php