Tag Archives: rebar hairpins

Vinyl Backed Insulation, Post Brackets, and Rebar Hairpins

This week the Pole Barn Guru answers reader questions about the availability of a tool for installation of vinyl backed insulation, pouring concrete prior to use of brackets and the limitations of “dry set” brackets, as well as setting vapor barrier once rebar hairpins have been installed.

DEAR POLE BARN GURU: Is there a tool out there that I can clip on the end of my vinyl back installation to pull it tight other than my hands. If so what would that tool be called and where can I buy it. I was hoping that there would be some type of alligator vice grips or something like that that we can attach and pull. MARK in OKLAHOMA

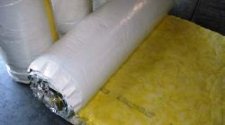
DEAR MARK: You are now finding one of many “joys” of using vinyl backed metal building insulation. You will want to read my personal metal building insulation story: https://www.hansenpolebuildings.com/2011/11/metal-building-insulation-in-pole-buildings-part-i/ and https://www.hansenpolebuildings.com/2011/11/metal-building-insulation/
In answer to your question – there is not such a commercially available product.


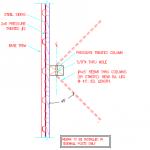
DEAR POLE BARN GURU: I plan to build a workshop with a concrete floor. a 24×40 x10ft building. Seems like it would be easier to just poor the concrete slab first and then just drill into the concrete and bolt the post brackets in place,,, rather than dig a bunch of holes and pour concrete piers for the post with wet set brackets…what are the advantages of setting all the posts first, then pouring a concrete floor later? Are there any disadvantages to bolting brackets to the concrete rather than using a wet set bracket? Ii am in a high wind area, (120 mph) and seismic area ‘e”. RON in HILO

DEAR RON: Problem #1 is dry set (bolted) brackets are not rated for moment (bending) forces, unlike wet set brackets. This becomes problematic, especially in areas of high wind.

Problem #2 – you can’t just pour a flat slab on grade, you would have to thicken slab edges to probably 18″

With wet set brackets, you can monolithic pour a slab with deeper excavation points at bracket locations, however I typically recommend waiting to pour slabs until after a roof is on to avoid heavy objects from falling and chipping your freshly poured concrete.


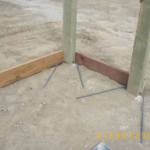
DEAR POLE BARN GURU: How do I install the concrete vapor barrier after the rebar hairpins in the columns have been placed?

Rebar Hairpins

Thanks! REID in WILLISTON

DEAR REID: Vapor barrier will go under rebar hairpins, so either block up one hairpin end or have someone lift it for you (this will cause other end of hairpin to raise) – slide vapor barrier under hairpin and up around sides of column. Seal vapor barrier to column and you are all good.


Rebar for Post Frame Concrete Slabs on Grade

Building with concrete involves many steps to achieve best results, including grading, forming, placing and finishing. One crucial step is placing reinforcing bars (rebar) correctly.

An engineer should do technical design work and provide specific information regarding sizes, configuration and placement of rebar. Slabs-on-grade for post frame buildings do not usually carry building loads, these are usually carried from roof and walls, through building columns to ground. This makes for far less complicated applications, unlike PEMBs (Pre-engineered Metal Buildings) or “weld ups” either being far more convoluted and beyond the skill level of all but experienced professionals.

rebar
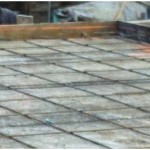
For slab reinforcement, necessary rebar can usually be obtained from a big box store (like The Home Depot®) or your local building supply. Should your specific application be more involved, it may behoove having a fabricator supply rebar. A fabrication supplier can review your building’s engineered drawings and produce a shop drawing with details and identifying tags for each type of rebar to be used in your building. For simpler projects, your building plans should provide spacing requirements and bar sizes. Use these documents to determine where and what rebar is needed in individual locations.

Most often rebar is tied with annealed steel wire, either purchased in four pound bulk rolls, or if using a bag tie spinner, in bundles of pre-cut wire pieces with loops formed on both ends. Bulk rolls are easier for novices to use, however are slightly more expensive.

Prior to placing any rebar, grade and properly compact the ground after all grading and any utility rough-ins are completed. Make sure all compaction testing has been completed and you have your geotechnical engineer’s sealed report in hand before moving forward. Any termite pre-treated should be completed, as well as a moisture barrier installed.

As post frame construction places columns and splash planks prior to pouring your slab, this gives you ready made forms for your slab perimeter.

Determine the size of bars to be used in each direction and mark several of them with layout measurements in each direction (front-to-back and side-to-side). Bars can be marked with a soapstone marker, a paint pen, lumber crayon or even spray paint.

This will be an ordinary slab mat concrete, the force interacting with rebar during placement is minimal. As mat movement is unlikely, a simple single twist of wire around each rebar intersection, twisted together tightly will be adequate. This tie can be done easily with a pair of nine inch lineman’s pliers.

To use your pliers to tie these efficiently, pull feeding end from wire reel with your non-dominant hand (for sake of this article, we will call this your left hand, with pardons to lefties). Grip wire end with pliers in your right hand. Push wire behind (under) rebar at an intersection. Angle end towards where you will be grabbing it, reach from this side, grip it again with pliers, pull towards next location pulling enough slack to complete tie. Hold resistance on wire with left hand, so wire bends snugly against bar being wrapped, at each stage. Release wire so pliers can be used to grip it. Pull end around bar and twist two ends together, pulling wire with pliers so tie is tight.

Once mat is assembled it must be held in place so concrete will cover it completely. Rebar chairs or concrete brick are often used for this. Place these positioners close enough together so rebar will not sag enough to reduce desired coverage of concrete – usually about 1/3rd distance from bottom of slab.

Watch rebar configuration as concrete is placed. If shifting occurs, support rebar with a shovel or alter direction of concrete flow so force is applied in the opposite direction.

Use caution when working around exposed rebar. Construction workers have suffered serious injuries or been killed when falling on projecting rebar.

Importance of Constrained Posts

Importance of Constrained Posts

In structural design of post frame (pole) buildings, an ability to transfer wind shear loads from roof to endwalls to ground becomes a key to cost effective design success. When sidewall columns are in a properly constrained condition (usually by attachment to a concrete slab-on-grade) shear forces are reduced by 25%. This reduction can result in smaller dimension sidewall columns, as well as a reduction or elimination of need for OSB (Oriented Strand Board) or plywood reinforced roof or endwall planes.

These savings are most often apparent in buildings with a far greater length than width, are fairly tall (especially if narrow) and/or are in high wind regions. In some cases savings from constraining sidewall columns can overcome a significant amount of costs to pour a slab-on-grade!

Savings – I now have your attention. Now I will explain constrained.

Excerpted from National Frame Building Association Post-Frame Building Design Manual (January 2015):

“5.2.4 Foundation Constraint

If a post or pier foundation is not restrained from moving horizontally at or just above the ground surface it is said to be non-constrained. Conversely, if a post or pier foundation pushes against (or is attached to) an “immovable” structural element such that the lateral displacement at some point at or just above the ground surface is essentially equal to zero, the foundation is said to be constrained. An example of a constrained post or pier foundation is one that bears against a concrete slab-on-grade.

A single post can be both constrained or non-constrained, depending on the load case. Using the previous example of a concrete slab-on-grade, and assuming that the post is not attached to the slab, if the wind loading was such that the post was pushing on the slab, the post would be considered constrained. However, if the wind were blowing in the opposite direction, the post would not be supported by the slab; hence, the post would be analyzed for that load case as non-constrained.”

In simple terms, attach sidewall columns to a concrete slab-on-grade to prevent ground surface movement. Rebar hairpins can be an effective method to achieve a constrained condition, and can be read more about here: https://www.hansenpolebuildings.com/2016/10/rebar-hairpins/.


Hairpins? Best Eave Height, and the Cost of a House…

DEAR POLE BARN GURU: I am installing re-bar hairpins prepping for a pour in a Hansen pole barn. My question is about the inside poles. I have on rebar per outside pole. Do i put two rebar hairpins on the inside poles?  

Thanks ALCUIN in LAVEEN

DEAR ALCUIN: The purpose of the rebar hairpins is to maintain the columns in a “constrained” condition. Columns with concrete on less than all four sides would require the hairpins to keep them from separating from the slab on grade in the direction(s) away from the floor – which would cause undue deflection at grade. Interior columns which are surrounded by concrete on all sides would not require the hairpins in order to meet with the requirements of a constrained condition.


DEAR POLE BARN GURU: How tall at the eaves is needed for a pole barn so a squeeze can be used to stack hay regular hay bales? SANDRA in CORNING

DEAR SANDRA: In the end the required height is going to depend upon the equipment you own. The great majority of what I would regard as ‘serious’ at their hay storage are using eave heights of 19 to 21 feet in order to clear the trusses.

One big consideration for hay storage is preventing condensation from the underside of the roof steel. Every good hay barn should either have reflective insulation or I.C.C. (Integral Condensation Control – https://www.hansenpolebuildings.com/2017/03/integral-condensation-control/) in the roof.

You will also get the most bang for your investment by loading from one or both eave sides, as opposed to loading from an end. In some instances, loading from the ends can work, provided there is an interior wall running across the narrow (width) direction of the barn half way between the ends.


DEAR POLE BARN GURU: I just need to know a round about price for a 2000 square foot home. Just your basic 3 bedroom 2 bath. With garage please. Thank you. STEPHANIE in STEELE

About Hansen BuildingsDEAR STEPHANIE: This is about the same as asking about how much a new car is going to cost? Do you want to drive a compact or an SUV? The possibilities of either are virtually endless.

With a post frame building being used as a home there are certain features which in my humble opinion are a must to include. Among these would be:

Built over a crawl space (https://www.hansenpolebuildings.com/2013/03/crawl-space/) – my knees just are not happy living on top of concrete.

Bookshelf style wall girts to provide a deep insulation cavity in the walls.

Use of a house wrap (https://www.hansenpolebuildings.com/2012/11/house-wrap/).

Raised heel trusses (https://www.hansenpolebuildings.com/2012/07/raised-heel-trusses/).

Generally you will be looking at $15-20 per square foot for a nicely configured building shell delivered to your clear level site in the lower 48 states.

Should a Treated Post Look Treated all the Way Through?

Welcome to Ask the Pole Barn Guru – where you can ask questions about building topics, with answers posted on Mondays.  With many questions to answer, please be patient to watch for yours to come up on a future Monday segment.  If you want a quick answer, please be sure to answer with a “reply-able” email address.

Email all questions to: PoleBarnGuru@HansenPoleBuildings.com


DEAR POLE BARN GURU: I am currently constructing a pole building. I’ve drilled holes through the columns for rebar hairpins to be inserted to tie the columns into the concrete floor. It appears the post isn’t treated all of the way through. What can I do? DRILLING DOUG

DEAR DRILLING: Pressure Preservative Treated lumber does not have to be treated all the way through to be properly treated. As long as the column is tagged as being UC-4B, the column is adequately treated for structural in ground use.

For rebar hairpin holes, after properly marking on every treated post, drill each one using a 5/8” bit. Galvanized re-bar is recommended. If not available, coat rebar penetrating column with an asphalt emulsion, or similar, to isolate re-bar from the pressure treated post. NOTE: #4 re-bar is ½” diameter. Cut re-bars into 5’ long segments and insert one through each column, centering the five foot length in hole. Bend rebar legs, by hand, to a 45 degree angle with skirt boards. Seal rebar, into bored holes, at each column edge with silicone caulking.

DEAR POLE BARN GURU: I read your articles on both reflective heat barriers and vapor barriers.  It seems they conflict somewhat in that for the vapor barrier article you suggest putting the vapor barrier between the purlin and the metal roof, but for a heat barrier you recommend a gap between the roof and heat barrier.  So how do I combine the two?  Would putting a double aluminum sided closed cell barrier like Prodex on the inside of the purlins (creating a substantial gap from the roof) work best?  Thanks in advance for your expertise. TRYING IN TENNESSEE

DEAR TRYING: Thank you very much for reading my articles. As long as the reflective radiant barrier is totally sealed, it should work quite well for both insulation and condensation control.