Building with concrete involves many steps to achieve best results, including grading, forming, placing and finishing. One crucial step is placing reinforcing bars (rebar) correctly.
An engineer should do technical design work and provide specific information regarding sizes, configuration and placement of rebar. Slabs-on-grade for post frame buildings do not usually carry building loads, these are usually carried from roof and walls, through building columns to ground. This makes for far less complicated applications, unlike PEMBs (Pre-engineered Metal Buildings) or “weld ups” either being far more convoluted and beyond the skill level of all but experienced professionals.
 For slab reinforcement, necessary rebar can usually be obtained from a big box store (like The Home Depot®) or your local building supply. Should your specific application be more involved, it may behoove having a fabricator supply rebar. A fabrication supplier can review your building’s engineered drawings and produce a shop drawing with details and identifying tags for each type of rebar to be used in your building. For simpler projects, your building plans should provide spacing requirements and bar sizes. Use these documents to determine where and what rebar is needed in individual locations.
Most often rebar is tied with annealed steel wire, either purchased in four pound bulk rolls, or if using a bag tie spinner, in bundles of pre-cut wire pieces with loops formed on both ends. Bulk rolls are easier for novices to use, however are slightly more expensive.
Prior to placing any rebar, grade and properly compact the ground after all grading and any utility rough-ins are completed. Make sure all compaction testing has been completed and you have your geotechnical engineer’s sealed report in hand before moving forward. Any termite pre-treated should be completed, as well as a moisture barrier installed.
As post frame construction places columns and splash planks prior to pouring your slab, this gives you ready made forms for your slab perimeter.
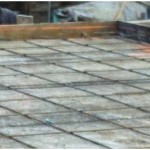
Determine the size of bars to be used in each direction and mark several of them with layout measurements in each direction (front-to-back and side-to-side). Bars can be marked with a soapstone marker, a paint pen, lumber crayon or even spray paint.
This will be an ordinary slab mat concrete, the force interacting with rebar during placement is minimal. As mat movement is unlikely, a simple single twist of wire around each rebar intersection, twisted together tightly will be adequate. This tie can be done easily with a pair of nine inch lineman’s pliers.
To use your pliers to tie these efficiently, pull feeding end from wire reel with your non-dominant hand (for sake of this article, we will call this your left hand, with pardons to lefties). Grip wire end with pliers in your right hand. Push wire behind (under) rebar at an intersection. Angle end towards where you will be grabbing it, reach from this side, grip it again with pliers, pull towards next location pulling enough slack to complete tie. Hold resistance on wire with left hand, so wire bends snugly against bar being wrapped, at each stage. Release wire so pliers can be used to grip it. Pull end around bar and twist two ends together, pulling wire with pliers so tie is tight.
Once mat is assembled it must be held in place so concrete will cover it completely. Rebar chairs or concrete brick are often used for this. Place these positioners close enough together so rebar will not sag enough to reduce desired coverage of concrete – usually about 1/3rd distance from bottom of slab.
Watch rebar configuration as concrete is placed. If shifting occurs, support rebar with a shovel or alter direction of concrete flow so force is applied in the opposite direction.
Use caution when working around exposed rebar. Construction workers have suffered serious injuries or been killed when falling on projecting rebar.


