Tag Archives: pole building ventilation

What is a Trickle Vent?

Apparently this is my week for learning brand new stuff, and as luck usually has it, when I get to learn – it is bushel baskets full!

A Hansen Pole Buildings client is constructing a post frame building home in Clallum County, Washington. In discussions with the local Building Officials, he was advised he would need to have “trickle vents” in his windows, if he did not have a forced air heating system.

One thing we do not profess to know much about (and we specifically exclude it from our scope of work) is HVAC (heating, ventilation, air conditioning). Having never heard of such a thing as a trickle vent, it was research time for me.

With an assist from a friendly young lady at the Clallum County Department of Community Development, I was directed to the International Mechanical Code, which states:

M1507.3.4.4 Outdoor air inlets. Outdoor air shall be distributed to each habitable space by individual outdoor air inlets. Where outdoor air supplies are separated from exhaust points by doors, provisions shall be made to ensure air flow by installation of distribution ducts, undercutting doors, installation of grilles, transoms, or similar means. Doors shall be undercut to a minimum of 1/2 inch above the surface of the finish floor covering.

Individual room outdoor air inlets shall:

  1. Have controllable and secure openings;
  2. Be sleeved or otherwise designed so as not to compromise the thermal properties of the wall or window in which they are placed;
  3. Provide not less than 4 square inches of net free area of opening for each habitable space. Any inlet or combination of inlets which provide 10 cfm at 10 Pascals are deemed equivalent to 4 square inches net free area.

Inlets shall be screened or otherwise protected from entry by leaves or other material. Outdoor air inlets shall be located so as not to take air from the following areas:

  1. Closer than 10 feet from an appliance vent outlet, unless such vent outlet is 3 feet above the outdoor air inlet.
  2. Where it will pick up objectionable odors, fumes or flammable vapors.
  3. A hazardous or unsanitary location.
  4. A room or space having any fuel-burning appliances therein.
  5. Closer than 10 feet from a vent opening of a plumbing drainage system unless the vent opening is at least 3 feet above the air inlet.
  6. Attic, crawl spaces, or garages.

So what actually is a trickle vent?

Trickle Vent
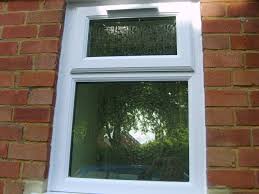
A trickle vent is a device usually fitted at the top of a window which allows fresh air to circulate naturally through a room, and allows polluted air out. They are controllable, to give the option of having them open or closed. When used correctly, trickle vents do not contribute excessively to heat loss. Trickle vents can also work in conjunction with mechanical extract fans when more immediate ventilation is required.

 And why use trickle vents?

 The Building Regulations state there should be adequate means of ventilation provided for people in a building because poor ventilation affects our health.

 Microscopic organisms, like house dust mites and fungi, thrive due to the moisture produced inside a home. Indoor air is also contaminated by chemicals discharged from the building itself and from the items we use within it, such as computers, carpets, furnishings, etc. In large quantities these pollutants can present a health concern and can cause or aggravate allergies, depression, and lung or heart conditions.

 In the past, adequate natural ventilation was provided by chimneys and gaps in the building structure, for example cracks around window and door frames. Modern living and improvements such as well sealed windows may increase indoor pollutant levels. To combat this, trickle ventilators are a safe and energy efficient way of providing fresh air.

 Trickle vents apparently are fairly widespread in the United Kingdom, and I found this commentary from an employee of a company which provides and installs them:

 “One of the major issues installations companies have with trickle vents is that when we have tried so hard to produce and install the best energy efficient windows possible, we find it completely contradictory to install trickle vents which badly affect the efficiency performance of the window. Once the windows with trickle vents are installed, the feedback from our customers is that they don’t use them. They find them ugly, unsightly, unnecessary, and that if they wanted ventilation, they would open a window. This is the second major issue, customers despise them. The problem here is that to a customer there is no obvious benefit.”

For years the push has been to make buildings tighter and tighter, so now new buildings have become too tight – with one possible solution being the trickle vent!

Pole Barn Roof Leaks

Welcome to Ask the Pole Barn Guru – where you can ask questions about building topics, with answers posted on Mondays.  With many questions to answer, please be patient to watch for yours to come up on a future Monday segment.  If you want a quick answer, please be sure to answer with a “reply-able” email address.

Email all questions to: PoleBarnGuru@HansenPoleBuildings.com

DEAR POLE BARN GURU: Would like some pricing information on a building similar to project number 04-0509. We want it for residential use. Want 2 story, the inside open to the ceiling with exposed beams. Basically I want a kit to get the building in the dry, then go inside and frame out how we want the floor plan. Can build myself, just want a kit if it is available. Please send pricing info. Thank you.
MICHAEL

DEAR MICHAEL: As every building we have ever provided has been custom designed to best meet the needs of the individual client, we can certainly modify a previous project to your desires. The beauty of post frame construction is it allows almost unlimited flexibility for locations of interior walls and partitions.

In order to provide pricing info, we will need to know where the building will be located, so proper climactic conditions can be applied (wind and snow loads). We’d also recommend you contacting one of our Building Designers at (866)200-9657 so we can best customize your ideal dream building.

Mike the Pole Barn Guru

DEAR POLE BARN GURU: We recently built a pole barn home, the whole outer shell is metal. We blew insulation in the attic, but did not vent it (to my knowledge) now when our central air unit kicks on, it blows hot stuffy air for a few seconds. Is this because of the attic not being vented? Will this cause us problems in the future? SYNTYCHE IN SENATH

DEAR SYNTYCHE: Without knowing a lot more about the installation of your central air system I cannot speak to it. You would be best to contact your local HVAC expert for a solution.

You WILL have problems with an unventilated dead air space attic. The Building Codes require any dead attic spaces to be ventilated to help prevent mold and mildew issues, keep attic insulation from getting wet from excess moisture and to help keep the attic from becoming unbearably hot.

Probably your best solution is to add gable vents. If they are in the upper one-half of the attic, the vents need to provide at least one square foot of free ventilation for every 300 square feet of attic. If the vents must be in the lower one-half, then twice the free ventilation area is required.

Mike the Pole Barn Guru

DEAR POLE BARN GURU: We have a pole shed approximately 27 x 40.

It was on our property when we bought it 2 years ago.

The steel on our pole barn roof leaks. It has nails (not screws)

Is it possible and/or recommended to replace it?

If so, any ballpark on how much it would cost?

Thanks so much.

Peace!

ANN

DEAR ANN: You are not the first person to have a leaking steel roof and probably not the last. Here is some reading on why it leaks: https://www.hansenpolebuildings.com/blog/2012/01/steel-roof/

It is both possible and recommended to remove the existing steel and replace it.

The actual length of the steel and number of pieces will depend upon roof slope and overhangs. You should also replace the ridge cap, rake trims, ridge and eave closures and reflective roof insulation. For budgetary purposes, plan on roughly $2-3 per square foot for the materials to repair pole barn roof leaks.

Mike the Pole Barn Guru

DEAR POLE BARN GURU: Hi: I have been reading through your website and have a question.  I am from Wisconsin, and am wanting to building a pole garage, there are lots of options out there.  My main interest is keeping costs down in its construction and the best way to do that is to build it myself.  I am no builder but am intelligent enough to build it myself, if, I have good detailed directions/instructions.  I want to spend my money on good high quality building materials.  So my question to you is, if I buy the materials from you, could you also supply the detailed construction manual to help me build this pole garage myself?  I plan to heat this garage, am making it bigger to not only park vehicles but added space for a small workshop.

Kind regards,

DAVE IN WISCONSIN

DEAR DAVE: You are absolutely correct about being able to keep your costs down by doing it yourself. And you certainly can successfully construct for yourself a great building: https://www.hansenpolebuildings.com/blog/2012/01/build-it-yourself/ and https://www.hansenpolebuildings.com/blog/2013/02/pole-buildings-3/

Part of what you get with every building is our 500 page Construction Manual, which seriously covers pretty much everything imaginable (and a few things which are beyond imagination): https://www.hansenpolebuildings.com/blog/2011/07/how-often-and-why-building-technical-support/

Of course the plans are so specific, you will be amazed, down to the last board: https://www.hansenpolebuildings.com/blog/2011/10/pole_building_plans/

You get plans drafted specifically for your pole building kit. Included in the plans is a pole layout, roof framing plan, cut-away section of the interior, and all four walls. To boot, we throw in the steel or osb layout sheet as a bonus. We have thousands upon thousands of proud clients, we’ll look forward to seeing the photos of your new building!

Mike the Pole Barn Guru


Dear Guru: Is Toe Nailing a Good Idea?

Welcome to Ask the Pole Barn Guru – where you can ask questions about building topics, with answers posted on Mondays.  With many questions to answer, please be patient to watch for yours to come up on a future Monday segment.  If you want a quick answer, please be sure to answer with a “reply-able” email address.

Email all questions to: PoleBarnGuru@HansenPoleBuildings.com


DEAR POLE BARN GURU: Hello, The bottom of my 2 x 8 skirt board is about 2 inches into the ground.  Is it OK to measure 10 feet from the top of the skirt board since it is so low?

As long as the steel siding is long enough I would like to do this. If I measure from the bottom of the skirt board and add my 3  1/2  inch. of cement  then my ceiling is lower. I can add another skirt board on top of the one that is there. I can add dirt up against the outsides so it looks  OK

I hope to work on this in the morning so please answer as soon as possible.

SITTING IN SALEM

 DEAR SITTING: You could do as you suggest (measuring the 10′ from the top of the 2×8 skirt board), as long as you add another 2×8 skirt board on top of the one you have installed, then fill up to the top of the lower 2×8 skirt board before pouring your concrete floor.

All of the steel for the siding is pre-cut to fit based upon a 0 point being the bottom of the 2×8 skirt board. There is no way to increase your interior height without ordering new wall steel or adding wainscot – either of which will prove to be a significant expense to pick up a few inches of height.

Mike the Pole Barn Guru

DEAR POLE BARN GURU: I have a pole barn that I am insulating. I am using rigid foam on ceiling between truss chords, covered with steel. Walls are 4×6 poles with 2×4 purlins on outside, sided with steel. I am adding 2×6 vertical studs on 24″ centers between poles, and stapling craft-backed roll f-glass insulation to studs, then covering wall with OSB. Should I consider stapling tar paper or other barrier to inside of purlins before adding the studs and insulation? There will be an air gap between the f-glass insulation and the outer steel, and moisture can get in via corrugations in the steel siding, top and bottom. Thanks! BUILDING IN BELLEVILLE

 DEAR BUILDING: You should place a housewrap (think Tyvek) ideally between the wall girts and the siding, but if not there, on the inside of the wall girts.

You can read more about housewrap here: https://www.hansenpolebuildings.com/blog/2012/11/house-wrap/
Here are some hints as to how to minimize the cost of your framing to support the insulation, and reduce transference of cold/heat from the contact of 2×6 vertical studs with the exterior horizontal girts.

  1. Start by placing a pressure treated 2×4 on top of the slab, flush to the inside of the columns (this board will end up between the posts, as will subsequent ones).
  2. Cut 2×4 blocks to 22-7/16″ and nail one to the each post directly above the treated 2×4.
  3. Cut a 2×4 to fit between the posts, and place like a bookshelf on top of the blocks. Repeat this process throughout the building.For best energy efficiency, make sure to completely seal the facing of the insulation batts on the inside of the wall.

Mike the Pole Barn Guru

DEAR POLE BARN GURU: Hello, I purchased my Hansen Pole Building some time ago. I’m just now getting around to drywall, but have always been stumped with one part of the construction. How are you supposed to attach the drywall “L” top plate? (I have the commercial girt setup). There just isn’t anything to attach the top plates unless I’m toe nailing it to the posts which doesn’t seem correct to me. The girts were attached to girt blocks, but the “L” top plate doesn’t have anything like that. Like I said…this one has stumped me for some time and now that I’m getting around to drywall I need to get the top plate installed.

Thank you very much, HARRIED IN HARRISVILLE

DEAR HARRIED: The distance from center to center of your wall columns is 12’. Conservatively, the “L” supports a maximum of 12 square feet (1/2 of the distance to the first ceiling joist, which is at 24 inches on center). 5/8” gypsum wallboard weighs 2.31 pounds per square foot. This makes the weight supported by the “L” of just under 28 pounds.

The 2005 NDS® (National Design Specification® for Wood Construction published by the American Forest & Paper Association) addresses toe nailing connections in “Design Aid No. 2”. To keep the design conservative, we will use the lowest Specific Gravity value of the commonly used framing lumbers (G=0.42 for Spruce-Pine-Fir). With the specified 10d common nail (3 inch length x 0.148 inch diameter), the lateral design value for a toe-nailed connection is 83 pounds per nail.

Placing two toe-nails through each end of the vertical member of the “L” would allow the “L” to support up to 332 pounds, many times the needed design requirements.

If you are uncomfortable with toe nailing the “L”, you could cut a notch out of the top “flat” part of the “L” 1-1/2 inches deep, to fit it tightly to the face of the column above the ceiling line. Two 10d common nails could be driven through the remaining portion of the “flat” of the “L” into the column, in addition to toe nailing them.

Mike the Pole Barn Guru

Concrete & Rain in My New Pole Building

This is a story which is heard all too frequently. And it always revolves around clients having just poured the concrete slabs in their new buildings. Even more so when the building has a low perm rated vapor retarder under the concrete.

Vapor retarders do exactly as their name implies, they retard the movement of water vapor through a system. They are not barriers which completely block the movement of moisture vapor. The amount of water vapor which passes through a vapor retarder is a function of perm rating, vapor pressure differential and penetrations.

The lower the perm rating of a vapor retarded, the better. A 1.0 perm rating will allow approximately 10 times more water vapor to pass through than a product rated 0.09, under the same conditions.

Moisture will flow from areas of high humidity or temperature to areas where these conditions are low. The force which drives the moisture through a vapor retarder is the vapor pressure differential.

wet concrete floor
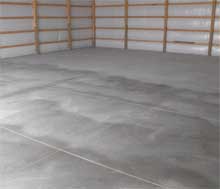
Freshly poured concrete contains a tremendous amount of moisture. In a typical two car garage (24 feet square) with a nominal four inch thick slab – the concrete contains approximately 138 gallons of water! As the concrete cures, much of this water is liberated into the air, increasing the relative humidity and vapor pressure within the building.

Ventilation is the simplest way to reduce humidity and vapor pressure and also lower the probability of condensation related problems. Failure to adequately ventilate a building during and after a concrete pour can result in condensation on the surface of the vapor retarder and potentially within any insulation. This is particularly critical in colder temperatures.

The easiest solution to “rain” after a new pour? Open up all of the doors and windows until the “rain” quits! And don’t panic – this will resolve the problem. My lovely bride came up with the idea of putting several fans on the concrete –but the concrete should NOT be forced to dry any “faster” as this lessens the overall strength of the finished concrete. You are best to retard the rate at which the concrete dries.

The whole point is – as the concrete dries, at its own natural rate, to ventilate out the moisture it releases into the air

Dear Pole Barn Guru: Grade First or Set Posts First?

Welcome to Ask the Pole Barn Guru – where you can ask questions about building topics, with answers posted on Mondays.  With many questions to answer, please be patient to watch for yours to come up on a future Monday or Saturday segment.  If you want a quick answer, please be sure to answer with a “reply-able” email address.

Email all questions to: PoleBarnGuru@HansenPoleBuildings.com

DEAR POLE BARN GURU:The prices for everything in upstate New York are ridiculous. Did get a good excavator but not sure of whether to grade and put shale base down first or find someone to do the posts first. So at this point I am on hold. ANGUISHED IN ASHLAND

DEAR ANGUISHED: You should set the posts first. We just need to know the amount of grade change across your building site, to make sure we ship adequate length columns. As fill is rarely adequately compacted, it is far easier to stand the posts, than to have to dig through the extra thickness of the fill in order to get the columns properly embedded in undisturbed soil.

DEAR POLE BARN GURU: I have a 32′ x 48′ pole barn used as a garage. It has 4 windows, 2 overhead garage doors with openers, 1/2″ foam board insulation with foil backing on sides and roof, 10′ from floor to trusses with no ceiling, just open. It has a 4″ concrete floor over stone.

My problem is moisture. In the summer there is white mold on things. Things in plastic storage containers get musky smelling. There is mold on the concrete underneath things.

The pole barn was built at the end of 2008. It gets full sun for at least 8 hours a day in the summer. It’s very frustrating. I’m guessing it’s lack of ventilation, but I don’t know what to do. It gets really humid during the summertime in southern Indiana.

Any suggestions? INHUMANE IN INDIANA

DEAR INHUMANE: Your problem is with too much moisture coming in, in relationship to the ability for it to be exhausted back out. These are common issues with pole barns where people try to make them too air tight.

As it is too late to add a good vapor barrier under the concrete floor, it should be sealed. Read more at: https://www.hansenpolebuildings.com/blog/2012/07/concrete-sealer/

At the least, the ridge should be vented. More information on ventilation is available at: https://www.hansenpolebuildings.com/blog/2014/02/pole-building-ventilation/

Happy Horse Barn Ventilation

If common sense was common, then articles like this one would not have to be written. One of the least expensive in upfront cost is also the most cost saving, when it comes to horse health and veterinary bills. Sadly, it is most often either an afterthought, or a “never even thought of” for horse barn ventilation.

Every horse stall should have some sort of sidewall openings which are permanent, they are left open year around. The best location for these openings is at the eave line – where the sidewall meets the roof. These openings should extend the entire length of the barn sidewall. This provides every stall with fresh air, as it is equally distributed along the length on both sides of the barn.

As the opening will be 10 to 12 feet above the floor (no, an eight foot eave height is not appropriate for a horse stall barn), the incoming cold air is mixed with warmer stable air before reaching the horses.

During cold weather, the full length ventilation provides a thin stream of cold, fresh air, as opposed to a large draft from an open door or window. In cold climates, the minimum guideline is to provide at least one inch of continuous-slot permanent opening for each 10 feet of building width.

Enclosed sidewall overhangs; using vented vinyl soffit panels provides an intake solution which is affordable, practical and attractive. The most popular vented soffit panel is what is known as a “triple 3 center vent”. These panels have perforated openings in 1/3 of each panel. Depending upon the manufacturer, the panels deliver from four to five square inches of net ventilating area, per square foot of panel.  A two foot wide overhang, across a 12 foot width stall, would therefore gain 96 to 120 square inches of net ventilating area, using the center vented soffit. Going to fully vented soffit panels, would triple the amount of air intake.

Along with air intake from the eaves, a continuous vented ridge must be provided. The ridge ventilation should be at least equal to (in square inches) the intake area provided for at the eaves. Properly designed ridge vents, allow for the warm moist air to exhaust at the ridge, without allowing the weather or debris into the building. At least a square foot of ridge vent should be provided, per horse. This may cause the need for additional venting, such as functional vented cupolas, to have to be added.

In order to encourage proper horse barn ventilation airflow, it is best to avoid having ceilings, or loft storage areas above stalls.

During warm weather, large doors can be opened to allow for cross ventilation – provided doors are on opposite walls.

I’ve never been a fan of windows in horse stalls. They tend to provide all too promising targets for young miscreants. If horses are to be kept in stalls during warm weather, outside openings of at least five to 10 percent of the floor area should be provided into each stall. For a typical 12 foot square stall, this means as much as 14-1/2 square feet. If outside runs are provided for each stall, a 4’ x 7’ sliding door will easily allow convenient access and adequate ventilation (and be affordable). With no run outs, a 4’ x 3’6” bale door, for each stall, may be a solution.

Open grill work on stall fronts, also help to aid in good stall ventilation.

One clear rule to follow – when in doubt, over ventilate. The costs will easily be gained in reduced vet bills, with healthy horses…who require adequate horse barn ventilation.