Tag Archives: attic vents

How To Vent An Attic Below A Lean-To Porch

How to Vent Attic Below a Lean-To Porch

Long time reader JON in SPRINGDALE writes:

“Hi Mike, long time reader. Thanks for the info you provide. These questions come from your

home town area. I was talking to my local building department and attic ventilation came up. He

said that using a ridge vent and vented soffits isn’t enough, because the purlins restrict the

natural air flow between the two. So he suggested powered gable vents. I believe code calls for 1″ minimum clearance between insulation and sheeting what would you recommend as this affects the size of the heel on the trusses. Still on attic ventilation, so I want a porch covered by a lean to with a continuous roof line peak to eave. My question is if the underside of the lean-to is open, how do I vent the attic with no overhang to put vented soffit on? Thank you.”

Mike the Pole Barn Guru says:

I have been unable to find any published research to back up your inspector’s theory, nor would anything in written Building Codes support use of powered vents as a method of either intake or exhaust to meet Code requirements. Code does require a minimum one-inch space between top of blown or batt insulation and bottom of roof deck.

To ventilate eaves on side of building with continuous roof and covered porch, you could oversize eave strut (purlin at top of wall between enclosed portion and porch) to say 2×10. Cut notches into top edge of purlin an inch deep, by whatever length would be necessary collectively to meet proper ratio of eave air intake to exhaust. Notches would need to be covered with Code compliant screen to restrict entry of small, flying critters and wall steel stopped below bottom edge of notch.

In summary, ventilation requirements in IRC’s 2018 edition are as follows:

Provision of one square foot of NFVA for each 150 square feet of attic floor. One important note – attic floor area is just as it reads – area – not volume. This is a minimum requirement and does not stipulate required ventilation openings provide intake (low), exhaust (high), or both.

Provision of one square foot of NFVA for each 300 square feet of attic floor if both following conditions are applicable:

A Class 1 (≤ 0.1 Perm) or 2 (> 0.1 to ≤ 1.0 Perm) vapor retarder is installed on warm-in-winter side of ceiling when the structure is located in climate zone 6, 7, or 8.

At least 40%, but not more than 50% of NFVA is provided by vents located not more than 3 feet below roof’s highest point.

Provision for a minimum one-inch air space between roof sheathing and insulation in attic at vent location.

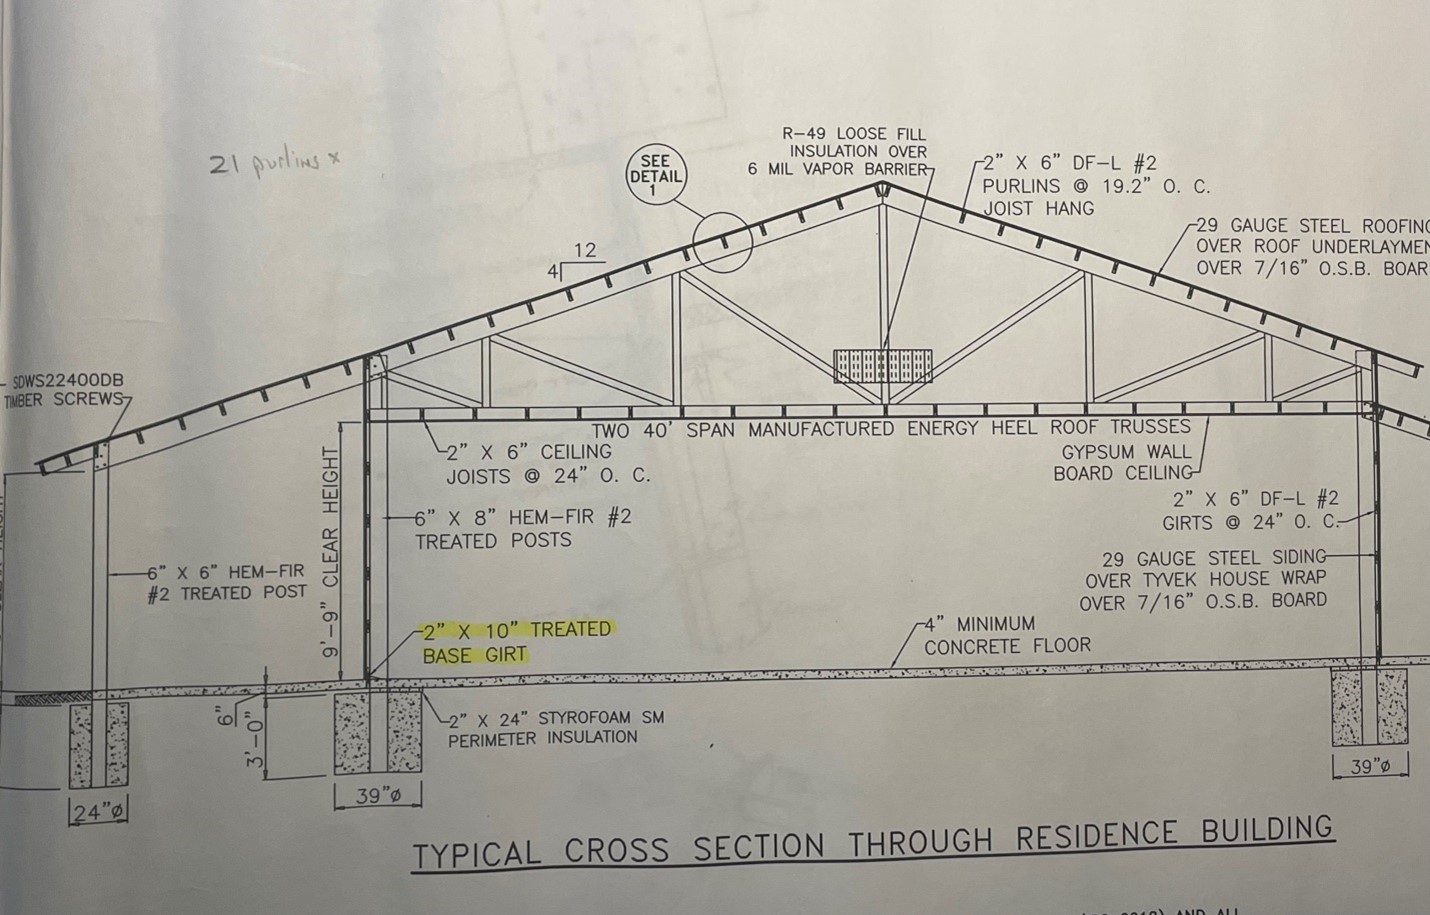
There are a few items I would suggest, after looking at your provided portion of plans.

Do away with all of expensive OSB sheathing. Order roof steel with an Integral Condensation Control factory applied. 

Increase ceiling height to 10′ 1-1/8″ from top of slab to bottom of trusses. This will allow you to use 10-foot sheets of gypsum wallboard (sheetrock) run vertically without cutting.

Use bookshelf wall girts to create an insulation cavity and for ease of interior finish.

Have your engineer check purlin spacing on each side of ridge to account for drift loads. Purlins at high side of dropped right side porch also need to be checked for slide-off and drift loads.

Code requires a minimum 6mil vapor barrier under concrete slabs on grade in conditioned areas.

Venting an Attic

Saving Money When Venting An Attic?

While some of you may think I have been doing post frame buildings since dinosaurs roamed our planet, I can assure you this is not true. Now my youngest son, when he was pre-school aged, did ask me (in all seriousness) what was it like watching space aliens build Egypt’s pyramids!

When reader DOMINIC in FESTUS wrote his question to me, it got me thinking about when I first had a client ask for a building with insulation at ceiling level. While I truthfully do not remember, in my first 6000 or so post frame buildings (we are talking 1980s here) I doubt there were more than a handful.

Fast forwarding to today’s modern fully engineered post frame buildings and nearly every building – garage, shop, barndominium, etc., is going to be climate controlled to some extent and most of these have enclosed attic spaces with insulation to be placed at ceiling level.

Here is DOMINIC’s question:

“I will be building a 30×40 pole barn soon. I plan on putting a ceiling in with insulation. My question is on attic venting. It seems best practice is to use a ridge vent with vented soffits but are gable vents alone sufficient? It would be cheaper for me to just do gable vents.”

Your best practice is to have even airflow from eave intakes to ridge exhausts. If your building will have sidewall overhangs, you might as well take advantage of this. You COULD (as an alternative) utilize gable vents. Provided at least half of your gable venting is located in the upper half of the attic, you can get by with as little as 576 square inches of NFVA (Net Free Ventilation Area). To achieve this would require (3) three 20″ x 30″ gable vents in each endwall. This could prove unsightly, difficult to install and is unlikely to result in being less of an investment than ridge vents. NOTE: a 20″ x 30″ gable vent provides roughly 106 square inches of NFVA (not 20″ x 30″ for 600″).

Of course, me being me, I had to snoop our records to see if he had requested a quote from us – and indeed he had…..

In looking over your quote from us, you may also want to consider increasing your overhead door width from 14′ to 16 (or even 18′) as you cannot safely get two vehicles side-by-side through a 14 foot wide door. For sake of resale value, with a 14 foot door it will appraise as a single car garage, wider doors will nearly double your appraised value as it is a two-car garage then.

My Barndominium Windows Are Leaking

Common questions we hear from barndominium, shouse (shop/house) and post frame home owners are, “Why are my new windows leaking?” or “Why do I have condensation inside of my windows?” In fact, many new barndominium owners think their windows are defective and need to be replaced in an effort to cure this problem. To answer these questions, let’s review what causes window condensation.

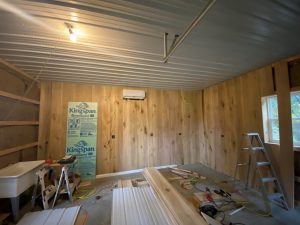
Condensation is visible evidence of excess air moisture. It may appear as water, frost, or ice on window or door surfaces. This occurs more frequently during winter months because of extreme differences between inside and outside air temperatures. Warmer air holds more water meaning air in any given room center will hold more water than air adjacent to window or exterior door walls, since this area is always cooler. When warm, moisture laden air moves toward cooler window or door walls, it becomes cooler and cannot hold as much moisture as it held when it was warmer. This moisture is dropped and appears as water on glass and frames of windows and doors.
Windows do not cause condensation, they just happen to be where moisture is most visible. Condensation is a sign of excess moisture in barndominiums. This can be caused by temporary conditions such as:
Building materials contain a great deal of moisture. As soon as heat is turned on, this moisture will flow out into the air and settle on door and window glass. This will usually disappear following first heating season. During humid summers, houses absorb moisture. This will be apparent during the first few weeks of heating and then should dry out. Sharp, quick, and sudden drops in temperature especially during the heating season will create temporary condensation problems.

Condensation can also be caused by more permanent conditions:
Insufficient attic ventilation and/or soffit ventilation traps moisture in barndominiums. Having sufficient soffit vents to allow adequate air flow in and ridge vents for exhaust will allow moisture and humidity to escape. Excessive humidity may be a result of poor ventilation but can also be a result of an imbalanced heating and air system or a need to add additional ventilation. Inadequate (or missing) vapor barriers under concrete slabs on grade. While Building Codes require a vapor barrier under any concrete slabs in heated buildings, it is all too often overlooked.

Controlled ventilation and elimination of excessive indoor moisture can keep humidity within bounds. Here are some suggestions to help reduce indoor moisture:
Turn off or set back furnace humidifiers until sweating (condensation) stops. Remove pots of water on radiators or kerosene heaters. Use exhaust fans or open windows slightly in kitchen, bathroom and laundry room during periods of high moisture production such as cooking, taking showers, washing and drying clothes. Clothes dryers must be vented outside. Do not hang clothes to dry indoors. Waterproof concrete floors. Make sure attic vents are unobstructed. Place all house plants in one sunny room where the door can be kept shut and avoid over watering. Opening windows slightly for a brief period of time will allow humid air to escape and drier air to enter. Use a properly sized dehumidifier, to reduce humidity.
Excessive indoor humidity and moisture are not a result of your windows. You should view the amount and severity of window condensation as a clue moisture damage may be taking place inside walls or ceiling cavities of your barndominium. This can lead to rotting wood, deteriorating insulation, and blistering paint.

My Pole Barn Needs Ventilation

My Pole Barn is a Sauna in Summer- and needs ventilation!

“Hey there Pole Barn Guru, got a question about ventilation.

Just bought a house with a pole barn on the property. I believe it’s only about a year old. 30 x 32.  It has no soffits or windows, only a standard garage door and walk-in door.

Metal siding and roof, and the underbelly of the roof has a vapor barrier. There are also two ceiling fans in here.

I don’t care that it’s cold inside the building in winter, but it’s like a sauna now in the summer.  I was thinking of an exhaust fan to pull out the heat, but I don’t know if that’s waste of money. How does one ventilate this thing without having to bulldoze it and start over?

Thanks.

Dezy”

Mike the Pole Barn Guru responds:

Since you cannot increase the amount of venting in your soffits (as you have none), you’ll need help from power vent fans.

Attic vent fans can be hard-wired and equipped with a thermostat and/or humidity sensor so they automatically cut on at a preset moisture level or temperature. You could also install solar-powered attic vent fans, though it has been found most solar models aren’t powerful enough to be very effective.

To determine what size power vent fan(s) you need for your attic, you first need to know the size of your attic in square feet.

Attic Size

To determine the size of your attic, multiply the width by the length of the attic floor in feet. In your case 30′ wide x 32′ long = 960 square feet of attic space.

Vent Fan Size

Next, multiply the square feet of attic space by 0.7 to get the minimum number of cubic feet of air per minute the fan should be rated to move. 960 sft x 0.7 = 672 CFM minimum fan rating.

Add an additional 20% (CFM x 1.20) if you have a steep roof, and 15% (CFM x 1.15) for a dark roof. Attic vent fans are commonly rated from 800 to 1,600 CFM, making one fan suitable.

Vent Fan Location

Install gable mounted fans on the gable vent at end of the building facing away from the prevailing winds.

Intake Air Vents

It’s also important to have plenty of soffit or gable vents for the fan to draw air into the attic. To find out if you have enough vent space, divide the cubic feet of air per minute the fan(s) is rated for by 300 to come up with the minimum number of square feet of intake vent space needed for that size fan. 672 CFM ÷ 300 = 2.24 sq. ft. intake vent area

If you prefer the answer in square inches rather than square feet, multiply the answer by 144 and round to the nearest inch (2.24 x 144 = 322.56 sq. in. vent area).


What is a Trickle Vent?

Apparently this is my week for learning brand new stuff, and as luck usually has it, when I get to learn – it is bushel baskets full!

A Hansen Pole Buildings client is constructing a post frame building home in Clallum County, Washington. In discussions with the local Building Officials, he was advised he would need to have “trickle vents” in his windows, if he did not have a forced air heating system.

One thing we do not profess to know much about (and we specifically exclude it from our scope of work) is HVAC (heating, ventilation, air conditioning). Having never heard of such a thing as a trickle vent, it was research time for me.

With an assist from a friendly young lady at the Clallum County Department of Community Development, I was directed to the International Mechanical Code, which states:

M1507.3.4.4 Outdoor air inlets. Outdoor air shall be distributed to each habitable space by individual outdoor air inlets. Where outdoor air supplies are separated from exhaust points by doors, provisions shall be made to ensure air flow by installation of distribution ducts, undercutting doors, installation of grilles, transoms, or similar means. Doors shall be undercut to a minimum of 1/2 inch above the surface of the finish floor covering.

Individual room outdoor air inlets shall:

  1. Have controllable and secure openings;
  2. Be sleeved or otherwise designed so as not to compromise the thermal properties of the wall or window in which they are placed;
  3. Provide not less than 4 square inches of net free area of opening for each habitable space. Any inlet or combination of inlets which provide 10 cfm at 10 Pascals are deemed equivalent to 4 square inches net free area.

Inlets shall be screened or otherwise protected from entry by leaves or other material. Outdoor air inlets shall be located so as not to take air from the following areas:

  1. Closer than 10 feet from an appliance vent outlet, unless such vent outlet is 3 feet above the outdoor air inlet.
  2. Where it will pick up objectionable odors, fumes or flammable vapors.
  3. A hazardous or unsanitary location.
  4. A room or space having any fuel-burning appliances therein.
  5. Closer than 10 feet from a vent opening of a plumbing drainage system unless the vent opening is at least 3 feet above the air inlet.
  6. Attic, crawl spaces, or garages.

So what actually is a trickle vent?

Trickle Vent
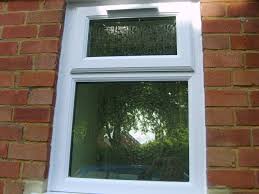
A trickle vent is a device usually fitted at the top of a window which allows fresh air to circulate naturally through a room, and allows polluted air out. They are controllable, to give the option of having them open or closed. When used correctly, trickle vents do not contribute excessively to heat loss. Trickle vents can also work in conjunction with mechanical extract fans when more immediate ventilation is required.

 And why use trickle vents?

 The Building Regulations state there should be adequate means of ventilation provided for people in a building because poor ventilation affects our health.

 Microscopic organisms, like house dust mites and fungi, thrive due to the moisture produced inside a home. Indoor air is also contaminated by chemicals discharged from the building itself and from the items we use within it, such as computers, carpets, furnishings, etc. In large quantities these pollutants can present a health concern and can cause or aggravate allergies, depression, and lung or heart conditions.

 In the past, adequate natural ventilation was provided by chimneys and gaps in the building structure, for example cracks around window and door frames. Modern living and improvements such as well sealed windows may increase indoor pollutant levels. To combat this, trickle ventilators are a safe and energy efficient way of providing fresh air.

 Trickle vents apparently are fairly widespread in the United Kingdom, and I found this commentary from an employee of a company which provides and installs them:

 “One of the major issues installations companies have with trickle vents is that when we have tried so hard to produce and install the best energy efficient windows possible, we find it completely contradictory to install trickle vents which badly affect the efficiency performance of the window. Once the windows with trickle vents are installed, the feedback from our customers is that they don’t use them. They find them ugly, unsightly, unnecessary, and that if they wanted ventilation, they would open a window. This is the second major issue, customers despise them. The problem here is that to a customer there is no obvious benefit.”

For years the push has been to make buildings tighter and tighter, so now new buildings have become too tight – with one possible solution being the trickle vent!