Tag Archives: osb sheathing

Attic Ventilation, Shearwall Stitch Screws, and Adding Sheathing

This week the Pole Barn Guru addresses reader questions about ventilation needed for a new attic with metal ceiling and blown-in insulation, a confirmation for endwall needing stitch screws for shear, and if adding sheathing to an existing pole building would add value.

DEAR POLE BARN GURU: I bought a house with a pole barn that is unfinished inside. The metal walls were not wrapped and the only insulation in the barn whatsoever is double bubble on the underside of the barn roof. I am going to have a metal ceiling put in and then blown fiberglass insulation for an R30 value in what will then be the attic. There is currently no ridge vent nor gable vents either so I am concerned about air flow in the attic once the metal ceiling and blown insulation are complete. The eaves have perforated soffit so I’m hoping even after the blown insulation is done that will provide an air flow into the attic. So am I correct to think that I need to have gable vents put at each end or a ridge vent so that there is positive air flow through the attic? Thanks! BILL in STEVENSVILLE

DEAR BILL: Your thinking is absolutely correct – you need an adequate ventilation exhaust point. Ideally, this would be at your ridge. Gable vents, while meeting code requirements, actually only provide good ventilation immediately closest to vent locations.

This article covers requirements for attic ventilation: https://www.hansenpolebuildings.com/2023/06/274512/

In Queen Anne’s County – you are in Climate Zone 4A. 2021’s IECC (International Energy Conservation Code) specifies R-60 for ceilings in your climate zone. As so much of your cost of blown insulation is having installers show up, you may want to consider going with a greater R value than originally planned. Energy costs are not ever going to go down (nor cost of insulating).


DEAR POLE BARN GURU: I have a rear end wall that is labeled shear wall that says I need an inch and a quarter number 12. Stitch screw 9 and 3/8 on center. Is that every 9 and 3/8 on center vertically on each overlap? DAMINA in TONOPAH

DEAR DAMIAN: You are correct. Panels stitched together have roughly twice as much shear capacity as do unstitched panels.


DEAR POLE BARN GURU: Question for you Guru! I bought a property with a small pole building/shed. Is there any value in adding sheathing? If so, how do you retroactively figure out if the roof will handle the additional load? JESSE

DEAR JESSE: If the roof steel is properly fastened (1-1/2″ screws in flats along one side of each high rib in field, #12 or #14 x 1-1/2″ screws both sides of each high rib at eave and ridge) chances are it will perform admirably without any sheathing. Think of steel roofing and siding as acting like very strong, very thin OSB or plywood.


How To Vent An Attic Below A Lean-To Porch

How to Vent Attic Below a Lean-To Porch

Long time reader JON in SPRINGDALE writes:

“Hi Mike, long time reader. Thanks for the info you provide. These questions come from your

home town area. I was talking to my local building department and attic ventilation came up. He

said that using a ridge vent and vented soffits isn’t enough, because the purlins restrict the

natural air flow between the two. So he suggested powered gable vents. I believe code calls for 1″ minimum clearance between insulation and sheeting what would you recommend as this affects the size of the heel on the trusses. Still on attic ventilation, so I want a porch covered by a lean to with a continuous roof line peak to eave. My question is if the underside of the lean-to is open, how do I vent the attic with no overhang to put vented soffit on? Thank you.”

Mike the Pole Barn Guru says:

I have been unable to find any published research to back up your inspector’s theory, nor would anything in written Building Codes support use of powered vents as a method of either intake or exhaust to meet Code requirements. Code does require a minimum one-inch space between top of blown or batt insulation and bottom of roof deck.

To ventilate eaves on side of building with continuous roof and covered porch, you could oversize eave strut (purlin at top of wall between enclosed portion and porch) to say 2×10. Cut notches into top edge of purlin an inch deep, by whatever length would be necessary collectively to meet proper ratio of eave air intake to exhaust. Notches would need to be covered with Code compliant screen to restrict entry of small, flying critters and wall steel stopped below bottom edge of notch.

In summary, ventilation requirements in IRC’s 2018 edition are as follows:

Provision of one square foot of NFVA for each 150 square feet of attic floor. One important note – attic floor area is just as it reads – area – not volume. This is a minimum requirement and does not stipulate required ventilation openings provide intake (low), exhaust (high), or both.

Provision of one square foot of NFVA for each 300 square feet of attic floor if both following conditions are applicable:

A Class 1 (≤ 0.1 Perm) or 2 (> 0.1 to ≤ 1.0 Perm) vapor retarder is installed on warm-in-winter side of ceiling when the structure is located in climate zone 6, 7, or 8.

At least 40%, but not more than 50% of NFVA is provided by vents located not more than 3 feet below roof’s highest point.

Provision for a minimum one-inch air space between roof sheathing and insulation in attic at vent location.

There are a few items I would suggest, after looking at your provided portion of plans.

Do away with all of expensive OSB sheathing. Order roof steel with an Integral Condensation Control factory applied. 

Increase ceiling height to 10′ 1-1/8″ from top of slab to bottom of trusses. This will allow you to use 10-foot sheets of gypsum wallboard (sheetrock) run vertically without cutting.

Use bookshelf wall girts to create an insulation cavity and for ease of interior finish.

Have your engineer check purlin spacing on each side of ridge to account for drift loads. Purlins at high side of dropped right side porch also need to be checked for slide-off and drift loads.

Code requires a minimum 6mil vapor barrier under concrete slabs on grade in conditioned areas.

Thinking Stick Frame Rather Than Post Frame

Thinking Stick Frame Rather Than Post Frame

Reader BRAD writes:“Real question…I’ve been doing lots of reading and love this site. I am building a 40x60x14 this spring. I originally thought I was going to go pole barn and now I am thinking stick frame. Reason….1. I am going to have insulated concrete foundation with in floor heating piping installed right away. (mono slab). 2. I am planning on fully finishing the inside insulation electrical, etc. in the future. What I’ve seen with post frame is that they are cheaper to build initially but if you are planning on finishing the inside there is substantial lumber and framing that needs to be done for interior walls and interior ceiling. It appears “at the end of the day” a finished pole barn is not much cheaper than a stick frame. I also question if it would be a lot more time trying to frame an interior post frame with 16” o/c studs and finishing a ceiling with 4’ or longer truss spacing vs 2’ with conventional stick frame. I am doing all metal exterior with 2’ o/c stud purlins on side walls vs osb sheathing. I know you can spray closed cell spray foam but again that is more than triple the price vs bats and vapor barrier that you can only do with 24”or16” o/c framing. 

Am I way off base on this theory or is there any truth to my thinking?”

Mike the Pole Barn Guru responds:
I just don’t see reason number one as a reason at all. A plethora of post frame buildings (my own included) utilize radiant in-floor heat. In order to stick frame, you are going to have to thicken your slab edges, or pour a continuous footing and stem wall, in order to provide adequate support for your now load bearing walls. This is going to result in added expenses for forming, regardless of your choice (before even considering extra concrete required). While anchor bolts for stud walls are relatively inexpensive, they do require some effort to be properly placed in order to avoid hitting studs and plates need to be drilled to account for them.

In order to stick frame without added engineering, your wall heights are going to be limited by Building Codes. To attach steel siding, you will need to add horizontal framing outside of your studs (scarily, I did see a builder post photos of vertical steel siding, screwed to vertical studs), resulting in two sets of framing, extra pieces to handle, cut and install. By using commercial style bookshelf wall girts in post frame, no extra framing is required in order to attach exterior steel siding and wall finish of your choice. As post frame buildings transfer gravity loads from roof-to-ground via columns, eliminating (in most instances) any need for structural headers.

Using prefabricated metal connector plated wood trusses, in pairs, directly aligned with columns (most often placed every 12 feet), does require ceiling joists to be placed between truss pairs. This can all be done on the ground, then cranked into place using winch boxes, with no need for other heavy lifting equipment.

When all is said and done, fully engineered post frame construction will always be more cost effective than stick frame, more structurally sound and afford a greater ability to super insulate, regardless of one’s choice of insulation systems.

An Alternative to a Very Flat Roof Extension

An Alternative to a Very Flat Roof Extension

Reader BOB in SANDPOINT writes:

“Hello we want to add a patio / work on car / whatever, extension off the front of an existing shop with a metal roof – joining the existing metal roof with the metal roof of the extension with a sort of pitch break. The challenge is the 10′ height of the existing roof and only having 18″ drop to the garage entrance. Ideally we would extend out about 14′ but I am thinking the extension roof would not be steep enough. I was planning on installing a pitch break joint where the two roofs meet (but not having an actual difference in pitch – or as little as possible).also, being in Montana we do have significant snow. I know with the pitch issue of only having the 18″ drop – and the target of 14′ I will have to compromise but trying to figure how much and where.”

Mike the Pole Barn Guru says:

Well Bob, you do have some challenges and are not the first person to have them.

Most steel roofing companies will not warranty their product on roof slopes of under a three in 12 slope (3/12). At very least, doing a single sloping roof this flat, in snow country, poses a myriad of challenges – some of them you have already considered. Rafters and purlins for such an extension will require them to be engineered to support the weight of snow sliding off steeper main roof. Ponding is a real concern, as ice and snow will build up and not slide off. You should probably look at using 26 gauge steel with ribs higher than what is on your existing building (meaning steel profiles will not match) and perhaps installing over solid sheathing – either OSB or plywood, with 90# asphalt impregnated (felt) paper or a synthetic water and ice shield below.

If you are thinking this is sounding expensive or perhaps impossible, there is an alternative option.

Your extension roof could be done as a reverse gable – meaning you would not have height issues in front of your existing overhead door opening. This would also allow for snow to slide off to right and left of your extension, rather than plopping off directly into your line of travel in and out. We use reverse gables frequently, in new construction, to protect door openings from rain water or snow slide offs. Here is some extended reading for you: https://www.hansenpolebuildings.com/2015/07/reverse-gable-porch/

Answers for Brian’s Barndominium Builder

Answers for Brian’s Barndominium Builder

Should you have missed yesterday’s episode, please click back to it using link at bottom of this page – it will make more sense as well as being more entertaining!

Hello Brian ~

My Father and his five brothers were all framing contractors, so I was raised in a world of trusses two foot on center and vertical stud walls. Even in my first few years of prefabricated roof trusses (as a truss designer/salesman/manager) – we used to laugh when builders would order trusses for pole barns. 40 years of experience has taught me they were right (post frame builders).

Having personally erected a plethora of buildings, both stick frame and post frame, it is far less time consuming to erect a post frame building with widely spaced trusses (and purlins and ceiling joists) than it is to stud wall frame. With a minor investment into building a set of four ‘winch boxes’ entire sections of roof framing can be assembled on the ground and cranked up into place. Not only is this fast, it is also far safer.

Learn about winch boxes here: https://www.hansenpolebuildings.com/2019/10/winch-boxes-a-post-frame-miracle/

Mindi’s quote does not include OSB sheathing or either 30# felt or ice and water shield to go between OSB and roof steel. These can be added, however there is really no structural reason to do so – it is going to add to both investment and labor. Should you opt to have your roof sheathed, OSB (or plywood) will run from fascia to ridge across purlins 24″ on center, so spans would be no greater than trusses every two feet.

If you do opt for roof sheeting, you might want to consider going to 5/8″ CDX plywood and a standing seam steel. It will be more expensive however it does eliminate any through fasteners.

When you create an encapsulated building (spray foam to all interior surfaces), you do not want to ventilate it, as you would then lose your air seal. With your OSB’s underside sealed by closed cell spray foam and upper side protected with 30# felt or ice and water shield, there is no way for your OSB to become moist. If this is still a concern, an upgrade to plywood could be done.

Certainly one could place scissor trusses every two feet – it would then require adding structural headers (truss carriers) between columns to support them – reducing ‘line of sight’ beneath them. In order to place two foot tall windows in your knee walls above wing roofs, your building height would need to increase to allow for their height. This entails a whole bunch of connections – trusses to headers, headers to trusses and connections are always a weak link of any structural system. It would also mean having to add 2×4 flat on top of either trusses or sheathing in order to have something to screw roof steel panels to (you cannot screw directly to OSB only). Single trusses also require added bracing not required with ganged (two ply) trusses.

You will find drywall installs far better over horizontal framing (wall girts) https://www.hansenpolebuildings.com/2019/09/11-reasons-post-frame-commercial-girted-walls-are-best-for-drywall/. By utilizing bookshelf girts your exterior walls only have to be framed one time – saving materials and labor over stud walls with horizontal nailers. Building Codes also do not allow for studwalls over 12′ tall, requiring added engineering.

We do have sample building plans available on our website for your builder to review and get a feel for https://www.hansenpolebuildings.com/sample-building-plans/. You may also want to invest (in advance) in our Construction Manual (please contact Bonnie@HansenPoleBuildings.com) – you do get one included with your building purchase (plus you have access to an electronic version through your login).

Please keep in mind – not only have I been involved in design, provision and/or construction of roughly 20,000 post frame buildings, I also happen to live in one. As technology brings about better design solutions, we have always been quick to adopt them, as our goal is to provide structurally sound buildings where benefits outweigh investments.

Feel free to have your builder reach out to me directly at any time.

Consideration for Future Building Length Additions

Adding on to post frame building length sounds like it should be such a simple process – unscrew sheets of steel and just build away, right?

Nope.

Long time reader ROB in ANNAPOLIS writes:

“I feel like you have answered this somewhere in the past, but when I search past “Ask the Guru” I get an employee login prompt.

Due to budget and general indecisiveness, I am considering building a structure shorter than I think I will need long term. If I am sticking to the same width and truss style, how hard is it to extend a building down the road? Essentially I am planning a workshop that I would like to have an office, bathroom, covered parking area. Those are all wants and not needs. If it is not a terrible design decision to add another couple sections to the end later on, I can get the important part, shop space, done sooner.”

My first recommendation would be to construct the ultimate sized shell and only finish off interior of what you immediately need and will fit within your budget. Done in pieces doubles the number of deliveries made to your site and trucks do not run for free. 

Built in segments – even though steel roofing and siding will come from the same manufacturer, there will be some degree of fade. People will be able to tell it was not all constructed at the same time. However, over time the newer steel will fade also and the difference may be imperceptible. Pick lighter colors so the degree of fade is not as noticeable.

If you do build in segments, it should be structurally designed to take into account eventual length. Roof and endwall shear are impacted by building length and it is far easier to account for possible added necessity of materials at the time of initial construction, rather than having to do a retro fit. Beyond a certain length braced endwall panels, by use of OSB sheathing, may be needed, This is a function also of wind loads, as well as building height and width.

Finally, if you are considering adding on to an existing building – place a double truss on the end to be added onto and have no endwall overhang on this end.

The Ultimate Post Frame Building Experience

Hansen Pole Buildings is on a mission to provide “The Ultimate Post Frame Building Experience™”. (Read about “The Ultimate Post Frame Building Experience™” here: https://www.hansenpolebuildings.com/2016/06/ultimate-post-frame-experience/) In doing so, we often make what I will refer to as ‘tweaks’ to make not only our clients’ experiences better, but also their new post frame buildings better.

About Hansen BuildingsWe look for trends in questions asked by owners of existing pole barns – usually not even those we provided! There are a couple of these our team has decided to address and we have so far done a very poor job of letting our clients know we have done so.

Lesser of these items are folks who decide, for whatever reason, they would like to add either plywood or OSB between their new post frame building’s roof purlins and roof steel (https://www.hansenpolebuildings.com/2017/03/osb-steel-roofing-pole-buildings/).

Near universally pole barn builders and kit suppliers (as well as most truss manufacturers) have designed trusses with barely enough load capacity to meet minimums. In most instances, actual weight of materials (dead load) of roof truss top chords is around 2.5 psf (pounds per square foot). This is enough to account for truss weight, roof purlins, some sort of reflective radiant barrier or other minimal condensation control, as well as light gauge steel roofing. We have been using 3.3 psf just to give a little extra cushion (roughly 1/3rd more capacity).

½-inch plywood and 7/16-inch OSB both weigh 46 to 48 pounds per four foot by eight foot sheet or 1.5 psf. In order to account for possibilities of someone wanting to add one of these sheathings during building assembly, Hansen Pole Buildings has opted to increase our design top chord dead load to five psf for clearspan trusses up to and including 40 feet. This is DOUBLE minimum requirements.

Tomorrow, I will share with you a solution to an all too frequent challenge.

Stay tuned……

Do Screws Back Out of Steel Roofing?

I had a question posed of me recently which included: “Where will the water go when the screws back out of my steel roofing”? While I answered the question at hand, I didn’t actually get into the why this might happen, or the solutions.

How to avoid the potential problem completely……use the right part, properly installed and driven into the correct material. Three easy steps, should not be so difficult.

The part – most commonly used screws are a #9 diameter by one inch long. When we tested steel roofing to determine sheer strength these screws pulled out of the framing under a minimal load (so minimal the steel didn’t even have ripples in it from the applied load). You can read more about our testing here: https://www.hansenpolebuildings.com/2012/08/this-is-a-test-steel-strength/.

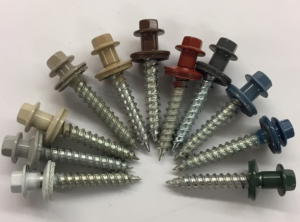
Going to a longer part solved the pull out issues in our testing. We also went to a larger diameter part in our testing, the shank below the screw heading being ¼ inch across, while the threads are a #12. The larger diameter screws also have deeper threads, which means they bite and grip the wood more tightly.

Proper installation – screws which are over or under driven, or driven at an angle are prone to a myriad of problems, all which end in leaks.  Over driven screws tend to damage the wood fibers, leaving little solid material to hold the screw. Use a screw gun with a clutch, so screws do not get over driven.

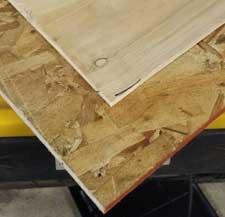
Driving into the right material– what could go wrong? I see folks using OSB or plywood sheathing under roof steel with the idea they can drive the screws into the sheeting and still hold, even when the screw tip misses a purlin. These screws will come back out.

Green lumber (or dried lumber which has been allowed to get wet) will cause screws to be loose as the moisture leaves the lumber once the building is dried inside. Of course green lumber has a myriad of other challenges which can be read about here: https://www.hansenpolebuildings.com/2011/09/499green-lumber-vs-dry-lumber/.

Right part, right screw, right material below – drop the mic and walk off the stage. Three easy steps for proper screw installation and keeping leaks from happening. 


The Look of Steel Siding

My Wife Does Not Like the Look of Steel Siding

DEAR POLE BARN GURU: I hope I’m not taking up too much of your time with this question. BTW, I’m copying Doug (Hansen Pole Buildings Designer) as we’ve briefly discussed this question.

My wife does not like the look of steel siding.  However, I’m pretty sure it’s the vertical siding that is her real issue.. i.e I agree with you that the type of material is probably not the problem. I think steel siding with a lapped siding look (Alside Satinwood for example) would be acceptable to her but I’m just not clear if such a thing is available for post frame buildings? One of your blog posts discusses horizontal steel siding but I’m not sure if it’s applicable to a post frame structure unless the panels are in multiple 2′ widths in order for the edges to line up with the girts? So, I basically have 2 questions:

1) Does Hansen have a steel, simulated lapped siding option for your kits?
2) If not but a steel siding manufacturer provided horizontal lapped siding look panels in 2′ or 4′ widths, would that siding be structurally sufficient for the wind shear loads or would the structure still require the plywood / OSB sheathing? and if the OSB is required, are we back to needing vertical stringers to attach the siding or could the siding be attached directly to the OSB?

Again, sorry to be a pain but since our property should be ready within the next 2 months, the siding issue is the only real question I have before ordering my kit.

Thanks LONNIE in COLORADO SPRINGS

DEAR LONNIE: Our goal is to deliver the Ultimate Post Frame Building Experience – as such we prefer clients who ask lots of questions, as they end up getting buildings they are extremely happy with.

In the article you reference (https://www.hansenpolebuildings.com/2015/10/horizontal-steel-siding/), the siding being used is typical post frame building steel siding, just run horizontally. This entails having to add vertical blocking between the wall girts to attach the steel. There are some benefits to this as opposed to other horizontal sidings. It is structural, so does not have to be applied over OSB or plywood. It is going to be strong – with an 80,000 psi minimum yield point, it is pretty tough stuff – less likely to dent. With the large quantity of ribs (high ribs every nine inches with two low profile ribs between each high rib) it tends to not show waves and ripples nearly as much as other products. And – it can be ordered in relatively long lengths, which minimizes the number of splices.

We can provide a steel, lapped siding (such as Alside Satinwood®  https://www.alside.com/products/siding/steel-siding/solid-color-horizontal-siding/satinwood-select/) however keep in mind, some of the same expansion/contraction issues as with other lap sidings are likely to occur – you are probably going to see some waves. These panels are not structural, so will need to be applied over either 7/16″ OSB or 15/32″ plywood. And, although most manufacturers say you can attach the siding directly to the substrate, I personally would not do it. I’d want to have verticals no more than every two feet to attach the siding. I have read recently where installers have screwed the siding to OSB, but have no personal experience with how it performs over time.

OSB versus Plywood

Plywood or OSB; OSB or Plywood?

Oriented strand board (OSB) long ago became the market leader, in relationship to plywood. As much as 75% of all sheathing is now OSB, thanks mostly to cost conscious buyers.

OSB vs. PlywoodOSB versus Plywood Prices

Prices for commodities like structural panels are notoriously volatile, and plywood can often be nearly double the price of comparable OSB sheathing. This can result in a savings of hundreds, if not thousands of dollars on an average OSB sheathed post frame building.

OSB versus Plywood Structural Differences

APA – The Engineered Wood Association (the main trade group representing panel manufacturers) says there is no real difference between the two panels. The structural characteristics are equivalent, and they can be used interchangeably. Both are rated Exposure 1 for temporary vulnerability to the weather; they have equivalent nail withdrawal resistance; and they’re installed using the same methods and construction details. However, there are differences.

OSB has more going for it than just cost. “Green” folks appreciate it can be made from small, fast growing trees, many of which come from tree farms rather than forests. OSB boasts a more consistent density. While a sheet of plywood might be 5 to 7 plies thick, a sheet of OSB is made from as many as 50 strand layers packed and compressed into the same thickness. There’s no equivalent of the weak spots which can be left in plywood when knotholes in adjacent plies overlap.

OSB versus Plywood Moisture Reaction

The biggest difference between the two panels is how they react when exposed to large amounts of moisture over extended time periods. With the exception of projects in very arid regions, sheathing and flooring panels are routinely covered with rain, snow, and ice during construction delays. This is where plywood has the edge.

When plywood gets wet, it tends to swell consistently across the sheet, and then returns to its normal dimensions as it dries out. It dries out relatively quickly, and the swelling is usually not enough to affect floor or roof finishes.

OSB takes longer to get wet than plywood but also takes longer to dry out. When used as roof sheathing, this tendency to hold moisture means it can degrade faster than plywood when exposed to chronic leaks.

When OSB does get wet it also tends to swell along the edges, and those edges stay swollen even after the material has dried out. Swollen edges have been known to telegraph visible ridges called “ghost lines” through asphalt roof shingles (just another reason to use steel roofing over purlins for pole barns).

Manufacturers insist OSB’s moisture problems have been corrected, thanks to the development of water-resistant edge seals. But of course that edge seal is lost when panels get cut on site, as they often do.

Screw Adherence in OSB versus Plywood

For post frame applications where screws will be placed into sheathing only (rather than into roof purlins or wall girts), steel roofing manufacturers specify the use of plywood, rather than OSB, as screws have a greater propensity to pull out of OSB under a wind load.

There you are…it’s 27 of one and 14 of another, but when it comes down to it…you need to weigh the pros and cons of how the osb/plywood will be used to make a conscientious choice.