Tag Archives: ice and water shield

Ice and Water Shield with Threw Screwed Steel Roofing

Ice and Water Shield with Threw Screwed Steel Roofing

Making sense of Building Codes can be a daunting task, even for Building Officials. Post-frame construction is vaguely mentioned, at best, within Building Codes, leading to at best head scratching and at worst total confusion.

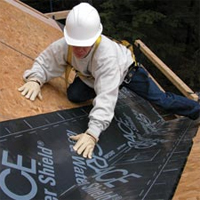
Ice and water shield is a waterproof membrane used to protect roof from ice and water damage. Its main purpose is to protect roof decking (plywood, oriented strand board – OSB, etc.) if water gets underneath roofing materials. Also known as a roofing underlayment, this rubberized slip-resistant product is “peel and stick” and self-adheres to roof deck’s surface, preventing it from flying up during high wind events.

Most post-frame buildings are constructed with threw screwed steel roof panels directly over purlins. So how do Codes apply to this circumstance?

2021 IBC (International Building Code) addresses Metal Roof Panels in Section 1507.4
“The installation of metal roof panels shall comply with provisions of this section.” (2021 IRC (International Residential Code) Section R905.10).

1507.4.1 Deck Requirements (IRC R905.10.1)
Metal roof panel roof coverings shall be applied to a solid or closely fitting deck, except where roof covering is specifically designed to be applied to spaced supports.” Metal roof panels on most post-frame buildings are designed to be applied over spaced supports (purlins)

1507.4.5 Underlayment (IRC Section R905.10.5) and High Wind.
Underlayment shall comply with Section 1507.1.1″ (IRC Section R905.1.1)

1507.1.1 Exception 3. “Structural metal panels that do not require a substrate or underlayment” (Note: this exception is not listed in the IRC, implying an underlayment must be used when V => 140 mph) Interestingly enough, the 2020 Florida Building Code, Residential, has an underlayment exception, “Compliance with Section R905.1.1.1 is not required for structural metal panels that do not require a substrate or underlayment.”

No substrate is required (steel fastened directly to purlins).
Table 1507.1.1(1) Underlayment Types (Table R905.1.1(1) in 2021 IRC)
Metal roof panels where maximum basic design wind speed V <140 mph are to be have underlayment per “Manufacturer’s instructions”

Manufacturer does not specify an underlayment must be used.
Metal roof panels where maximum basic design wind speed V => 140 mph are to meet ASTM D226 Type II or ASTM D4869 Type IV (IRC allows ASTM D4869 Type III)

ASTM D226 Type II is authentic asphalt saturated organic felt (also known as 30# felt) underlayment used as a breathable secondary weather resistant barrier when applied over roof deck prior to installation of primary roofing product.

ASTM D4869 Type IV affords same features as ASTM D226 Type II plus has a tear strength of 0.9 lbs/ft for both machine direction and cross machine direction of sheet; a 6% (as compared to 4%) loss on heating/behavior on heating for 5 hours at 221 degrees F; has liquid water transmission able to pass four hour water test on a 14 degree (3/12 slope) inclined roof; has a maximum dimensional stability of 1.75% both machine and cross direction from low to high humidity; has a 150% minimum saturation % by weight; a 2% moisture minimum % by weight at time of manufacture and a 70% minimum saturation efficiency % by weight.

However, we must refer in IBC governed buildings, once again, back to Section 1507.1.1 Exception 3 (yes, the Codes seemingly go around in circles).
1507.1.2 Ice Barriers (IRC R905.1.2)
“In areas where there has been a history of ice forming along the eaves causing a backup of water, an ice barrier shall be installed for asphalt shingles, metal roof shingles, mineral-surfaced roll roofing, slate and slate-type shingles, wood shingles, and wood shakes.”

Note: Metal roof panels are specifically not included.

Answers for Brian’s Barndominium Builder

Answers for Brian’s Barndominium Builder

Should you have missed yesterday’s episode, please click back to it using link at bottom of this page – it will make more sense as well as being more entertaining!

Hello Brian ~

My Father and his five brothers were all framing contractors, so I was raised in a world of trusses two foot on center and vertical stud walls. Even in my first few years of prefabricated roof trusses (as a truss designer/salesman/manager) – we used to laugh when builders would order trusses for pole barns. 40 years of experience has taught me they were right (post frame builders).

Having personally erected a plethora of buildings, both stick frame and post frame, it is far less time consuming to erect a post frame building with widely spaced trusses (and purlins and ceiling joists) than it is to stud wall frame. With a minor investment into building a set of four ‘winch boxes’ entire sections of roof framing can be assembled on the ground and cranked up into place. Not only is this fast, it is also far safer.

Learn about winch boxes here: https://www.hansenpolebuildings.com/2019/10/winch-boxes-a-post-frame-miracle/

Mindi’s quote does not include OSB sheathing or either 30# felt or ice and water shield to go between OSB and roof steel. These can be added, however there is really no structural reason to do so – it is going to add to both investment and labor. Should you opt to have your roof sheathed, OSB (or plywood) will run from fascia to ridge across purlins 24″ on center, so spans would be no greater than trusses every two feet.

If you do opt for roof sheeting, you might want to consider going to 5/8″ CDX plywood and a standing seam steel. It will be more expensive however it does eliminate any through fasteners.

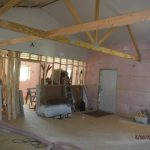
When you create an encapsulated building (spray foam to all interior surfaces), you do not want to ventilate it, as you would then lose your air seal. With your OSB’s underside sealed by closed cell spray foam and upper side protected with 30# felt or ice and water shield, there is no way for your OSB to become moist. If this is still a concern, an upgrade to plywood could be done.

Certainly one could place scissor trusses every two feet – it would then require adding structural headers (truss carriers) between columns to support them – reducing ‘line of sight’ beneath them. In order to place two foot tall windows in your knee walls above wing roofs, your building height would need to increase to allow for their height. This entails a whole bunch of connections – trusses to headers, headers to trusses and connections are always a weak link of any structural system. It would also mean having to add 2×4 flat on top of either trusses or sheathing in order to have something to screw roof steel panels to (you cannot screw directly to OSB only). Single trusses also require added bracing not required with ganged (two ply) trusses.

You will find drywall installs far better over horizontal framing (wall girts) https://www.hansenpolebuildings.com/2019/09/11-reasons-post-frame-commercial-girted-walls-are-best-for-drywall/. By utilizing bookshelf girts your exterior walls only have to be framed one time – saving materials and labor over stud walls with horizontal nailers. Building Codes also do not allow for studwalls over 12′ tall, requiring added engineering.

We do have sample building plans available on our website for your builder to review and get a feel for https://www.hansenpolebuildings.com/sample-building-plans/. You may also want to invest (in advance) in our Construction Manual (please contact Bonnie@HansenPoleBuildings.com) – you do get one included with your building purchase (plus you have access to an electronic version through your login).

Please keep in mind – not only have I been involved in design, provision and/or construction of roughly 20,000 post frame buildings, I also happen to live in one. As technology brings about better design solutions, we have always been quick to adopt them, as our goal is to provide structurally sound buildings where benefits outweigh investments.

Feel free to have your builder reach out to me directly at any time.

Post Frame Building Insulation

Pole Barn Guru’s Ultimate Guide to Post Frame Building Insulation

When it comes to insulating any building (not just post frame ones – like barndominiums) there is a certain point of diminishing returns – one can spend so much they will never, in their lifetimes, recoup their investment.

Here my ultimate guide to post frame building insulation is based upon practicality and obtaining the best possible value for investment.

There are some basics applicable to any steel covered building:

Under any concrete slab on grade inside a building, place a well-sealed vapor barrier. Read about under slab vapor barriers here: https://www.hansenpolebuildings.com/2017/11/vapor-barriers-slabs-grades/.

Between roof framing and steel roofing – please do not assume condensation is not going to be a problem. At some point in time it will become one and if precautions are not taken regrets will happen. Condensation under roof steel is maybe number one of the issues I am asked to assist with.

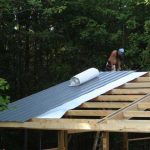
Least expensive financially, but does take some extra labor hours, especially if it is windy – a single air cell layer reflective radiant barrier. Six foot widths will install much quicker than four foot. Make sure to order with a six foot width NET COVERAGE and an adhesive tab along one edge with a pull strip. Without an adhesive tab all butt edges will require seam tape, not expensive, but adds lots of time. Do not waste your money on adding an extra approximate R 0.5 for double bubble (two layers of air cells).

For a slightly great investment in materials, hours of labor can be saved by the use of an Integral Condensation Control bonded to roof steel. This would be my product choice. https://www.hansenpolebuildings.com/2017/03/integral-condensation-control/.

Next higher cost would be sheathing the roof with either OSB (Oriented Strand Board) or plywood on top of roof purlins. Roof purlins will need to be spaced appropriately so sheathing seams fall on purlins (16, 19-3/8 or 24 inches on center). Roof truss top chord live load must be increased to allow for greater dead loads. Either 30# felt (asphalt impregnated paper) or an Ice and Water Shield must be placed between sheathing and roof steel. Roof screws must still be placed to go into purlins, as thin sheathing is inadequate to adequately hold screws.

Bigger financial investment, but no extra labor involved is to have two inches of closed cell foam sprayed on the underside of roof steel. This will prevent condensation and is noise deadening. As a rough budgetary figure, plan upon spending roughly two dollars per square foot of roof surface.

Storage/Utility Buildings

If you ever believe anyone might ever have a future desire to climate control your building then provisions should be made for making it easiest to make future upgrades.

For now we will assume this building is totally cold storage. If it might ever (even in your wildest dreams) be heated and/or cooled include in your initial design, walls with a Weather Resistant Barrier (https://www.hansenpolebuildings.com/2016/01/determining-the-most-effective-building-weather-resistant-barrier-part-1/) between framing and siding. 

Taking walls one step further would be ‘commercial’ bookshelf wall girts (https://www.hansenpolebuildings.com/2011/09/commercial-girts-what-are-they/).

In roof – have trusses designed to support a ceiling load, ideally of 10 pounds per square foot (read about ceiling loaded trusses here: https://www.hansenpolebuildings.com/2016/03/ceiling-loaded-trusses/). 

Trusses should also be designed with raised heels to provide full depth of future attic insulation above walls (https://www.hansenpolebuildings.com/2012/07/raised-heel-trusses/).

Make provision for attic ventilation, by having an air intake along sidewalls using enclosed ventilated soffits and exhaust with a vented ridge.

Any overhead doors should be ordered insulated – just a good choice in general as, besides offering a minimal thermal resistance, they are stiffer against the wind.

Equine Only Use

Same as storage/utility however ventilation is essential (and often overlooked). (Read more on stall barns here: https://www.hansenpolebuildings.com/2012/08/stall-barn/)

Garage/Workshop/Man Cave/She Shed/House/Shouse/Barndominium

Many previous recommendations are going to be repeated here. Ultimately it is going to depend upon willingness to include higher R values in initial budget, rather than having increased utility bills forever.

Start with a Frost-Protected Shallow Foundation – post frame version (https://www.hansenpolebuildings.com/2016/11/frost-protected-shallow-foundations/) with sand on the inside rather than a thickened slab. This makes for an excellent and affordable design solution.

For walls, we will again work from generally ascending price and R values.

On low end would be having installed a weather resistant barrier beneath wall steel, in conjunction with commercial bookshelf wall girts. Fill insulation cavity with unfaced batt insulation and cover inside face of wall with a well-sealed six ml clear visqueen vapor barrier. As an alternative to fiberglass would be mineral wool insulation as it is not affected by moisture (https://www.hansenpolebuildings.com/2013/03/roxul-insulation/). This method can be entirely done D-I-Y.

I have personally used BIBs (https://www.hansenpolebuildings.com/2011/11/bibs/) in several buildings, including my current barndominium home. It does require a certified installer.

A Weather Resistant Barrier can be eliminated by the use of a ‘flash coat’ of two inches of closed cell spray foam against the inside of wall steel. Balance of wall cavity can be filled with batt insulation. (https://www.hansenpolebuildings.com/2016/07/advantages-spray-foam-over-batt-insulation/).

For added R value and a complete thermal break, add two inch rigid closed cell foam boards to inside of framing. To maintain thermal break integrity, glue foam boards to inside of framing and properly seal all seams. Gypsum wallboard can be glued to the face of foam boards.

After ceiling has been installed, have insulation blown into dead attic space, following Energy Star™ guidelines (usually R-45 to R-60).