Tag Archives: stick frame

Thinking Stick Frame Rather Than Post Frame

Thinking Stick Frame Rather Than Post Frame

Reader BRAD writes:“Real question…I’ve been doing lots of reading and love this site. I am building a 40x60x14 this spring. I originally thought I was going to go pole barn and now I am thinking stick frame. Reason….1. I am going to have insulated concrete foundation with in floor heating piping installed right away. (mono slab). 2. I am planning on fully finishing the inside insulation electrical, etc. in the future. What I’ve seen with post frame is that they are cheaper to build initially but if you are planning on finishing the inside there is substantial lumber and framing that needs to be done for interior walls and interior ceiling. It appears “at the end of the day” a finished pole barn is not much cheaper than a stick frame. I also question if it would be a lot more time trying to frame an interior post frame with 16” o/c studs and finishing a ceiling with 4’ or longer truss spacing vs 2’ with conventional stick frame. I am doing all metal exterior with 2’ o/c stud purlins on side walls vs osb sheathing. I know you can spray closed cell spray foam but again that is more than triple the price vs bats and vapor barrier that you can only do with 24”or16” o/c framing. 

Am I way off base on this theory or is there any truth to my thinking?”

Mike the Pole Barn Guru responds:
I just don’t see reason number one as a reason at all. A plethora of post frame buildings (my own included) utilize radiant in-floor heat. In order to stick frame, you are going to have to thicken your slab edges, or pour a continuous footing and stem wall, in order to provide adequate support for your now load bearing walls. This is going to result in added expenses for forming, regardless of your choice (before even considering extra concrete required). While anchor bolts for stud walls are relatively inexpensive, they do require some effort to be properly placed in order to avoid hitting studs and plates need to be drilled to account for them.

In order to stick frame without added engineering, your wall heights are going to be limited by Building Codes. To attach steel siding, you will need to add horizontal framing outside of your studs (scarily, I did see a builder post photos of vertical steel siding, screwed to vertical studs), resulting in two sets of framing, extra pieces to handle, cut and install. By using commercial style bookshelf wall girts in post frame, no extra framing is required in order to attach exterior steel siding and wall finish of your choice. As post frame buildings transfer gravity loads from roof-to-ground via columns, eliminating (in most instances) any need for structural headers.

Using prefabricated metal connector plated wood trusses, in pairs, directly aligned with columns (most often placed every 12 feet), does require ceiling joists to be placed between truss pairs. This can all be done on the ground, then cranked into place using winch boxes, with no need for other heavy lifting equipment.

When all is said and done, fully engineered post frame construction will always be more cost effective than stick frame, more structurally sound and afford a greater ability to super insulate, regardless of one’s choice of insulation systems.

Converting a Stick Framer

Converting a Stick Framer

As my long term followers may remember, I grew up stick framing houses, apartments and commercial buildings working for my Father and his framing contractor brothers. While our (myself and my male cousins) education was focused far more on “do” as opposed to “why we were doing” we all got a pretty good grasp of things like walls are composed of 2×4 or 2×6 studs running vertically to support loads from subsequent floors and/or roofs.

Now when I built my very first ‘pole barn’ in South Salem, Oregon in early 1980 it would have been a step up for me to have considered myself as even having a clue as to how they went together:

Builder STEVE is erecting a barndominium for Hansen Pole Buildings’ clients in ROYSE CITY, Texas. He wrote to Bonnie (in our office, she prints and transmits plans, among other things, to our clients), and copied his client’s Project Coordinator, Justine:

“I have a couple of question about the girts…

I will be the first to admit this is a different type of building than what I’m used to.
We build houses, not pole barns. 

I’ve never seen Girts or this type of supporting walls so to speak in any of the houses I have built.

We typically use “sheer walls” or a totally different type of material when supporting “open portals” and bracing corners.

Can the engineer point to the locations, on the perimeter/outside walls that the girding is supposed to go. 

If they’re telling us that these only go in specific locations I would like to know what those specific locations are. 

Then after that please give me a detail of what runs between the Girts on the exterior wall where there are no Girts.

It was my understanding from previous emails that the Girts do not run continuously around the four exterior walls.

If they do, then please let me know that as well.

Thank you in advance.”

Even on a Sunday morning, Justine responded:

Good Morning Steve,

Bonnie is not tech support.  

I have CC’D tech support in on this email.  Also, please find the construction manual that shipped with the hardware. This book will help you on many levels in building this post frame building.

On previous conversations – it was the Girt blocking that I stated isn’t continuous which was 2×4.  The “girts” which are primarily 2x6s per materials list and plans are what go between the posts horizontally.”

While our Construction Manual clearly lays out proper contacts (saving emails having to be passed from team member to team member), it does require actually opening and reading said manual.

Here our Technical Support Department got to join it (yes, on a Sunday as well):
Mike the Pole Barn Guru;
Justine is correct in instructing you to go to your best resource for understanding post frame structural systems, our Construction Manual.

Post frame differs from stick frame, as roof loads are transferred downward through columns to ground – eliminating need (in most instances) for structural headers over door and window openings. I grew up stick framing and it wasn’t until I was able to ‘wrap my head’ around framing running left-to-right, rather than up-and-down I was able to make any money building post frame.

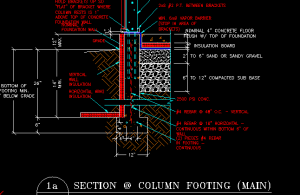
You will want to carefully review Sheets S-4.1, S-5.1 and S-5.2 of your engineered building plans, as they detail location, orientation and placement of all wall girts and associated framing members. Bookshelf wall girts run from column to column, not continuously around the building perimeter.

Please keep in mind, your entire roof surface should be finished prior to any wall framing. Last page of Construction Manual Chapter 3 gives an outline of installation processes and for best success you will want to follow it explicitly.

Why Pre-cut Studs are 92-5/8″ Long

Why Pre-cut Studs are 92-5/8” Long

Growing up with my Father and six framing contractor uncles (my Dad’s five brothers and Auntie Darlene’s husband Vern) all of us male Momb cousins (myself, brother Mark, Kim, Randy and Scott) eventually became M.E.I. (Momb Enterprises, Inc.) teenage slaves. My beloved Uncle Gil even has on his Facebook profile, “Former Mean Boss at MEI”. Whilst our generation worked hard, we were generally looked upon as strong backs and weak minds – there was very little explanation as to why things were done a certain way, and lots of do it, do it quick and do it right.

In framing stud walls, Uncle Gil would give us an evil eye if we had a stud even a minute fraction of an inch off being directly between his lay out marks on top and bottom plates. Never was there a discussion of why it was we were framing with studs 92-5/8” long, when all other framing lumber came in even two foot multiples (albeit those were always ½” to 5/8” greater in length than an exact two foot).

Now an average small home takes roughly 400 studs, can you imagine how time consuming it would be to have to trim back all of these if eight foot material was ordered and 92-5/8” was desired? 

It wasn’t until I went to work managing Lucas Plywood and Lumber’s roof truss plant, where I became exposed to “P.E.T.” – Precision Trimmed Lumber. This was one service provided for by our lumber remanufacturing (aka reman) operation. While there, since I was good at math, I taught members of our lumber sales team how to do material takeoffs for stick frame home lumber packages.

Helpful hint to those of your reading along at home – want studs 16” on center (o.c.)? Take lineal footage of walls and order the same number of studs as feet of wall. 24”o.c. take lineal footage x 2/3rds. Works out to be remarkably close in actual use.

Anyhow, back to why studs are 92-5/8” long.

Interior Wall FramingAnecdotally, supposedly the company who first pre-cut studs couldn’t close their 1943 delivery truck’s tailgate with eight foot material – so studs were cut to fit the truck bed.

When 92-5/8” studs are placed upon a single 2x bottom plate and a double top plate, wall height becomes 97-1/8”. This allows for 5/8” drywall on ceilings and keeps wall drywall ½” above the subfloor. This gives space for drywall to expand and contract without affecting flooring, as well as from absorbing any moisture on the floor.

Even though post frame buildings, with interiors to be finished, should be properly designed using bookshelf (horizontal girts) for exterior walls, these same rules are best followed for determining floor-to-ceiling heights. By use of heights 1-1/8” greater than whole feet, material use is minimized and drywall sheets can be run vertically without need for cutting. For extended reading on why this is best: www.HansenPoleBuildings.com/2019/09/11-reasons-post-frame-commercial-girted-walls-are-best-for-drywall/.

You Can’t Build it Here Part II

You Can’t Build It Here Part II

If you missed part I, go back two days to find it.

Continuing on…

Post frame homes can save thousands of dollars in excavation, footing and foundation forming and concrete costs inherent to stick framing. This is due to use of isolated widely spaced wood columns either embedded or placed into brackets on concrete piers.  Post frame construction allows greater flexibility of design for wide door and window openings without requiring structural headers. It has fewer framing members touching both exterior and interior surfaces, reducing thermal transference issues. Deep wall cavities and use of raised heel trusses provide for an ability to super insulate. Material use is minimized by elimination of redundant members so often found in stud walls. Add to this – an average physically capable person, who can and will read instructions, can successfully erect their own beautiful home!

Today’s fully engineered post frame homes are not your grandfather’s pole barn. Although steel siding and roofing will prove to be more cost effective and durable than any other cladding materials – any exterior surfacing is possible. As an example, one of our clients is building on Lake Havasu, Arizona with a concrete tile roof and stucco for exterior wall finishes.

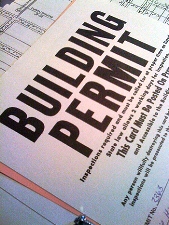
There are jurisdictions sadly attempting to prevent ‘pole barn houses’ in their neighborhoods. Scenarios usually go something like this – a potential homeowner inquires to their local building permit issuing authority and asks, “Can I build a pole barn home here”? Too often (in my opinion one time is too often) they are told flatly no. Most of these who do move forward, automatically default to an easy route and stick frame.

What is not being asked by these potential post frame home owners is, “Can you provide your written ordinance prohibiting fully engineered post-frame homes”?

Use of terms such as “pole barn” or “pole building” home, barndominium, shouse or shop/house oftentimes cause permitting waters to become clouded. Presenting as a “fully engineered post-frame home” dramatically decreases initial resistance.

My personal experience is well over 90% of these jurisdictions have no such written ordinance. And if it is not in writing, and duly approved by an elected governing body, then it does not exist. When pointed out no written prohibiting ordinance exists, this has always resulted in approval.

In those rare instances where an adopted written statute does appear, I have often appealed to legal counsel for the jurisdiction. I kindly explain, in trying to rule out a 100% Code conforming structural building system, they are attempting unlawfully to restrict free trade and this could result in a protracted (and expensive) legal battle they cannot win. Municipalities do not want to have to explain to their constituents how good money was thrown after bad. For me, in all but a single instance, this has resulted in approval to move forward.

Other courses of action would include taking this issue to the jurisdiction’s governing body (City/town counsel or county commissioners) and requesting their statue be overturned or amended. This can prove to be a lengthy process as the wheel of progress moves slowly.

Now my one single (and ongoing) challenge – Madison County, Illinois. In their Ordinance #: 2020-02 “Ordinance authorizing a text amendment to Chapter 93 of the Madison County Code of Ordinances”:

93.025 “R-1” THROUGH “R-4” SINGLE-FAMILY RESIDENTIAL DISTRICTS

(F) “R-1”, “R-2”, “R-3”, and “R-4” Permitted uses.

     (5) Single-family dwelling, frame construction only.

Madison County’s Planning and Zoning Department’s position is “frame” means stick frame only. I have reached out to Madison County State’s Attorney’s Office and as there is no pending actual permit application, they feel there is no compelling reason to address this issue.

Planning and Zoning Departments can regulate things such as setbacks, building footprints, heights, siding and roofing materials, even colors! However it is unlawful to preclude any Code approved, engineered structural building system.

In my humble opinion, we will see entire subdivisions filled with post-frame homes, as affordable housing becomes less and less affordable.

You Can’t Build it Here Part I

You Can’t Build It Here

Pole Barn Guru BlogWhen I first began selling pole barn kits in Oregon, back in 1980, they were almost universally no permit required farm buildings. As our service area expanded into states such as California and Nevada, engineering was required in most instances, however there was never a concern about a pole building not being approved for use in any jurisdiction.

Now there were some ‘tough’ Building Departments. Most providers and builders refused to even quote permitted pole buildings within Multnomah County, Oregon or King County, Washington – just because they involved engineering and had plans examiners who were actually engineers themselves.

As our Pacific Northwest pole building industry evolved and expanded, we knew we had clients who were bootlegging our buildings into homes, but it wasn’t until I built a shouse (shop/house) for myself in rural Spokane County, Washington nearly 30 years ago, where I actually participated in a post frame building specifically designed for residential use all along.

In recent years, there has been a literal explosion of barndominiums across our country – many of these being post frame homes. And why not? Post frame offers so many benefits over limitations of what is considered to be a more traditional structural system – stick (or stud wall) framed.

Perhaps stick built construction’s biggest advantage is builders and tradespeople are very comfortable working in and around stick framing. All registered architects and most building inspectors are very familiar with stick framing. 2018’s International Residential Code (IRC) provides a prescriptive ‘cook book’ to follow for adequate structural assembly, within certain limitations. These include, but are not limited to, no story height of greater than 11 feet 7 inches (R301.3.1), no hurricane prone areas with a design wind speed of 130 mph or greater located south of Virginia, or 140 mph elsewhere (R301.2(5)B), and no ground snow loads over 70 psf (R301.2.3).

IRC802.10.2.1 further limits truss spans to a maximum of 36 feet and building lengths to 60 feet (measured perpendicular to truss span). Trussed roof slopes must be at least 3:12 and no greater than 12:12.

Wood is a very forgiving building material and, even when miscut, replacement material is usually only a short drive away. America’s home building industry has built traditional, wood stick framed homes, on site for decades.

Many builders, architects, carpenters and other subcontractors prefer to work on stick built homes as compared to alternative building systems, as it is what they are familiar with.  Because traditionally framed houses are so popular, dimensional lumber and stick built framers are readily available.

Another advantage of stick built homes is they allow for a great level of design freedom.  One can design a home with various ceiling heights, angles and curves, niches and other details. Stick framing is one way to achieve those unique details at a fairly affordable cost.

Despite its popularity, stick framing does have some drawbacks. Because stick built homes are assembled outside, over several weeks, framing lumber is subject to outside moisture. If lumber gets too wet, it can shrink and warp as it dries and cause cracks in the attached drywall.  This shrinking and warping can also make it difficult to properly insulate. To decrease risks of potential moisture problems, exteriors are covered with an appropriate and well-sealed Weather Resistant Barrier and lumber should be properly dried before drywall and insulation are installed.

Another drawback of a stick built home is it usually takes several weeks to complete framing.  Total amount of time it will take will obviously depend on the size and complexity of house plans and size, experience and availability of any particular framing crew.

A framing crew must precisely cut, assemble and erect framing components sometimes in adverse weather conditions.  Working around adverse weather conditions is another challenge with stick framing.

Come back in two days for the conclusion in You Can’t Build it Here Part II.

Answers for Brian’s Barndominium Builder

Answers for Brian’s Barndominium Builder

Should you have missed yesterday’s episode, please click back to it using link at bottom of this page – it will make more sense as well as being more entertaining!

Hello Brian ~

My Father and his five brothers were all framing contractors, so I was raised in a world of trusses two foot on center and vertical stud walls. Even in my first few years of prefabricated roof trusses (as a truss designer/salesman/manager) – we used to laugh when builders would order trusses for pole barns. 40 years of experience has taught me they were right (post frame builders).

Having personally erected a plethora of buildings, both stick frame and post frame, it is far less time consuming to erect a post frame building with widely spaced trusses (and purlins and ceiling joists) than it is to stud wall frame. With a minor investment into building a set of four ‘winch boxes’ entire sections of roof framing can be assembled on the ground and cranked up into place. Not only is this fast, it is also far safer.

Learn about winch boxes here: https://www.hansenpolebuildings.com/2019/10/winch-boxes-a-post-frame-miracle/

Mindi’s quote does not include OSB sheathing or either 30# felt or ice and water shield to go between OSB and roof steel. These can be added, however there is really no structural reason to do so – it is going to add to both investment and labor. Should you opt to have your roof sheathed, OSB (or plywood) will run from fascia to ridge across purlins 24″ on center, so spans would be no greater than trusses every two feet.

If you do opt for roof sheeting, you might want to consider going to 5/8″ CDX plywood and a standing seam steel. It will be more expensive however it does eliminate any through fasteners.

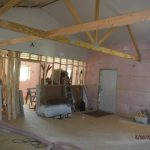
When you create an encapsulated building (spray foam to all interior surfaces), you do not want to ventilate it, as you would then lose your air seal. With your OSB’s underside sealed by closed cell spray foam and upper side protected with 30# felt or ice and water shield, there is no way for your OSB to become moist. If this is still a concern, an upgrade to plywood could be done.

Certainly one could place scissor trusses every two feet – it would then require adding structural headers (truss carriers) between columns to support them – reducing ‘line of sight’ beneath them. In order to place two foot tall windows in your knee walls above wing roofs, your building height would need to increase to allow for their height. This entails a whole bunch of connections – trusses to headers, headers to trusses and connections are always a weak link of any structural system. It would also mean having to add 2×4 flat on top of either trusses or sheathing in order to have something to screw roof steel panels to (you cannot screw directly to OSB only). Single trusses also require added bracing not required with ganged (two ply) trusses.

You will find drywall installs far better over horizontal framing (wall girts) https://www.hansenpolebuildings.com/2019/09/11-reasons-post-frame-commercial-girted-walls-are-best-for-drywall/. By utilizing bookshelf girts your exterior walls only have to be framed one time – saving materials and labor over stud walls with horizontal nailers. Building Codes also do not allow for studwalls over 12′ tall, requiring added engineering.

We do have sample building plans available on our website for your builder to review and get a feel for https://www.hansenpolebuildings.com/sample-building-plans/. You may also want to invest (in advance) in our Construction Manual (please contact Bonnie@HansenPoleBuildings.com) – you do get one included with your building purchase (plus you have access to an electronic version through your login).

Please keep in mind – not only have I been involved in design, provision and/or construction of roughly 20,000 post frame buildings, I also happen to live in one. As technology brings about better design solutions, we have always been quick to adopt them, as our goal is to provide structurally sound buildings where benefits outweigh investments.

Feel free to have your builder reach out to me directly at any time.