Tag Archives: net free ventilation area

What Size Fresh Air Intakes Do I Need?

What Size Fresh Air Intakes Do I Need?

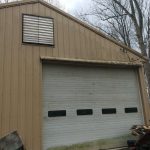
Reader BOB in GRAHAM writes: “I have a 40 x 60 pole building. There is a ridge vent along the 60′. I recently installed Sheetrock on the ceiling and blew in insulation. My question is what size fresh air intake vents do they need to keep the attic cooler. I was thinking I need Air vents on each side of the end wall at the lowest points. The other thing is I can only pull fresh air in at one end of the building. As the other end is open to the ridge vent, separate from the other 60′. Should I put an electric intake fan rather than just an air vent?”

Here are ventilation requirements:

Provision of 1 square foot of NFVA (Net Free Ventilation Area) for each 150 square feet of attic floor. One important note – attic floor area is just as it reads – area – not volume. This is a minimum requirement and does not stipulate required ventilation openings provide intake (low), exhaust (high), or both.

Provision of 1 square foot of NFVA for each 300 square feet of attic floor if both following conditions are applicable:

At least 40%, but not more than 50% of NFVA is provided by vents located not more than 3 feet below roof’s highest point.

Provision for a minimum 1 inch air space between roof sheathing and insulation in attic at vent location.

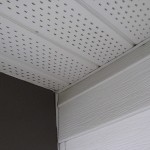
Your 40 x 60 building would therefore require at least eight square feet ( 40 x 60 = 2400 / 300 ) or 1152 square inches of NFVA, with at least 50% of this been at eaves (vented sidewall soffits) or gable vents located in lower half of attic space.

While an electric powered fan would move air within your attic area, you do need to provide adequate intake area. 576 square inches of NFVA is a lot of gable vent (assuming you have no soffit intake vents).

2018 IRC Attic Ventilation Requirements

2018 IRC Attic Ventilation Requirements

Reader SCOTT in MINNESOTA writes:

“I read a couple of articles on your website and was hoping you could answer a question or give me some insight on venting my shop building,

It is pole barn construction with 24” vented soffits and a ridge vent.   The original foam/screen closures on the ridge vent were along the entire length of the ridge but over the years have pretty much deteriorated and come down in pieces.  This last Minnesota winter was hard on them.  I think replacing them with an “LP2 like” option available from Midwest Manufacturing will be a good idea and probably last longer than the simple 1” wide foam style.   My building is 40’ x 40’ with a 42’ ridge and it is finished inside with a level ceiling.

Questions:

Should I do the entire length of the ridge with vented closures or do I just need a percentage? 

If I don’t do the entire length should the sections of venting match on both sides of the ridge?  

Any thoughts on this matter would be appreciated.

Thanks for your time.”

Mike the Pole Barn Guru says:

Historically, IRC (International Residential Code) ventilation requirements are applicable to one and two family homes and have been based on a ratio of “net free ventilating area” (NFVA) being area of ventilation openings in attic to area of attic space. NFVA is the total unobstructed area air can pass through and it is calculated at the most restricted location through a vent’s cross section.


Ventilation requirements listed in Section R806 in IRC’s 2018 edition are listed in excerpts below:

  • R806.1 Ventilation Required. Enclosed attic and enclosed rafter spaces formed where ceilings are applied directly to the underside of the roof rafters shall have cross ventilation for each separate space by ventilating openings protected against the entrance of rain or snow. Ventilation openings shall have a least dimension of 1/16 inch minimum and ¼ inch maximum. Ventilation openings having a least dimension larger than ¼ inch shall be provided with corrosion-resistant wire cloth screening, hardware cloth, perforated vinyl or similar material with openings having a least dimension of 1/16 inch minimum and ¼ inch maximum. Openings in roof framing members shall conform to the requirements of Section R802.7. Required ventilation openings shall open directly to the outside air and shall be protected to prevent the entry of birds, rodents, snakes and other similar creatures.

  • R806.2 Minimum Vent Area. The minimum net free ventilating area shall be 1/150 of the area of the vented space.  Exception: The minimum net free ventilating area shall be 1/300 of the vented space provided both of the following conditions are met:

  1. In climate zones 6, 7 and 8, a Class I or II vapor retarder is installed on the warm-in-winter side of the ceiling.

  2. At least 40 percent and not more than 50 percent of the required ventilating area is provided by the ventilators located in the upper portion of the attic or rafter space. Upper ventilators shall be located no more than 3 feet below the ridge or highest point of the space, measured vertically. The balance of the required ventilation provided shall be located in the bottom one-third of the attic space. Where the location of wall or roof framing members conflicts with the installation of upper ventilators, installation more than 3 feet below the ridge or highest point of the space shall be permitted.

  • R806.3 Vent and Insulation Clearance. Where eave or cornice vents are installed, blocking, bridging and insulation shall not block the free flow of air. Not less than a 1-inch space shall be provided between the insulation and the roof sheathing and at the location of the vent.

  • R806.4 Installation and Weather Protection. Ventilators shall be installed in accordance with manufacturer’s installation instructions. Installation of ventilators in roof systems shall be in accordance with the requirements of Section R903.

In summary,  ventilation requirements in IRC’s 2018 edition are:


  • Provision of 1 square foot of NFVA for each 150 square feet of attic floor. One important note – attic floor area is just as it reads – area – not volume. This is a minimum requirement and does not stipulate  required ventilation openings provide intake (low), exhaust (high), or both.
    • Provision of 1 square foot of NFVA for each 300 square feet of attic floor if both following conditions are applicable:
    • A Class 1 (≤ 0.1 Perm) or 2 (> 0.1 to ≤ 1.0 Perm) vapor retarder is installed on warm-in-winter side of ceiling when the structure is located in climate zone 6, 7, or 8.
    • At least 40%, but not more than 50% of NFVA is provided by vents located not more than 3 feet below roof’s highest point.
    • Provision for a minimum 1 inch air space between roof sheathing and insulation in attic at vent location.

Hopefully this Code lingo didn’t dull your senses too badly!

A Marco LP-2™ ridge vent (read more here: https://www.hansenpolebuildings.com/2014/12/ridge-vent/ provides 18.4 square inches of net free ventilation per lineal foot of ridge when placed on each side of ridge, provided roof steel’s upper edges from each side are at least 1-9/16” apart.

As a maximum of 50% of required ventilation can be at ridge, 18.4 X 2 X 300 / 144 = 76’8” as maximum building width these vents can handle on a gabled roof.

You will need to determine NFVA of your vented soffits in order to calculate the correct ratio of intake to exhaust. If the entire ridge does not have to be vented, it would be prudent to have equal footage of vented closures on each side of the ridge.

Moisture Barrier for a North Idaho Hanger

Moisture Barrier for a North Idaho Hangar

Reader BILL in SANDPOINT writes:

“Hey guru! Question about insulation – moisture barrier. We are under construction on a 64×70 post frame aircraft hangar in North Idaho. The eave height is 19 feet, plus a two foot heel. There are no overhangs. Roof pitch is 3:12 and the ceiling is vaulted 1:12 there will be a 58 foot wide by 18 foot tall hanger door. Attic venting will be from gable end vents. The roof will be sheathed with 7/16 OSB and receive 30# felt under the 26 gauge PBR. The walls will be sheathed 7/16 OSB and house wrapped under the 29 gauge steel panels. The plan is to install metal liner panel on the ceiling and 5/8″ drywall on the walls. Insulation will be r49 blow in the attic, and r25 unfaced batts in the walls. The hanger door is yet to be determined, but it might also be unfaced batts under a metal liner. Two 125,000 BTU radiant tube heaters will be installed in the ceiling. They will be vented outside and will draw combustion air from outside. I am thinking that it makes sense to install a full vapor barrier for the walls and the ceiling, but would appreciate your thoughts on the matter.”

Mike the Pole Barn Guru writes:

Before we get to your question, I have some concerns….

First – you are putting a 58 foot wide door in a 64 foot endwall. This leaves only three feet of solid wall on each side of your door opening. These areas need to be shearwalls and maximum aspect ratio for a shearwall is 4:1 (four feet of height for every foot of width). With a three foot wide shearwall your maximum opening height would be 12 feet. You are likely to experience some tremendous racking problems (if not a failure) on your door endwall.

Second – trying to ventilate a 4480 square foot dead attic space with gable vents will require 1075.2 square inches of NFVA (Net Free Ventilating Area) in each endwall and this is providing half of NFVA is located in each upper and lower half of each endwall. You could accomplish this with say four 24″ x 36″ galvanized gable vents each end, however this might not be your most aesthetically pleasing design solution. Downside of gable vents is once you get past your first pair of trusses, airflow becomes negligible. I would be much happier with vents in your sidewalls (in area of truss heels) as an intake, combined with continuous ridge venting.

If it were me – I would use unfaced R-30 rockwool batts in sidewalls (they are not affected by moisture and R value does not degrade over time like fiberglass does) with a well-sealed interior vapor barrier before hanging drywall. This would allow your walls to dry to outside. Ceiling should not have a vapor barrier, as you want moist air to be able to escape into your well ventilated attic. I would blow in R-60 of rockwool.

Best of success with your build.

Insulating a Partially Climate Controlled Building

Insulating a Partially Climate Controlled Post Frame Self-Storage Building

Reader KEVIN in HUMBOLDT writes:

“ I’m designing a post frame building for self-storage that will have non climate control units around the perimeter of my building with climate controlled units in the center, accessed via a hallway down the center of the building. The entire building will have a metal ceiling. The walls between the climate controlled area and the non-climatized units will be insulated with fiberglass with a vapor barrier between insulation and wall metal on climatized side. I’ll have fiberglass in the attic space above climatized area with vapor barrier between insulation and ceiling metal. If my math is correct on a 58×174 building, I need 4845 square inches in NFVA (net free ventilation area) exhaust and intake. My soffit and ridge vent combo will provide 6960 NFVA exhaust and intake. I have 2 questions. First, do I still need a thermal break under my roof steel? Second, I’ll have 2×6 purlins on edge, recessed btw trusses so, would it be advantageous to install a radiant barrier or house wrap to the bottom side of my purlins, simply for smooth airflow from my soffit vent to ridge vent? Just wondering if purlins blocking air path up the roof is anything to be concerned with. Thank you.”

Mike the Pole Barn Guru replies:

You need some provision for condensation control below roof steel – easiest would be to order roof steel with an Integral Condensation Control factory applied. In Tennessee you should not have a vapor barrier between steel ceiling liner panels and blown in fiberglass attic insulation. Placing a barrier on the underside of roof purlins does not appear to make a noticeable difference in performance of attic ventilation. Although you did not ask, you should have a well-sealed vapor barrier (6mil or greater) and R-10 EPS insulation under slabs (even in non-conditioned areas) to minimize potential for condensation on top of slab.

Help! My Barndominium Roof is Dripping!

Help! My Barndominium Roof Is Dripping!

Reader TIMM in WHITEFISH writes:

“Thanks for taking my question. I recently built a barndominium in NW Montana. I tried to find someone to build it for me, but the demand and cost in the area had gone up so much that I had to do almost all the work on my own. I was not completely unfamiliar with building but not an expert by any means but I was able to get it built with helpful videos found online. I finished the home in late October and have moved in. The home is 28’x36′ with 10′ walls and is all living space, no garage. I had planned on doing spray foam insulation around the entire shell of the barn and had hired a company in August to come out and spray the barn but they were not going to be able to get to the building until December at the earliest but we were willing to do it and fight through the winter in our camper. Our plumber mentioned a product to us that he had seen some other clients use called Prodex that had similar characteristics of spray foam with a reflective surface on both sides and it was something I could do myself and much sooner. I did some research and the product looked good and the reviews looked good so I bought some and installed it. The steel was already on when I installed it so the Prodex was installed by stapling or screwing to the Purlins/Girts around the whole building which was an install method on their website. While we were mudding/painting/texturing I noticed some condensation in the attic in between the steel and the Prodex insulation (I could see where it was coming through a seam in the Prodex). I asked some people and they thought it was just because I was putting a lot of moisture in the air that was causing the condensation and it would dry out when we were done. On a recent trip up to the attic I noticed that the steel is still condensating when it is cold outside and the Prodex itself seems to be condensating as well. I emailed Prodex and they told me that it is caused by cold air moving across the inside surface of the steel and I should put foam around the ridge cap, eave edge of roof and tops of wall. I have foam around the ridge cap, but nothing on the ridge cap ends, I have foam on the eave edge of the roof, but only in the high ridge parts, and I have nothing on the walls. I am also concerned that this is happening inside of the walls which may lead to a bad mold problem next summer. My question is, how do I get it to stop condensating? I am ready to do whatever I need to do. I just don’t want to throw ideas at the house until something works. As far as ventilation goes, I am sure I do not have enough but was hoping to address that in the summer months. I do not have eaves on the building which I regret so my only real ventilation is the ridge cap and the little bit that may be coming through the ridges on the eave edge of the roof. I thought about gable vents, but I felt like that would let too much cold air in and would make the issue worse, but maybe that is what I need? If I put in gable vents, do I pull out the Prodex insulation and leave bare metal on the inside of the attic? I am trying to figure out a way to reduce the moisture right away (dehumidifier?) while I work on a long term solution but I don’t know which direction to go to solve this issue. I thought about pulling off the steel and putting in plywood sheeting, but we are in the middle of winter and that would have to wait until Spring at least and I am afraid I will end up with too much water damage by then. I have even considered putting sheeting under the roof and replacing the outside walls with wood siding but the cost would be high and I feel like there should be a solution to this issue. For heat we electric wall heaters (Cadet in-set wall units) occasionally and a pellet stove most of the time. We put the Prodex insulation as well as blown insulation in the attic to about 12 inches deep and we put Prodex as well as rolled insulation in the walls for a total of about an R30 value. Dryer and bathroom vents both go outside and nothing is venting into the attic. Any help would be appreciated! Thanks.”

Mike the Pole Barn Guru says:

Kudos to you for doing a D-I-Y. Sadly you were lead to a product (Prodex) claiming to be insulation, however in reality it is a condensation control, and only if totally sealed.

All of these issues could have been easily addressed at time of construction had your building kit provider given you proper advice.

First thing to do is to get your attic properly ventilated – you need to add at least 121 square inches of NFVA (Net Free Ventilating Area) to each gable end. This will give you an air intake and your vented ridge will then function as a proper exhaust. By itself, this should greatly minimize, if not totally cure your problems.

As time allows, remove roof Prodex, have two inches of closed cell spray foam applied to roof steel underside, and increase thickness of blown in attic insulation to R-60.

If you do not have a well-sealed vapor barrier under your concrete floor, if possible, seal top side of it (this is where moisture is coming from).

Heating as much as possible with your pellet stove will also help to dry your interior air out and provided your slab is sealed, should help greatly.

I do have some concerns about your walls, if you have faced insulation batts with Prodex on outside of batts, you are potentially trapping moisture between two vapor barriers. If this is indeed your case, come Spring, remove siding (one wall at a time) , remove Prodex (as much as possible) and add a Weather Resistant Barrier (Tyvek or similar) to the exterior of framing, properly seal all wall openings and reinstall wall steel.

Building Codes and Requirements in Contract Terms

Building Codes and Requirements in Contract Terms

Disclaimer – this and subsequent articles on this subject are not intended to be legal advice, merely an example for discussions between you and your legal advisor.

Please keep in mind, many of these terms are applicable towards post frame building kits and would require edits for cases where a builder is providing erection services or materials and labor.

BUILDING CODES: The Total Cost of this Agreement is based upon an agreement between Purchaser and Seller, for Seller to perform according to a specific scope of work, per code and loading information as stated in the Agreement. Total Cost to Purchaser may be increased depending upon the review completed by one or more of Purchaser’s permit approval granting agencies, which include, but are not limited to building and land use departments, in which event either the Seller or Purchaser shall be relieved of further obligation under this Agreement if the increase in Total Cost is greater than ten percent (10%). 

In the event the building department, any other governmental agency or agent may require revision(s), further documentation, or explanation of any work after one initial plan check/review, Seller will advise the Purchaser of any required changes or modifications. Upon notification by Seller of extra work or materials required, Purchaser shall authorize Seller to perform such according to Section xx of this Agreement, “Change Orders”. 

Seller is not responsible for any plan check fees, re-inspection fees, special inspections, analyses or reports which are not ordinarily provided by Seller to a building department, plan check or inspector, including, but not limited to any additional charges resulting from unfamiliarity of said person(s) with either post frame buildings in general or the work as specifically designed by Seller. 

Once the approved plans and specifications have been reviewed by the applicable jurisdictions and building permit has been issued, both Seller and Purchaser may rely upon those approved plans and specifications as conforming to all applicable regulations and building codes of the jurisdictional building authorities. 

Total cost, unless otherwise specified, includes two sets of engineered 24″ x 36″ plans. Extra sets are available at time of order for $xx per set. Plans will be made available online (once drafted) and must be fully reviewed and approved by the Purchaser prior to deliveries being scheduled. Time spent handling calls or Emails made by the Purchaser, Purchaser’s agent(s), or Purchaser’s permit issuing agencies to engineer of record will be paid for by Purchaser, directly to the engineer, at engineer’s prevailing rate. 

In the event any conflicting information is found on the plans, Purchaser agrees to immediately notify Seller. Seller will promptly clarify or correct any conflicting information (at no charge to Purchaser), this being Purchaser’s sole remedy. 

Building Codes require attics above insulation to be ventilated with a net free area (NFVA) not less than 1/150 of area of space being ventilated. NFVA may be 1/300 of area of space ventilated, provided 50 percent of required ventilating area is provided by ventilators located in the upper portion of space to be ventilated at least 3 feet above eave, with balance of required ventilation provided by eave or gable vents. Purchaser to make provisions for adequate ventilation, if not so included in Agreement.

My commentary: permit issuing authorities can and will do some absolutely bizarre things. Often all it takes is one new person in a department who is fresh out of school and wants to prove their brilliance by upsetting an apple cart. This caps these unforeseen costs to both parties.

PER ANSI/TPI 1 LEGAL REQUIREMENTS MANDATE: In all cases where a Truss clear span is 60 feet or greater, the Owner (Purchaser) shall contract with any Registered Design Professional for the design of the Temporary Installation Restraint/Bracing and the Permanent Individual Truss Member Restraint and Diagonal Bracing. In all cases where a Truss clear span is 60 feet or greater, the Owner (Purchaser) shall contract with any Registered Design Professional to provide special inspections to assure that the Temporary Installation Restraint/Bracing and the Permanent Individual Truss Member Restraint and Diagonal Bracing are installed properly.

For extended reading on this subject, please visit: https://www.hansenpolebuildings.com/2019/09/responsibilities-where-the-legal-requirements-mandate/

Venting an Attic

Saving Money When Venting An Attic?

While some of you may think I have been doing post frame buildings since dinosaurs roamed our planet, I can assure you this is not true. Now my youngest son, when he was pre-school aged, did ask me (in all seriousness) what was it like watching space aliens build Egypt’s pyramids!

When reader DOMINIC in FESTUS wrote his question to me, it got me thinking about when I first had a client ask for a building with insulation at ceiling level. While I truthfully do not remember, in my first 6000 or so post frame buildings (we are talking 1980s here) I doubt there were more than a handful.

Fast forwarding to today’s modern fully engineered post frame buildings and nearly every building – garage, shop, barndominium, etc., is going to be climate controlled to some extent and most of these have enclosed attic spaces with insulation to be placed at ceiling level.

Here is DOMINIC’s question:

“I will be building a 30×40 pole barn soon. I plan on putting a ceiling in with insulation. My question is on attic venting. It seems best practice is to use a ridge vent with vented soffits but are gable vents alone sufficient? It would be cheaper for me to just do gable vents.”

Your best practice is to have even airflow from eave intakes to ridge exhausts. If your building will have sidewall overhangs, you might as well take advantage of this. You COULD (as an alternative) utilize gable vents. Provided at least half of your gable venting is located in the upper half of the attic, you can get by with as little as 576 square inches of NFVA (Net Free Ventilation Area). To achieve this would require (3) three 20″ x 30″ gable vents in each endwall. This could prove unsightly, difficult to install and is unlikely to result in being less of an investment than ridge vents. NOTE: a 20″ x 30″ gable vent provides roughly 106 square inches of NFVA (not 20″ x 30″ for 600″).

Of course, me being me, I had to snoop our records to see if he had requested a quote from us – and indeed he had…..

In looking over your quote from us, you may also want to consider increasing your overhead door width from 14′ to 16 (or even 18′) as you cannot safely get two vehicles side-by-side through a 14 foot wide door. For sake of resale value, with a 14 foot door it will appraise as a single car garage, wider doors will nearly double your appraised value as it is a two-car garage then.