Tag Archives: Ridge cap

Help! My Barndominium Roof is Dripping!

Help! My Barndominium Roof Is Dripping!

Reader TIMM in WHITEFISH writes:

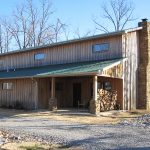
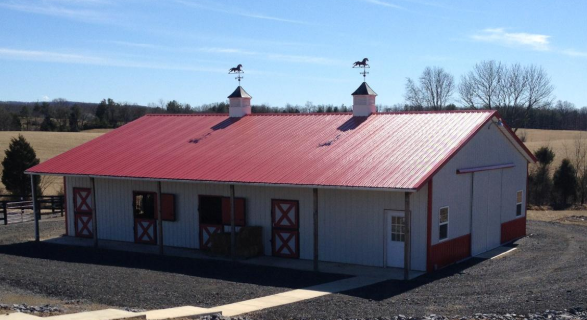
“Thanks for taking my question. I recently built a barndominium in NW Montana. I tried to find someone to build it for me, but the demand and cost in the area had gone up so much that I had to do almost all the work on my own. I was not completely unfamiliar with building but not an expert by any means but I was able to get it built with helpful videos found online. I finished the home in late October and have moved in. The home is 28’x36′ with 10′ walls and is all living space, no garage. I had planned on doing spray foam insulation around the entire shell of the barn and had hired a company in August to come out and spray the barn but they were not going to be able to get to the building until December at the earliest but we were willing to do it and fight through the winter in our camper. Our plumber mentioned a product to us that he had seen some other clients use called Prodex that had similar characteristics of spray foam with a reflective surface on both sides and it was something I could do myself and much sooner. I did some research and the product looked good and the reviews looked good so I bought some and installed it. The steel was already on when I installed it so the Prodex was installed by stapling or screwing to the Purlins/Girts around the whole building which was an install method on their website. While we were mudding/painting/texturing I noticed some condensation in the attic in between the steel and the Prodex insulation (I could see where it was coming through a seam in the Prodex). I asked some people and they thought it was just because I was putting a lot of moisture in the air that was causing the condensation and it would dry out when we were done. On a recent trip up to the attic I noticed that the steel is still condensating when it is cold outside and the Prodex itself seems to be condensating as well. I emailed Prodex and they told me that it is caused by cold air moving across the inside surface of the steel and I should put foam around the ridge cap, eave edge of roof and tops of wall. I have foam around the ridge cap, but nothing on the ridge cap ends, I have foam on the eave edge of the roof, but only in the high ridge parts, and I have nothing on the walls. I am also concerned that this is happening inside of the walls which may lead to a bad mold problem next summer. My question is, how do I get it to stop condensating? I am ready to do whatever I need to do. I just don’t want to throw ideas at the house until something works. As far as ventilation goes, I am sure I do not have enough but was hoping to address that in the summer months. I do not have eaves on the building which I regret so my only real ventilation is the ridge cap and the little bit that may be coming through the ridges on the eave edge of the roof. I thought about gable vents, but I felt like that would let too much cold air in and would make the issue worse, but maybe that is what I need? If I put in gable vents, do I pull out the Prodex insulation and leave bare metal on the inside of the attic? I am trying to figure out a way to reduce the moisture right away (dehumidifier?) while I work on a long term solution but I don’t know which direction to go to solve this issue. I thought about pulling off the steel and putting in plywood sheeting, but we are in the middle of winter and that would have to wait until Spring at least and I am afraid I will end up with too much water damage by then. I have even considered putting sheeting under the roof and replacing the outside walls with wood siding but the cost would be high and I feel like there should be a solution to this issue. For heat we electric wall heaters (Cadet in-set wall units) occasionally and a pellet stove most of the time. We put the Prodex insulation as well as blown insulation in the attic to about 12 inches deep and we put Prodex as well as rolled insulation in the walls for a total of about an R30 value. Dryer and bathroom vents both go outside and nothing is venting into the attic. Any help would be appreciated! Thanks.”

Mike the Pole Barn Guru says:

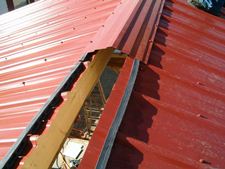
Kudos to you for doing a D-I-Y. Sadly you were lead to a product (Prodex) claiming to be insulation, however in reality it is a condensation control, and only if totally sealed.

All of these issues could have been easily addressed at time of construction had your building kit provider given you proper advice.

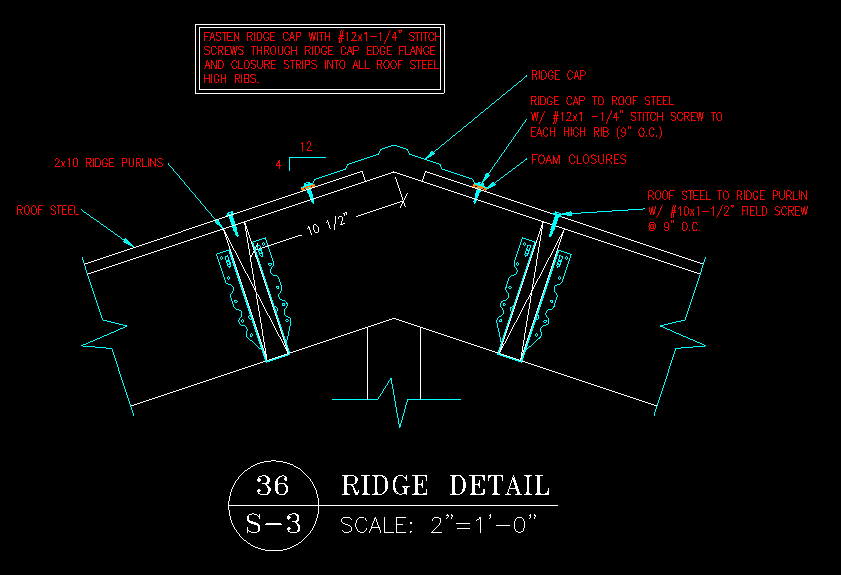
First thing to do is to get your attic properly ventilated – you need to add at least 121 square inches of NFVA (Net Free Ventilating Area) to each gable end. This will give you an air intake and your vented ridge will then function as a proper exhaust. By itself, this should greatly minimize, if not totally cure your problems.

As time allows, remove roof Prodex, have two inches of closed cell spray foam applied to roof steel underside, and increase thickness of blown in attic insulation to R-60.

If you do not have a well-sealed vapor barrier under your concrete floor, if possible, seal top side of it (this is where moisture is coming from).

Heating as much as possible with your pellet stove will also help to dry your interior air out and provided your slab is sealed, should help greatly.

I do have some concerns about your walls, if you have faced insulation batts with Prodex on outside of batts, you are potentially trapping moisture between two vapor barriers. If this is indeed your case, come Spring, remove siding (one wall at a time) , remove Prodex (as much as possible) and add a Weather Resistant Barrier (Tyvek or similar) to the exterior of framing, properly seal all wall openings and reinstall wall steel.

How Do I Ventilate My Barn’s Attic?

How Do I Ventilate My Barn’s Attic?

Right up there with curing condensation issues is how to properly ventilate a pole barn’s dead attic space.

Reader CURTIS in TRENTON writes:

“I have a 40’x60’ outbuilding that doesn’t have soffit vents for fresh air intake and the ridge cap has solid foam closures along the length of both sides of it so I have no air exhaust either. Basically just whatever air leaks are within the building. My plan is to fully finish the inside of my building. (Insulated walls and OSB sheathing and a metal ceiling with a blown in r-38) I plan on making it as air tight as possible. This building will be heated some over the winter as well. My roof panels also have the “drip X” felt like material that is attached to the underside of the panels. I believe this acts as a vapor barrier to keep the roof from condensing. My question is since I don’t have soffit vents or a vented ridge cap do you recommend adding 2 gable vents? If so, what size? I know there’s a formula for sizing them. I believe it is the square footage of the building, (40×60=2400/300=8 sq ft) so would be adding a 4 sq ft gable vent on each end of the building be sufficient? 4 sq ft of intake and 4 sq ft of exhaust totaling 8 sq ft of ventilation? Or should I do a gable vent on the west side of my building for air intake and a shutter exhaust fan wired to a humidistat/thermostat on the east side (away from prevailing winds) to pull hot air from the attic. I believe there’s a formula for this too to determine the fan’s cfm rating and the gable vent size. (40×60=2400×0.7=1680CFM) 

Add an additional 15% (1680×1.15=1980CFM) for a darker colored roof. My roof is forest green. So an exhaust fan with a minimum rating of 1980CFM/300=6.44 sq ft, which would determine the gable vent size on the west end of the building. Examples: 30”x32”=6.65 sq ft or 26”x36”=6.48 sq ft) My question is are these formulas correct and which one do you recommend using? Two gable vents, a gable vent and a shutter exhaust fan, something different or nothing at all? I just want to do this right and make sure my attic has sufficient ventilation once it’s enclosed. I hope to hear back from you. Thanks! 

Last questions. I found a 36×36 square gable vent that has a NFVA of 585. I need 576 on both sides of my building so this vent should be sufficient, correct? Also, with me using the 1/300 ventilation rule the gable vent company who has this vent recommended using a vapor barrier in the attic too. I believe he said that it needs to be no more than 1 perm and to install it on the warm side of the attic. He said this is needed because I’m not using the 1/150 rule. He said if I have 16 sq ft on ventilation instead of 8 I wouldn’t need a vapor barrier. That’s not really an option though. That many gable vents wouldn’t look good. So what do you think? Do I really need a vapor barrier using the 1/300 rule? My roof panels have a felt-like material on the underside of them that I believe is called “drip x”. I was under the impression that this was a vapor barrier and when warm air rises and hits those cold roof panels the “drip x” keeps it from condensing. Do I really need a vapor barrier along the warm side of the attic too? That sounds like overkill to me but I want to do it right too. The plan is to fully finish the inside of my outbuilding eventually with a ceiling that will be white ribbed panels with a r-38 blown in fiberglass. I only plan on heating the building to about 55-60 degrees and that’s only if I’m out there working. The thermostat will be set to 45-50 if I’m not out there. Also, this outbuilding doesn’t currently have air conditioning but I may consider adding it down the road. You’ve been a big help so far. Thank you and I look forward to your response. “

Mike the Pole Barn Guru responds:

As long as your four square feet (576 square inches) of NFVA (Net Free Ventilation Area) is located in the upper half of each gable endwall, your formula is correct and should provide sufficient ventilation. Actual vent size is not the same as the NFVA – so look closely before investing in any particular vent.

A vapor barrier would only be needed if you have over 8000 heating degree days. One of those vents on each end should do the trick. 

You can look up your heating degree days here: https://www.huduser.gov/portal/resources/UtilityModel/hdd.html

Steel Roofs Are Not Meant to Be Weather Tight?

Once upon a time I was a post frame building contractor. With as many as 35 crews erecting buildings in six states, we erected thousands upon thousands of buildings. If we would ever have told a client, “Steel roofs are not meant to be weather tight” it might (and should) have been our last job! Our Quality Control team would check in with each client every three months, post completion, to ensure they were satisfied and had no leaks. We actually warranted our workmanship against roof leaks for five years.

Reader STEVE in ROCKFORD writes:

“Hi, 

I had a local crew put a new 29ga pro-rib steel roof on my older pole barn.   Since then we have had a couple storms come through, one was very heavy wind and rain, and all was good, building was good.   The next was a light drizzle, and the roof leaks at the ridge cap – it looks like the leak was coming from the screw, not the top of the sheet. The next day I went up to take a look.  It looks like they screwed the ridge cap down the upper purlin next to the rib, and not into the rib.    Is this a problem?  How can I fix it?  A call to the contractor was no help, “that’s how we do them all, and they are not meant to be 100% weather tight” was the response.   It does have some kind of meshy vented like closure strip.”  

Under Illinois’ Roofing Industry Licensing Act, all contractors offering roof construction services must obtain a license from Illinois Department of Financial and Professional Regulation (IDFPR) before engaging in any work. This local crew needs to come and repair or replace their work so your roof is weather tight. I would recommend you spend $100 to have your attorney send a demand letter on Monday. Construction work comes with a minimum one year implied warranty on materials and labor, so as long as you are within this time frame, you have cause of action should he fail to repair. You can also file a complaint with your state (https://www.idfpr.com/Forms/Brochures/FilingAComplaint.pdf) –  you should do this immediately, as this contractor needs to be stopped before he rips off yet another innocent building owner with shoddy workmanship.


Your building’s ridge cap should have been attached to each roof steel high rib with a metal-to-metal stitch screw. Ridge cap to roofing screws should not be placed next to ribs.

Steel Ridge Cap to Roofing Overlap

Hopefully no one wants to create a roof with leaks. Reader MIKE in HARBOR CREEK wants to make sure he is doing things correctly. He writes:

“How much overlap do you have to have with roofing and ridge cap? Is 2.5″ enough and then you use metal to metal screw you do not have to penetrate the purlins?
Ty”

I cannot vouch for how other building providers assemble their buildings, so I will go with how we do it.

To calculate a building’s roof steel length we take one-half of the building’s span (or horizontal measure from peak/ridge to the outside of columns) and multiply this times a factor for roof slope. 

For slope factor – multiply slope by itself and add 144. Take the square root (use a calculator) of this number and divide by 12.

Example to calculate slope factor for 3.67/12:  [3.67 X 3.67] + 144 = 157.47. Square root of 157.47 = 12.549. Divided by 12 = 1.0457.

For a 40 foot width gabled building with a 4/12 slope this length would be 21.082 feet (call it 21’1”).

Outside of columns at eave we have a 2x of some sort as an eave strut, with a width of 1-1/2 inches and roof steel must overhang this by 2-1/4 to 2-1/2 inches. Using 21’1” for our roof steel length, this means the top edge of roof steel will now be four inches from the peak/ridge.

Standard steel ridge caps are generally very close to 14 inches in overall width, giving somewhere around three inches of overlap on each side. Placed in this overlap will be either a form fitted outside closure strip or a vented closure (https://www.hansenpolebuildings.com/2015/11/ridge-cap-foam-closure-strips/). Either of these products properly installed will prevent weather (rain and/or snow) from being driven beneath the ridge cap into your building. You can read a little more on correct placements of closures here: https://www.hansenpolebuildings.com/2015/11/outside-closure-and-vented-closure-installation/.

By using metal-to-metal stitch screws to attach the ridge cap to high ribs of roof steel, there is no need to have to miraculously hit any ridge purlins with screws. Here is a brief tale involving a builder who went off on his own tangent https://www.hansenpolebuildings.com/2011/12/stitch-screws/.

In summary Mike, provided you have a 2-1/2 inch overlap, have used proper ridge closures and stitch screws your life will be good and you will have a happy end result!

Help! My Cupola Leaks

Help! My Cupola Leaks

If you have a leaking cupola, I can understand why you would be looking for help. Only twice ever have I gotten feedback from a client with a leaking cupola. In first case client’s builder somehow neglected to read installation instructions in Hansen Pole Buildings’ Construction Manual.

Aforementioned builder decided to defy Isaac Newton (Laws of Gravity) and installed cupola and flashing directly to top of roof purlins, then butted steel roofing and ridge cap up to cupola. According to Mr. Newton, things like water will flow downhill, resulting in water leaking around said cupola.

In today’s dilemma reader PAT from TRAFALGAR writes:

“If possible I would like a direct response via email

My 30×40 pole barn was completed in September. When it rains it get very small amounts of water leaking in through the cupola. Is this normal? Should I require my contractor to repair, under the warranty? Will repairing result in other problems?”

As much as I would like to have sent a direct response via email, Pat neglected to share his email address. For those who are curious, Pat did not invest in a Hansen Pole Building.

Water leaking in through or around a cupola would be abnormal. Your contractor should indeed repair it and a proper repair should not result in other problems.

Most often provided cupolas are pre-manufactured. If site built instead, it should probably be replaced with a manufactured unit.

Pre-manufactured cupolas come with either standard flashings or a universal base. Universal bases do involve a slightly greater investment, however save a significant amount of labor as well as greatly reducing (or probably eliminating) chances of a leak. Many builders are short sighted and will go the cheaper route, ignoring end result challenges.

Assuming the builder wants to fix rather than replace – find the leak (sounds pretty simple, eh?). This requires a hose and someone to stand inside and tell a person upon the roof when water starts coming through. Begin with downhill edge flashings, run a pretty good stream of water onto them (one side, then other) for a minute or so. Even if the leak happens to be along one of them, keep checking along the way, as it could be multiple points. Next, check ridge cap side flashings, using the same process. Then check each side of the cupola individually (letting water run down from cupola roof).

If a leak exists, it should have shown up in the hose test. With leak isolated, a repair can be done using the best silicone caulking money can buy. If a flashing edge happens to not be sealed to the roof, Emseal AST expanding closures work quite well to fill those gaps. https://www.hansenpolebuildings.com/2016/03/emseal-self-expanding-sealant-tape-closures/


Why it is Essential to Supervise Professional Installers

Why It Is Essential to Supervise Professional Installers

In an ideal dream world, one would be able to hire a professional installer and know the job would be done right, without the need for hands on supervision.

RYAN in ELLENSBURG recently contracted out the roof steel installation of his new Hansen Pole Building kit package and this was his report:

“My roofer finally showed up yesterday and I wasn’t able to supervise the installation, so several mistakes were made but the one I’m most uncertain of is that the ridge cap was installed with diaphragm screws instead of stitch screws. He also left off all of the closures so the ridge cap has to come off anyway. My question is whether or not it can be reinstalled with stitch screws because of the difference in screw profile.”

Mike the Pole Barn Guru says:

It is a shame to have invested in a professional for installation and not be able to leave them alone and expect the job to be done correctly. The diameter of the diaphragm screws is larger than a #12 stitch screw (which was provided to attach the ridge cap). In the event the roofer placed the diaphragm screws so as they were driven into the solid wood of the ridge purlins, then you could do the same once again. Otherwise you are probably going to need to invest in some #14 diameter stitch screws.

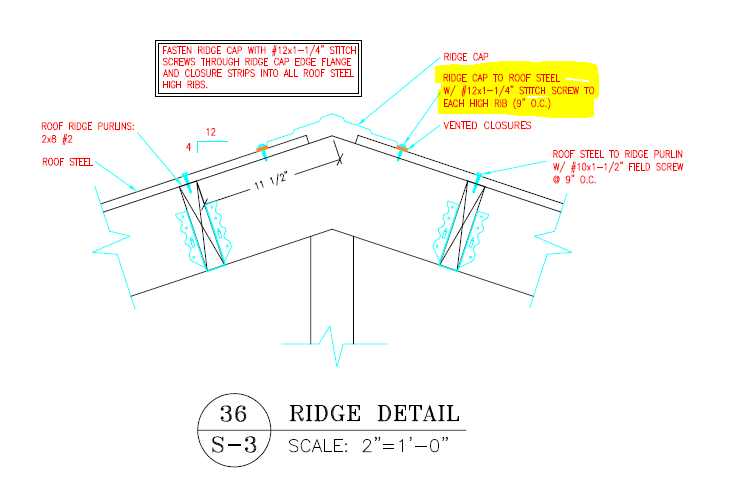
Well, it turns out it was worse than originally imagined, as Ryan wrote back:

“Yes, I agree. That’s just the beginning of the list of issues with the installation. On top of that none of the insulation seams were taped together, screws that missed the purlins were just left in place with no wood block placed behind them so they will leak at some point, the insulation was placed over the peak of the roof so the ridge cap that is supposed to be vented can’t flow any air, and none of the closures (vented closures and eave closures) were installed. It’s really disappointing because he did the roof on my house 3 years ago and I thought he’d done a good job on that, now it makes me wonder what corners were cut on that job, too.”

Mike the Pole Barn Guru:

There are ways to avoid being sadly disappointed by a contractor:

(1) Do it yourself. Hansen Pole Buildings are designed with the Do-It-Yourselfer in mind. The step-by-step construction manual covers every aspect of assembly. If you can and will read the instructions, chances are you will have a better finished product than what any builder will construct for you.

(2) Still want to hire a “professional”? Require a performance bond. (read more here: https://www.hansenpolebuildings.com/2012/07/contractor-bonding/).

(3) If you hire a contractor, familiarize yourself with the Hansen Pole Buildings’ Construction Manual and be onsite during construction to make certain the contractor does the work correctly.


How to Install a Steel Roof Over Shingles

How to Install a Steel Roof Over Shingles
Absolutely true story, with me as part of it! My lovely bride bought a raw weed covered property along the South Dakota shore of Lake Traverse in the early 1990’s. For a home, she had a double wide manufactured home set up on the property. A few years later, she had a 32 foot square stud framed garage added. Both the home and the garage had asphalt shingle roofing.
Between extreme temperatures from 100 F plus in summer to -40 F., some potent winds and occasional hail storms, this is a brutal climate for shingles. More than a few of them had broken or blown off.
Reader DAN from MOUNDS VIEW triggered this soliloquy with his message to me:
“I was reading past questions and the subject of metal roofs was brought up, which prompts this question.

We have a cabin that I intended to have a metal roof but didn’t get one. We are now getting close to needing a re-roof and I’d like to get metal on it.

The question is, when starting with an existing asphalt shingle roof, installed over, I believe 1/2 cdx, what should be done to prepare for the metal? FWIW, it’s a 10/12 pitch.

Thanks.”

Mike’s story:
Before sharing what we did I did my usual Google search to see if I could find someone else’s good advice. Ran across some scary stuff, so I felt compelled to share.

steel roofingMy wife’s roof had only a single layer of shingles. If I had more than a single layer I would scrape them off as it would potentially overload your roof trusses or rafters.
We placed 2×4 flat on top of the shingles running the long direction of the roof and 24 inches on center. Allowable spacing will vary due to snow load where the building is and load capacity of the steel. You are going to hear (actually read) me tell you I would do it differently soon. We used 40d threaded hardened nails to attach the nailers – with two nails through the nailer into the top chord of each truss. The nail length (five inches) is enough to get into the trusses comfortably with the threads helping to resist wind uplift issues.

A1V radiant reflective barrier was placed draped loosely over the nailers and the steel installed with 1-1/2” long powder coated diaphragm screws.

Here is what I would do differently next time. I’d run a 1×4 nailer up the roof on top of each roof truss., then the 2×4 nailers. This would allow for free airflow up the roof for eave to vented ridge.

For trims, use an eave trim at the low edge along the sidewalls. Install on top of 2×4 nailer at edge of overhang leaving the vertical about an inch out from the fascia. Place one inch thick venting material between the vertical leg of the eave trim and the fascia to keep insects out. Standard Rake trim and Ridge Cap can be used, with vented closure strips beneath the ridge cap.

It’s been about eight years since we reroofed my wife’s house and garage with steel and it still looks brand new.

Ridge Cap Replacement, Floor Plans, and Pole Barn Pics

DEAR POLE BARN GURU: My poly ridge cap needs to be replaced because it was leaking due to cracks. I want to replace it with a metal ridge cap. The purlins spacing specified for a poly ridge seems to be a little too far apart for supporting a metal ridge cap. Is this going to be an issue? Do I need to add more purling for additional support. JOHN in SUMMERFIELD

DEAR JOHN: A good quality steel ridge cap (one with several small bends on each side of the peak) should be sufficiently strong to span across the distance. You will want to make certain to attach the ridge cap to each high rib of the roof steel with stitch screws so you do not have any buckling issues.

DEAR POLE BARN GURU: Do you have floor plans? TALLY in PORCUPINE

Engineer sealed pole barn
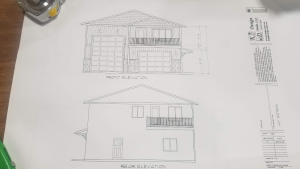
DEAR TALLY: Yes, however they all look the same – an outline of the perimeter of the building. What we provide are the engineered plans and materials for the structural portions of your building, the parts which hold it up against climactic conditions like wind, rain, snow and seismic occurances. Unless asked for specifically (or for cases such as supporting multiple floors) post frame buildings are open clearspans. This allows for nonstructural interior walls to be placed wherever is most convenient for your use. The beauty of this is – you can always reposition a wall at a later date, without structurally compromising your building.


DEAR POLE BARN GURU: Where can I see many pictures of pole barn homes? JAMES in FLAGSTAFF

Prefab pole barn cabinJAMES: Not to sound snarky – but anywhere. Since post frame (pole barn) buildings can be sided and roofed with any materials, there is really not practical way to tell the difference between a stick built and a post frame building without getting up close and personal to the building. Look online or at any book of house plans, any one of these could very well be a post frame building. Home shows, open houses, and driving through virtually any suburban American neighborhood will give a plethora of examples of what post frame can do for you.