Tag Archives: post frame building contractor

Steel Roofs Are Not Meant to Be Weather Tight?

Once upon a time I was a post frame building contractor. With as many as 35 crews erecting buildings in six states, we erected thousands upon thousands of buildings. If we would ever have told a client, “Steel roofs are not meant to be weather tight” it might (and should) have been our last job! Our Quality Control team would check in with each client every three months, post completion, to ensure they were satisfied and had no leaks. We actually warranted our workmanship against roof leaks for five years.

Reader STEVE in ROCKFORD writes:

“Hi, 

I had a local crew put a new 29ga pro-rib steel roof on my older pole barn.   Since then we have had a couple storms come through, one was very heavy wind and rain, and all was good, building was good.   The next was a light drizzle, and the roof leaks at the ridge cap – it looks like the leak was coming from the screw, not the top of the sheet. The next day I went up to take a look.  It looks like they screwed the ridge cap down the upper purlin next to the rib, and not into the rib.    Is this a problem?  How can I fix it?  A call to the contractor was no help, “that’s how we do them all, and they are not meant to be 100% weather tight” was the response.   It does have some kind of meshy vented like closure strip.”  

Under Illinois’ Roofing Industry Licensing Act, all contractors offering roof construction services must obtain a license from Illinois Department of Financial and Professional Regulation (IDFPR) before engaging in any work. This local crew needs to come and repair or replace their work so your roof is weather tight. I would recommend you spend $100 to have your attorney send a demand letter on Monday. Construction work comes with a minimum one year implied warranty on materials and labor, so as long as you are within this time frame, you have cause of action should he fail to repair. You can also file a complaint with your state (https://www.idfpr.com/Forms/Brochures/FilingAComplaint.pdf) –  you should do this immediately, as this contractor needs to be stopped before he rips off yet another innocent building owner with shoddy workmanship.


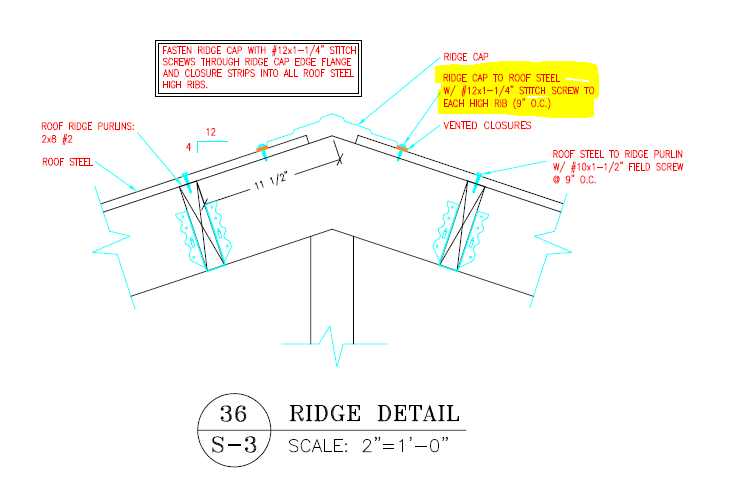
Your building’s ridge cap should have been attached to each roof steel high rib with a metal-to-metal stitch screw. Ridge cap to roofing screws should not be placed next to ribs.

When a Contractor Ignores Building Plans

I realize this may come as a surprise, but there are more than a few times I have discovered building contractors have made errors in building assembly due to failure to examine the provided building plans.

Shocking.

Our client STEVE in HINES writes:

“Good morning, my building is framed, sided and roofed. However, yesterday we discovered that the sidewalls girts should have been 2x 8’s but 2×6’s were used instead (same as the endwalls). I know this is my problem to fix, but before I tell the contractor, I’d like to know if you have ever heard of this happening and if so, what they had to do to fix the problem. As it stands, it definitely does not meet wind code anymore. I’m not asking for a fix, but only some direction as where to start pursuing one. Could very well become a messy job!

Thanks.”

Well, to begin with, I was a post frame building contractor in a past life. At times we had as many as 35 crews erecting buildings in six states. Most of these crews were very, very good. Some of them were not quite as good. Overall this mix did give me an interesting perspective – if something could be done wrong, one of my crews figured out how to do it. Along with this, chances are I have had to come up with a fix for these unexpected challenges.

In Steve’s case, actual reasoning for 2×8 sidewall girts was so his building could have a flush interior surface to drywall – known as commercial girts. (Learn about commercial wall girts here: https://www.hansenpolebuildings.com/2011/09/commercial-girts-what-are-they/)

Our curiosity question was – what did the builder do with the 2×8 material supplied for girts? It turns out client had a pile of 2×8 left over when the pole building was completed. They ran short of 2×6, so building owner just assumed someone had stolen them and more were purchased!

Anyhow – there are several possible fixes. 2x4x12′ could be ripped and nailed along length of  2×6 installed where 2×8 should have been, or 2×4 could be placed vertically (3-1/2″ face against girt inside face) every two feet’ to provide a surface to attach drywall. Whichever choice is decided upon, a revision should be done to plans and sealed by Engineer of Record to verify adequacy.

Just Another Reason to Love Builders

Please keep in mind, I was a post frame (pole) building contractor in a past life. With as many as 35 crews erecting buildings in six states – if something could possibly go awry, one of my crews would find a way to achieve it!

Seriously.

Some of them were creative in methods which I could not even have imagined (you would have had to have been there).

In some ways, they reminded me of my beloved Seattle Mariners, always seemingly finding a way to snatch defeat from the jaws of victory.

oregon-builders-150x150In today’s episode of “How the Stomach Churns” we find Builder Bob (the name has been changed to protect those who probably don’t read my articles anyhow) industriously working away in the wilds of Colorado – where he determines the sidewall steel above a sliding door is four inches too short!

Could this happen?

Well anything COULD happen, but in all likelihood the Hansen Pole Buildings’ Instant Pricing™ system is pretty darn accurate when it comes to steel takeoffs – so probably not.

I always work from the theory somehow we have screwed up, so I go through the scenario longhand, to the joy of all involved:

Eave height = 16′ above grade (all of my long term and loyal readers fully understand how to measure eave height: https://www.hansenpolebuildings.com/2015/02/eave-height-2/; builders, not so much as it does involve having to read, at the very least, the plans).

Drop across 1.5″ wide eave girt and J Channel (3/4″) at a 5/12 roof slope = 0.9375″

So top of wall steel is at 15’11.0625″

Top of sliding door track board is at 10’10” above grade

15’11.0625″ – 10’10” = 5’1.0625″

Steel above sliding door is 5’0″ long

This leaves just over 1″ of sliding door track cover back flange exposed – which is perfect

If it is 4″ too short, I am going to guess one or more of the following has occurred:

Eave height is too high (maybe measured from top of slab, instead of grade)

Sliding door header and track board are not properly located (at 11’0″ and 10’10” above grade to tops, respectively)

In the event the eave height is too high, there are solutions. However, all of them are going to involve some sort of investment in more materials by the builder. If the challenge is door number two, the solution takes only time and a good cat’s paw to remove the nails holding the sliding door header and track board – properly position the two and reinstall.

Voilà! A door that fits and steel sent by Hansen Buildings is indeed the right length.