Tag Archives: lofts

Contract Scheduling and Terms

Disclaimer – this and subsequent articles on this subject are not intended to be legal advice, merely an example for discussions between you and your legal advisor.

Please keep in mind, many of these terms are applicable towards post frame building kits and would require edits for cases where a builder is providing erection services or materials and labor.

SCHEDULING: Upon completion of all required documents by Purchaser (including, but not limited to, Instant Invoice, Door locations and Jobsite Delivery Information), Purchaser’s online approval of Seller’s plans, and appropriate payment, shipment(s) will be expedited to be as soon as is practical, however no guaranteed time frame is promised. Purchaser will receive multiple deliveries over a span of a week or more. Seller has little or no control over the exact date of arrival, nor can Purchaser specify any exact date and/or time for deliveries.

Some vendors will require Purchaser or Purchaser’s adult agent to be present at time of delivery. Materials may be delivered via any combination of USPS, UPS, FedEx or freight carrier, the choice of which is strictly determined only by Seller and/or Seller’s vendors. In the event tracking information is furnished to Purchaser, the responsibility to monitor tracking is upon Purchaser.

EXCLUSIONS: Seller is not a contractor, architect or engineer in any state, and both parties agree no such representation has been made. Seller does not and cannot endorse, nor take responsibility for the performance of any contractor or laborer hired by Purchaser, even if the name was provided by Seller. Purchaser waives any and all right of claim against Seller for non-performance of any materials improperly installed by any contractor. 

Seller cannot predict nor guarantee any permit, construction or labor costs. Any and all construction labor and equipment, as well as nails 16d or smaller, staples or tacks which can be commonly driven by pneumatic powered equipment are to be provided by Purchaser or Purchaser’s agents. The need for butyl tape sealants, water seals, closures for wall steel or polycarbonate panels, caulking or any other sealants is to be determined and furnished by Purchaser. 

While great effort is made to include web bracing material Seller does not see final engineered truss drawings prior to shipment so cannot verify, in advance, all web bracing requirements. As such, any materials for web bracing required beyond what is originally shipped with building kit, shall be furnished by Purchaser. Seller also does not furnish, nor pay for, any cement, concrete, pre-mix, rebar, wire mesh or any other materials which would be used to backfill Purchaser’s building columns or to construct any concrete floor, foundation or curb.

Concrete floors and/or continuous footings and/or foundations, electrical, plumbing, HVAC, insulation, drywall, site or grading plans, non-structural interior walls or partitions, provision for flooding, firewalls, sprinklers or other fire separations, gutters and downspouts, energy/heat loss calculations, meeting requirements of any energy code, meeting requirements of The International Wildlife-Urban Interface Code, or materials not provided by Seller, as well as the design of or specifications for any concrete work (including but not limited to driveways, porches, approaches, slabs, retaining walls, footings for walls, continuous foundations or stem walls) are specifically excluded from this Agreement and provided plans and/or calculations to be provided by Seller or third party engineer(s). 

Seller’s plans include a foundation designed as an isolated, shallow foundation with embedded columns. In the event any other foundation type be desired, or required, Purchaser will need to hire an appropriate engineer, at Purchaser’s expense. Any “plot” plans, floor plans or site tests/reports/engineering, or other “special” reports requested by any agency for Purchaser’s building are to be provided by Purchaser. Stairs, lofts, decks, mezzanines, second or higher floors, if included, will have handrails provided by Purchaser, unless otherwise specified. 

Purchaser further agrees to not enter into any other agreement, either verbal or written, with any of Seller’s suppliers, manufacturers, agents, employees or subcontractors, without the express written consent of Seller.

Building a Workshop, Chemical Reactions, and a Retaining Wall

This week the Pole Barn Guru answers questions about building a workshop, if there should be concern for a chemical reaction attaching steel siding to a PT skirt board, and building a shop near a new retaining wall.

DEAR POLE BARN GURU: Hi, we are looking to do a workshop build in the next 2-4 months and I came across your site. I saw that you don’t do the installation but may have some contractor referrals in my area.  We are located in Prescott Arizona which is about 1.5 hours from Phoenix and Flagstaff.  Please let me know if you have any referrals for this general area.
Also, we watched a YouTube video and saw that you can provide materials to build a loft, the video was quite old so I wanted to double-check to see if this was still the case.

Thank you in advance for your time. ANDREA in PRESCOTT

Loft FloorDEAR ANDREA: Thank you for your interest in a new Hansen Pole Building. While we are not contractors, we do have an extensive independent Builder Network covering all 48 contiguous U.S. states.

Our custom designed third party engineered post frame buildings include structural and materials for all structural portions of your new workshop – including and lofts, mezzanines, second or even third floors.


DEAR POLE BARN GURU: Do I need to be concerned if attaching treated ledger board to steel siding? Chemical reaction of treated wood to metal siding. DWAYNE in MARYSVILLE

DEAR DWAYNE: Your inquiry leads me to believe you are intending to add a deck or a lean to onto an existing building. My initial concern is a ledger and its attachment should be designed by a Registered Professional Engineer who can also take into account how what you are adding on impacts your current structure. In most instances, steel siding should be cut away to provide direct ledger to structural wood contact. This also allows for any needed flashing to be inserted behind bottom edge of wall steel and over top of addition.

As far as a chemical reaction between treated wood and steel siding, this was most severe in cases where ACQ chemicals were used for pressure treating. When water was added to this mix, it tended to rapidly corrode even heavily galvanized steel. Therefore avoid using ACQ treated lumber. Keep this wood dry and place a barrier between it and steel siding so they do not contact each other and you should be safe.


DEAR POLE BARN GURU: I am building an approximately 9 foot high engineered retaining wall and will be backfilling to meet the grade of the road behind my house. If I am going to put up a pole building, how far back from the rear of the retaining wall blocks will I need to set the posts? NATHAN

DEAR NATHAN: Thank you for asking. Because your retaining wall has been designed by a Registered Professional Engineer, this is a question they should address as your new post frame (pole) building could impact previous improvements.


Elevated Floors, Snow Loads, and Species of Wood in Posts

This week the Pole Barn Guru answers questions about elevated floors, heavy snow loads, and what species of lumber posts are cut from.

DEAR POLE BARN GURU: We own a site that was fully treed so the soil is not so great. We are interested in doing a pole barn design however a few engineers recommend doing a pier and beam foundation. Do you have details that would allow the house finished floor to be elevated off the soils to create a typical crawl space? JOHN in AZLE

DEAR JOHN: A quick answer would be YES! Post frame (pole) buildings are ideal as homes over a crawl space. For more reading about this subject, please check out: https://www.hansenpolebuildings.com/2013/03/crawl-space/.


DEAR POLE BARN GURU: Can the Hansen pole barns be designed/built to 100 or 120 pound snow loads? CHUCK in WALLACE

DEAR CHUCK: Hansen Pole Buildings can be designed for any snow load you desire. Over my career I’ve been involved in many high snow load post frame buildings including ski resorts (https://www.hansenpolebuildings.com/2014/04/2014-winter-olympics/), in Glacier National Park, and right close to you in Wallace along I-90 – you may be familiar with a large blue building occupied by Spunstrand®.


DEAR POLE BARN GURU: What species lumber used for the posts 16 feet long? RICH in CHICAGO

DEAR RICH: Further reading regarding popular framing lumber species can be found here: https://www.hansenpolebuildings.com/2012/03/lumber-species/.

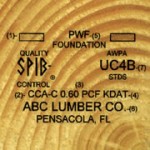
If you are talking about solid sawn timbers, they are most often Southern Yellow Pine (SYP) or Hem-Fir (primarily Western U.S.). With glu-laminated columns, most manufacturers use #1 SYP for pressure preservative treated portions and 1650 msr Spruce-Pine-Fir for uppers. For more information about msr lumber, please read https://www.hansenpolebuildings.com/2012/12/machine-graded-lumber/.


16 Foot Eave Height and Lofts

We get a few requests for quotes from clients every day – actually more like a few hundred. With this volume of inquiries, it goes to figure we see and hear a broad variety of ideas.

Buildings with lofts
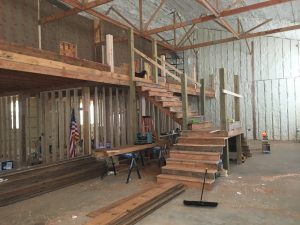
One of the more popular ones is clients who want a 16 foot tall eave height and a loft (either a full or partial second floor).

When I do training sessions for our Building Designers, one of my cautions is folks are generally dimensionally challenged. This particular lofty situation being a case in point.

Most frequently eight foot high ceilings are considered a standard, and allow for two sheets of drywall to be stacked horizontally on a wall without the need to cut sheets lengthwise. The International Codes (IBC – International Building Code and IRC – International Residential Code) do allow for finished ceiling heights as low as 7’6” throughout buildings (as well as seven foot in bathrooms and kitchens), however the lower height increases the amount of work as well as waste.

So, two eight foot high ceilings add up to 16 feet, so a 16 foot eave should be ideal – right?

Wrong.

I’ve had some fun writing about eave height in the past, and you can too by checking out this previous article: https://www.hansenpolebuildings.com/2015/02/eave-height-2/

In our above 8 + 8 = 16 equation, there are a few things being left out. This includes:

A concrete floor – a nominal four inch thick slab on grade is going to chew up 3-1/2 inches when all is said and done;

The thickness of the roof system – as the eave height is measured to the bottom of the roofing, plan upon the loss of at least six inches of thickness to the trusses and roof purlins. If designing for a conditioned (heated and/or cooled) structure, plan upon trusses with “energy heels” https://www.hansenpolebuildings.com/2012/07/raised-heel-trusses/

These could be as deep as nearly two feet in order to allow for R-60 blown in insulation);

Oh, and last but not least, the thickness of the loft floor itself. Most folks who want loft floors would like to minimize the number of supporting columns, so planning upon the loss of a foot minimum. If the floor joists need to span much more than 20 feet (or loads greater than standard residential loads are applied), then engineered wood floor trusses come into play with a general rule of thumb being an inch of depth per foot of span.

From a practicality standpoint, the absolute minimum eave height to allow for two floors should be no less than 18’.

Dear Pole Barn Guru: What Size Glulam Should I Use?

Welcome to Ask the Pole Barn Guru – where you can ask questions about building topics, with answers posted on Mondays.  With many questions to answer, please be patient to watch for yours to come up on a future Monday segment.  If you want a quick answer, please be sure to answer with a “reply-able” email address.

Email all questions to: PoleBarnGuru@HansenPoleBuildings.com

DEAR POLE BARN GURU: I’m building a 32’x40′ pole barn using 6×6 treated posts on 8′ centers and would like to use a glue-lam beam across the 40′ length, but am not sure how to calculate the size needed to support the roof or if I need to increase the support post size.

This will be the ridge beam. I live in a sparsely populated area of Alaska, but plan on a trip to town soon to look at other similar sized buildings. There are no building regs out here, but I have looked at some large metal buildings blown down by 90 mph winds we had two years ago and another built out of rough cut spruce logs (ridge beam type) that looked pretty simple to build. I planned to use posts sunk 6′ and set in concrete. I always like to err on the safe side, so overkill is OK. MUSHING

DEAR MUSHING: Even in the remote areas of Alaska, there are probably much safer and practical methods to design a pole building rather than trying to utilize a ridge beam 40 feet long. I’d seriously recommend rethinking your design and using prefabricated ganged (two ply or greater) wood roof trusses placed at each sidewall support. This will be much more efficient than the use of a huge beam.

In any case, you need to determine the design load for your site. Here is one possible source: https://www.groundsnowbyzip.com/

The International Building Code also provides a table of ground snow loads for Alaskan locations: https://publicecodes.cyberregs.com/icod/ibc/2012/icod_ibc_2012_16_sec008.htm

You might want to consider getting an engineered pole building kit package, which could be easily shipped out of the Port of Seattle or Tacoma. This would take away your guessing at how to construct it right.

Back to your question….assuming a relatively low roof live load of 40 psf (pounds per square foot), your beam has to be able to support somewhere in the area of 30,000 pounds of weight (this will depend upon the dead loads – what is being used for roofing, etc.).

Assuming the snow will remain on the roof for an extended period of time, a Duration of Load of 1, is probably realistic. This means you will need a 2400f rated glulam with a Section Modulus of around 800 (for information on Bending Moments and Section Modulus read more at: https://www.hansenpolebuildings.com/blog/2012/09/bending-moment/).

In the above scenario, you would be looking at a 6-3/4” x 27” deep glulam beam!! Not only will this be amazingly expensive, but it will also result in the need to hire a crane to set it in place.

DEAR POLE BARN GURU:  HEY MIKE…………COULD YOU GIVE ME THE NAMES  AND ADDRESSES OF A COUPLE OF YOUR CUSTOMERS IN NYS HUDSON VALLEY AREA?  THANKS! NEW YORK NICK

DEAR NICK: Thank you for your continued interest in a new Hansen Pole Building. Among the thousands of building kit packages we have provided are hundreds in New York (as well as every other state in the U.S.A.). We are VERY protective of the personal information of all of our clients, just like we will be of yours. Most people feel very uncomfortable with having “strangers” visit their homes and buildings. It is a security and safety issue, as it would be all too easy for an unscrupulous person to use this method as a way to case things out for “less than helpful” activity.  Please click on the Free Product Guide and we will be happy to mail you a very nice 32 page “showroom” of our buildings.

Here is what a few of our clients have to say: https://www.hansenpolebuildings.com/testimonials.htm

DEAR POLE BARN GURU: You have provided a tremendous amount of information and have given us a lot of questions that need answering – Thank you.

One of the major questions we have, what is code to make a living space (studio) type apartment inside one of these structures?  The second floor load being 40 psf, can this be increased for living space?

Do you have contractors that can assemble this on our site?  What kind of cost would be associated with assembly?

We are in the process of obtaining a VA construction loan with our local credit union and the above questions may be answered through that process.

I’ll take your questionnaire to our building department next Friday to get all those questions answered.

Thanks for your time and patience as we are just starting down this unfamiliar road.

WANTING IN WALLA WALLA

DEAR WANTING:  You are very welcome, we try to assist our clients to be as educated as the want to become, so as to make certain the choices they make in the end, are the right ones.

A 40 psf second floor live load would be Code loading for a residential living space. You will need to meet the Washington State Energy Code for level of insulation in relationship to the number and area of openings (doors and windows) in the conditioned space. Whoever designs your HVAC (heating, ventilation and air conditioning) systems can assist you with the proper recommendations to meet the requirements.

While we are not contractors, we do deal with builders who may be able to assist you with your project: https://www.hansenpolebuildings.com/find-a-builder.php

Fair market value for assembly varies greatly depending upon geographical location and the costs of doing business in any particular state. In my mind, a competitive labor quote should be around 50% of the cost of the materials being installed. As it begins to creep upwards from there, I think about strapping on my old nail belt and doing the work myself.

Please do not hesitate to contact us at any time we can assist you.

Dear Pole Barn Guru: How Do I Fix the Insulation Leaks?

Welcome to Ask the Pole Barn Guru – where you can ask questions about building topics, with answers posted on Mondays.  With many questions to answer, please be patient to watch for yours to come up on a future Monday segment.  If you want a quick answer, please be sure to answer with a “reply-able” email address.

Email all questions to: PoleBarnGuru@HansenPoleBuildings.com

 DEAR POLE BARN GURU: Five years ago I bought a house and property that included one of your 48’ x 36’ buildings.  For some reason, the brain-dead owner didn’t have it insulated.  The fool even measured the building dimension to the inside of the corner posts rather than the outside.

Anyway, not knowing any better, I hired a contractor that removed all of the metal siding and roof and sandwiched 2” vinyl faced insulation between the sheet metal and the framing.  Unfortunately, I now think this was an expensive mistake.

Since then I’ve experienced some leakage due to loose screws but the biggest problem after quite cold weather has been leakage that is dripping from the purlins at intervals that seem to be spaced where the screws would be.  Needless to say, this makes the shop uncomfortable and nearly useless.

After reading articles on your web-site, it would seem that the problem is condensation between the insulation and the sheet metal and that I should have had your bubble wrap foil insulation installed between the sheet metal and the insulation I had installed.

I’m wondering if adding the foil insulation between the roof and the insulation I had sandwiched between the sheet metal and purlins will cure the problem or am I just totally screwed and have to start over?

Thank you so much for your help. EXASPERATED IN ELMA

DEAR EXASPERATED: It sounds like whoever put the building up was challenged….mostly by not reading the detailed plans and instructions which came with the building.

The “fix” will involve a lot of labor, but not a huge amount of materials.

Remove the roof and the vinyl faced insulation. Throw away the vinyl faced insulation.

Order enough A1V insulation to do the roof (www.buyreflectiveinsulation.com), 1-1/2” powder coated diaphragm screws to replace all the ones on the roof now, new ridge caps and vented ridge closure strips.

When you go to reroof – cut the first panel in ½ with the cut edge towards the endwall. The other ½ of the first panel will finish the roof at the other end. This will shift all of the screw holes by 4-1/2” so holes which have been elongated by being taken out and put back in will not be reused.

Make sure to use the adhesive tab to fully seal each strip of insulation to the next, as it is installed.

The vented ridge caps will allow warm moist air from inside your building to have a place to escape. If you have a concrete floor in the building, use a good sealant on top of it as well.

DEAR POLE BARN GURU: How can I get the most room and best use of the loft of a monitor barn…Need standing room and a 16 wide aisle down the center of the building. CAROL IN MANDAN

DEAR CAROL: You must have been thinking about this very hard, as I just this morning wrote an article on lofts and headroom.

For a monitor barn, plan the eave height in the raised center around this – add the height of the tallest door in the lowest level. Add one foot if the door is sliding, two feet for an overhead (this will give room for the door tracks, as well as the floor thickness). Add eight feet for loft headroom (code requires a minimum of 7’6”) and a foot for the roof system and any concrete slab on the lower level.

Example – 12 foot tall sliding door + one foot + eight feet + one foot equals 22 foot for eave height.

Be mindful to allow space for stairs. A hole the width of the stairs and at least 10 feet long is going to needed.

Lofty Aspirations Part II: Bonus Room

Bonus Points

Steep roof slopes on many homes of the past decade have brought about a resurgence in designing for a bonus room. With a steep enough roof slope, a “room” can be created in the middle of the attic.  The height must be tall enough to be able to make the minimum ceiling height of 7’6″ which is required by the building codes for a habitable room. Provided the lower floor can stand to have a few posts (similar to my two story building example in yesterday’s blog), the greatest amount of space can be gained by designing the building as pole and raftered rather than with trusses.

In a pole and raftered building, the posts extend through the loft floor all the way to the roof plane where they support rafters which run with the slope of the roof line. The same posts are then utilized to support the floor. For additional cost, “attic” roof trusses can be designed with a “box out” space in the middle. The width of this box is typically 1/2 the span of the truss or less. In most cases, the overall truss height is limited to 12′ as this is the tallest many truss fabricators can manufacture and ship legally down the highway. In spans over 40′, this design is usually not economically feasible.

Build it like a Barn

Gambrel roofs (where the roof has 2 slopes on each side, with the lower portion being fairly steep), can be utilized to gain space for a loft or second floor bonus room. Standard gambrel roof designs have the pitch break of the roof supported by posts which extend to the ground. The steep slope of the roof then utilizes rafters, and roof trusses span the building center from pitch break to pitch break. These posts can then be used to support the second floor and allow for the floor height to be easily adjusted. Also possible, similar to attic roof trusses, a gambrel truss with a “box out” can be designed. The same dimensional rules apply to these trusses.

Not Fibonacci’s Golden Ratio

There is a generally accepted set of proportions to make a gambrel roof look most ideal. The overall height of the roof, above the eave height, should be 1/2 of the width of the gambrel. The pitch break should be located at 1/3 of the distance from the sidewall towards the peak. But which “look” of your Gambrel roof you think looks “good” may be other than what I’d prefer.  Do this simple exercise: take a sheet of paper and draw the dimensions and angles of your gambrel endwall, or ask your building designer to provide a simple sketch of it.

Can You See Me Now?

With either steeply sloped roofs for a bonus room or a gambrel style roof, windows can only be easily and economically placed in the peaked gable endwalls. Dormer windows can be added in the sidewall directions. By placing a gable perpendicular to the main roof ridge or a smaller flatter single slope roof in the steep slope, a window or windows create a room with a view.

Getting there is Half the Fun

Remember to allow adequate space for stairs to your bonus room.

With a beam and joist floor and a straight set of stairs, a hole through the floor the width of the stairs and about 10′ in length is required. A “landing” with clear dimensions equal to the stair width must be at the top and bottom of the stairs.  And if the top of the second floor is over 12′ above the concrete slab below, an intermediate landing must also be added. Every point along the stairs is required to have minimum headroom of at least 6’8″. In mixed use occupancies (garage/apartment as an example), the stairs may have to be exterior, or separated from the non-residential area by a one hour fire wall.

Not to take away all of the fun, but unless building footprint space is a dictate, it is always more economical to build a larger square footage building on a single level than it is to go bigger than multiple floors.

Plus – no stairs to clamber up and down.

Building Plans 101: Loft Storage or Bonus Room

Last week and up through today I have been talking about building plans, how to tell if they are “good ones” or not, before you buy your building.  Whoever you buy a pole building kit from should be able to show you a set of sample plans prior to you plunking down a huge chunk of change to purchase it.  The plans don’t have to be for your specific building.  If you are ordering a custom design, it takes manpower and dollars on their part to configure the design and draft them.  However, they should be able to at least give you an idea of what the plans pages entail for drawings and instructions of how to put it together.  Pole building kits are probably one of the easiest buildings to assemble, compared to all steel buildings or stick built.  But it’s amazing what some companies do to make it look like rocket science in the presentation of their pole barn plans.  It just doesn’t have to be “that hard”.

Plans should be specific, easy to understand and follow.  Obviously a set of plans will only show how to put in a loft, if the building is designed for loft storage of any kind.  If you don’t tell the company you are purchasing a pole building kit from you will “someday” be putting in a loft, your building will not be designed to support one.  Trying to “beef it up later” is just not smart thinking.  I’m sorry, but this is the cold hard reality: be sure to tell the vendor you are purchasing from exactly what you are doing with your building in the future, not just “now”.  Yes, you may never put in the loft storage space you dream of.  But the extra cost now may save you thousands of dollars later.

Or worse yet for those who sort of “ignore” the design loads for adding a loft “later” and think the trusses/roof support system can handle adding “attic space for a few boxes”….Do NOT go there.  I am serious.  Do you really want to risk having your building fall down on your new car, pickup or even worse, family members or friends, because you chose to inadequately design your building?  This is nothing to mess around with!  For a few dollars more you can, at a minimum, have the trusses designed to carry the load of your loft/attic/bonus room.

What you will see on your plan of your loft is exactly what I’ve alluded to here: loft loading values.  Your plans should clearly list the floor live load.  This value varies according to what you are putting up in the loft.  Discuss with your vendor if you are going to use the loft for a “bonus room” such as a room for the pool table, or to store hay, or just to throw a Christmas decoration boxes up there.

Stairs are also shown on the plans, with very code specific guidelines on what you can use for the handrails, guardrails and balusters, besides stair “rise and run”.  These may vary from one state to the next, and even between counties within a state, so it behooves you to ask your county ahead of time.  There are over 7,000 different building departments in the United States!  Although our company tries to keep up with all of them, including changes over time, it helps to have the client on the ball for every bit of county (or borough or city) specific information on lofts and stairs.

Click here to see a sample Lofts/Stairs layout: https://www.hansenpolebuildings.com/sample-plans.htm

What are elevation drawings and who needs them?  Come back tomorrow and find out!