At What Temperature Can You Not Spray Foam Insulation?
Reader DON in ELLSWIRTH asked this question.
Mike the Pole Barn Guru responds:
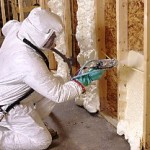
Ideally, spray foam insulation should be installed during warmer months. Once temperatures start dipping, spray foam insulation installation processes become a lot more challenging. For a successful spray foam insulation installation, application side surface typically needs to fall between 60 and 80 degrees Fahrenheit. If temperatures are below this range, there’s a greater potential for equipment breakdowns and a larger chance foam will pop, shrink, and fail to adhere properly to substrates.
With this said, it is possible to successfully install spray foam insulation when temperatures dip below this range.
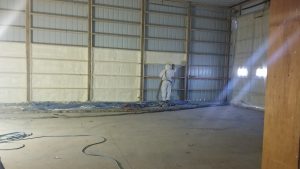 Installing spray foam during winter months is more challenging, but one can increase potential for a successful installation in several ways. One way to successfully apply spray foam insulation in winter, despite less than ideal conditions, is to use a winter blend of spray foam. Closed-cell spray foams can be formulated into a winter blend allowing them to withstand colder environmental and surface temperatures. If you want to install open-cell spray foam insulation, however, it’s not possible to create a winterized formulation. Instead, you must create a suitable environment at installation site (e.g. add heat to building).
In addition to using a right blend of spray foam, making application adjustments for lower ambient temperature is also important. When applying spray foam when temperatures are colder, it’s important to keep hose off any ice, snow, or concrete, as doing so will cause heat to be drawn out more quickly. Minimizing distances between spray rig and application site will also reduce heat loss by reducing hose amount exposed to elements.
On especially cold days, using a smaller application gun mix chamber can keep material warmer. Doing so will slow material’s flow so it stays in heated system longer. It’s important to note installation process of spray foam is generally much longer during winter due to need for such accommodations.
Installing spray foam insulation is a complicated and potentially dangerous process if you don’t have necessary equipment and expertise. As such, it’s always best to hire a professional spray foam insulation contractor—especially during winter, when installation processes are even more complex.
 Recently I read a thread in a discussion group where a person posting was not going to use closed cell spray foam insulation in their pole barn due to safety precautions needed when installing. This got me wondering just how safe or unsafe installing fiberglass insulation is, so I started doing research.
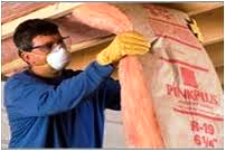 Goggles and a dust mask are crucial safety equipment because those tiny glass fibers can irritate your eyes and lungs. Choose large safety goggles fitting securely all around your eyes, including sides. You do not need a heavy-duty filtration mask when working with fiberglass. A simple dust mask available at any hardware or home improvement store should provide an adequate barrier to keep fiberglass particles from being inhaled.


