Tag Archives: HVAC

Order of Construction

Order of Construction

Reader DANIEL in SAINT JOSEPH writes:

“Hi Mike, I am looking to start building in the next year or two on my up north Minnesota cabin land. I was planning on doing my own general contracting to save. In what order would you recommend I schedule the subs to do their work and when should I begin finding the subs? I already have the septic and well installed for my camper.”

Click here to download our free brochure!Mike the Pole Barn Guru writes:

Here is a general construction sequence. In most instances, you want to line up your subcontractors 6-12 weeks prior to needing them. Further ahead, seems to make it difficult to get return calls. A great source of more reliable subs, is by contacting your nearest Home Builders Association and asking for referrals.

1. STAKE LOT
First step of home building is locating your new home on its lot. This will usually involve a surveyor who will come out and accurately drive stakes to locate your home on lot. They will be used by excavators and foundation subcontractors to guide their work.

2. OBTAIN PLANING, ZONING AND BUILDING PERMITS (Where required)

3. TEMPORARY UTILITIES
You will need to have water, electric power, and toilet facilities available during construction process.

4. CLEAR AND ROUGH GRADE
Clearing is removal of trees and undergrowth from actual construction site and yard areas. Rough grading is moving dirt around to establish approximate drainage patterns, yard areas, drive and walk levels, etc. you hope to achieve. Properly compact any fill in no greater than six inch lifts.

5. WELL
If you are going to have a well, you might as well dig it up front so you will have water available for construction.

6. LAY OUT BUILDING

7. DIG HOLES FOR COLUMNS OR PIERS
Call for hole inspection (where required)

8. SET COLUMNS IN HOLES OR INTO WET-SET BRACKSET Backfill per plan

9. INSTALL
a)SPLASH PLANKS
b)TRUSSES AND/OR RAFTERS
c) Purlins and all other roof framing (including ceiling joists and bracing)
d)  roof steel and ridge cap (or sheathing, felt and roofing)
e) any raised wood floor framing and floor sheathing
f) Girts and all other wall framing

10. CALL FOR FRAMING INSPECTION (where required)

11. INSTALL
a)  Weather Resistant Barrier over wall framing
b) Entry doors, sliding doors and windows
c) All steel wall trims except corners
d)  Wall steel and corner trim

 12. SEWER AND WATER TAPS

If you are connecting to municipal water and sewer, this is where pipes are laid to house and actually connected (tapped into) water and sewer mains.

13. UNDER SLAB UTILITIES
Any plumbing and electrical needs to go under concrete slab is installed here.

14. UNDER SLAB VAPOR BARRIER, UNDER SLAB AND PERIMETER SLAB INSULATION, PEX FOR RADIANT FLOOR HEAT

15. SLAB  FLOOR

16. ANY STAIRS RESTING ON SLAB FLOOR
Get these in now so that the subs working inside can get from one floor to the other without depending on ladders.

17. GARAGE DOOR AND EXTERIOR LOCKS
Some people wait until end to get garage door in. But we think having it in place creates a good place to store materials and equipment during construction. Installing exterior locks means whole house is secure.

18. BACK-OUT FRAMING

This is a general category including interior room partition, soffits for wall cabinets, and drywall nailers.

19. FIREPLACE AND CHIMNEY
A prefabricated fireplace should be installed before roughs (below). A prefab will have a framed chimney. A masonry fireplace and chimney can be installed before any brick veneer.

20. ROUGH HVAC
HVAC (heating, ventilation, air conditioning) sub is first of three “mechanical” subs (plumbing, electrical, HVAC) to come to job. He will install duct work for your HVAC system and possibly furnace. He comes first because stuff he puts into walls is biggest and most inflexible.

21. ROUGH PLUMBING

Next comes plumber to install his pipes.

22. ROUGH ELECTRICAL

Codes call for house to be “dried in” before wiring is installed. With exterior windows and doors in place and roof on, it’s time. For roughs, electrician will put in boxes (switch, outlet, and lighting) and will pull wires into them. Cable, telephone, speaker wires, etc. are also installed at this point.

23. ELECTRIC & GAS METER SET
You’ll need these in place to get some heat in house for drywall installation.

24. GUTTERS AND DOWNSPOUTS
It’s good to get water away from house as soon as possible.

25. WALL INSULATION

Once everything else is in walls and rough inspections are completed, it’s time to insulate your home.

26. TEMPORARY HEAT
With meters set (above), HVAC sub can get some temporary heat going. This will be critical for getting drywall joint compound (mud) to dry in a timely fashion. Carpet sub also needs a warm home so  carpet is installed at a temperature comparable to normal living conditions.

27. DRYWALL
Sometimes called “Sheetrock®.” This will be “hung” (screwed to wall girts, studs and ceiling joists), taped (at joints), and “mudded” (joint compound applied) . . . after the in-wall plumbing, HVAC, electrical, and insulation have been inspected!

28. ATTIC INSULATION

29. CABINETS
Base and wall.

30. INTERIOR DOORS AND TRIM

Trim materials installed here may include door casing, base mould, window stool and apron, window casing, chair rail, crown mould, built-in cabinets, stair railing parts, and others. This step also includes hanging doors.

31. PAINT AND WALLPAPER
First coat of paint is usually sprayed. Get it in before hard wood floors are installed.

32. HARDWOOD FLOORS
Now it’s time to install your hardwood floors.

33. COUNTER TOPS
Counter tops are next. this may involve a different sub than one who installed cabinets.

34. VINYL AND CERAMIC TILE
Vinyl floor coverings and ceramic tile are installed. Two different subs.

35. SAND ANF FINISH WOOD FLOORS

This is first of two finishes. The last is done just before you move in.

36. APPLIANCES AND SPECIAL EQUIPMENT

This would include all of your major appliances – washer, dryer, range, oven, refrigerator, as well as any other special equipment you have specified.

37. FINISH ELECTRICAL
Here is where electrician comes back to install switches, outlets, light fixtures, ceiling fans, door bells, etc. He will also hook up appliances, furnace, air conditioner, doorbell, and so forth.

38. FINISH PLUMBING
Plumber will install sinks, lavatories, toilets, and all faucets.

39. FINISH HVAC & FINAL HEAT
Your heating sub will install registers and get furnace and air conditioning running properly.

40. SHOWER DOORS AND MIRRORS
Install shower doors. Hang mirrors.

41. CARPET
Now it’s starting to feel like home!

42. HARDWARE AND SCREENS
Typically, this is door, window, and closet hardware. Window screens.

43. DRYWALL REPAIRS
You may need to get drywall subcontractor back out to patch some dings caused by other subs’ work. This is normal.

44. CLEAN UP
This is final interior clean up.

45. FINAL PAINT
Touching up drywall repairs and so forth.

46. FINAL WOOD FLOOR FINISH
This should be your last inside job before moving in.

47. RETAINING WALLS
These outside home building jobs can be going on while work proceeds inside.

48. WALKS, DRIVES, AND PATIOS
You should wait until drywall has been delivered, because drywall trucks are VERY heavy, and could damage your flat work

49. SEPTIC TANK AND DRAIN FIELD

Same as above on timing with regard to drywall delivery. Septic tank holds waste and allows microbic action on solids. Drain field is where effluent leaches into soil.

50. FINISH GRADING AND LANDSCAPING
Final finished grades are established to ensure proper drainage away from home, and to prepare yard for landscaping. Trees, shrubs, grass, etc. are installed.


Pool Inside Pole Barn

Pool Inside Pole Barn

Reader DOUG in SNOHOMISH writes:

“I am just starting the process of having an inground swimming pool installed but due to weather and TREES in my area I have decided to build a Pole Barn to enclose the entire pool.  I have done a lot of research on Pools and Pole Barns over the past 2+ years before coming to this conclusion.  With advice from you and a ex-framer brother I feel that this is the right direction based on cost and complexity level.

What I am missing is real details and examples of individuals that have done similar projects.  I could ask a million questions and spend days just chatting to you and/or other experts  but it is unlikely I would be allowed.    I have been searching the web for examples with more details on the different phases of the construction such as (1) Insulation, (2) Framing Walls, (3) Drywall, (4) Ceiling, (5) HVAC D, (6) Electricial, (7) ETC… but have not found much.  Is there any good information on such projects being undertaken by experienced DIY individuals?  (I know what you are thinking DIY = Don’t Indulge Yourself, but in this case I really am an Experienced DIY, having BUILT my own 4700sf home including either GC or hands on.  

I am really considering using a Hansen Pole Barn Kit for the shell, but need to figure out how to ensure 60% humidity inside the building doesn’t rot it from the inside out.  I know that HVAC Dehumidification will be very import, but so is how to seal the build walls from both the outside and inside, how to insulate the walls and ceiling (especially since we plan to have a flat ceiling thus an attic area where the Ceiling and Roof may need to both be insulated to avoid condensation, etc.

Any advice and especially great examples with details would be appreciated.”

Mike the Pole Barn Guru says:

It has been several years since we provided one of our buildings over a pool. Here is an article I wrote as a result of it and a more recent inquiry: https://www.hansenpolebuildings.com/2019/08/post-frame-indoor-swimming-pool-considerations/

Obviously your key to success is having a great HVAC/R system.

I do try to always err on caution’s side.

Adding to my referenced article above – I would add using all rock wool insulation as it is unaffected by moisture. Have a Weather Resistant Barrier between framing and wall steel (allows water vapor to exit the wall). Consider finishing the interior with cement board over a well-sealed vapor barrier, rather than “green board” moisture resistant drywall. Cement board is comparable in weight to drywall, so will not require adding to structural capacity beyond what sheetrock would take. Have a well ventilated attic (eave and ridge).

You will want to seal the interior – walls and ceiling, while having the exterior able to allow any moisture to escape.

Electrical is outside of my wheelhouse, otherwise you should be “good to go”.

A Barndominium Challenge

A Barndominium HVAC Challenge

My now dear friend (thanks to his barndominium) LONNIE in COLORADO SPRINGS writes:

“Hi Mike, I’m still around and still working on the house and making some slow but constant progress so I thank you all for your help and support. I have run into an issue (it’s not related to my Hansen building but I’m hoping you can offer advice anyway).. I ran into a problem getting a HVAC contractor to install my HVAC system. Not too many companies are willing to work with a owner/builder and HVAC install is way out of my wheelhouse. I was able to find a contractor that was willing to do the install but they were pretty much unwilling to do anything different than their “normal” installation (i.e. supply and return ducts in the attic). I was really wanting to do at least return air in my conditioned crawl space but they wouldn’t even consider doing that. So, in order to make progress on the project, I okayed the installation. All the building guru’s say that HVAC duct should not be placed in an unconditioned attic due to leakage and inefficiency so I’m trying to figure out how to mitigate duct losses. There are a couple of ways that I’ve thought of but I’d like your thoughts.

Options:

1: As described in some articles I’ve read and encapsulate all the ductwork with spray foam then bury all the ducts in my blown in insulation

2: Just leave the ducts as is and just bury the ducts as deep as I can afford with insulation3: I’ve thought of covering all the ducts with 6 mil plastic down to the ceiling drywall.. i.e. kind of enclose the ducts in a bubble that is attached to the ceiling, then bury it all in insulation. Covering the ducts in plastic seems like it would basically move the ducts to the conditioned space. Anyway, thank you for all your input and all the help you guys have been to me.

Thanks Lonnie”

Lonnie ~

Mike the Pole Barn Guru responds:

You are most certainly among my favorite all time clients, it has been such a pleasure working with you. While I am excited for you to be moving in, I have to admit it will be sad to not hear from you once all is completed. Since you started, one of our sons has moved to Colorado Springs, so if we get down to visit, I will drop you a message and maybe come by to see your beautiful home for real.


Your HVAC experience is why our Construction Industry in general is so far behind the curve of efficient building design – very frustrating. I would look to make those ducts as efficient as possible – I’d start with two inches of closed cell spray foam on sides and top, then bury it with enough blown in insulation to achieve an R value equal to the balance of your attic space. Closed cell spray foam will seal up any leaks in your duct work (trust me, there will be some). Return air through your crawl space would have been a no-brainer, in my humble opinion. I worked with stick frame builders nearly four decades ago who insulated their crawl space perimeters and then used those crawl spaces as one huge air return. Then, it was less expensive than running ducts.

Open Web Wood Floor Trusses

Prefabricated Open-Web Wood Floor Trusses in Your Future?

Use of open-web floor trusses has steadily increased over this past decade, but there’s a lot of room to grow. Ed Huston from Home Innovation Research Labs (HIRL) recently shared some results from their April 2021 Builder Best Practice Reports on Structural Systems, containing survey results from over 1500 homebuilder participants. 

If a picture speaks a thousand words, the chart below neatly summarizes more than ten thousand words regarding building code impacts. Chart’s green line represents wood I-joists, clearly preferred framing product for non-slab-on-grade first floors and floors above grade.  Market share was actually increasing until 2015, when most states updated to 2012 versions of model code.  In IRC (International Residential Code), Section R501.3 (R 503.1 in later versions of the code), gypsum sheathing was now required on all unprotected wood structural framing unless it was constructed using dimensional lumber.

This code change had an immediate impact on builder preference, with I-joists and dimensional lumber market share moving in opposite directions. Curiously, over time this code change may have actually prompted some builders to finish off basements and use open-web floor trusses to more easily run all MEP (mechanical, electrical, plumbing) in the floor cavity.  Benefits of easier MEP installation in floor trusses is efficiently illustrated in builder-preference in multi-family construction, where market share has also increased over time, as chart below shows.

Since 2017, slab-on-grade single-family construction has surged. While this has taken relative market share from both dimensional and EWP joists,  open-web floor truss share has continued to increase (albeit, slightly). Given dramatic shifts in market share, this national market resiliency of floor trusses suggests in non-slab markets, floor truss market share has increased in recent years.  Chart below shows there is currently significant regional preference for floor trusses.

All of this data suggests there is an opportunity for significant market share growth for floor trusses, given they offer an incredibly efficient and accurate floor framing system utilizing less lumber and easing labor burden for all MEP trades. 

Personally, our now 16 year old post frame shouse (shop/house) utilizes floor trusses to give a 48 foot clearspan over our basketball half-court and provides a comfortable structural system for our second floor living space. All of our plumbing, electrical and HVAC is run through our floor truss system, providing an unobstructed ceiling downstairs.

Planning upon a multi-story post frame building? Open-web wood floor trusses might very well be an excellent design solution.

Solving Horse Barn Condensation Challenges

Solving Horse Barn Condensation Challenges

Proper ventilation of horse barns is essential to good equine health. Reader DONN in LONGMONT writes:

“Hi, last summer I added 8 more horse stalls to our existing  horse barn. There was a lean-to already attached that I extended on to and enclosed. The horse stalls are approximately 12’x12′ and a 10′ wide walkway that is poured concrete. The entire footprint is, 100′ x 24′.The ceiling height is approximately 12′ tall at the original barn and 7′ tall at the west end for fall. 2 sliding doors to bring horses in and out on the north & south ends and 8 windows on the west side that are 3′ x 4″. I insulated the walls & ceiling with 6″ batt insulation then drywall and painted. I started having condensation issues with water getting into the drywall and lights in the horse stall only so we installed 6 – 6″ turbine vents spaced evenly throughout the horse stalls and cracked the windows to allow air to come in. This seemed to help for a while but now I’m having the same issue with condensation. When I cut a hole in the ceiling above one of the horse stalls, it is dry about half way down and the other half I have moisture trapped in the insulation. Any ideas/ information on how to stop the condensation?”

Mike the Pole Barn Guru answers:

An average 1100 pound horse intakes 5 to 10 gallons of water a day – all coming back out in one form or another. For good equine health, air flow is essential, most usually handled by intakes from vented soffits and exhaust from ridge vents (for extended reading: https://www.hansenpolebuildings.com/2012/11/horse-barn-ventilation/). Most post frame stall barns have unfinished interiors, further allowing for air flow. In your case, you have sealed off air infiltration points and are seeing negative results from 40 to 80 gallons of water vapor (333 to 667 pounds) being added to your barn’s air daily. This does not take into account moisture rising from any floor areas without concrete slabs on grade (or slabs without a well-sealed vapor barrier below).

Riding Arena Interior
Air’s ability to hold moisture is a function of temperature. Your building has roughly 22,800 cubic feet of volume. At 40 degrees F and a 90% relative humidity (RH) you would have 33 grains of water vapor per pound of dry air (13.33 cubic feet). With 7000 grains per pound of water you get:

333# x 7000 grains = 2.331 million grains.

22,800 cft / 13.33 cft = 1710# of air x 33 grains = 56,444 grains.

Just to maintain even a 90% RH at 40 degrees F you would need to turn the air in your barn 41 to 83 times per day (depending upon actual output). To get to 60% RH (high end of comfortable living) air turns would need to double, for 30% RH triple.

Your solution is going to be to mechanically ventilate your barn. An HVAC professional can design a system for you to remove your excess moisture – otherwise you are looking at problems beyond just condensation (mold, mildew and premature degradation of lumber), such as your horses’ health.

11 Reasons Why Barndominium Crawl Space Encapsulation is Important

11 Reasons Why Barndominium Crawl Space Encapsulation is Important

Today’s Guest Contributor is Joseph Bryson. Joseph was born in Alberta, raised in NYC and is living in New Zealand. He has been working in 4 different industries and helped numerous businesses grow. Now, he is focused on writing as his next career from home and lives a peaceful life with his family and a whole pack of dogs.
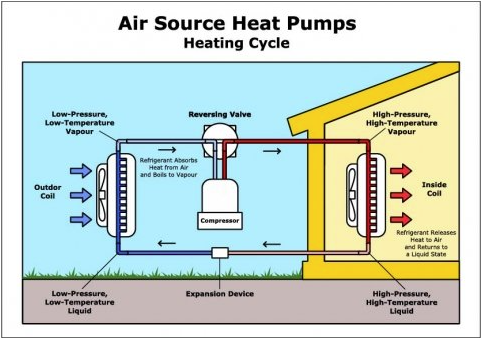
No matter what kind of a barndominium you will have, if there is a crawl space present then it can potentially cause you a whole host of problems. People tend not to realize this because they don’t think too much about crawl spaces. 

Like it’s not a place people generally venture to in their own homes. It’s just down there beneath your elevated wood floor, out of sight and out of mind. And so various issues can arise in your house you don’t know how to fix because you don’t realize they’re originating in your crawl space. 

In a post-frame building, crawl spaces are set up a little bit different. Instead of having a perimeter of concrete and a concrete slab, it is instead a wooden framework on short pressure preservative treated timber or glu-laminated columns.

It’s a style of crawl space allowing for much better access to plumbing, ventilation ducts and electrical wiring, but without a concrete slab. It also makes it somewhat more susceptible to some of these problems. 

This leads us to crawl space encapsulation creating an unvented crawl space. A process involving installing a vapor barrier in your crawl space to cover ground, walls and seal up all vents and seams. Air is then conditioned using a humidifier or HVAC system.

International Residential Code (IRC) R408.3 addresses unvented crawl spaces. Exposed earth is covered with a continuous Class I vapor retarder. Vapor retarder joints shall overlap at least six inches and be sealed or taped. In post frame buildings, this vapor retarder must extend up perimeter walls to floor level and be attached and sealed to floor. One of four possible options outlined in IRC R408.3(2) must also be met.

Let’s have a look at what issues a crawl space encapsulation will help to prevent and why it’s so beneficial:

  1.   Controls Pests

One very important thing you’ll be doing by sealing up all openings is removing access to your crawl space for a wide variety of pests. You can get mice, rats, cockroaches, racoons and even birds have been known to find their way into crawl spaces.

Once pests find their way in, it can be a nightmare getting them out but an encapsulated crawl space removes a primary entry point for pests so you would be reducing possibilities significantly.

Roaches can be disastrous for a wooden framework and so you should be very serious about keeping them out of your crawl space and your home in general.

  1.   Improves Air Quality

Because air coming up through your crawl space will be going through HVAC or a humidifier, you can rest assured it will be much higher quality than if it was just blowing in unfiltered. A crawl space is a hot bed for low quality air, but not if it’s encapsulated.

  1.   Allows for Better Energy Efficiency

One thing you will probably notice after encapsulation is your energy bills will be lower. Your heating and air conditioning won’t have to struggle against crawl space damp air, meaning they’ll be doing less work.

And this will of course result in you having to spend less on utilities. While encapsulation might cost a bit, it is Code required and will be financially beneficial over time.

  1.   Keeps Floors Warm

As we just mentioned, the normal state for a crawl space is to be full of damp air. It’s exposed to elements and especially during winter months, this just means there’s consistent moisture and low temperatures blowing through.

All of this is prevented with encapsulation meaning the only thing rising from below will be heat. And while it won’t necessarily be equivalent to under floor heating as such, it will make floors more warm and comfortable to walk on, especially in a post-frame home where there isn’t concrete separating heat from floors.

  1.   Prevents Mold

Mold is very problematic. For some people it’s just an irritant causing things like coughing, sneezing and sore throats, but it can also be toxic if left to grow for too long. And for anyone with a compromised immune system or who suffers from asthma, it’s dangerous.

Mold and mildew are further consequences of dampness and moisture retention and most crawl spaces are full of it. It’s much more likely to build up on wood than it is on concrete meaning this is more common in wood frame structures.

  1.   Improves Storage

Not everyone opts for using their crawl space for storage, even after it’s been encapsulated, but  it can be done. If your encapsulation is neat, you should definitely have some room down there to store a few boxes.

If you did this with an unencapsulated crawl space, then anything you store could be potentially damaged by moisture or mold. So it’s basically a really safe storage space once encapsulated.

  1.   Prevents Flooding

I’ll start this point by saying crawl space encapsulation doesn’t necessarily prevent floods entirely, but it can help in a lot of cases. Excess rainwater and runoff can build up down below and can result in flooding, but not if everything is sealed and blocked up.

Flooding takes a much greater toll on wood than it does concrete and although your post-frame home will be sturdy by design, too much water over time could do some serious damage.

  1.   Protects Structural Integrity

If left for long periods of time without intervention, moisture and mold will slowly eat away at untreated wood under your home. This will eventually destroy structural integrity and you won’t have any idea it’s happening because it takes so long.

Just another reason why you should be slowing down, or entirely stopping mold growth and retention of moisture.

  1.   Keeps Allergens at Bay

Spread of allergens is primarily caused by moisture and dust. We’ve discussed to death how moisture is controlled by encapsulation, but because air coming through is unfiltered, dust shouldn’t be a problem either so if you’re prone to allergies you will benefit.

  1. Can be Done Without Professional Help

Key word here is ‘can’. Crawl space encapsulation can be done without professional help. Before hiring a professional it’s worth looking into how you would do it yourself.  

If you have an interest in DIY and are particularly adept at this type of handiwork, you could for sure give this a try. Again, not everyone will be up to this task, but if you are then it will save a lot of money.

  1. Enhances Longevity of Your Home

With all of these different things considered, it’s clear crawl space encapsulation will help make sure your barndominium is in livable condition for a long, long time. Every issue we’ve discussed here will gradually build up until it becomes potentially disastrous.

Crawl space encapsulation is a big job, but fairly easily accomplished DIY.

Raised Floor Over Crawl Space, Engineered Plans, and a Pool House

This week the Pole Barn Guru answers questions about a raised floor over a crawl space, purchase of engineer sealed plans, and moisture issues in an above ground pool house.

DEAR POLE BARN GURU: Appreciate all the information on your website very awesome it’s a lot to take in we are thinking of building a pole barn home and we have one question we typically don’t like concrete floors. I joist, does anybody just frame out floor joist, has with a 3 in rat slab for crawl space? GARY

DEAR GARY: Thank you for your kind words.

I would rather not live on a concrete slab either. One of our retired Building Designers has been putting up a hunting cabin done exactly as you envision:

https://www.hansenpolebuildings.com/2019/03/development-of-my-cabin-plans/
https://www.hansenpolebuildings.com/2019/03/pole-barn-cabin-part-ii/

https://www.hansenpolebuildings.com/2019/04/my-pole-barn-cabin-part-iii/
https://www.hansenpolebuildings.com/2019/03/participating-in-ricks-post-frame-cabin-planning/

Engineer sealed pole barnDEAR POLE BARN GURU: Do you sell only engineered plans for your building? I am interested in PROJECT# 06-0602 but I do not want to buy a kit.

Thanks! MATT

DEAR MATT: Thank you very much for your interest. Our independent third-party engineers will only provide sealed plans for buildings where we are providing materials, as there is no other way they can guarantee materials as specified actually arrive at your building site. Some of these are manufactured specifically for Hansen Pole Buildings, so there is no other method to acquire them. Frankly, our massive buying power allows us to acquire components at far better prices than you will be able to find and our low overhead and narrow profit margins allow for us to be extremely competitive, even with lesser quality providers.


DEAR POLE BARN GURU: Hello, I’m researching putting an above ground pool in a pole barn for my swim school. I live in Oregon so my biggest concern is mold in the colder months. Do you have any ideas on this & what type of doors & windows would you suggest? It will be a 12×24 heated salt water pool. Thank you, HANNAH in HOOD RIVER

DEAR HANNAH: Thank you very much for your interest in a new Hansen Pole Building. This article should be an assist to you: https://www.hansenpolebuildings.com/2019/08/post-frame-indoor-swimming-pool-considerations/. Our factory pre-painted commercial steel entry doors and vinyl windows should work well with a proper HVAC system.


Where Your Barndominium Dollars Go

Where Your Barndominium Dollars Go

Recently published by NAHB (National Association of Home Builders) was their 2019 Cost of Construction Survey. I will work from their ‘average numbers’ to breakdown costs so you can get a feel for where your barndominium, shouse or post frame home dollars go.

Please use this as a reference only, as chances are your barndominium, shouse or post frame home will be anything but average!

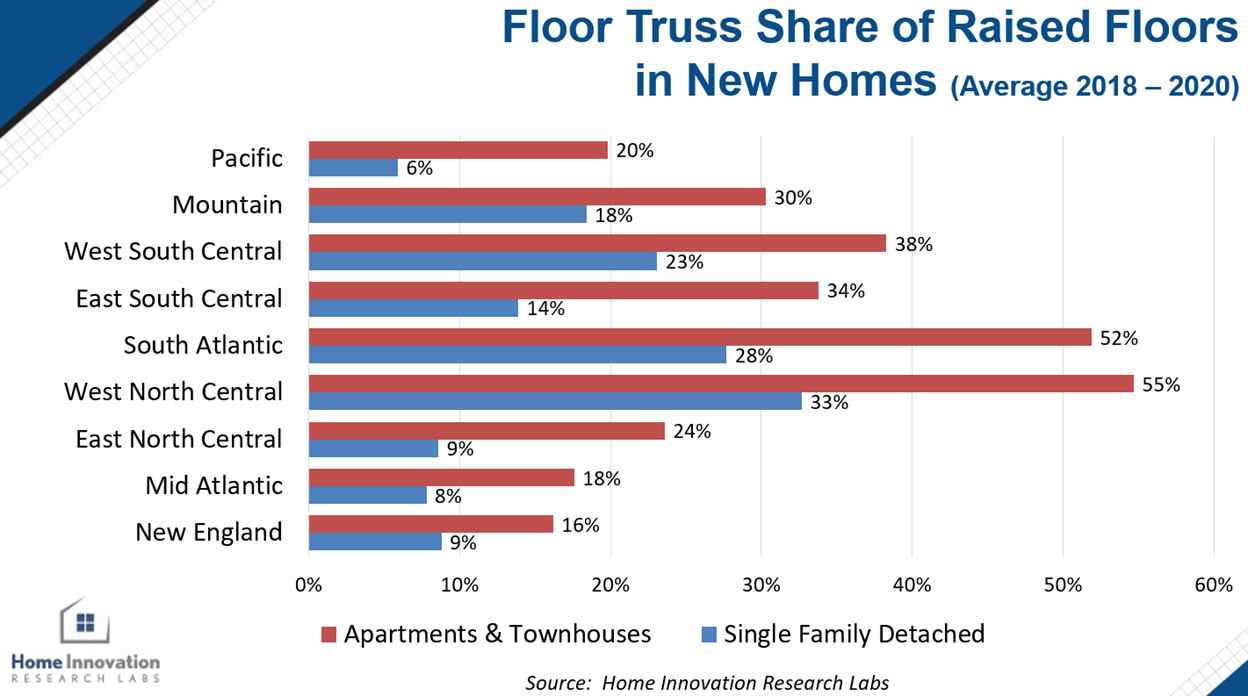
2019’s average home had 2594 square feet of finished space and a sales price of $485,128. Without lot costs, general contractor’s overhead and profit actual construction costs were $296,652 ($114 per square foot).

Construction Cost Breakdowns as Follows:

Site Work

Building Permit Fees                                                                                  $5,086

Impact Fees                                                                                                   3,865
Water & Sewer Fees                                                                                     4,319

Architecture, Engineering                                                                           4,335

Other                                                                                                                 719

                       Foundation

Excavation, Foundation, Concrete, Retaining walls and Backfill        $33,511

Other                                                                                                                1,338

                     Framing

Framing (including roof)                                                                            $40,612

Trusses (if not included above)                                                                     6,276

Sheathing (if not included above)                                                                 3,216

General Metal, Steel                                                                                           954

Other                                                                                                                     530

                       Exterior Finishes   

Exterior Wall Finish                                                                                   $19,319

Roofing                                                                                                          9,954

Windows and Doors (including garage door)                                       11,747

Other                                                                                                                671

                       Major Systems Rough-Ins       

Plumbing (except fixtures)                                                                        $14,745

Electrical (except fixtures)                                                                           13,798

HVAC                                                                                                               14,111    

Other                                                                                                                 1,013

                       Interior Finishes       

Insulation                                                                                                  $ 5,184

Drywall                                                                                                        10,634

Interior Trims, Doors and Mirrors                                                           10,605

Painting                                                                                                         8,254

Lighting                                                                                                         3,437

Cabinets, Countertops                                                                             13,540

Appliances                                                                                                    4,710

Plumbing Fixtures                                                                                       4,108

Fireplace                                                                                                       1,867

Other                                                                                                                923

                                              Final Steps

Landscaping                                                                                              $6,506

Outdoor Structures (deck, patio, porches)                                           3,547

Driveway                                                                                                     6,674

Clean Up                                                                                                     2,988

Other                                                                                                              402

Other                                                                                                      $11,156

Considering using post frame construction, rather than stick built and foundation costs will decrease by roughly $10,000 (https://www.hansenpolebuildings.com/2011/10/buildings-why-not-stick-frame-construction/).

Architecture, Engineering, Framing and Exterior Finishes for this average home run an astonishing (to me) $97,614. If labor runs 60% of material costs, this would put a material package at $58,300! At over $20 per square foot, this would be one very, very nice post frame barndominium!

Looking to stretch your barndominium dollars? Considering Doing-It-Yourself, you absolutely can do it!

Planning for a South Carolina Post Frame Home

Planning for a South Carolina Post Frame Home

A barndominium, shouse (shop/house) and post frame home wave is sweeping across America. There are numerous articles available on Hansen Pole Buildings’ website – just click on SEARCH (upper right of any page) and type in BARNDOMINIUM and hit ENTER and relevant articles will appear for your reading pleasure.

Loyal reader LANE in NORTH AUGUSTA writes:

“Hello,

I’m currently planning a post frame home in North Augusta, South Carolina.

I’m planning to build 72x40x16 with a wrap around overhang around one end and part of the front or 84x40x16 with the last 12′ bay open to create the end porch then a lean-to on part of the front. 

I’m curious firstly on the shipping. There are a few local businesses here that sell kits and will erect the building as well if desired. How much will freight affect my final cost if I buy from you vs. sourcing it locally? I haven’t gotten any prices from the local companies yet. I decided to reach out to you guys first because I’ve been reading your blog and it seems like you really have this pole building thing figured out. I’m also really interested in the design and plans that you provide. Do these also include the interior walls, plumbing and electrical, or is it just the shell of the building?

I’ve already drawn up a simple floor plan for the living space that really fits our needs so I’d like to incorporate that.

Thank you for your time. Look forward to hearing back.”

Mike the Pole Barn Guru answers:
Thank you for your interest in a new Hansen Pole Building. We have wholesale relationships all across America and will ship bulkiest items, in most cases lumber and trusses, from your locale – freight costs will be no more for you, than they would be to any other location.

We would like to believe we have at least a reasonable idea of what pole (post frame) buildings are all about :-). It is all we do, unlike your local businesses who also do other things – we are specialists.

With your investment into any complete post frame building kit are detailed structural plans showing every member and all connections. For those with living areas, we have available an offer for interior floor plans: http://www.hansenpolebuildings.com/post-frame-floor-plans/?fbclid=IwAR2ta5IFSxrltv5eAyBVmg-JUsoPfy9hbWtP86svOTPfG1q5pGmfhA7yd5Q. For a nominal fee plumbing and electrical can be provided (a hint – your plumber and electrician will normally provide these at no charge as part of their service).

One of our Building Designers will be reaching out to you shortly to further discuss your ideal new building!

Geothermal Heating/Cooling

Geothermal Heating/Cooling for Post Frame Buildings

I’ve opined upon geothermal heating and cooling for post frame buildings in the past (https://www.hansenpolebuildings.com/2016/12/modern-post-frame-buildings-geothermal/). Reader STEVE in BOYNE CITY had some further questions and writes:

“You said you pump (approx.) 55 degree liquid through pex in ”wells” in the ground (I think is how you put it) through your concrete floor to maintain the slab at that temp. Then you heat the air space above the slab to whatever you want ambient to be. When you said wells did you really mean troughs? More importantly, in hot humid weather, is there a condensation problem on the slab and if so, are ceiling fans used? If the slab is covered with a thin, moderately conductive thermal break like vinyl flooring, how would that affect the temperature moderating effects of the slab? Condensation? Is air conditioning ever needed? PS. I had the idea to do this years ago, and all the older guys in the trades said it was a stupid idea. I am glad you proved it to be a worthy idea.”

When I remodeled what was then my grandparent’s lake cabin outside of Spokane, WA in 1990, I tried to convince my HVAC guy using geothermal wells would be a good idea. Sadly, I let him talk me out of it as I am now (hindsight giving us all 20/20 vision) fully convinced the investment into drilling the wells would have been recouped many times over.

Outdoor temperatures fluctuate with the changing seasons but underground temperatures don’t change as dramatically, thanks to the insulating properties of the earth. Four to six feet below ground (below the frost line), temperatures remain relatively constant year-round. A geothermal system, which typically consists of an indoor handling unit and a buried system of pipes, called an earth loop, and/or a pump to reinjection well, capitalizes on these constant temperatures to provide “free” energy.

Gambrel roof pole barnThe pipes which make up an earth loop are usually made of polyethylene (PEX) and can be buried under the ground horizontally or vertically, depending on the characteristics of the site. In the case of our 2004 pole building in SD,  the loops are buried vertically, hence wells.

In winter, fluid circulating through the system’s earth loop or well absorbs stored heat from the ground and carries it indoors. The indoor unit compresses the heat to a higher temperature and distributes it throughout the building, as if it were an air conditioner running in reverse. In summer, the geothermal HVAC system pulls heat from the building and carries it through the earth loop/pump to reinjection well, where it deposits the heat into the cooler earth/aquifer.

The airspace above the slab is heated by the compressed heated liquid running through the pex tubes, although in spaces designed to be offices, the bathroom and kitchenette, they are heated by forced air (where heating/cooling is also generated by the same process as heating/cooling for the slab). We live where it can be 100 degrees and 100% humidity in August and have never experienced condensation on the slab. This could be due, in part, to having a well sealed vapor barrier underneath the concrete slab.

Stone, tile, wood and vinyl are fairly good conductors of heat and do not present any special design considerations. Carpeting may require more temperature from below to allow the heat through.

For more answers on radiant in floor heat, we recommend contacting Les Graham at Radiant Outfitters www.radiantoutfitters.com.