New! The Pole Barn Guru’s mailbox is overflowing with questions. Due to high demand, he is answering questions on Saturdays as well as Mondays.
Welcome to Ask the Pole Barn Guru – where you can ask questions about building topics, with answers posted on Mondays. With many questions to answer, please be patient to watch for yours to come up on a future Monday or Saturday segment. If you want a quick answer, please be sure to answer with a “reply-able” email address.
Email all questions to: PoleBarnGuru@HansenPoleBuildings.com
Dear Pole Barn Guru: What is the proper wind sheer bracing for a 60’W x 80’L by 20’H monitor pole barn with a 20′ center aisle and a second story? The raised center portion has 20 foot walls, then another 6 feet to the center at the ridge.
The 2 sheds on either side are 10′ at the edge and intersect the center at about 15′. The entire structure is made of poles on 20′ centers, Lvl beams and ladder trusses for floor and trussed roofs. It is unprotected from the wind. We are in central Texas. TEETERING IN TEXAS
DEAR TEETERING: This is why it is such an excellent idea to order complete pole building packages from a company who can run all of these calculations accurately in advance. Then buildings are designed to resist the proper loads, including wind shear, without having to search for solutions in the middle of the game.
Provided all of the columns are adequately sized and embedded …..
Steel roofing should be 3′ width, minimum 29 gauge, with high ribs every 9″, attached to 2x purlins on edge spaced no more than 28″ o.c. Roofing should attach to purlins with #12 x 1-1/2″ diaphragm screws at 9″ o.c. at each purlin. At eave and top edges of panels place screws on each side of every high rib.
Provided you attach the endwall steel the same as the roof steel, you should be able to have up to 19 lineal feet of openings on each endwall without further reinforcement.
All of this should be reviewed by a Registered Design Professional (RDP – engineer or architect) for structural adequacy.
DEAR POLE BARN GURU: Is it possible to get a quote to have it assembled? MINDFUL IN MORRIS
DEAR MORRIS: We are not contractors, however fair market value for labor is typically about 50% of materials costs.
I recommend placing an ad on Craigslist under “labor gigs” such as:
Contractor needed to assemble pole building kit package on my clear level site in Morris County. 24’x40’x14′ includes 12″ overhangs, a 12’x12′ overhead door, entry door and wainscot. I will provide all materials except for nail gun nails. Willing to pay $4000-5000 depending upon experience and references.
DEAR POLE BARN GURU: I have a metal building constructed of 2×4 square tubing and 4×4 metal posts. 3″ × 1.5″ c purlin is welded with the c side down spanning across my 2×4 square tubing roof beams. I have a metal roof screwed to the c purlin. The building wraps around an existing building and looks like an L from a top view and has a 2 on 12 shed roof with a hip. The building is “stand alone” and attached to the other structure only with a side wall transition piece. The metal roof slides under the eve of the other structure with the side wall transition on top. I also used the vented enclosure under the sidewall transition for ventilation. I also have a ridge vent at the hip with the vented enclosure under the hip cap. I have a 12″ soffit around the outside perimeter of the metal structure with soffit vents every 5 ft. I have a 4 ft cedar picket half wall around the outside perimeter with the remaining height of the wall in screens….basically a screened in party room but I plan on switching out the screens for heavy plastic sheeting in the winter. I have a hot tub inside and I want to insulate the roof and install a ceiling. 1st question: do I have to install a vapor barrier IF I am using 3/8 marine plywood for the ceiling and the attic side of the sheathing is covered in heavy vinyl….sheathing was once election signs. I am attaching the ceiling directly to the bottom of the 2×4 roof beams following the slope of the 2 on 12 pitch.
2nd question…..because I only have the 4″ depth of the 2×4 sq tubing + 1.5″ depth of the c purlin = 5.5″ total for insulation AND vent space, how would you insulate? Spray foam is too expensive for me. I want to reduce the radiant heat in the summer and I am concerned with the humidity from the hot tub especially in the winter. Any help would be greatly appreciated. TOASTY IN TEXAS
DEAR TOASTY: My guess is you are going to be creating an inadequately ventilated dead attic space. You need to have 1/150th of the “foot print” of your space, as ventilation, equally divided between the eaves and the ridge. In your case, you have no ability to adequately vent the high side of your roof, as it abuts another building.
Even though the best solution might well be to tear everything down and construct a new building, chances are you would not look favorably financially upon it as the end all.
Probably your best bet is to install an A1V reflective radiant barrier beneath the roof purlins (https://www.buyreflectiveinsulation.com) with the reflective side up. Make sure every seam is tightly sealed. This should help reduce the thermal gain in the summer. If you are going to create a dead attic space between a ceiling and the reflective radiant barrier – powered attic vents in each end could be a good investment.
As for humidity from your hot tub, install air inlet vents near the floor and exhaust vents near the ceiling line. You may also need to have one or more powered vents in the walls of this area.
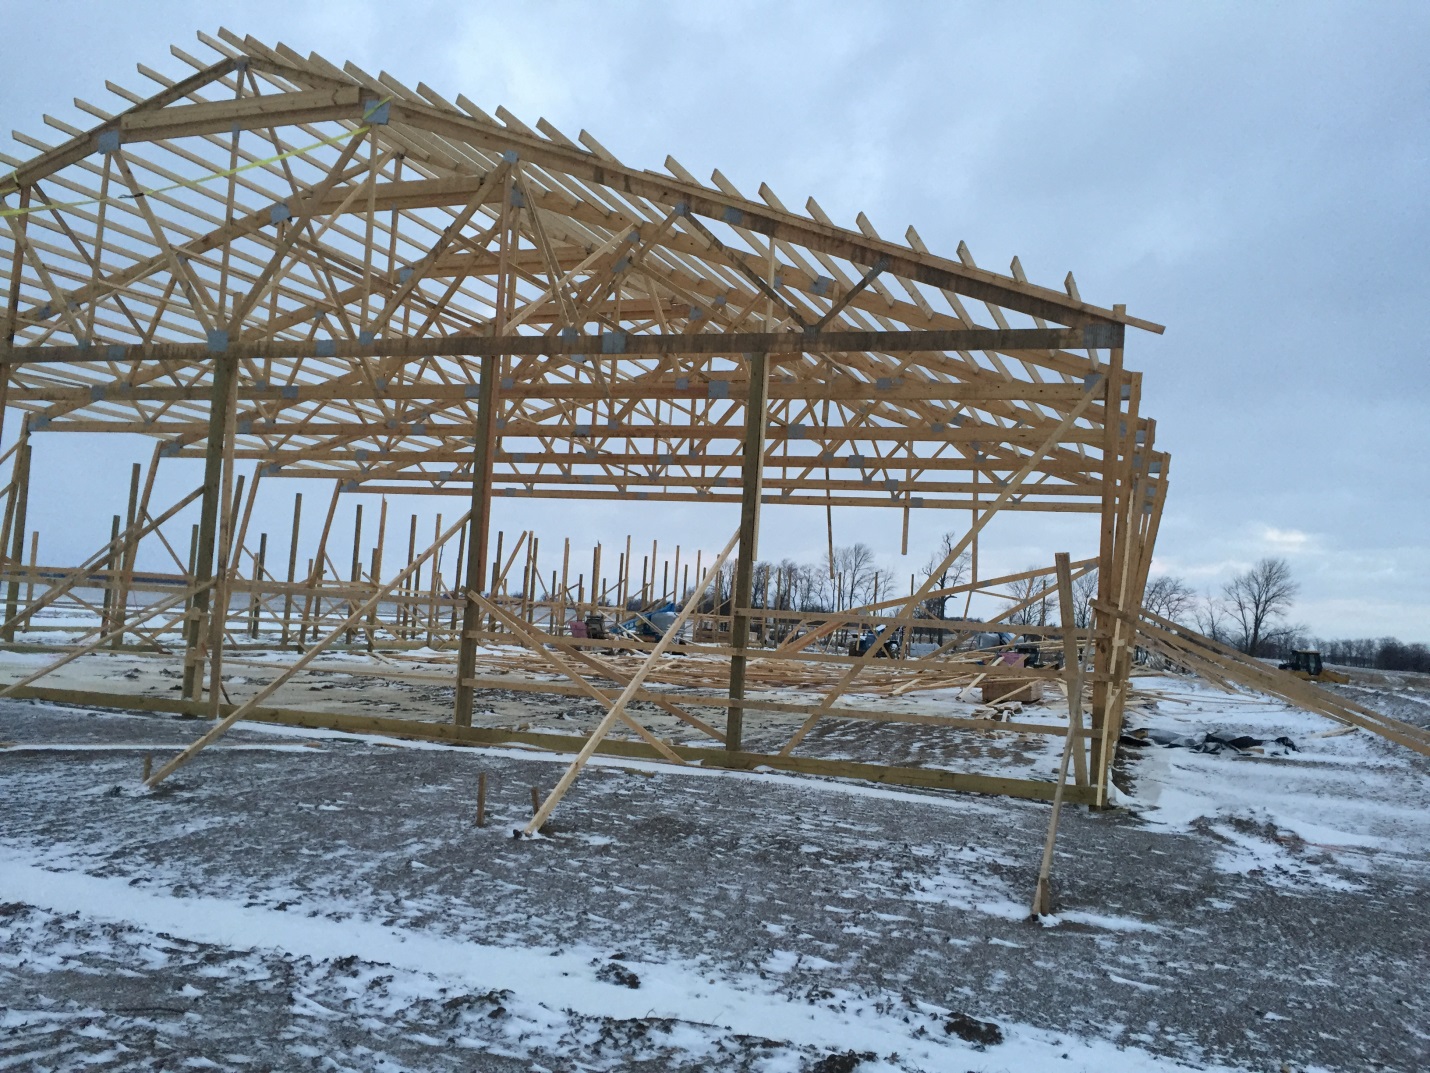 Over the Christmas weekend the area experienced some high localized winds, resulting in what you see above. There are some things which might have either prevented or minimized the current situation:
 Post frame buildings also work as a system, so individual components or connections might possibly be adequate, however the entire building fails due to a weak link. This is why I always, always (did I say always) recommend ONLY to invest in a building which is designed by a registered design professional (RDP – engineer or architect) – especially for your particular site.


