Tag Archives: pressure preservative treated columns

Help, My Barn Home Poles Are Rotting

Help, My Pole Barn Home Poles Are Rotting

Reader HEATHER in HELENA writes:

“I was encouraged to email you regarding my current situation. A couple years ago I bought an unfinished pole barn home. Construction originally began in 2012. While recently doing some improvements to some interior posts I discovered that the nearest pole had wet rot below ground level. The rot has compromised the surface of the pole. The poles were coated with a rubber coating called Blackjack 57 but it appears to be failing. I had a general worry about this but now I know it’s the case. My guess is all the poles are in similar condition or will be at some point. The poles are still salvageable and so I am hoping to find the least invasive and hopefully cost effective way of addressing this issue. I have been studying chemical treatments which may stop the rot and preserve existing wood, but am not sure how effective that would be. I am now living in the building so access to the poles would be limited to the outside. There are approximately 26 poles. 

Do you know of a contractor who can help or any possible solutions?”

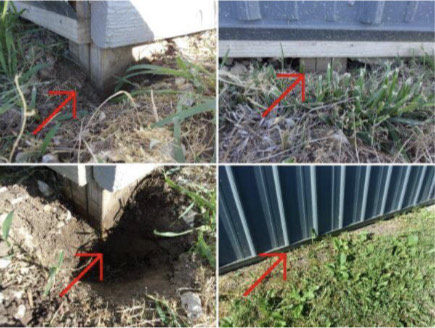
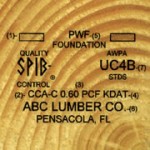
As properly pressure preservative treated wood (UC-4B rated) will outlast anyone alive on our planet (https://www.hansenpolebuildings.com/2020/09/pressure-treated-post-frame-building-poles-rot/), it leads me to believe your columns are what is typically found at local lumber yards and big box stores and should never be used structurally in contact with ground (https://www.hansenpolebuildings.com/2014/05/building-code-3/). It is likely whoever began this build was aware of having improperly treated wood, so in an attempt to solve this, they applied Black-Jack™ Rubr-Coat 57. While an excellent foundation waterproofer, I will guess it was applied to wet wood and/or not thoroughly sealing columns in areas prone to decay. It has probably made the situation worse, by trapping water, yet allowing oxygen to still reach wood.

As you can access columns from outside, I would look towards cutting off columns at grade, removing affected areas from ground, then fill area with concrete, using a Code approved wet-set bracket to attach the remaining column to piers. This will be fairly labor intensive, however getting under treated wood out of the ground is your best solution.

If not up to performing this yourself, try posting on Craigslist under “Gigs” to find local help.

Insulation Options for an Idaho Barndominium

Insulation Options for an Idaho Mountain Post Frame Barndominium

Loyal reader LORISTON in NAMPA writes:

“We are in the initial phase of preparing for our residential post frame home and are excited to partner with Hansen Buildings when ready. Thank you for all the amazing information and supporting your clients. Question: I am targeting a highly efficient design, with >r-40 walls and >r-60 roof. There is a lot that I do not know and humble to learn from others. My mechanical engineering background helps. I would like your advice on a wall and roof design that meets my targeted R-values incorporating (from outside to inside) metal siding, >3/4″ rain screen, rock wool >2″ external insulation, Zip insulated r sheathing for WRB and thermal break/R-value increase, laminated Timber Tech glulam columns with bookshelf / commercial girts, closed cell spray foam internal insulation around 3″ thickness, fill remaining thickness from spray foam to inside edge column with insulation (recommendation would be helpful on type of insulation), internal insulation on inside of wall for thermal break if needed or helps, with final residential area having 5/8″ sheetrock and shop area having metal inside finish. We have not solved how to create a space for utilities on the outside wall as we would prefer to run them on inside of columns or thermal break insulation. We are contemplating internal framed 2×4 walls spaced away from post frame wall to create a space for utilities. No water will be run on external walls, only power, low voltage, gas, telephone as reference. Suggestion on how to run utilities with this highly efficient wall design would be appreciated. Roof is similar to wall, just horizontal with >r-60 performance, as we are targeting a conditioned attic space. Roof exception may be a second zip sheathing layer over the insulation (under rain screen/standing seam metal) but to be determined. Climate Zone 6 region in the Idaho mountains for reference. Post frame columns and wall will be on a full foundation wall with thickness based on wall design. Performance is priority over cost, targeting an air tight and efficient living space. Your experience and practical approach are greatly appreciated. Best regards and thank you.”

Mike the Pole Barn Guru writes:

Thank you for your very kind words, they are greatly appreciated.

Rather than add an expensive and structurally unnecessary concrete foundation wall, I would recommend embedded properly pressure preservative treated wall columns (as my first choice), columns above grade set into wet set brackets on concrete piers as my second. Either of these can be insulated using R-10 EPS (Extruded Polystyrene) insulation boards. I would run them on the inside of the splash plank, with the top even with the top of the slab, extending down two feet, then outward horizontally two feet.

In Climate Zone 6, I normally would not look towards spray foam as my go to choice, however conditioning your attic and your desire for air tightness come into play, so here goes:

Walls (out-to-in): Steel siding over 2×8 bookshelf girts; 4″ of closed cell spray foam applied directly to inside of wall steel and balance of cavity with either open cell spray foam or rock wool (rock wool being my preference). No internal vapor barrier or continuous interior insulation boards as we want walls to dry to interior, without trapping moisture in the wall cavity.

Roof (out-to-in): Standing seam steel over 30# felt or synthetic ice & water shield (second preferred) over 5/8″ CDX plywood. Zip sheeting is OSB and screws just do not hold well into OSB. We can specify 2×12 roof purlins in order to get a deep cavity for insulation. Closed cell spray foam 5-3/4″ (R-40) plus R23 rock wool (5-1/2″).

This combination will require mechanical removal of humidity.

My normal recommendations would be:

Walls (out-to-in): Steel siding over a Weather Resistant Barrier, over 2×8 bookshelf girts. Fill the cavity with two layers of R15 rock wool. Add R-10 EPS well-sealed on interior. This wall will now dry to the outside.

Roof (out-to-in): Through screwed steel with an Integral Condensation Control factory applied, or standing seam steel over 30# felt or synthetic ice & water shield (second preferred) over 5/8″ CDX plywood. Roof trusses with 22″ raised heels, vent eave and ridge. Blow in R-60 on top of ceiling. This eliminates the expense of heating/cooling a dead attic space.

In either instance, I would have no fears or concerns about running non-plumbing utilities within your wall insulation cavity.

Porches, Post Savers, and Airplane Hangars

This week the Pole Barn Guru answers reader questions about the “least expensive” option for porches, the performance or ground contact poles when using a “Postsaver” and discussion of options for an airplane hangar.

DEAR POLE BARN GURU: Which is least expensive: house and porches under one roof or house under one roof and porches under lean to roofs? KEVIN in SENATOBIA

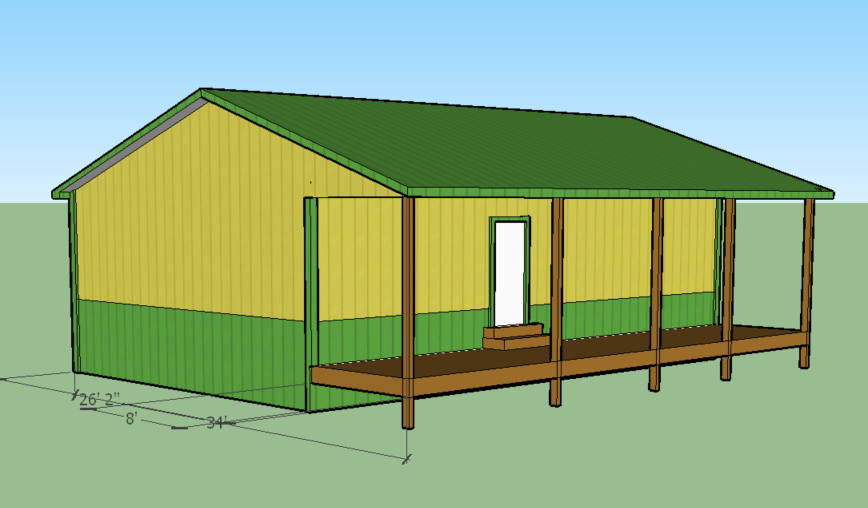
DEAR KEVIN: Obviously way too many variables to determine least expensive choice for all situations. Personally I would put house and porches under one roofline, regardless of price point. Reason number one is my line of sight out of windows would not be blocked by low porch eaves. Secondly, it eliminates a pitch break on roof. Pitch breaks take extra work and materials in order to be constructed to eliminate a leak point (read more here: https://www.hansenpolebuildings.com/2014/11/pitch-breaks/).


DEAR POLE BARN GURU: I see some products out there like Postsaver™ that use a tar lined plastic that heat shrinks to the post. Do these products help or hinder the performance and longevity of a standard ground contact pressure treated pole? BRIAN in OLYMPIA

DEAR BRIAN: In order for wood to decay it requires a food source (wood), moisture, oxygen and right temperature. Postsaver and other sleeves are designed to separate wood from surrounding earth (or concrete). Neither earth nor concrete are causing premature decay (see previously listed requirements). I have yet to see any peer reviewed studies on any of these products, as to if they actually perform as advertised. In theory, if they were absolutely sealed at top and bottom, I suppose they could eliminate sources of oxygen, hence no decay (it is why posts do not rot roughly eight or more inches below ground surface – lack of oxygen). An open ended sleeve would not prevent ground water from wicking up wood grains by capillary action (no matter how tightly sealed), however this is a non-issue if oxygen is not present.

When all is said and done, order UC-4B rated pressure preservative treated wood and it should outlast anyone alive today. If a sleeve makes you sleep better, then by all means make an investment in them.


DEAR POLE BARN GURU: I would like to build a wooden hangar for my nx carbon cub. Its wingspan is 34′ 6″ and height 8 ft and 25′ in length. I’d like to put it at the end of my private strip at ranch. it would only be used May to October because i have a modern steel hangar in Kalispell so no snow load or heat issues can any monitor style building be built without interior supports that would obstruct wings? A single slope design probably doesn’t work a say 36 or 38 foot door. I’d like to use to use four door section on rollers. What would you recommend? Happy to talk by phone, best if you text me and suggest time to discuss. WILLIAM in SEELEY LAKE

DEAR WILLIAM: Even though you are only using this hangar from May to October, snow is an issue as you probably do not want to come back in Spring and find it flattened. Your exact ground snow load (Pg) can be found from your site’s latitude and longitude at www.snowload.montana.edu/calculate. Based strictly upon Seeley Lake, Pg is roughly 80 psf (pounds per square foot).

Yes, we can use clearspan monitor trusses to eliminate any interior columns.

Four rolling (sliding doors) would entail an overall building width of 54′ in order to make a 36′ opening work. They would have to be mounted on double tracks, so are less than ideal for sealing down and over time you will grow to hate them. We’d recommend using a Schweiss or similar brand hangar door. You will be glad you did and building width on a 36′ opening could be roughly 42′.

One of our Building Designers will be reaching out to you to discuss further.

Inspecting an Existing Barndominium

Inspecting an Existing Barndominium

Reader STEPHANIE in BATES CITY writes:

“We are in the process of buying an existing barndo and will be finishing it out with additional living space. The barndo was built by the current owner, along with his dad, 13 years ago.my question comes from a discovery during inspection on Monday. The research I have done is leading me to believe this issue is not an issue but i want to make certain before we are out of inspection period. The inspector was at first concerned that the pole beams were just sunk into the ground without footers. However, the current owner, who is also the individual who built the structure, came out to answer questions for us. He said he sunk the beams into concrete about 4 feet down. Then there is about a foot or so of “treated” beam in contact with the soil. He assured us the beam was treated specifically to be in contact with the soil. I will include photos following this message. In my research I have learned there is a particular material wrap that can be put around the exposed beams so maybe this is something we can consider down the road if we feel it is better or necessary. My question for you, if you don’t mind…..does this appear to be normal/standard practice for the sunken beams/footers? Do we have any reason to be concerned?”

Mike the Pole Barn Guru says:


Most post frame buildings/barndominiums are constructed with pressure preservative treated columns embedded in ground (like what you are seeing). Provided they have been properly treated to UC-4B standards, they should outlive anyone alive on our planet today (for extended reading please see https://www.hansenpolebuildings.com/2020/09/pressure-treated-post-frame-building-poles-rot/). Polesaver sleeves™ (https://advancedpostsolutions.com/post-solutions) might also help to alleviate some of your concerns.

If this building was built to engineer sealed site specific plans, then you should feel fairly confident of its structural integrity, if not, I would recommend engaging an Registered Professional Engineer’s services to do a physical inspection to verify structural adequacy and make any recommended repairs/upgrades if needed.


Rust, Washington State, and Sleeves or Protectors

This Wednesday the Pole Barn Guru answers reader questions about potential for rust on a welded oil field pipe framed building, if Hansen has structures in the state of Washington, and if sleeves or post protectors are needed for post frame construction.

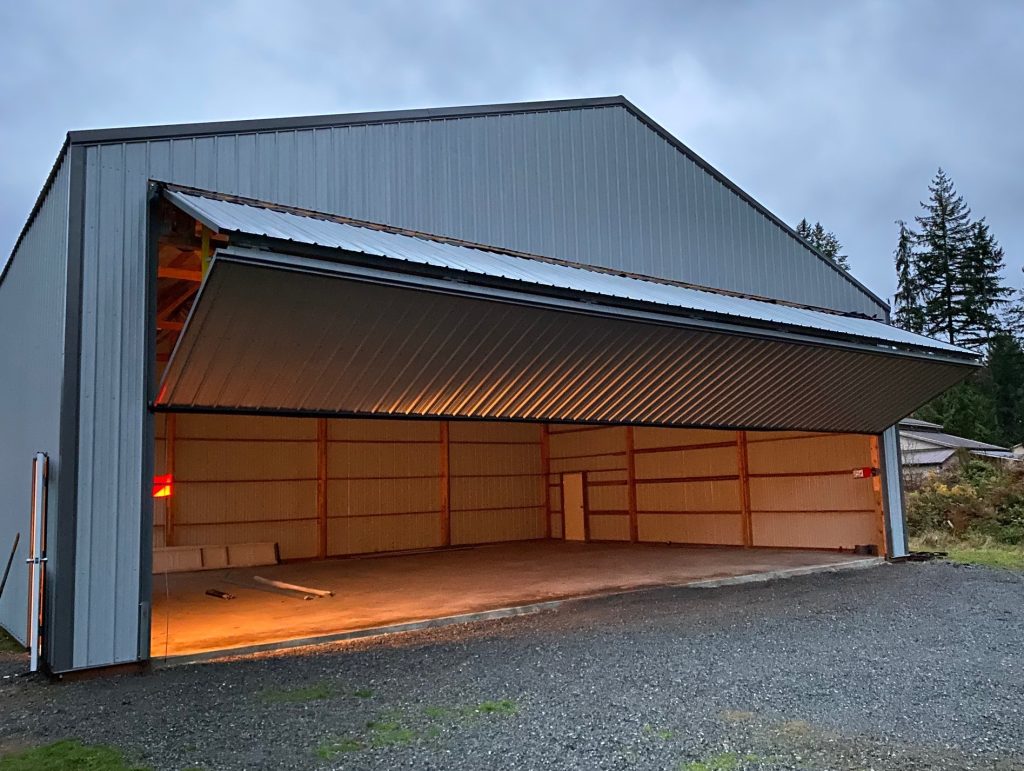
DEAR POLE BARN GURU: My barn is a welded oil field pipe frame with what we call red iron purlins, basically a metal c channel. I had concrete poured yesterday and they didn’t use any wood framing. They just used the bottom purlin as the frame. Is this going to be an issue? Thank you, sir. PJ in MADISONVILLE

DEAR PJ: I personally remain a skeptic about performance of buildings done by welding up oil field pipe. This could be a partial reason one does not find welded up oil field pipe buildings anywhere structural building permits and inspections are required. I would imagine your non-galvanized bottom girt will slowly rust away, however not much you can do about it at this point. I hope it works out better for you than I suspect it will.


DEAR POLE BARN GURU: What areas in Washington State do you service?
DANIEL in OAK HARBOR

DEAR DANIEL: Hansen Pole Buildings has many buildings in all 50 states – including Alaska and Hawaii. We have provided roughly a thousand fully engineered post frame buildings to our clients in Washington State, and I would venture to guess there are multiple buildings of ours in every county.


DEAR POLE BARN GURU: My main question is regarding the skirt board and posts. I know it’s pressure treated but what about long term exposure to ground contact? Obviously when pouring a monolith slab for a stick frame house the wooden forms are removed afterwards. And I’m thinking that just maybe even though we are blessed with a low humidity climate, the building inspector with Yavapai County (seat- Prescott, Arizona) will question such exposure and certainly may want the posts in sleeves and skirt board removed or placed at finished concrete grade for attachment purposes ( like a bottom plate with a stick house) where there’s any chance of water or earth contact. Also with the YC Building Safety Department there’s no mention of the IBC only the IRC. I would appreciate any thoughts. STEVE in CAMP VERDE

DEAR STEVE: We have provided several fully engineered post frame buildings to our clients in Yavapai County without undue challenges.

Pressure preservative columns are all rated UC-4B and skirt boards (splash planks) UC-4A. This meets with AWPA described uses: (www.awpa.com/images/standards/U1excerpt.pdf Page 4). From peer reviewed research, it would appear UC-4B treated wood columns will likely outlive your grandchildren’s grandchildren. Should you have concerns, we can provide plasti-skirts to cover splash planks (https://www.hansenpolebuildings.com/2017/08/plasti-skirt/) and Plasti-Sleeves for columns (https://www.hansenpolebuildings.com/2012/04/plasti-sleeves/).

While barndominiums would fall under IRC requirements, IRC defaults to IBC when it comes to non-prescriptive structural systems (https://www.hansenpolebuildings.com/2018/10/what-building-code-applies-to-post-frame-construction/).


UC-4B Treated Columns, A Connecting Structure, and Custom Options

This Monday the Pole Barn Guru answers reader questions about UC-4B treated columns, advice to connect a new structure to existing building, and if one can customize a monitor style building to eliminate pony wall.

DEAR POLE BARN GURU: We are considering residential post frame construction in southeast Ohio. I’m concerned about wood posts in the ground and trying to avoid permacolumns. I asked the post frame contractor I’m talking to about UC4 treated posts in the ground, specifically UC4B. His response was that building codes changed in the last couple years and all UC4 posts are now treated at the same level, there is no more UC4A/B/C distinction. In your expert opinion, is that information correct? Should I continue discussions with this contractor or walk away? RORY in CHILLICOTHE

DEAR RORY: Your proposed building contractor is talking out of his……..(not mouth) as he obviously has no clue as to what he is talking about. Building Codes dictate UC-4B pressure treating levels for lumber to be embedded in ground structurally. You can look this up yourself at: https://codes.iccsafe.org/content/IBC2021P1/chapter-18-soils-and-foundations#IBC2021P1_Ch18_Sec1807   Go to subsection 1807.3.1

American Wood Protection Association has a detailed listing relating use categories to placement – please  to upper left on Page 3 of this document for definition and where to use UC-4B treated wood. https://awpa.com/images/standards/U1excerpt.pdf


In my humble opinion, it may behoove you to deal with a supplier who can provide you with a fully engineered post frame home to meet Building Code requirements and either erect shell yourself or hire an erector to assemble it for you.


DEAR POLE BARN GURU: The picture is of my existing 30x40x10 Pole Barn.  One the back side I’m planning to build an attached a 26X40X16 barn.  The peaks of the barns will in the same direction and aligned in the center.  There is no rear overhang on the existing barn, just a piece of trim like you can seen in the picture on the front side.

My question:  how do I make the connection between the roof on the existing barn and the new wall where they attach?  I can see from some of the pictures on your website that this is somewhat common, but couldn’t find any details.  

The roof on the existing barn is shingles (not steel), will that pose any problems?

If you need more pictures or any other info let me know and I’ll get it for you.

Thank you very much. JON in WAYNE


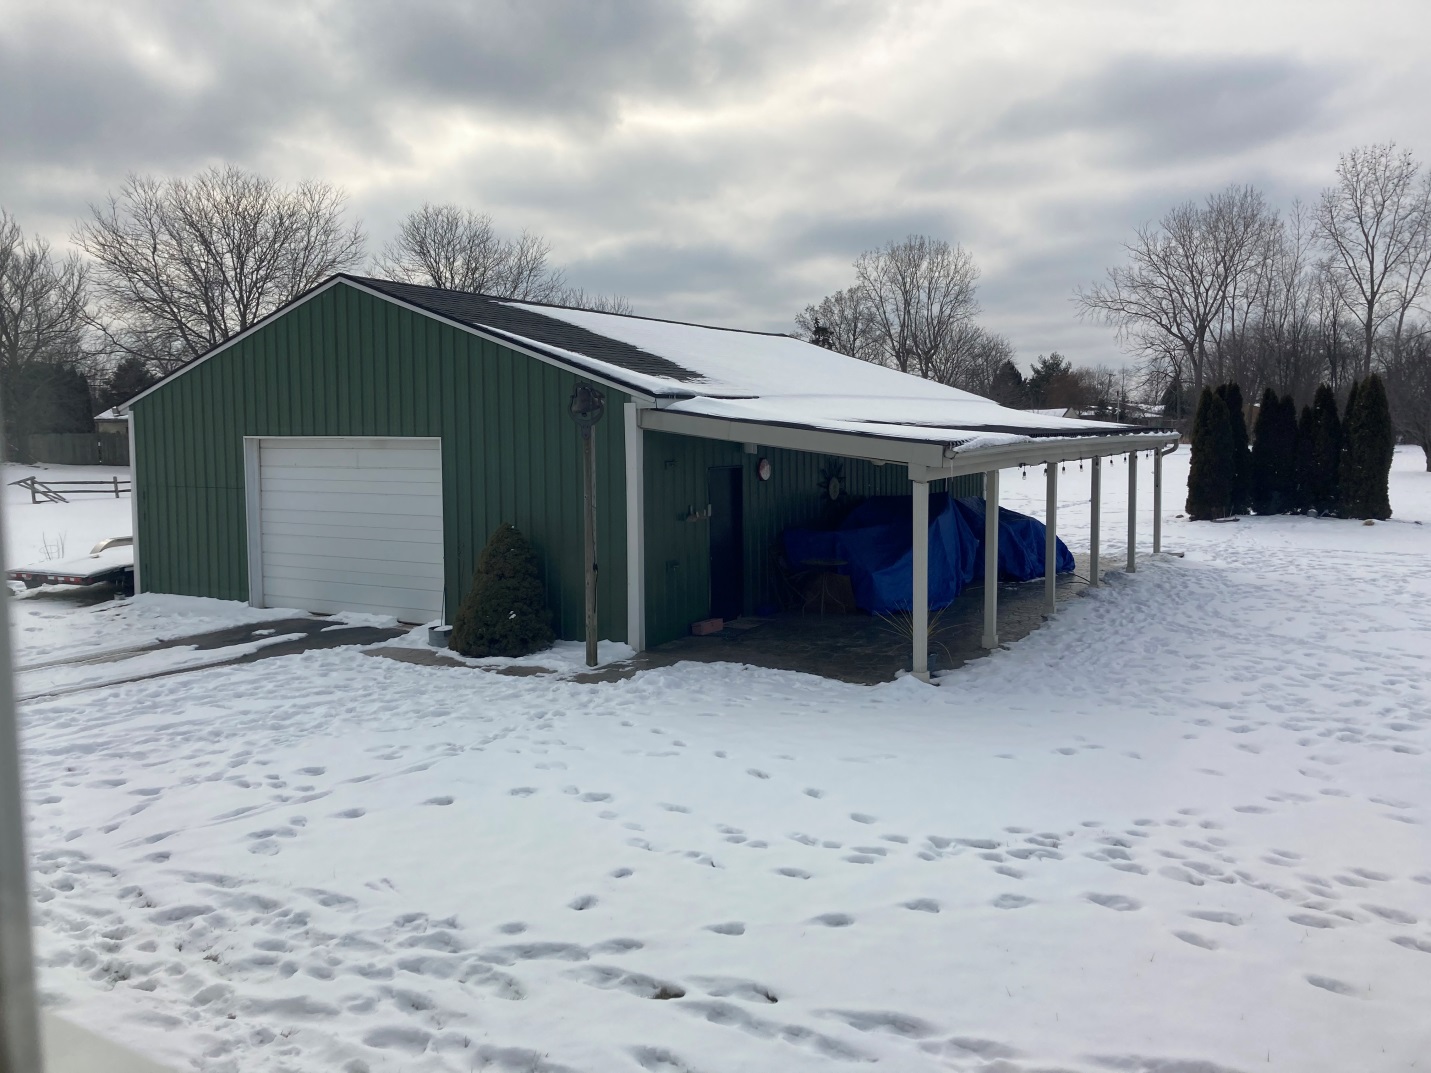
DEAR JON: Assuming new endwall columns for your addition can be placed directly against your existing endwall – framing will extend 1-1/2″ past these columns (effectively creating an overlap above your existing building). A piece of flashing known as sidewall, will go up your new endwall and lap onto your existing roof. Being as your existing roof has shingles, I would order Emseal expanding closures to use on underside of this flashing to seal against water infiltration. Sticky side of Emseal can be placed on flashing (inside of drip leg) and it will expand after installation to fill any irregularities. Wall steel is then applied to overlap this flashing.


DEAR POLE BARN GURU: Is it reasonable to design a monitor style pole barn home: 1.5 stories With the central roof lines connecting into the shed roof sides, without the traditional short wall seen on most exteriors? Will I run into trouble creating head space in the central alley of the second floor? I have looked at attic trusses and mono trusses…I had thought to get an 18′ wide, alley with pony/short walls of 4′ – 5′. But it looks like the cut off is 16′ wide with a squared off 8′ tall ceiling. I suppose I could do with the more traditional look, but I want to keep a low profile, and would rather have the ceiling follow the roof line on the interior and not have it be squared off. Is this possible with a pre-built truss system?

Thank you, I love your blog. AMY in STANWOOD

About Hansen BuildingsDEAR AMY: Thank you for your kind words. Depending upon width of side sheds, we could probably have your building engineered using rafters at attached to shed eave side columns, main columns and cantilevered over center portion. Same concept could also be done using parallel chord trusses, however they would take up more depth. In either case, you could have a vaulted ceiling to follow roof lines.


Avoid Being Driven Crazy With Barndominium Questions Part I

Avoiding Being Driven Crazy With Barndominium Questions Part I

Loyal reader and client GREG in KENTWOOD is planning his new post frame barndominium home and has questions no one else will answer. Mike’s answers are in italics.

Mike,

Good morning, I hope all is well with you.  

 I have some questions that I would like to understand and it is driving me crazy, because no one other than Hansen Pole Building, it seems will answer my questions and return my calls.  Most the crazy part is about the slab. I find cement workers are not great communicators.  I am 56, a mechanical engineer, have renovated several houses from the studs up, I can do plumbing without butt crack showing, I raced stock cars for 10 years, I tell you this, because I know how to build stuff and am not afraid of hard work. My job requires a detailed list of Bill of Materials, precision drills and reamers and very detailed processes to make fuel injection parts, ABS brake parts and other.  I hope you can help out, as I am ignorant about some simple facts that are driving me crazy.

Mike: We believe good communication is essential to successful completion of most any building. You will find we strive towards written communications in order to minimize (or eliminate) possible miscommunication of important facts and details).

I also would like to say Brenner is doing a fine job.

Mike: Brenner has a passion for post frame buildings and he is not at all afraid to reach out to higher authorities for answers to complex structural questions.

Due to your great level of communication, you so far are my #1 choice to partner with on my new house.  I also would be willing to visit you in MN if you have/think I could see examples of my questions first hand.  

Statements from details I learned at Code Meeting:

  • In Michigan, in my county I need to have a 2’ foam, below grade, with R10 barrier, around the full foundation or slab perimeter. 
  • So my building code staff recommends a Rat Wall 2’ below grade, or a crawl space with footers, or a slab with a wooden wall built to hold the 2’ foam below grade.
  • I don’t really have a problem with the Rat Wall, but it certainly will add more cost to cement.

My questions on this topic are:

    • If using a Rat Wall, it seems like the 6” * 6” poles will then be encapsulated in cement for about 2.5’ at minimum.  I thought the poles were not supposed to be in cement as it causes probably more decay than dirt.
      Mike: Concrete does not cause premature decay of properly pressure
      preservative treated columns.
    • What are your thoughts?
      Mike:
      Personally I would build over a crawl space because my knees are far happier living on wood than concrete.
    • What would you recommend for the 2’ below grade issue regarding the slab foundation?  Mike: With a slab on grade, you can use rigid perimeter insulation without a need for a ‘rat wall’ or wood foundation wall. It can be held in place by backfill on each side. It can be placed running from below base trim on exterior of splash plank, or on inside of splash plank. If on inside of splash plank, it eliminates having to protect it from possible UV degradation.

On attachment pictures in the middle pages show where the 6” X 6” poles go and spacing, listed are my questions:

I am concerned with spacing of 12’ and 14’ of the 6” X 6” posts.  (I’m sure the loading is OK, within code, but see below)
Mike:
Actually with your 21 foot eave height and Exposure C for wind 6×6 columns will not engineer out. Your building will have glulaminated columns manufactured out of high strength 2×6 or 2×8 depending upon location.

    • One concern is getting wood in today’s supply chain that are straight enough for the girt boards and purlins at 12’ and 14’, should I be concerned? ( I can’t get straight 2” X 4” at 8’ for the walls I have built in last year alone.) Mike: Lumber is obviously organic and we can no longer cut down those old growth trees where one might be able to get straight grained, narrow growth ringed lumber with few or no defects and very little warp, twist or cup. One beauty of steel roofing and siding is it hides a plethora of framing imperfections (like warp), due to high ribs of steel siding.

When using double trusses, at all locations, why not just go to 8’ centers on the poles?   I know it is more 6” X 6” poles, but really is not anymore trusses and may help get straighter girt and purlin boards. 
Mike: Wider spaced columns allow for more flexibility in location of doors and windows and an added advantage of not having to dig as many holes. If you were thinking of using a single truss every eight feet, rather than a double truss every 12, I would discourage it. Double trusses allow for true load sharing and eliminate any possibility of a single truss having a weak point, where under extreme loads (beyond design loads) it may fail and bring down your entire roof.

Come back tomorrow for Part II in Barndominium Questions!

Post Frame Shouse Column Options

Post Frame Shouse Column Options – Risk vs. Reward

Loyal readers will recall a recent post involving GREG in KENTWOOD (https://www.hansenpolebuildings.com/2020/09/dont-want-pressure-treated-columns-in-the-ground/).

Our discussion continues and I share below:

“Mike,

Thanks for the quick response.   

If I was a sane man, not sure I am, if properly pressure treated lumber will last a few generations, why would I not go with that?   


  • The time to DIY yourself wet set brackets could add a few weeks to the projects. ( I probably have the time.)
  • Using a Perms Precast Columns which are $152 each will be costly with probably needing 50 to 60 posts. (Adds about $10k to project)
  • I might be able to be talked into using pressure treated poles. 
  • Does the plastic help or does it add more risk of trapping moisture or other?
  • I will cost out each method, on a little “nerd chart” to determine what risk and reward I can accept.

Do you think your source for the pressure treated poles is better and more consistent than say a Menards or other source a non-builder would get supplies?

For a (2) story would you use laminated posts or solid?

Would you use only treated on the first 8’ to prevent shrinkage and warping at a (2) story height?

This will hopefully be all my questions prior to submitting a plan. 

Thanks Mike!”

Greg is probably going to be very satisfied with his end result – he is reading, asking questions and learning. Hours spent in preparation can save tens of thousands of dollars later.

I live in a million dollar shouse (shop/house) with roughly 8000 square feet finished. It has glu-laminated columns with pressure treated bases, embedded in the ground. I could easily have chosen any alternative solution, as cost was not a deciding factor.

Wet set brackets are probably only marginally more time consuming, however to minimize concrete needed for piers, you will (or should) be using insulated forms. When all is said and done plan upon roughly $100 per column for budget.

Precast columns have not just column investment, they are also heavy to handle onsite and do require a concrete footing or bottom collar to prevent settling.

Plastic sleeves might be effective, however I felt they were redundant given modern pressure treating technologies.

In most cases, it is impossible to walk into a lumberyard or big box store and get UC-4B treated lumber, it most usually has to be special ordered in. Our providers know, in advance, of this being our expectation (not to mention minimum requirement by Building Codes).

I would go with true glu-laminated columns (I did on my own building). They will be lighter, straighter and stronger than solid sawn columns and not have challenges as do nailed up columns. Lower portions are typically treated so laminations are a minimum of six feet of treatment (usually a 6′, 8′ and 10′ member are bottom treated segments). Pressure treating does not prevent shrinkage or warping – shrinkage is limited due to this lumber being kiln dried after treating in order to get moisture content low enough for proper glue adhesion. Warping is a by-product of laminations being oriented so lumber grain is all one direction and is a rare occurrence with glulams.

Ask as many questions as you need to feel confident in your decisions.

Mike the Pole Barn Guru

Don’t Want Pressure Treated Columns in the Ground?

Loyal reader GREG in KENTWOOD writes:

“We plan to build a house next summer with basically (2) – 40’x60’ units connected at 90°, wife is still in the planning stage, 2 story.  I feel that me and my sons should be able to erect a kit with directions from the supplier and tips.   I like your website and the pole barn guru – FYI.

Here is my first question(s):

Since this project will be a house, on a slab in Michigan, which will require 48” depth of some sort of pole / wall / perma-column / piers like CRS system / Cedar post / other.

I really can’t put a treated pole in a hole and expect it to last 100 years, even with a plastic cover.  But I do not want to break my “bank” going overkill.

I also kind of like the idea of laminated posts above ground, which could be untreated if some method was used to get posts above the ground, which would also allow them to be shorter and reduce cost.

Might even like the idea of pouring cement at the base of each pole hole for better support then use a perma-column, instead of a cookie.  (Wish they did not cost so much, alternative?

With my concerns, what method would you suggest to use for the poles?

My wife should be done with the exterior plan in a week or so then I will send it to you for a quote. 

Thanks

How do I create a client account?”

Thank you for your interest in a new Hansen Pole Building as well as your kind words. We have assisted thousands of clients just like you to erect their own beautiful buildings – basically anyone who is physically able and can read directions in English can become a success story.

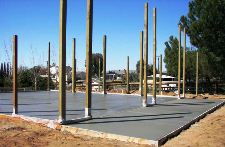
While properly pressure preservative treated lumber will last for generations embedded in ground (even without any sort of plastic sleeves), we recognize there are those, just like you, who feel far more confident with columns above ground. With this in mind, your least expensive and easiest to construct design solution will be poured concrete piers with wet set brackets embedded into them to attach your building’s columns.

With this option, we do account for your columns being shorter in length. We do recommend use of true glu-laminated columns in markets where they are logistically available as they are stronger and straighter than similarly sized solid sawn columns.

Poured concrete foundation walls with footings (and wet set brackets in the top of the wall) will be a budget buster. Nine years ago the cost of a single 40’ x 60’ foundation for a two foot frost depth was roughly $12,000 (https://www.hansenpolebuildings.com/2011/10/buildings-why-not-stick-frame-construction/).

Permacolumns (besides just their cost) can prove to be unwieldy (https://www.hansenpolebuildings.com/2018/04/perma-column-price-advantage/). They also would require a poured concrete footing beneath in order to adequately distribute roof and second floor loads plus building dead weight to supporting soils. Concrete cookies will rarely be adequate for even minimally sized buildings and loads.

Depending upon species of cedar, soil moisture conditions and amount of freeze and thaw cycles, it may last 15 to 30 years – so probably not a viable alternative.

A Hansen Pole Buildings’ Designer will be reaching out to assist you further.

Pressure Treated Post Frame Building Poles Rot

Presenting actual factual evidence, from a peer reviewed and published study seems to have little bearing upon reality in today’s social media influenced world.

Instead, people tend to rely heavily upon those with a vested (financial) interest in promotion of something other than actual and factual truth. Those invested interests vary from those selling alternatives to properly pressure preservative treated lumber (various lumber protection products, precast concrete piers, brackets, etc.) to competing building structural systems (PEMBs, weld ups, etc.).

In reality, I know a couple people in either lumber or post frame building industries. Having spent my entire adult life in these tends to add to those I know. I have yet to meet anyone, who can prove to me they have actually experienced a properly pressure preservative treated wood building column rot.

Zero.

Of course there are always those who have stories such as, “My Uncle’s cousin says he knows of somebody, who knew somebody who had all of their pole barn poles rot off”. Could be – and those poles were most probably inadequately treated (or maybe not at all).

In order to put this matter to rest and ease my already untroubled mind, I utilized Google to do some research.

Well, it turns out four fine people named Stan Lebow, Bessie Woodward, Grant Kirker and Patricia Lebow got their collective thinking caps together and authored an article entitled “Long-Term Durability of Pressure-Treated Wood in a Severe Test Site”. Said article was published in Advances in Civil Engineering Materials, Vol. 2 No. 1, 2013 on pages 178-188 (for those of you who want to read it in its full and unabridged glory: https://www.fpl.fs.fed.us/documnts/pdf2013/fpl_2013_lebow001.pdf).

Our team of authors was motivated, as stated in this article’s introduction, by this:
“Pressure-treated wood has been widely used as a durable construction material in the United States for over a century. However, despite its long history of use, there are relatively few reports on the long-term decay and insect resistance of pressure-treated wood”.

Now, as it so happens, USDAFS (U.S. Department of Agriculture Forest Service) has a test site located near Saucier, Mississippi.

You ever been to Saucier, Mississippi?

This plot has a relatively high annual rainfall (67 inches average) and warm temperatures (average high temperatures are 80 degrees F. or more from May until November) creating a harsh decay environment. Eastern subterranean termites are active at this site. Bugs, heat, water – you have it all! This location is within American Wood Protection Association (AWPA) Deterioration Zone 5, Severe Hazard – there is no greater severe hazard classification.

As a control, some untreated posts were placed and all failed in less than three years!

Current Building Code standard for pressure-preservative treated lumber for structural use is UC-4B (read one of my better articles of all time regarding pressure-preservative treating here: https://www.hansenpolebuildings.com/2012/10/pressure-treated-posts-2/). UC-4B requires a chemical retention for many water borne treatments such as ACZA, CCA-B and CCA-C of 0.60 lb/ft^3 (pounds of chemical per cubic foot of lumber). With retention levels LESS than this current UC-4B requirement, there have been ZERO failures in these chemically treated woods in tests of well over 60 years!

When will those properly pressure preservative treated timbers rot?

Impossible – no, however probably not within your grandchildren’s grandchildren’s lifespans.

And there you have it, research and all.

What Is Keeping Posts Above Ground Worth?

What is Something Worth?

I can be overly anal. Sometimes I have to really work hard to get around it – I purposefully have conundrums on my desk and for some perverse reason I feel comfortable in them. 

I inherited my maternal grandmother’s counting gene. Even into her nineties, if I called her up and asked what she had been doing, she could tell me she picked 384 strawberries. Passing trains are my worst – if I see it right in front of me I have to work to not count cars.

Back on track – traditionally post frame buildings have been pressure preservative treated columns, embedded in augured holes.  Pretty low tech – as most people have available technology to dig a hole.

I will share a recent Facebook exchange, regarding a drawing posted by a potential barndominium owner:

MK:  “Looks great if its stick built on a poured stem wall.”

Me: “Looks like it would be a challenge to stick build. Those poured stem walls also add significantly to costs.”

Here is an article I had authored on foundation costs: https://www.hansenpolebuildings.com/2011/10/buildings-why-not-stick-frame-construction/

MK: “I imagine $20k extra. But you more than doubled the lifespan of a “AG building” with a wood foundation, which average is 60 years depending on soil. Usually less.”

Me: “Your $20k is probably pretty close. Properly pressure preservative treated columns will last far longer than any of us will be around to witness. https://www.hansenpolebuildings.com/2017/12/will-poles-rot-off/

MK: “I’ve personally seen rotted pressure treated wood. For AG buildings, use perma columns. You won’t catch me building my dream home on a wood foundation. That would fall under the same term as “throw away society”, and what about our children who inherit a house that’s rotting? I understand these shomes are driven by demand, but please inform people about the differences between a AG building and a house.”

Me: “I have seen it also and every single case I have seen documented the pressure treating was unrealistically low what its intended use should have been.

The treating standards in the past were much more lax than today. 30 years ago you could treat wood to “.60 or REFUSAL” with CCA. Lots of really not treatable wood was ‘treated’ – I personally know people who did it. A past employer of mine used to send 6×6 DouglasFir to be CCA treated. DougFir will not take a waterborne treatment except with heat and different chemicals.


Hansen Buildings only uses properly treated lumber to UC4B. UC4A doesn’t cut it. After over 30 years and 20,000 buildings I have yet to see a member treated to UC4B rot.

I could live in any type of building anywhere in the world I choose. Even though our weather can be brutal, rural Northeast South Dakota has its own charm. We live in a million dollar post frame building by choice and we love it. How much do I believe in our product? Good enough to live in it every day.

If you become a reader of my blog articles, you will find me referring people to Professional Engineers and promoting the use of plans from a Registered Design Professional. A great post frame engineer will design a stronger building, with few(er) materials. It actually costs less to do the job right.

Permacolumns are expensive and difficult to handle – in my humble opinion. It is more economical to pour a pier with a wet set bracket and far easier. If the bottom of the column is an inch above the top of the slab, the columns do not have to be pressure preservative treated even.”

For information on Permacolumns: https://www.hansenpolebuildings.com/2018/04/perma-column-price-advantage/

All of this got me thinking and thinking hard. For four decades I have been standing upon a soap box extolling longevity of properly pressure treated wood embedded in ground. Perhaps I have been making this issue more difficult than it had to be.

In this video: https://www.youtube.com/watch?v=fVwUl4cm8fQ Kyle from Rural Renovators demonstrates how to pour piers and place wet set brackets: https://www.hansenpolebuildings.com/2019/05/sturdi-wall-plus-concrete-brackets/.

I conducted an informal and not overly scientific poll on Facebook:

“Traditionally post frame (pole barn) buildings have been designed with pressure preservative treated columns embedded in holes. Research proves properly pressure preservative treated columns, in ground, should last a lifetime without decay. There are at least two very popular post frame building companies who use only columns above ground, in brackets. We are investigating if there are enough perceived benefits to justify an added investment.

Along with this we would consider going to all high strength glu-laminated columns. These would be stronger than any other regularly utilized post frame columns in the industry. They are also very straight and lighter weight.

Per column, what range do you think is reasonable?”

Out of 22 respondents, exactly 50% felt an added investment of over $100 per column would be reasonable.

The good news is – we can make this happen for about half of this!

Post Frame Construction On Clay Soils

Many years ago, when I first went to work at Lucas Plywood and Lumber in Salem, Oregon I was given a quick tour of some areas where new construction was prevalent. Having moved from sandy/gravel soils of Eastern Washington, I was totally unprepared for bright red clay soils in this Willamette Valley region. When wet walking across these soils would add huge and heavy red clay mud balls to work boots.

Post frame (pole) building construction, or indeed any type of building, can become problematic when dealing with clay soil.

Reader JEFF in GAMBIER writes:

“I have a high water table, a 24 in diameter 5 foot deep augured post hole in clay soil will fill up in 3-4 days with water. Will a CCA treated 0.60 retention 3 ply glu-laminated post survive in these conditions or is this a good place for the concrete “perma-columns”.”

Mike the Pole Barn Guru says: Let’s take a step back – to site preparation:

At a minimum, site preparation includes:
· Remove all sod and vegetation.
· For ideal site preparation, remove topsoil and stockpile for later use in finish grading. In frost prone areas, remove any clays or silty soil
from within future building “footprint”.
· Replace subsoil removed from around building with granulated fill to help drain subsurface water from building.
· Distribute all fill, large debris free (no pit run), uniformly around site in layers no deeper than six inches.
· Compact each layer to a minimum 95% of a Modified Proctor Density before next layer is added. Usually, adequate compaction takes more than driving over the fill with a dump truck, or
earth moving equipment.

Why would clay be an issue to build upon? Clay expands and contracts depending upon amount of moisture present. When wet – clay expands, when dry it shrinks. These movements will cause buildings to move as well – not a good thing.

You might also add a french drain beyond the building perimeter, in order to direct water away from your site. Make sure to slope the ground away from your new building, no less than a 5% slope. Downspouts should discharge water at least five feet away from building.

Whether your site is adequately prepared or not, properly pressure preservative treated columns should provide more than a lifetime of use. Your real question to be answered is if you want your building to be stable and straight, or if you are willing to accept it moving up and down, in and out (and perhaps randomly) with time.

Starting from the Ground Up- UC-4B Treated Columns

Starting From the Ground Up- UC-4B Treated Columns

Decades ago, when I began training a sales staff for Momb Steel Buildings (my 1990’s post frame construction company) I developed an outline we called, “From the Ground Up”. Just as implied by its name, this training went through features and benefits of a typical post frame building, starting with ground line and working upwards.

In this and subsequent articles, features and benefits will be described relevant to a typical Hansen Pole Building kit package with double trusses placed upon widely (most commonly every 12 feet) spaced columns.

FEATURE: Structural building columns pressure preservative treated for in-ground use.

BENEFIT: Pressure preservative treated to a UC-4B rating, these columns are warranted against decay for as long as you are building owner!

WARRANTY INFORMATION HERE: https://www.hansenpolebuildings.com/pole-building-warranty/ and https://www.hansenpolebuildings.com/images/warrantylarge.gif

EXTENDED READING ABOUT THIS SUBJECT: https://www.hansenpolebuildings.com/2017/12/will-poles-rot-off/ and https://www.hansenpolebuildings.com/2012/10/pressure-treated-posts-2/.

WHAT OTHERS DO: Hansen Pole Buildings provides post frame building kit packages in all 50 states, so we know how difficult obtaining properly pressure preservative treated columns can be. Many local lumberyards and even big box lumber dealers inventory pressure treated columns rated for “Ground Contact” rated only to a UC-4A level of chemical retention. They can’t be used structurally in-ground according to Building Codes!

Speaking with these providers and being told ‘everyone’ in their area uses UC-4A rated columns for post frame buildings adds to frustration levels!

WHAT WE DID IN 1980: Lucas Plywood and Lumber was providing ungraded 6×6 columns pressure preservative treated to .60 pcf (pounds per cubic foot) or refusal with CCA. The catch in this was “or refusal” meant there was a lot of CCA untreatable lumber (primarily Douglas Fir) was being sent to treatment plants. Being unable to take a CCA treatment and was, for practical purposes, merely painting lumber green with chemicals!

An excellent article written by Sharon Thatcher editor of Rural Builder magazine about Pressure Treatment Beyond CCA can be viewed here: https://www.hansenpolebuildings.com/2016/01/pressure-treatment-beyond-cca/.


What is the Correct Overhang Distance?

Welcome to Ask the Pole Barn Guru – where you can ask questions about building topics, with answers posted on Mondays.  With many questions to answer, please be patient to watch for yours to come up on a future Monday segment.  If you want a quick answer, please be sure to answer with a “reply-able” email address.

Email all questions to: PoleBarnGuru@HansenPoleBuildings.com

DEAR POLE BARN GURU: I am still building my pole barn. I have recently finished the roof metal and ridge cap. While looking at the construction manual for installing the soffit and roof trims I noticed a conflict of information.

On page 119 figure 16-4 shows an overhang of 2 1/4” to 2 1/2”

On page 365 figure 55-20 shows an overhang of 1 1/2” to 1 3/4”

Which is the correct overhang distance? AARON IN VIRGINIA

DEAR AARON: Actually BOTH of them are correct, and here is why. On Page 119, the overhang is from the outside edge of the eave girt BEFORE the steel siding is applied (no sidewall eave overhang situation). The steel siding is 3/4″ thick, which leaves 1-1/2″ to 1-3/4″ of overhang past the siding after it is installed. On Page 365, the overhang is beyond a fascia board (buildings with eave overhangs). The net resultant of each is the same and perfect for gutters, if they are installed.

Mike the Pole Barn Guru

DEAR POLE BARN GURU: Hi, We purchased a Pole Barn kit from you several years ago.  When installing the roof my husband (the non-builder man) would miss the wood that he was supposed to screw the roofing screw into.  With that said we have screw holes in the roof which are really leaking.   We really need to try to plug the screw holes somehow!

What would you suggest to use to plug the holes in my metal blue roof? SHIRL

DEAR SHIRL: There is a good chance this is easier solved than imagined.

Step #1 Clearly identify where the leaks are – puddles on the floor are a good clue, as are “shiners” (screws which have obviously missed a purlin).

In most cases the “misses” will be several screws along a particular roof purlin where the purlin bowed up towards the ridge or down towards the eave past the pre-drilled holes in the roof steel. If this is the case, one person needs to carefully get up on the roof and utilizing adequate safety precautions, remove the screws from that particular purlin. From the inside, another person needs to push the purlin uphill or downhill far enough so as the screws will now hit it.

In the case of just a random miss – remove the screw, have one person hold a block of wood securely beneath the hole and run the screw back through the hole.

Screws which were not driven in straight or with the EPDM washers adequately compressed can also be a source of leaks, which can be remedied by removing reinstalling the offending screws.

In no case should caulking or other sealants be applied to a screw hole, as they will not afford a permanent fix.

Mike the Pole Barn Guru

DEAR POLE BARN GURU: Howdy,

Noticed a magazine report on treated poles and questioned our treater on their .23 treatment vs. the .60 you mentioned and they said it is equivalent, the only difference is the chemical used. Curious on your take, and if you feel these are ok to go in the ground?

JOEL from MIDLAKES METAL SALES

DEAL JOEL: As best I can tell from the data presented, any of the treatment combinations which meet the UC-4B treating requirements should be totally adequate for structural in ground use (burying them in the ground).

For more reading on MCA pressure preservative treating: https://www.hansenpolebuildings.com/2013/08/mca-micronized-copper-technology/

Here is an article I wrote for Rural Builder magazine on pressure treating, as well: https://www.hansenpolebuildings.com/2014/05/building-code-3/

Mike the Pole Barn Guru

Wood Rot and Bugs in South Carolina

Hansen Pole Buildings’ Designer Dave Gross sent me this note recently: I have a client questioning steel versus wood. I have gone through the blogs and discussed the pros and cons with client. Her main comeback is wood rot and bugs in South Carolina.

She is a sharp cookie. 30 year business owner. Just built her 4500 SF house and was the GC on it.  She is direct and wants the truth.”

Dave was certainly right in sharing some of my articles with his client. Among these would be why wood decays to begin with: https://www.hansenpolebuildings.com/blog/2011/07/how-untreated-wood-decays/ and what the Code requirements are for pressure preservative treated wood: https://www.hansenpolebuildings.com/blog/2012/10/pressure-treated-posts-2/

One of the questions I posed of Dave was, did your client happen to build her house out of all pressure preservative treated wood? Of course the answer was “no”.

Wood is an inherently durable material which is resistant to most biological attack provided it remains dry. However prolonged wetting leads to a risk of decay by wood rotting fungi. Various insects also use wood as a food source.

“Dry Rot” is a term most often used to describe a particular kind of dry, cracking, rotting wood. However, dry rot occurs because of a variety of brown rot species, most notably the “true” dry rot fungus known as Serpula lacrymans. It originally got its name from the thought that it did not need water to survive and used a fermentation process to survive. Research has long since been proven untrue, and it is now called, more appropriately, “brown rot“, although the old name hangs on. Dry rot needs much less moisture than other types of wood rotting fungi–a wood moisture content of at least 28-30% — to survive.

Treated Wood StampThe solution to wood rot problems is to prevent it from ever starting – the use of properly pressure preservative treated lumber in critical areas can reduce or altogether eliminate the potential for insect and fungal decay.

And yes, Hansen Buildings uses lumber which is treated to UC4B standards for all structural in ground use.

Read more about this here:

https://www.hansenpolebuildings.com/blog/2012/10/pressure-treated-posts-2/


Pressure Treated Lumber

Preserving Wood Columns Beyond Code Requirements

The Building Codes (IBC – International Building Code and IRC – International Residential Code) specify minimum requirements for pressure treated lumber used to structurally support buildings.

My previous dissertations on pressure treating are available for your reading pleasure here: https://www.hansenpolebuildings.com/blog/2012/10/pressure-treated-posts-2/ and https://www.hansenpolebuildings.com/blog/2014/05/building-code-3/

Pressure Treated PostsHansen Pole Buildings Designer Kelly brought to me the question (posed by one of his clients) about the available (and feasibility) of the utilization of greater levels of preservative treatment chemicals for wooden columns embedded in the ground.

Higher levels of pressure preservative treating are available for pressure treated lumber. However they are going to be done by special order at the pressure treating plant. Special orders come with “special” (read – higher, sometimes MUCH higher) pricing, as well as extended periods for delivery of product.

The reality is, if the Code requirements will last the useable lifespan of the building or more, an increase in the treating levels is probably not the best investment of a building owner’s hard earned funds.

If one is skeptical (or even unbelieving) about the ability of properly treated pressure preservative columns to last when embedded in the ground, there are some alternatives.

Plasti-sleeves® https://www.hansenpolebuildings.com/blog/2012/04/plasti-sleeves/ or Post Protectors™ can be placed over the in-ground portion of pressure preservative treated columns to isolate the wood from contact with the surrounding soils.

Carrying the argument even further, columns can be removed from ground contact completely! Engineered brackets are available which allow columns to be mounted to foundations, or even concrete piers which are poured into the ground: https://www.hansenpolebuildings.com/blog/2012/09/concrete-brackets-2/.

Also available, are patented pre-cast concrete short columns with brackets on top, which can be placed into previously augured holes and the wood columns are then attached to the brackets.

The end game is, there is a design solution available to fit every future building owner’s level of comfort and pocket book when it comes to pressure treated lumber.