Insulation Options for an Idaho Mountain Post Frame Barndominium
Loyal reader LORISTON in NAMPA writes:
“We are in the initial phase of preparing for our residential post frame home and are excited to partner with Hansen Buildings when ready. Thank you for all the amazing information and supporting your clients. Question: I am targeting a highly efficient design, with >r-40 walls and >r-60 roof. There is a lot that I do not know and humble to learn from others. My mechanical engineering background helps. I would like your advice on a wall and roof design that meets my targeted R-values incorporating (from outside to inside) metal siding, >3/4″ rain screen, rock wool >2″ external insulation, Zip insulated r sheathing for WRB and thermal break/R-value increase, laminated Timber Tech glulam columns with bookshelf / commercial girts, closed cell spray foam internal insulation around 3″ thickness, fill remaining thickness from spray foam to inside edge column with insulation (recommendation would be helpful on type of insulation), internal insulation on inside of wall for thermal break if needed or helps, with final residential area having 5/8″ sheetrock and shop area having metal inside finish. We have not solved how to create a space for utilities on the outside wall as we would prefer to run them on inside of columns or thermal break insulation. We are contemplating internal framed 2×4 walls spaced away from post frame wall to create a space for utilities. No water will be run on external walls, only power, low voltage, gas, telephone as reference. Suggestion on how to run utilities with this highly efficient wall design would be appreciated. Roof is similar to wall, just horizontal with >r-60 performance, as we are targeting a conditioned attic space. Roof exception may be a second zip sheathing layer over the insulation (under rain screen/standing seam metal) but to be determined. Climate Zone 6 region in the Idaho mountains for reference. Post frame columns and wall will be on a full foundation wall with thickness based on wall design. Performance is priority over cost, targeting an air tight and efficient living space. Your experience and practical approach are greatly appreciated. Best regards and thank you.”
Mike the Pole Barn Guru writes:
Thank you for your very kind words, they are greatly appreciated.
Rather than add an expensive and structurally unnecessary concrete foundation wall, I would recommend embedded properly pressure preservative treated wall columns (as my first choice), columns above grade set into wet set brackets on concrete piers as my second. Either of these can be insulated using R-10 EPS (Extruded Polystyrene) insulation boards. I would run them on the inside of the splash plank, with the top even with the top of the slab, extending down two feet, then outward horizontally two feet.
In Climate Zone 6, I normally would not look towards spray foam as my go to choice, however conditioning your attic and your desire for air tightness come into play, so here goes:
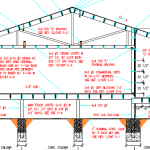
Walls (out-to-in): Steel siding over 2×8 bookshelf girts; 4″ of closed cell spray foam applied directly to inside of wall steel and balance of cavity with either open cell spray foam or rock wool (rock wool being my preference). No internal vapor barrier or continuous interior insulation boards as we want walls to dry to interior, without trapping moisture in the wall cavity.
Roof (out-to-in): Standing seam steel over 30# felt or synthetic ice & water shield (second preferred) over 5/8″ CDX plywood. Zip sheeting is OSB and screws just do not hold well into OSB. We can specify 2×12 roof purlins in order to get a deep cavity for insulation. Closed cell spray foam 5-3/4″ (R-40) plus R23 rock wool (5-1/2″).
This combination will require mechanical removal of humidity.
My normal recommendations would be:
Walls (out-to-in): Steel siding over a Weather Resistant Barrier, over 2×8 bookshelf girts. Fill the cavity with two layers of R15 rock wool. Add R-10 EPS well-sealed on interior. This wall will now dry to the outside.
Roof (out-to-in): Through screwed steel with an Integral Condensation Control factory applied, or standing seam steel over 30# felt or synthetic ice & water shield (second preferred) over 5/8″ CDX plywood. Roof trusses with 22″ raised heels, vent eave and ridge. Blow in R-60 on top of ceiling. This eliminates the expense of heating/cooling a dead attic space.
In either instance, I would have no fears or concerns about running non-plumbing utilities within your wall insulation cavity.
 We have provided numerous post frame homes over crawl spaces. Almost universally, no excavation has been done other than to level the site. With a raised wood floor, you can either leave crawl space unconditioned and insulate between floor joists, or condition space and insulate the perimeter wall below floor.


