This week’s Ask The Guru addresses reader questions about the cause and possible solution to excessive dripping, the dimensions of an RV garage Hansen designed, and advice regarding putting a vapor barrier bubble blanket on the underside of the purlins before blowing insulation in attic.
DEAR POLE BARN GURU: I live in Pennsylvania – we just had our barn roof replaced with drip stop at the suggested of a local builder. Finished in October, 2024, November comes with cold mornings and warm days and now we have excessive dripping in our barn. We have a 140-80 long indoor attached to horse barn – dripping especially bad along the edge where the two barns meet. There is no installation guide for this material that I can find, although I see some places talk about using a heat gun to treat lap edge. I know ventilation plays a role, although no issues prior to this install. Looking of insight how what to do to fix this problem. Would love to talk with you on the phone to discuss further and pay you for your time to discuss particulars. Thanks in advance. ROBIN in RUFFS DALE
 DEAR ROBIN: In order for Dripstop to work effectively takes an excellent ventilation system – one with both adequate intake and exhaust vents. Outside of ensuring ventilation is doing its job, is reducing possible sources of moisture. Obviously your horses contribute greatly to adding moisture to the air, so not much you can do about them as a source. You do need to make sure your area at least 10 feet wide around your building is sloped away at least 5%. Downspots from gutters need to discharge at least 10 feet away from building. If these measures are ineffective, you may want to contact Dripstop directly at 1.937.660.6646.
DEAR POLE BARN GURU: Do you have the dimensions for the RV Door, gross dimensions of the building? Tried to attach photo. Custom RV & Motorhome Pole Barn (Hansen). Thank you JOHN in WEST LAFAYETTE
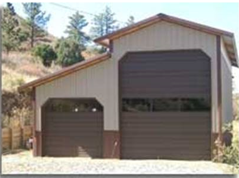
DEAR JOHN: The footprint is 28′ x 42′ with a 12′ x 14′ overhead door on the taller 16′ section and a 9′ wide door on the attached side shed. As every building we provide is 100% custom designed to best meet wants and needs of our clients, we can adapt those dimensions to whatever is needed for your particular combination.
DEAR POLE BARN GURU: This building is a shop and will be heated probably only when I am in it working. Should I put a vapor barrier bubble blanket on the underside of the purlins before blowing insulation in attic. RUSS in DEVILS LAKE
 DEAR RUSS: Assuming your building is already up, if you have no means of controlling condensation on underside of your roof steel, you should be doing something. In order to be effective, whatever is used must be totally sealed, else you risk creating problems between roof steel and any barrier if moisture passes through and gets trapped. Your best bet – two inches of closed cell spray foam directly applied to underside of roof steel. Make sure dead attic space is properly ventilated.
 1) Why would you want to use your own posts, when we have available and affordable stronger glulaminated columns than anywhere else in America?
  DEAR POLE BARN GURU: I am getting ready to pour a concrete slab in my 24’x30′ pole barn. I calculated the thermal contraction along the 30′ length to be just over 1/8″. Would it be a good idea to install a foam sill sealer type material onto the inside of the grade boards to accommodate any thermal movement of the slab? DAVID in WESTFIELD
 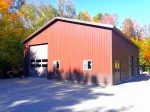 DEAR POLE BARN GURU: O great pole barn genius, what would I want to store an RV, also be at least a 2 car garage, and workshop, with a couple finished rooms for living quarters? What’s that beast called, and what should I budget for it low/high in KY? KIM in PAYNEVILLE
  DEAR ANDREW: Rather than trying to reinvent a wheel, it would probably behoove you to look into an actual polycarbonate greenhouse such as these
 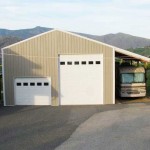 DEAR JOSEPH: More important than concrete thickness will be what you have done to prepare your site. Properly prepared and well compacted, it is possible a four inch thick slab could do everything you need it to be. It might behoove you to thicken slab to five or more inches in zones of wheel travel and add 1/2″ rebar in these areas (less than five inches thick does not provide adequate concrete coverage for rebar to be effective).
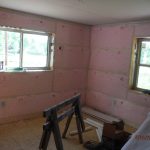 DEAR MARK: DeKalb county is in Climate Zone 3A. Here are my recommendations (all based upon 2021 IECC):
 DEAR GREG: As long as you are measuring from a level point and top of your concrete slab will be below bottom of your base trim you will be all good with measuring down 3-1/2″ from splash board tops. While I have not done it personally, I know more than one person who has used a pressure preservative treated 2×4 to screed against as you describe. At a minimum it should be rated UC-4A (ground contact) for treatment.
 DEAR POLE BARN GURU:
 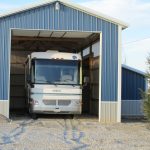 DEAR ERIC: Without knowing how far you intend to span with your trusses it is difficult to provide a definitive answer. Boundary County does not require building inspections, so even though you are in an area of extremely high snow loads – risks end up being upon you as a new building owner.
 DEAR POLE BARN GURU:
  DEAR POLE BARN GURU: I am ready to build but I am in Texas. The plans were designed for traditional stick frame construction. Can you quote me from those plans? SOCRATES in McALLEN
 DEAR POLE BARN GURU: What is the snow load on the roofs of your buildings? KAREN in ALBUQUERQUE
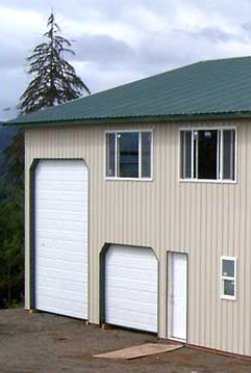 My wife and are currently going to market with our home in Lakeville and are considering our next steps. We have a great deal of interest in exploring an affordable option for our current needs which include about 1,500 SF of residential space and then remaining storage for a 45’ motorcoach, our vehicles/toys, shop and an above ground “block” safe room. As we have no idea what the cost, or practicality, of this option is we felt it would be a good first step to determine your design services and simply what you have to offer in terms of options.
 DEAR MARK: By “top boards” I will guess you are placing ‘truss carriers’ (headers) between columns in order to support trusses. In my humble opinion it would be best to utilize a two-ply ganged prefabricated wood roof truss at each column (notched in) and eliminate carriers entirely. It is far cleaner structurally as you eliminate numerous connections and if a failure is going to occur, it is most often at a connection.
 DEAR BRENDA: A quandary exists in providing you an answer as IRC (International Residential Code) makes no provision for post frame (pole) buildings, so therefore IBC (International Building Code) should be code to be used for their correct design.
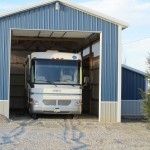 DEAR POLE BARN GURU: How much will it cost to build a roof only pole structure tall enough for RV while in use as shelter from elements but allowing as much light as possible.
 We have a client who is enjoying his 30 foot wide pole building – which has a ten foot wall height. It did everything he wanted it to, until he bought an RV. Which is nearly 12 feet tall.


