Tag Archives: sonotubes

Post Frame on a Rock Pile

Post Frame on a Rock Pile?

Reader MIKE in MAINE writes:

“Hello ,

I am looking to purchase a Post and Beam Barn kit, but I have been advised by my excavator guy that I won’t be able to set the sonotubes in the ground due to the mixture of rocks sizes at my location

A bit of background:

The location is northern Maine and the soil composition is granite and clay, with poor drainage. Freezing line is probably at 8+ ft

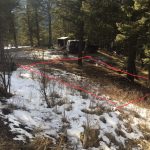
The location chosen is a 75×75 area that has a pile of rocks collected from all over the old field years ago, and the suggested plan by the excavator guy was to grade that over a 75×75, add crushed gravel on top (10 inches or so) and when I told him I would need the sonotubes embedded at least 4-5ft down, he said I wouldn’t be able to dig the holes, but I won’t have any problems with heaving

This is an incorporated township, so there is no code requirement or enforcements (just as a fyi), but I still want to do things by the book for my own safety and investment protection

He suggested a perimeter sidewall of 12×12 and attach the posts to the wall with the perma column type brackets

My plan is to build at minimum a 40×50, ideally a 50×60 barn with porch around

I’ve uploaded a video of the site (as well as an alternative spot just across the road from it) and some still photos to help you help me divide what type of foundation do I need, and if it is in fact viable or doable

I would greatly appreciate your assistance with this before I commit tens of thousands of dollars into a kit I would not be able to build

Site video:

https://www.youtube.com/watch?v=FCUO6jBIWvE

Mike the Pole Barn Guru writes:

Thank you for your interest in a new Hansen Pole Building, as well as for providing so much valuable information.

Your rock pile site would be far less than ideal for several reasons, beyond just an inability to auger holes through rocks. Biggest challenge would be this being a terrible surface to pour a concrete slab on top of. Adding crushed rock over this is going to leave temporary voids between those larger, underlying stones. Over time crushed rock will slowly filter into these spaces, now your gaps will be directly below your slab – forcing your slab to bridge across them. Without significant amounts of rebar being added, slabs are not going to perform well under this scenario. Be prepared for more than just minimal cracking.

Any uninsulated foundation not extending to below frostline is likely to present frost heave issues over time.

My vote would be to opt for your alternative site. I have previously penned a four-part series on site preparation starting here: https://www.hansenpolebuildings.com/2011/11/site-preparation/

You have several options for foundation:

My favorite (also most cost effective and easiest to construct) – embedded columns. You can limit needed embedment depth to 40″ below grade by use of R-10 EPS insulation, going down two feet, then out another two feet.

Second choice would be using concrete piers with wet set brackets. Square piers can be formed out of EPS insulation (again to limit needed depths) with continuous insulation between piers. Sonotubes could be used, however they are difficult to effectively insulate, so it would be recommended to embed them to frost depth.

Please do not hesitate to reach out to me at any time with questions or concerns.

A House on a Hill, Slab on Grade, and Post Brackets

This week the Pole Barn Guru answers reader questions about building a house on a hill lakeside, building a slab on grade instead or embedded posts due to rocky soil, and use of dry set brackets.

DEAR POLE BARN GURU: Hey. We have a lot on the lake that is on a hill (not super steep but does have a decent slope). Is a post frame house an option and if so how would be the best way to build it as far as ‘foundation’. ASHLEY in BOWLING GREEN

DEAR ASHLEY: A post frame home is certainly an excellent design solution for a slope building site. You do have some options (both of these I used on a personal building site of my own) – you can cut to create a ‘daylight’ or ‘walk-out’, or build on stilts.

Here is how I handled cutting into a hillside: https://www.hansenpolebuildings.com/2012/02/grade-change/ as well as a little reading on stilt houses: https://www.hansenpolebuildings.com/2017/09/stilt-houses/.


DEAR POLE BARN GURU: I’m finding it prohibitive with local excavators to set poles in this part of rocky NH. It makes a slab on grade look better than ‘poles’. However – I assume I lose lateral support if I build on a slab will horizontal girts provide enough stiffness to the building or would bottom sills/sheathing be required. I’m looking at a 30×20 shed and would like 10′ bays and metal roofing, local green lumber vertical b&b siding. DAVID in GRANTHAM

DEAR DAVID: Even building with a slab on grade is going to require excavation, as you need to have footings either extending below frost line, or thermally isolated to prevent frost heaving. Horizontal girts, by themself, provide little or no resistance to racking. Properly engineered, your steel roofing and board and batten siding can provide adequate shear resistance.

If it were my own building, I would probably consider excavating holes, place and properly backfill sonotubes, and use ICC-ESR approved wet set brackets to mount columns. I would avoid use of green lumber, in any circumstance: https://www.hansenpolebuildings.com/2011/09/499green-lumber-vs-dry-lumber/.


DEAR POLE BARN GURU: I have an existing 35′ x 50′ slab with 16″ beams around the perimeter. Is it possible to construct a pole barn on it that meets windstorm qualifications for my area? ALAN in LAKE JACKSON

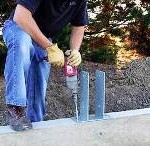
DEAR ALAN: There are plenty of folks out there who would gladly be willing to use dry set brackets to mount pole barn columns to your slab. In most instances, this is a less than adequate design solution as these brackets are not designed to withstand moment (bending) loads. (For extended reading, please visit https://www.hansenpolebuildings.com/2014/12/dry-set-column-anchors/).

My preference would be to use embedded columns – either by placing them outside of your existing slab perimeter, or by saw cutting through edges of your existing slab.


Installing Treated Wood Columns in a High Water Table

In my past life as a post frame building contractor one of our biggest challenges was we could not use our x-ray vision to determine what below ground surface conditions existed.

Reader ALAN in DANDRIDGE writes: “Mike I think we might have a high water table, if we have water in the bottom what is the best way to install poles and will your posts hold up if we do?”

Back when I was a contractor we would run into this situation occasionally. Our solution then was to stand columns in holes, brace them and then backfill with pre-mix concrete with very little water in it. Concrete weight would displace water in the holes. It did take a significant amount of concrete, however it was only about $30 a yard then.

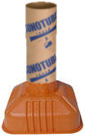
How I would do it now – I would use sonotubes equal to or larger in diameter than what was specified by an engineer. Cut tubes to depth of hole length, then cover one end of tube with six ml black visqueen (read about visqueen history here: https://www.hansenpolebuildings.com/2013/07/moisture-barrier/ ) sealed tightly around sides of tube. Place the tube in the hole with covered end down (this will take some work, as the tube will want to float like a boat). Once sonotube has been placed, backfill around outside with compactable material – compacting no more than every six inches. Then stand column in tube, brace it and backfill with pre-mix concrete as engineer specified.

All wood-rotting fungi require some air for growth, and many species die quickly if they are deprived of it. Air-moisture balance in wood cells, therefore, is a most important factor controlling wood’s susceptibility to decay. Fungi need oxygen for sugar oxidation, which they use for growth and energy supply. This breakdown of carbohydrates in the respiration process produces water and carbon dioxide.

If there is no interchange of air, fungus will die from suffocation by carbon dioxide. For example, when cell spaces are completely filled with water, as they are when wood is submerged in water, air supply is cut off and growth is stopped. Burial in the ground below the water table will similarly cut off air supply.

Brackets to Sonotubes, Housewrap, and Help with a Remodel

This week Mike the Pole Barn Guru gives some advice regarding the use of brackets with sonotubes, installation of housewrap, and the possibility of replacing a gable style roof with a gambrel.

DEAR POLE BARN GURU: Guru, I am looking at building a pole barn home. I like the idea of doing wetset brackets in concrete sonotubes, then after building is erected pouring the slab inside. My question is how will the grade board and slab be connected to the existing concrete and pole with wet set bracket. Thank you . STEVEN in COVINGTON

DEAR STEVEN: Your building’s grade board (aka splash plank or skirt board) will be oriented so upper 3-3/4 inches will be above top of slab. In this area, 10d common galvanized nails can be used. Below top of slab, fasten with two 3/16” x 3” Powers (www.powers.com) PC3DA-HDG galvanized steel split drive anchors (or equivalent).

Your building’s concrete slab can be connected to concrete in sonotubes by use of two five-foot lengths of ½” rebar bent to 90 degrees at center. Place one leg into tube leaving other leg out into future slab area at approximately 60 degrees from plane of splash plank (this will require cutting a short slot into top of sonotube.


DEAR POLE BARN GURU: Greetings, I’m at the point in construction where I need to read up on how to install house wrap prior to wall steel. I don’t have the Wall Steel chapter (Chapter 21) in my manual and I can’t find any mention of house wrap anywhere else. I’m assuming that I can’t put wall steel over cap staples unless they are under a rib. CARL in SPRUCE

Reflective InsulationDEAR CARL: Installation of housewrap will be a chapter in an upcoming version of our Construction Manual. Although it might be possible to install steel siding over cap staples, we are unaware of anyone who has tried it. To the best of our knowledge everyone has used just enough staples to hold housewrap in place and installed siding immediately. By running housewrap vertically you can place wrap right ahead of installing steel. Make sure to seal all seams with three inch wide tape.


DEAR POLE BARN GURU: I have a 24×47 detached garage and I wanted to remove the wood rafters and replace them with metal joist in a gambrel design with metal roof. Is that something your company would do? HARRY in SACRAMENTO

DEAR HARRY: We are not contractors, so could not assist with any form of construction. As post frame building kit suppliers, we do not use metal joists of any kind.

You might be able to find a contractor who would undertake this project, however my educated guess is it would be less expensive to demolish your existing garage and begin from scratch, than to do a remodel of this scope.


.

Bigfoot Systems

Bigfoot Systems®

Bigfoot Systems® bills itself as North America’s Original #1 Selling Pier Footing Form, which I would say is most likely 100% or more correct.

So, what exactly is a Bigfoot and why would one use one?

Before we get carried away, I have never used a Bigfoot and this is not a celebrity endorsement. This article began with Hansen Pole Buildings’ Designer Greg Lovell asking me what I thought of the system.

Bigfoot is a footing form which is used to form a pier base under a cardboard construction tube (think Sonotubes: https://www.hansenpolebuildings.com/2013/11/sonotube/).

Unless one wants to make a significant investment in concrete filling a very large diameter tube, it is more economically practical to increase the size of the footing (maintaining a smaller diameter tube) in order to properly distribute the downward forces over an adequate surface.

In a previous article we shared why it takes a fairly large footing to spread the weight out (read more here: https://www.hansenpolebuildings.com/2012/08/hurl-yourconcrete-cookies/).

There are some limitations as to the “smallness” in diameter of the cardboard tube. In cases with concrete encasement around an embedded column, Code requires a minimum of four inches of thickness of concrete on all sides of a column. The diagonal measure across a nominal 6×6 (actual 5-1/2 inch by 5-1/2 inch) column is just under eight inches, meaning the smallest possible Sonotube would be 16 inches in diameter.

While Bigfoot comes in 20, 24, 28 and 36 inch diameters. Only the largest size will accept a tube over 12 inch diameter.

I am certain Bigfoot offers advantages for many types of construction, especially with decks. For post frame construction, in most cases it appears as if it would be added effort and expense. In order to be utilized with an embedded column, a 36 inch diameter or greater hole would have to be dug – and rarely are auger bits this large readily available.

The only true practical case I could make for the use would be if one had soil which collapsed as the hole was being dug – thereby forming a crater.


Call a Geotechnical Engineer

When is it time to bring in a Geotechnical Engineer?

Reader WES in RAVENNA writes:
“I am building a 36×48 pole barn w/ attic trusses on a piece of property were the water table is quite high. The wettest hole contained about 3 feet of water and caved in to about 5 or 6 feet in diameter before we filled it back in. The bottom of the driest hole jiggled like gramma’s jello mold when we tamped it flat. Obviously I am worried that my barn will sink.

We plan to use sonotubes and a trash pump to get a hole clean enough to drop our 20×6 round footing cookies and 6×6 posts in before filling the hole in with sand. We also plan to double up on the grade board (2×8 on the outside and 2×8 on the inside) to help transfer any load down the line if a post starts to sink.

I am also thinking of running re-bar through the grade board and across the floor to help tie the walls to the slab in hopes that it will help the barn float. Is that a good idea? Do you have any advice on building a pole building on soft, wet ground?

I don’t want to wait till you put your answer in a blog. Please email. Thank you.”

Mike the Pole Barn Guru writes:

Back in the olden days (the 1980’s) we encountered a site in Western Washington where we were going to be literally constructing a building on top of a peat bog. The soil was so weak, one could take a 12 foot long 2×6 and push it vertically into the ground by hand until it disappeared. It is surprising none of the jobsite workers got lost in it! The solution was to set the columns and hurriedly pour a concrete slab on grade which was tied into the columns with rebar. The slab was literally floating on top of the peat. Not the ideal site to build upon.

Okay – you have some challenges going on – high water table and the inability of your soil to support a load. I would highly recommend your next call be to a competent soils (geotechnical) engineer who can do a site investigation to best advise how to solve your problems. You are going to have to do something to remove the water from beneath your proposed building site – as it stands currently I can see nothing but potential problems with frost heaves. You will want to read more on preventing frost heaves here: https://www.hansenpolebuildings.com/2011/10/pole-building-structure-what-causes-frost-heaves/.

Even with good soil, your proposed 20 inch diameter concrete cookie is not adequate to properly distribute the weight of your building across the soil. Added to the challenge is the use of attic trusses which is going to further increase the loads on the footings. From the sound of it, a registered design professional (RDP – architect or engineer) has not been involved in the structural design of your building itself, as not only is your footing inadequate, but there is no provision made to prevent uplift issues.

Do me a favor and do it right away – call the geotechnical engineer. If you do not, you are going to end up investing a lot of money in a building which will do nothing but sink and heave, until such time as it becomes structurally unusable, or collapses of its own accord.


Design for Spray-Foam, Sonotubes, or Proper Fasteners!

DEAR POLE BARN GURU: My name is Wade, I purchased the design and material from

Hansen for my pole barn this past year. It is a 64×64 Pole Barn. My question is, what’s the best way to insulate with the wall girts being horizontal and at an odd measurement on center? Thanks WADE in HILLSBORO

DEAR WADE: Thank you very much for your investment in a new Hansen Pole Building. If you have an opportunity to do so, I would enjoy seeing photos of your completed building, as it has some unique features which other clients would appreciate seeing.

Insulating buildings, after the fact, is one of the most common questions I get asked about. If we were in the design phase of your project, my advice would have been to place the bookshelf girts at 24 inches on center

(https://www.hansenpolebuildings.com/2011/09/commercial-girts-what-are-they/) and use housewrap between the girts and the siding. As we are past this point, my best recommendation is going to be closed cell spray foam (read more about spray foam here: https://www.hansenpolebuildings.com/2016/07/advantages-spray-foam-over-batt-insulation/). It is not inexpensive however it is very effective and can be sprayed directly onto the inside of the wall steel.

DEAR POLE BARN GURU: I am looking into building a pole barn. In my area up north (Alpena Michigan) the ground is laden with heavy rock. 2 ‘ below the rock is bedrock. How will one set the main post for construction?? Digging this rock out would be near impossible while at the same time keeping things plumb and square! Please help! CHRIS in ALGONAC

DEAR CHRIS: I’ve actually been to Alpena! My first choice is always to dig holes to solid bedrock, probably requiring a backhoe. If the rock is such as to leave you with craters, sonotubes can be used to reduce the amount of concrete backfill required around the columns. If the bedrock is fairly shallow, or not below frost depth, the columns can usually be designed by the building engineer to be rebar pinned to the bedrock to prevent movement.

DEAR POLE BARN GURU: I recently bought a property and the 20 yr. old pole barn that is leaking inside from the eves on the sides. I have excessive overhang 4.5 inches on one side and 5 inches on the other. According to your sight, it should be 1 1/2 to 1 3/4. How do I repair/fix this problem?
Thanks, DALE in NEWPORT

DEAR DALE: Your challenge probably has nothing to do with the distance the roof steel overhangs past the sidewalls. The ideal length (1-1/2 to 1-3/4 inches) is based upon getting the runoff water from the roof directly into a gutter, without having the water just sailing over the top.

If your building is only leaking along the eaves, then it is a function of the original builder having used the industry standard #9 diameter screws. Over time, the cyclical nature of windloads will cause these small diameter screws to act like knives, cutting away at the surrounding steel until slots have formed around the screws – and water then leaks through the slots.

Provided this is indeed the problem, and the slotting is not too excessive, it can be fixed by using #14 diameter screws, which are greater in length than the existing screws. Remove all of the current screws at the eave, place the larger and longer screws back through the same holes and as long as no slots extend past the grommets, you have the job half done.

screwsProbably the roof only has screws on one side of the high ribs along the eave, if so, add another large/long screw at the other side of each high rib. The eaves and ridge are where roof shear forces (from wind) are the greatest. By adding the extra screws, it reduces the lateral force on each of the screws along the eaves.

If the slots are too great to be covered by a new fastener, the solution is to replace the roof steel and install it using the correct screws and with a pattern which will prevent the same problem from happening again in the future.

Retrofit for Wind Uplift Protection

Another great question from a reader!

DEAR POLE BARN GURU: Hello,

I bought my house from you a few years ago and know that you all have a very good engineering group. I was wanting to see if they could come up with a plan to retrofit an existing pole barn for wind uplift.

The existing pole barn is 28’x36′ with a lean to on the right side 12’x36′ with 2′ overhangs on all sides. It has a metal roof and ceiling in the whole building and one metal enclosed room that is 8′ off the ground. It is 14’x24′ with a 12’x14 desk connected to the room on the left side, the rest of the build is open. It is constructed with 6″x6″ post 12′ spacing. They used 16 post total 4 rows of 4 post.

The trusses are 4/12 pitch. After asking owner about how this was constructed he stated that the post are 38″ to 40″ in the ground in 18” holes. They are setting on top of concrete cookies with compacted dirt around them. He did not believe that they put uplift cleats on the post. My wind exposure is B and Snow Load is 30 PS. This is a little background information let me know if you need to know anything else to answer my question.

So here is my question.  Is there any way I can retrofit this build to give better uplift protection?  I like the open look and would like to keep it open if possible. But I do have access to a bobcat if I need to do any digging. Please let me know what your thoughts are to fix this. I’m guess I should have ordered from you in the first place. This was not the best way to save a buck.

Thanks. MARK in BROOKSVILLE

DEAR MARK: Thank you for your kind words. There are several choices of things to do to increase resistance to uplift:

1. Easiest – if the building does not currently have a concrete slab on grade, five foot long rebar hairpins can be placed through each column at mid-thickness to be poured minimum four inch thick concrete slab. For more reading about hairpins: https://www.hansenpolebuildings.com/2016/10/rebar-hairpins/

2. Not as easy, but less digging – excavate top 12-18″ around each column and backfill with concrete. This is known as a “top collar”. It does reduce uplift, however it adds the risk of creating possible frost heave conditions if the soil beneath the building is not well compacted granular soil. For added information on frost heave protection: https://www.hansenpolebuildings.com/2011/10/preventing_frost_heaves_in_pole_building_construction/

3. Lots of digging – excavate down to the top of the cookie (which is probably not adequate in diameter to prevent settling of the posts) and either pour a bottom collar (8-10 inch depth of concrete around the base of the column) or entirely fill around the column with concrete. Either of these can be accomplished by using sonotubes. Cut them lengthwise so they can be placed around the columns.

Read about the problems with concrete cookies here: https://www.hansenpolebuildings.com/2012/08/hurl-yourconcrete-cookies/ and why sonotubes work here: https://www.hansenpolebuildings.com/2013/11/sonotube/
Sounds like you have found out the hard way how saving a few dollars can cost a lot of dollars.

SquareFoot™ Concrete Footing Forms

I really, really enjoy interactive clients. The ones who pay attention to what is going on (chances are, if you are reading this, you are one too). They help keep me on my toes, as well.

I’ve been enjoying interacting with John. Over the weekend he came up with this for me:

Squarefoot FormI looked at each of the suppliers of pole frame kits and was not impressed with the cookie base with treated pole foundation. I only found one that included a preformed concrete pillar with a top flange. I like this system. A little more labor and a wee bit more concrete but it seems to make for a better quality foundation. Whaddya think?”
https://www.soundfootings.com/Index.php

My gentle readers who are long time followers know my feelings about concrete cookies. Here is an article I wrote about them:

https://www.hansenpolebuildings.com/blog/2012/08/hurl-yourconcrete-cookies/

I’ve never used the product John found, so this is a good time to check it out.

Before digging into the SquareFoot™ concrete footing forms, an examination of the standard pole building footing would be in order.

One of the beauties of pole barn construction is it is fairly low tech in the field. Holes are augured  into the ground (most typically using a skid steer), usually to a depth of either 40 inches, or greater if needed to get the bottom of the footing below the frost line.

Unless an attempt is going to be made at dropping a pre-formed chunk of concrete into the hole (aka cookie) to support the columns, the hole itself becomes the form for any poured concrete.  Columns can be placed, suspended above the bottom of the holes, and premix concrete monolithically poured to flow beneath the base of the column (as a footing) and up the sides of the column (as a bottom collar).

Pretty simple.

The premise behind the SquareFoot™ concrete footing forms is to eliminate the need for wooden footing forms. They are a unique, patented square footing form which provides a one-step process for excavation, backfill and pouring concrete.

As a simplified description – a hole is dug with a backhoe or mini-excavator, and the SquareFoot™ is placed in the hole with a construction tube inserted (aka Sonotube®). For pole building construction, a pressure preservative treated column would be inserted into the tube and suspended in the assembly, then premix concrete would be poured in.

Having built plenty of footing forms, in my younger days, I can see the advantages of the SquareFoot™ for typical residential and commercial stick frame construction. For pole buildings, I just am not feeling the love (and the soundfootings.com website does not show post frame as an application).

Why add the expense of a plastic footing form and a construction tube, plus the time and effort needed to place, when the nicely augured hole, does everything needed?

Add to that – my largest concern structurally comes with filling in around these forms with dirt.  If they are not compacted to the density of pre-excavated soil, there is a propensity for lateral motion of the columns.  So there is more work again – having to refill dirt around the concreted columns and having to tamp…tamp….tamp!  With a monolithic concrete pour into a cleaned out augured hole, once the concrete is poured, you are done!