Tag Archives: pole barn plans

Show me Your Barndominium Plans Please

Like a bunch of little kids exploring differences in body parts – “You show me yours, I will show you mine.” Barndominium, shouse (shop/house), post frame home want to be owners are not far removed from here when it comes to floor plans. In numerous Facebook groups I see this request over and over!

Each family truthfully has their own wants and needs – ones where chances of anyone else’s plans being ideal for them being close to those of winning a major lottery.
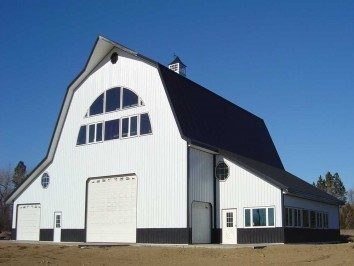
Gambrel roof pole barnFor those who have been following along, I have covered preliminary steps leading to actually designing a functional and affordable floor plan.

Step number one, determining if a new barndominium is even a financial reality: https://www.hansenpolebuildings.com/2019/07/how-much-will-my-barndominium-cost/

Once fiscal reality has sunk in – your new barndo will need to be located somewhere: https://www.hansenpolebuildings.com/2019/08/a-place-for-a-post-frame-barndominium/

And unless you and your significant others have been squirreling away stacks of Franklins or are independently wealthy, financing must be secured: https://www.hansenpolebuildings.com/2019/07/borrowing-for-a-d-i-y-barndominium/

With all of these steps squared away, it is time to start considering a floor plan. Popular home spaces and sizes need to be determined: https://www.hansenpolebuildings.com/2019/09/room-in-a-barndominium/ and https://www.hansenpolebuildings.com/2019/09/the-first-tool-to-construct-your-own-barndominium/.

I read about people in barndominium planning stages looking for free or low cost design software, attempting to put room sizes and orientations together in a fashion making any sort of sense. This becomes daunting and can be an all-consuming struggle, regardless of how many pads of grid paper you own.

Most people are not far removed from reader MARK in WAYNESTOWN who writes:

“Looking for a 3 bed- bath 1/2- open kitchen living room vaulted ceiling concept and maybe with 1 or 2 bedroom loft up top — and 2 car garage in back what size of pole barn should we look for?”

Here is where it is well worth investing in services of a design professional. Someone who can take all of your ideas, those wants and needs and actually craft a floor plan best melding them with the realities of construction. 

Hansen Pole Buildings has just this service available and it can be done absolutely for free! Read all the details here and we look forward to continuing to walk with you in your journey to a beautiful new home: http://www.hansenpolebuildings.com/post-frame-floor-plans/?fbclid=IwAR2ta5IFSxrltv5eAyBVmg-JUsoPfy9hbWtP86svOTPfG1q5pGmfhA7yd5Q

Shopping for Pole Barn Engineering

Shopping for Pole Barn Engineering
When most of us shop for a new computer or a new car, we don’t go shopping for the best deal on the design so we can go buy the pieces on our own – we shop for the finished product which best meets with our needs.
Getting a “great deal” on engineered plans only, doesn’t do the end user one iota of good, if the materials specified are not necessarily the best design solution from a cost or practicality standpoint. As a design professional – if you came to me looking for just plans, I am probably going to overkill your building, as my advance vision of you is of someone who is trying to cut corners and get by on the cheap. Chances are you will buy inferior, undersized or inadequate products and when your building doesn’t pass inspections, or fails, you will come blaming me for poor design!
Here is a recent inquiry which has triggered this article:
DEAR POLE BARN GURU: Do you offer pole building engineering as a stand alone service without a kit? Can you give me an estimate on this project?
I have an attached picture of the building I am wanting to build.
All the dimensions are to fit specific needs, irrespective of available building material dimensions. If material dimensions and costs dictate different dimensions I am open to hearing suggestions.
Likewise, I like the appearance of the Monitor style building for our property and neighborhood. But if there is another layout that is much less costly to build, I am open to suggestions.
I have a meeting with the city, hopefully next week, where I can learn more about the wind and snow loads. So I am not certain of those.
Hopefully you know what is called for, because I would prefer not to wait for the city meeting to move forward.
If possible, I would like to use beam construction on the roofs, instead of trusses to gain usable height inside the main bay in particular. But if this is a problem, or it adds a great amount to the construction costs, I would be open to suggestions about trusses.
The center and left bays will have a dirt/packed earth floor. The right bay will have a wood floor for a boat shop. There is a utility sink and toilet room in the right bay.
I am hoping the engineering plan you provide has dimensions of materials, and specify correct attachment techniques or hardware requirements.
So, can you let me know a cost to provide stamped engineered plans for this building that will pass code in Port Townsend? And what would be the timeline in which you could provide those?
Thanks for your time. GALEN in PORT TOWNSEND
DEAR GALEN: Thank you very much for your inquiry. No, we are not a plan’s service. We take great pride in providing the most economical and practical engineered custom post frame building designs, along with all of the materials which meet or exceed those structural requirements delivered to your jobsite.

This is the insurance all of the components meet with the specifications called out for by our engineers, who have experience in thousands of post frame building designs. You are going to make a serious investment in your new building, we only want you to have to make it one time.
Mike the Pole Barn Guru

What Does It Mean When a Pole Building is ‘Engineer-Sealed’?

Engineer sealed pole barnIf you’ve been shopping around for a pole building kit, you may have heard the phrase ‘engineer-sealed’ and wondered what it meant—and whether it matters for your planned building.

‘Engineer-sealed’ simply means that a licensed engineer has reviewed a set of building plans and put their stamp of approval on it. Engineer-sealed plans are also sometimes referred to as ‘wet-sealed’, a phrase that comes from the old practice of physically applying an inked stamp on building plans. Some engineers will still use an ink stamp, but in many cases, engineers can now use an electronic seal in place of the traditional wet seal.

To be qualified to seal a set of plans, an individual must have a degree in Engineering and be up-to-date with any tests or dues required at the state level. The state in which they are licensed must be the same state where you are planning to construct your pole building.

Hansen Pole Offers Engineer-Sealed Plans

In the past, we’ve offered engineer stamped pole barn plans as an option with our building kits. As of 2016, however, all of our pole building kits come with engineer-sealed plans, and we have engineers who can seal plans in all 50 states.

The Benefits of Engineer-Sealed Plans

Whether you plan to construct a pole building for residential or commercial use, it’s a good idea to start out with engineer-sealed building plans. Depending on where you live, your building department may require you to submit sealed drawings before you can get a permit for your project. Sealed plans are almost always required for commercial building projects, no matter where you are. If you have your sealed plans ready to go when you first apply for a building permit, you should be able to get your permit relatively quickly and easily.

Even if your local building department doesn’t require you to submit sealed plans, it’s smart to get a pole building kit with engineer-sealed plans. These plans essentially provide additional insurance, because a design professional has reviewed them and certified that the planned building is structurally sound. With engineer-sealed plans, you can enjoy the peace of mind that comes with knowing your pole building is designed to withstand harsh weather and last for years.

Reviewing Your Building Plans

Every Hansen Pole Building Kit Package comes with building plans which are drafted by a real live human being! They are then reviewed not once, but twice, by upper level team members – who catch just about every errant line.

building-plansTo insure the final building plans are correct (usually it is an issue of “no, the other left”) before printing and sending the plans, we do ask our clients to view and approve (or request edits). All of this is done via login on our website.
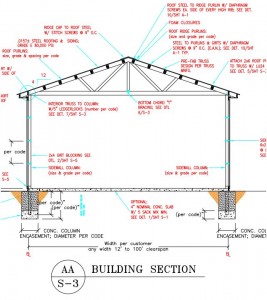
Here is an example of a response from one of our clients, who actually did have a very sharp eye!

“I have a few questions regarding these building plans and would prefer asking first rather than declining, but you can advise which path to take.

 On Sheet S-Oa and S-Ob under Basic Wind Speed it is listed as 123 mph.. In my original request and all subsequent communications I needed to make sure that the wind load was listed the plan for Building Permit purposes that it was designed for “at least” 115 mph with a 3 second gust. This was listed on the quote sheets as “Wind Speed (3 sec gust): 123 mph”, but here on the plans it only says “Wind Speed: 123 mph”. It is very important to my Building Department that this be stated correctly on the plan themselves. So, I request this information be added in that manner. As for the 123mph versus 115mph, if we are overbuilding and using larger materials than required for 115mph 3-second gust, that was not at my request or approval, so please advise on this.

 Under #10 on General Notes on S-Oa and S-Ob, and on Sheet S-3, Building A Section and Building B Section, AA / S-3, the steel roofing and siding is listed as .0157 plus/minus, which isn’t consistent with 26 gauge steel. The initial drawings were for 29 gauge steel, however prior to final quotes we changed to 26 gauge steel for both roof and siding. This may be listed in other places as well, but this one caught my eye. Please make the necessary changes to ensure the correct product is shipped.

 Throughout the plans the Poles/Columns are listed as 6″x8” measurement where in all prior quotes I was shown that the columns were going to be 6”x6”. I know the price was quoted at 6×8 because the designer mentioned this dimension in our last conversations, but I wanted to ensure that this size post was required as it seems excessive based upon what I have seen in the area. Again, if we are using larger materials than required to withstand the 115mph 3-second gust required in my area, I’m sure we are also spending more than necessary and I would like to use only what is demanded (other than my request for 26 gauge steel).”

 And my response:

 Wind Speed:

Actually your initial request for a quote had 110 mph on it. Our data base shows your area to be in a 123 mph 3 second gust area, and every quote we provided for you AND the invoices you approved show 123 mph. Under the 2006 IBC the basic wind speed and 3 second gust are the same (https://publicecodes.cyberregs.com/icod/ibc/2006f2/icod_ibc_2006f2_16_sec009.htm). Our Drafting Department will happily add the term “3 second gust” on Page S-0 and S-0b of your building plans. Your price is the same for either wind speed.

Steel thickness on plans will be corrected.

Basic pole location diagrams provided by use do not specify a column size and are “placeholders” – used merely for discussion purposes. Our design program does a complete Code Conforming analysis of every component and connection for any given building. Just because you have seen something smaller in your area, does not mean those buildings actually would meet Code.

We do guarantee, however, your building (and every building Hansen Buildings designs) does meet your local code. We never under-design a building, and believe me, there are plenty of companies out there who do.

 As always – crisis averted!

Building Plans

Plans, plans, plans….

sample building plansAs one might imagine, with about two hundred new clients contacting us every day, we have some conversations amongst ourselves which are frankly at the least – interesting.

I listened in on a discussion between Hansen Pole Buildings’ Designer Matt and Managing Partner Eric recently.

Matt, “I have a lead that the guy is asking for plans only. I assume we don’t do anything like this? I guess he bought a building from someone else and it had no plans.”

Eric, “Correct we do not sell plans only. Even worse that he bought something without plans….aka a lumber pile.”

I’ve spoken with thousands of clients about their pole building kit packages in the last decade alone. I consider most of them to be smarter than the average bear (yes, I confess to having watched Hanna-Barbera’s iconic cartoon character Yogi Bear). Which leaves me both perplexed and wondering…..

How in the world would someone end up owning a “lumber pile”?

As the greater majority of my adult life has been devoted to providing pole building kit packages to clients, the two keys to success (from a provider standpoint) are furnishing great plans as well as explicit step-by-step instructions. Without these two keys, the potential for a lumber pile becoming an actual building (at least as envisioned by the person who bought the lumber pile) would be pretty well exactly zero.

Here is my take on buying just pole building plans on the ‘net: https://www.hansenpolebuildings.com/blog/2011/08/buy-pole-barn-plans/

Shopping for a pole building kit package? Then please do yourself a huge favor – make sure any potential providers are capable of producing and providing for you building plans which are both Code conforming and exactly match what is being built. Every last board on the building should be shown.

And, while you are at it, see if they will provide a copy of the instructions for assembly. Even if one has to pay for the instructions in advance, it is a good investment.

Poor plans equals poor planning, and poor planning makes for unhappy results.

Read here to find out what great pole building plans are all about: https://www.hansenpolebuildings.com/blog/2011/10/pole_building_plans/

Free Pole Barn Plans

Humor me here – do a Google, Yahoo or Bing search for either “Free Pole Barn Plans” or “Free Pole Building Plans”. Up should come a million or so choices. With all of those possibilities, it has to be a great way to go….right?

To begin with, keep in mind free pole barn plans are most probably going to be worth exactly what they cost.

Nothing!

Want to totally embarrass yourself? Download and print a set of free pole barn plans and try to submit them as plans for permit in any jurisdiction which does any sort of structural plan review.

Chances are about 99.4% of obtaining one of two results from the Plans Examiner. Result Numero Uno – the Plans Examiner will do his or her best to not bust a gut rolling on the floor laughing, and will send you to get a real set of plans designed by someone with some actual structural knowledge (can we say, “Registered Design Professional”?). Or, behind Door Number Two – out will appear the red pencils as correction marks will be made all over the plans and a lengthy list of items to be corrected will be handed back with the lovely, now red colored, free pole barn plans.

But – there exists a saving grace….where you want to build does not require a Building Permit, or does not require a plan review or do inspections! Wow, really cool, right?

Please, do not fool yourself. If the plans are not adequate to pass a structural plan review, is it worth taking the risk to life and limb to attempt to build from them just because they were free?

homemade ferrariIn my mind this would be the equivalent of assembling one’s own Ferrari from a set of free Ferrari plans off the internet. Pole barns, while they may appear simple to the casual observer, are actually structures which, to be constructed correctly, require more than a passing amount of engineering.

Hence, avoid the “free pole barn plans”. You will be glad you did.

Dear Guru: Can I Purchase Just Pole Barn Plans?

Welcome to Ask the Pole Barn Guru – where you can ask questions about building topics, with answers posted on Mondays.  With many questions to answer, please be patient to watch for yours to come up on a future Monday or Saturday segment.  If you want a quick answer, please be sure to answer with a “reply-able” email address.

Email all questions to: PoleBarnGuru@HansenPoleBuildings.com

DEAR POLE BARN GURU: Can I purchase pole barn plans from your company without purchasing the building? NEEDY IN NEOSHO

DEAR NEEDY: Technically, we do not sell pole barn plans only – however, you could order a pole building from us, paying 25% down to acquire the plans, and then never go further. As our materials are so affordable, it actually would not make much sense to not have them provided by us. Plus, we use some higher quality materials which have been tested to provide added strength, which are not available to the general public, other than with the investment in one of our pole building kit packages.

DEAR POLE BARN GURU: We recently received your quote on our new pole building. The price was close to budget, but a little high. We’d like to know how the price would change if we reduced the wind rating. HOPING IN HUNTERS

DEAR HUNTERS: The design wind speed for your building is the lowest which is possible anywhere in the country under the 2012 International Building Code (IBC). If your building site is protected from the wind in all four directions, then Exposure B could be used, rather than the more severe Exposure C. For more information on Wind Exposure please read: https://www.hansenpolebuildings.com/2012/03/wind-exposure-confusion/

There are probably other ways to get the cost “down” without sacrificing designing a building to code. We often have folks purchase a building the width they desire, but scale down the length a bit, and then add onto that building a year or two down the road.   We have a gal who boards horses who has added onto the length of her horse barn three times.  As her business grows, her barn grows with it!  This is easily done and spreads the “budget” out over time. Don’t skip on features – sacrifice “for now” those things you can “do without” and then add them on later on. Overhangs should be done at time of building, but windows and even additional doors can be added in at a later date. Get your “box” figured out, and then add to it as you can afford.

Eave Height Snafu #2: My Building is Too Tall!

I Spoke Too Soon!

In yesterday’s blog, I was addressing challenges which seem to occur with professional buildinTape Measureg contractors, and the challenge to correctly measure eave height.

So….up jumps the devil….

Not long after the cited incident from a few months ago, a building owner was out constructing their own pole building kit package and discovered their wall steel is 3-1/2 inches too short!

Again, our Girl Friday (in charge of ordering materials) asks the client to measure from the bottom of the pressure treated skirt board, to the top of the eave girt and (drum roll please)….

The building is 3-1/2 inches taller than expected!! Again, an eave height issue.

Just an educated guess, the client somehow had the idea he needed another 3-1/2 inches of interior clear height to compensate for the thickness of the nominal four inch thick concrete slab. And yes, our the plans show “grade” along with showing where to measure eave height, along with a description – in about 7 different places.

This dilemma has some relatively painless solutions.

Choice #1 – pull all of the nails out of the skirt boards and raise them up 3-1/2 inches,

Or

Choice #2 – add a pressure treated 2×4 on top of the current treated 2×8 skirt board.

In most cases the first choice is going to result in having to add 3-1/2 inches of compactable fill across the building site in order to pour the slab. There is a side benefit to this. The building is far less likely to have water pouring into it, in the event of a deluge or tremendous snow melt.

The second choice may not be as aesthetically pleasing, as it will leave a lot of treated wood exposed at the base of the building.

Of course there are some more expensive solutions, which include:

Cut all of the wall steel short and purchase steel wainscot panels and the z flashing trim to go between the wainscot and the wall steel.

Or, purchase a bunch of longer wall steel panels.

This is another case in point; an expensive mistake which could have been prevented by reading the plans and instructions, as well as utilizing a tape measure to carefully match eave height to plans.  And again, when in doubt, call us!

Pole Building Plans: Following Directions

When All Else Fails

Read the directions.

The Hansen Pole Buildings Productions office had a builder contact them a few months ago, because the endwall steel on the pole building kit package they were constructing was “eight inches too short”.

Now the builder DID admit to having framed the building three inches taller then he should have. His reasoning – to compensate for the building having end overhangs. Obviously, this made much more sense to him, than to have followed the building plans and instructions.

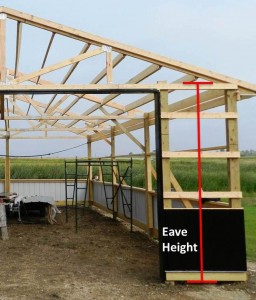
Eave HeightThe gal in our office who orders all of our materials astutely asked him to measure the height of the building, from the bottom of the pressure treated splash plank (aka. skirt board), to the top of the eave girt. Of course she knew the answer was supposed to be 14 feet, so she wasn’t overly surprised when the builder told her it was 14’9”!!

Just in case anyone is wondering, every Hansen Pole Building comes with two sets of multiple page 24 inch by 36 inch blueprints, specific to the building being constructed. On at least three pages of the building plans, in seven different places is stated, “Eave height = bottom of skirt board to intersection of roof steel and outside edge of sidewall columns”.

Even if the building plans were somehow hidden under the back seat of the crew cab, the correct measure of eave height is also stated repeatedly in the Construction Guide provided with the purchase of every post frame building kit. There are diagrams with clear marking of dimensions, along with written encouragement for anyone not understanding eave height, to “call us”.

Historically, clients who construct their own buildings rarely make this error – they read the provided documents. Considering hiring a builder? If so, find one who will read and pay attention to the plans and instructions. There are some great ones out there. We have many contractors who purchase pole building kits from us, providing “turn-key” buildings for their clients, and do a wonderful job.  They study the building plans and ask questions before they even move a handful of dirt.  Most of all, hire one who is not afraid to ask questions and clarify things if he’s not familiar with constructing a building kit from the chosen vendor. Just like any other do-it-yourself project kit from Sauder to Ikea, they are not “all the same”.

Pole Building Plans 101: Siding Cutting Layout

If you have not yet read the previous 6 or 7 blogs – it would be helpful at this point to back up a bit and read them in order, or at least enough so you get a good idea of what is included on a good set of building plans.

We deal with all 50 states, and even those counties and states where they like to make their own requirements or states where building departments are known to “be somewhat challenging” (can you say California?) we get nice comments from Building Officials.  Just recently I spoke with a B.O. from a county with stricter requirements in Ohio, and the nice lady engineer told me she was “impressed with the detailed drawings we provided for a pole building.”

Providing very specific drawings with lots of details and easy to follow instructions is a “no brainer” for me.  The better our drawings, the happier our clients are with their finished building.  It just doesn’t get any better for me than this!

Ok – so siding cutting sheets (steel, wood, osb or otherwise) – what do you need to know about them?  These are very easy sheets to follow, but if you don’t pay attention to how the panels are laid out, you may run short!

A plan for siding cutting is not required by any building department.  However, about ten years ago, we’d both email and mail a copy of the wood siding cutting or steel cutting sheet on a 9×11.5” piece of paper separate from the plans.  But there were a number of clients who’d call…. not when they were ready to cut their steel or wood siding, but when they’d already started to cut it and amazingly they were “short”!  I’d go back and recount every sheet and rarely would it appear there was a shortage on the Material Takeoff.  Could it be they cut a panel “wrong” or used the wrong length in the wrong place?  Providing a sheet where all the endwall and sidewall panels are shown and laid out, including around and above doors pretty much solved this issue.

And yes, there is some cutting to the panels, including if you have chosen steel siding.  If you set a post a few inches “off” on a pole building, it’s often not a problem to shift things a bit to make things all work. Or how about if you decide during framing an entry door or window should be moved a foot or two?  If we had all of the panels precut for angles, you would be one very sad customer when I outline the additional costs to send out “new” panels of steel to cover the changes.

Screw requirements for steel siding are also listed on this sheet, so there is no question as to where you are to put the screws, based on the location of the panels.

Whether you like “dog ears” or not (the angles at the upper corners of residential overhead doors) we provide the lumber to put them on.  We also include enough steel to cover these spaces if you choose the “square cut” look for your corners.  This gives you the flexibility to decide at time of assembly.

Click here to see a sample siding cutting sheet:

https://www.hansenpolebuildings.com/sample-plans.htm

And see you all back tomorrow when I discuss Lofts & Stairs!

Pole Building Plans 101: Sidewall Elevations

This is day number five in talking about building plans, so if you have not read the blogs, you may find them well worth your time.

Today I am looking at sidewall elevations.  Right off the bat I’m going to have you click here to take a look at a sample:

https://www.hansenpolebuildings.com/sample-plans.htm

Be sure to scroll down to the page on Sidewalls.  Sidewall framing is really pretty straightforward: it’s a skirt board and girts running horizontally to support siding, OSB underlayment for siding, or steel panels.  Of course you can have doors in a sidewall, and sometimes this can pose some challenges.

Putting a door in a sidewall means it needs to fit within the bay.  So for those of you familiar with posts on 8’ centers, how do you fit a 10’ or 12’ door between the posts?  Yes, you can put in a structural header for the trusses to sit on top, but why make it harder than it has to be?

We create what my wife likes to call “variable bays”.  This means all bays on the sidewalls of a building may not be the same width.  Obviously they do need to be the same spacing from front to back on both sidewalls for the trusses to attach to them, but they could be spaced at: 10’, 12’, 14’, 12’, and 10’ from front to back.  Or they could be 12’, 6’, 12’, 6’, and 10’.  It all depends on a multitude of factors: door size, overhangs, building height, snow, wind, seismic and other design criteria.  Although endwalls normally take the brunt of the “push/pull” type forces, the sidewalls also carry great significance since the trusses are attached to these sidewall columns.

This means if you have a 12’ wide door, you can put it in a 14’ bay and not have to worry about a huge “structural” header.  And I really don’t like using headers any more than I really have to. This means a pair of trusses is now dependent upon this header to carry the roof load, instead of being able to notch those trusses into the posts and transfer the load smoothly into the ground.  As I’ve discussed in the past – connections are potential failure points for a building.  If this header fails or is poorly installed, ouch – down goes your building.  What are the chances of this happening if the trusses are all notched into the posts and weight is on the posts? 

Another feature you can probably appreciate on a sidewall drawing is the framing for enclosed overhangs.  It’s just two boards nailed together in the shape of an L and installed to attach the level return soffit panels to it, and the fascia.  Not shown on the plans, but in the Construction Guide, will be the trims to hold all of this nicely in place and makes for a finished look to your building.

The eavelight support, another “L” backing, is also shown on your plans if you’ve ordered this feature.  When you get right down to it, other than gable vents and cupolas (which come with their own directions) all features if purchased (lofts, stairs, eavelights, wainscot, overhangs) are drawn on your custom drafted plans.

Entry door, sliding and overhead door framings are shown on the plans, including the track board and jambs.

This pretty much covers a sidewall drawing, and by now, your building is framed up and ready for siding!

Next up: putting on the siding!

Pole Building Plans 101: Interior Section Elevation

This is Day 3 in my discussion of building plans (i.e. blueprints) with today’s focus on the Interior “section” elevation.  When you cut open an apple, what do you see?  Just a flat one dimensional view of what is inside of the apple. This is exactly what we do with the Interior Section on your building plans.  For some people, this view is more difficult to “see”, as it is just a slice through the width of their building.  If this page is too difficult for you to look at, it’s ok.  There are “end” pages for all 4 sides of your building, and many of the pieces are shown on more than one page.  You have lots of views to choose from, along with details to “zoom in” on the connection areas.

The interior section elevation shows the inside connections of the trusses to the posts.  In our particular structural building style, we use double trusses for the interior bays and single trusses on the endwalls.  All trusses are notched in for full weight bearing.  This is the point in writing this blog where I usually anticipate questions on the merits of double versus single trusses, and also the pros versus cons of notching in trusses to the posts or hanging them off the sides of the posts.  This is not the point of today’s discussion, so please look back (or stay tuned) for those particular topics.  I have a lot to say on each of them!

The interior section elevation shows how many and what type of connectors are used to attach the trusses to the posts, and also the purlins to the trusses.  If the building is very large or very tall, like riding arenas, large heavy plates and bolts are used to attach interior trusses to posts.   These plates can be 18” long, 5 inches wide and a quarter inch thick!  But again, this is for those really wide and tall buildings, or those with high wind speeds.

With sheds, interior rafter connections are shown, along with any special nailing if rafters are doubled.  This view shows a generic drawing of a truss, as the actual trusses designed for your wind/snow/seismic and other features (height, width) must come from the truss company supplying the trusses.  They also come with building specific drawings sealed by a truss engineer.

Girts are those horizontal members which support the wall sheeting, such as steel panels.  This also includes OSB as a precursor for any non-structural siding such as vinyl or stucco.  Some folks call the wall girts “wall purlins”, just as they also call the roof purlins, “roof girts”.  It doesn’t really matter, as long as you are clear on what your plans are telling you to do with them, and you are using the Construction Guide to assist your assembly.  The plans will show you how far apart to place the girts, as spacing is dependent upon the wind speed and exposure of your building, unless you purchase what is termed “commercial girts”. These girts are spaced every 2’ and are designed to have an insulation cavity, along with a mud sill at the bottom and a drywall “L” at the top so sheetrock can be screwed to top and bottom edges.  Do you need commercial girts?  Not if you are not insulating and drywalling your buildings, but some builders prefer to install girts and purlins all at 24” for ease of construction. You can always add more framing to your building.  You just can’t do less than what the building code dictates for your jobsite.

A cut view of the poles with concrete depth, diameter and showing the spacing off the bottom of the hole (to be filled with concrete) is also shown on this view.  If you have a building with two eave heights, such as a two story portion attached to a one story, there will be an interior section for each elevation.

Want to see a sample page?

Click here to view: https://www.hansenpolebuildings.com/sample-plans.htm

And come back tomorrow when we talk about page 4, Front and Rear Endwall Elevations.

Have a great day!

Pole Buildings Plans 101: Roof Framing Plan

This is day 2 talking about the specific pages of building plans – what they should include, and how to “read” them.

I divert to my lovely bride for this next analogy, because she is the “farm gal”.  She tells our clients when they look at the Roof Framing Plan to pretend they are up on top of a 40’ silo, looking down on the top of their framed building.  What they “see” from this birds’ eye view, is the roof framing plan we include as the second page of your plans.

The first thing you should notice is the page is similar to the pole layout with the overall dimensions and posts.  Except now we’ve drawn in the rest of the roof framing over the posts, which you see portions of peeking out between purlins, blocking and sometimes truss bracing.   If you have overhangs, you will note the framing for these extending outside the building line.  This means if your county building department has required minimum “setbacks”, they may intend for the building footprint to be situated the required number of feet plus the overhangs.  When in doubt, ask them.

Roof purlins are those members between the trusses which support the roof “cladding”.  This means steel or roof sheathing such as osb (oriented strand board) or plywood in the event you are installing shingles or tile.  The size and spacing of the purlins depends upon the roof snow load, the wind load and other design criteria, as well as the distance they span between trusses.  There is a whole discussion on what size bays are “ideal”, which I will devote lots of attention in another blog down the line.  Suffice it to say even numbered bays are the most cost effective for lumber, as lumber comes in even numbered “foot” sizes.

Not all pole building companies use purlins the same way.  Ours are hung into joist hangers, not merely “toe nailed” into the side of the trusses.  If a building is going to fall down for any reason, the culprit is usually a failed connection.  Over the years, whether wind, snow, ice, earthquake or a combination –it was failed connections nearly every time which caused the building to collapse. It was not weak or defective materials, but poorly designed or wrongly installed connections.  This is why I believe in engineered steel connectors such as Joist Hangers, and RT-15’s for those purlins on the endwalls with overhangs and Ledgerloks which have been tested in a lab for strength and shear values.    This also applies to trusses, which use engineered plates (see my former blog on truss plates) with tested values.  Engineers love connectors too, such as plates, bands and all the other connectors previously mentioned. Why?  Because they can be easily and consistently applied by a variety of homeowners and builders, and have all been tested and certified to verify their ability to carry the required loads. And, they stand the test of time in keeping your building standing.

The roof framing plan shows rafters if there is a shed, how they connect to the main posts, and if there is any blocking between rafters on each side of the posts.  This page also shows the eave girts and fascia boards.  When you have a monitor style building, it gets a little trickier to see the overhangs of the upper section, “above” the wings below, but with a little practice, you will be able to see each section.

The last thing a roof framing plan view will show is location of entry, overhead and sliding doors.  This is not the main purpose of a roof framing section, but it does help to envision where the doors will “be” in relation to all of the posts.  And from your perch on the silo, or perhaps in a hot air balloon flying over, you too can begin to really “see” how your new building is going to come together.

Click here to see a sample page of a roof framing plan:

https://www.hansenpolebuildings.com/sample-plans.htm

And come back tomorrow – when we dig into the inside of the building with the Interior “cut” section!

Pole Building Plans 101: Pole Layout

As important as carefully investigating the style, quality and features of the building you are going to buy, is taking the time to look over a sample set of plans and directions of how it all goes together…before you buy the building.  I’ve purchased what looked to be the simplest projects in the past (how hard can a child’s toy box be?) only to come home and wonder if the people writing the directions had ever put one together themselves!

As I mentioned yesterday, our plans are a minimum of 6 pages:

  1. Pole layout
  2. Roof Framing Section
  3. Interior Section
  4. Endwall framing elevations (both front and rear)
  5. Sidewall framing elevations (both left and right)
  6. Steel or Wood Siding Cutting and Layout Sheet


Depending upon your building size and features, there could be more pages for lofts, stairs or those pretty drawings certain building departments like to see, called “elevation drawings”.

Plans are drawn in a commonly used scale, which is required by most building departments.  A word of caution here  -do not ever and I say ever, try to use a ruler and “scale” off the drawing!  Why?  In printing, sometimes depending upon the computer and printer, the scale can get slightly altered.  We also have detail drawings which are scaled at different scales, for you to get a closer look as if you zoomed in on them with field glasses.  Getting the scales mixed up for the inexperienced could result in disastrous building errors.  All dimensions are marked in “real foot” measurements, so read, use your tape measure and you will be just fine.

A word here about some of the common abbreviations used on your plans, before we get into discussing a pole layout.  We try very hard to not use any abbreviations which are out of the ordinary, or difficult to figure out.  Most folks can read BL  and CL and understand they mean Building Line and Center Line.  But not everyone reads: U.O.N. as Unless Otherwise Noted. And what does this mean anyway?!  So we stick to the common ones, but when in doubt, ask! If you are looking over a sample set of plans and don’t understand half of what it is telling you, maybe this is not the building kit you want to purchase.

A pole layout is the first page of our plans.  It shows outside of post to outside of post Building Line dimensions for the corners.  This means if you have a building 24’ x 36’, and drew a line on the ground for those exact dimensions, all the posts including the corners would fit tight against the line on the inside of the rectangle.

The sidewall and endwall posts which are not corners, are measured to the centerline of each post.  Why do we use centerlines for the inside posts?  Not all posts are exactly the same size.  They can vary as much as an inch or more, so a 6×4 which is normally 5-1/2” x 3-1/2” could be 5-1/4” x 3-3/8”!  Small measurements for one post won’t make a hill of beans difference overall, but think how far off you’d be if you had a building 120’ long and every post was off “just a bit”.

The pole layout shows the diameter of the hole you are going to dig and fill with concrete, and then it shows you the orientation of the post.  This means if you have a 6×4, on an endwall it could be placed with the 4” side “to the wind” or the 6” side “to the wind”.  And the direction is important.  Building codes, wind exposure and speed, along with large doors and width of your building will dictate both the size and orientation of the posts.  But don’t worry, every dimension is shown on your pole layout.

OK, page one is easy, right?!

Click here to check out a sample Pole Layout:

https://www.hansenpolebuildings.com/sample-plans.htm

Come back tomorrow and we’ll talk about taking another look at your building from the sky: the Roof Framing Section.

Pole Building Plans 101

Pole building plans are included with every one of our kits, and I can’t help but scratch my head in wonderment (and often frustration) when someone calls for more materials, a verbal directive on what is outlined nicely on their plans, and still manages to make major mistakes in putting their building together.  Most upsetting is when they want me (or the company I work for) to make restitution, repairs or fork over our credit card to pay for what obviously – they screwed up on.

OK, so I will readily admit I am one of those people who, once they purchase something, tries to figure it out without reading the directions first.  I moan and groan when things don’t go together, and only out of despair I revert to the instructions – provided with whatever it is I am trying to assemble.  Yes, I am probably one of those people for whom the common saying was created, “when all else fails, read the directions”! However, there is a difference between assembling a 10k plus pole building garage kit, and a $40 bookcase I bought at Walmart!

We have one of the most detailed Construction Guides known in the pole building business, and yet we have folks who don’t read it.  Or, if they pretend they do, it would be a stretch of the imagination when we get pictures of their building!  The building may very well come out looking “ok” or even “pretty good” but it’s the extra pieces they want to know “where do they go” – once the building is completely done which truly scares me.  And if it doesn’t match the plans, guess whose liability it is?

Folks, these pole building plans have every piece outlined on them, so let me tell you about plans, not just ours, but plans in general.  Before you purchase a kit, take as much time to investigate how good the plans and directions are to put it together, as you’d check out quality and type of building materials. I will spend a few blogging days here going over each page, as kind of a “how to read plans” type tutorial.  Hopefully this will save some of you the agony of reaching deeper into your pocket for more cash, to purchase those extra materials when plans were not read and followed.

As I said, every piece is outlined on your plans – or at least where they all go.  When you are comparing our kit to our competitors, look at a sample set of their plans.  Is every board shown on the plans, or did you just get a generic outline of “cutaways” along with a list of lumber you hope will build an entire building? In doing free quote comparisons for clients, I’ve taken other companies lists, tried to figure out how to make a building from it, and came up with 2 walls “short” on girts, one complete wall devoid of steel, enough screws for about half the building, and wondered who they expected to pay for all the missing pieces.

Along with the plans, we also provide what is called an MTO, a Material Take Off Sheet.  This lists all of the lumber, the lumber grade, sizes, quantity and length of the boards.  When I do a set of “specs” (specifications) for your building, prior to it being drafted, I also do what I call a “preliminary” MTO.  This lists what experience has taught me (after over 14000 buildings, I have a pretty good idea) will be required to construct your building.  But I don’t just stop there.  Once the plans are done, the next thing I do is to go back through every page.  This is usually 6 pages, often more depending upon the building size and features, and recount every board, screw and nail (larger than commons) to be sure I have everything you need to construct the custom building you purchased.  I do make mistakes!  I don’t try to, because it costs me time and money to correct them once you have your deliveries.  As in most things, it’s much cheaper and easier to “do it right the first time.”

Our plans are so detailed; I can count every board, joist hanger, ledgerlok and screw.  Or I can calculate from formulas I’ve devised for roof and siding screws, where I add in an extra 5%, because I’m a nice guy and figure if you drop a few off a roof or ladder while fastening them, I’m not going to make you dig in the dirt and crawl back up a ladder.  Posts are exact counts, lumber covers every board foot required (and often over due to odd measurements) and screws and 40d nails are given “a few extra” for those fumble finger moments.

Come back tomorrow and we’ll start my Plans 101 course – how to read your blueprints.  It will be fun, I promise!

Buy Pole Barn Plans

Let’s Buy Pole Barn Plans

As I browse about the ‘net, checking out what is available in our industry, I find lots of folks who are selling plans for barns and pole buildings. Some of these are remarkably inexpensive.

Now, why might buying a set of pole barn plans off the internet not be a great idea?

Hansen Buildings offers engineer sealed plans

These standard boilerplate pole barn plans are not checked by any engineer for structural adequacy. While they may look “pretty” and appear to get the job done….attempting to build from them may cause you to end up with a new building which flattens your possessions from a snow load collapse, or blows upside down into your neighbor’s yard.

We get inquiries every day from clients who are looking for plans. Long ago our engineers told us they have no interest in being part of a plans service.

Why? Because the engineer has no ability to control the use of the materials – to make certain the materials which they specify, actually get purchased and used as they envision.

So, why not hire a registered design professional to do design a building for you?

Hire an architect? No offense intended, as I went to school to become an architect. Architects are a wealth of knowledge, for many facets of construction and are invaluable when having to deal with a planning department on a complex commercial project. However – I have yet to see a set of pole building plans produced by an architect, which I would have endorsed for use by a client.

How about an engineer? Very few engineers specialize in post frame building design. Find one of the very few who do (we are talking about ones who have designed hundreds or thousands of buildings) and you can be assured of a sound structural design. Be prepared, however, to pay appropriately for their work. A good engineer should command a price of about 10% of the value of the project.

Really want to have the job done right?

The best route is to deal with a pole building kit supplier, who can provide engineered plans designed specifically for your project. The supplier can also make certain the materials provided meet the engineer’s specifications.

To receive more pole building tips and advice subscribe to the pole barn guru blog!