Tag Archives: attic insulation

Ceiling Liner, Double trusses, and a Second floor

This Wednesday the Pole Barn Guru answers reader questions about what best installed between ceiling liner and trusses and insulation recommendations in a new shop, advice on sidewall column size for use with double trusses, and the structural stability of a pole barn second floor.

DEAR POLE BARN GURU: Just built a 40x60x11 pole barn on the eastern shore of MD. Approx. 20×40 will be garage workshop, the rest will have a kitchen and bathroom etc. going to use liner panel for ceiling, what do I, if anything needs to use between the liner and the trusses? Insulation recommendation? Product recommendations are appreciated! Thank you, LYNN in SHARPTOWN

DEAR LINN: There is not a Code requirement for a barrier between trusses and liner panels in your climate zone. If you are considering blowing in cellulose, chemicals in cellulose can react with steel panels to cause premature deterioration, so a barrier should then be used. My first choice would be blown granulated rockwool, second would be fiberglass. Make sure to have adequate eave and ridge ventilation, in correct proportions.


DEAR POLE BARN GURU: Went reading your blog on double truss system, if wanting to erect a pole barn 30×78. Would using 4×6 be ok going 12 ft high post spaced every 8 foot other then 2 16 openings. BRIAN in PADUCAH

nailing trussesDEAR BRIAN: Thank you for being a reader of my articles. Even with a very low design wind speed, low risk occupancy and a well-protected site, it is unlikely 4×6 columns would be adequate to properly carry design loads, given your eave height. As you are possibly considering utilization of ganged (double) trusses, and will need larger columns anyhow, you may want to consider increasing column spacing to 12 feet on center. Fewer holes to dig, fewer columns to set and your budget will be much happier. In any case, I would encourage you to invest in a fully engineered building – any possible savings you might believe you would attain without engineering, will be quickly eaten up when you have a failure.


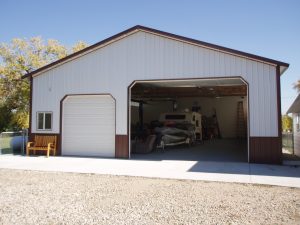
DEAR POLE BARN GURU: I’m wondering if this would be structurally sound with a top floor on it? It would be meant as a home/business. I work in the commercial construction industry I guess the other question is do you have any of these in New Hampshire? Please let me know what you think and Thank you. JOE in HUDSON

DEAR JOE: My own post-frame building has a 48′ x 60′ main center section. Downstairs has a clearspan floor (yes, spanning 48 feet), with a 16 foot high ceiling. Upstairs is a full living area, again with 16 foot high ceilings. A portion of this upper level also has a small mezzanine. Overall building height at peak of roof is 44 feet. So, in answer to your question – fully engineered post-frame construction lends itself very well to multiple stories (up to three stories and 40′ tall sidewalls, or four stories and 50′ tall sidewalls with fire suppression sprinklers). We have provided over 100 of our buildings to clients in New England states, including a dozen or so in New Hampshire.


Insulated Ceiling Vapor Barrier

Should a Vapor Barrier Be Installed in an Insulated Ceiling?

Should you put a vapor barrier in an insulated ceiling or not? I build in a cold climate, where many longtime builders swear that you shouldn’t put a ceiling vapor barrier in. The reasons go something like, “Because you have to let the moisture escape,” or “Because the house has to breathe out the top.” What do the experts say?

Here I will defer to Joe Lstiburek – building scientist and the founding principal of Building Science Corporation:

Mike the Pole Barn Guru says:

To heck with the experts — here’s my answer. Plastic vapor barriers should only be installed in vented attics in climates with more than 8,000 heating degree days. You can forego the plastic and use a vapor retarder (kraft-faced insulation or latex ceiling paint) in all other climates except hot-humid or hot-dry climates. In hot-humid climates, attics should not be vented and vapor retarders should not be installed on the interior of assemblies.

In hot-dry climates a vapor retarder should also not be installed, but attics can be vented. All attics — vented or unvented — should have an air barrier (a properly detailed airtight drywall ceiling, for example) regardless of climate.

Omitting a ceiling vapor barrier by arguing that “you have to let the moisture escape” or “because the house has to breathe out the top” is actually correct, in a way. It’s also incorrect, in a way. Now, I’m a real fan (ha, ha) of controlled mechanical ventilation to limit interior moisture levels in cold and mixed climates, as well as to limit other interior contaminants in all climates. In other words, all houses require controlled mechanical ventilation in order to “breathe.” It is also my view that this necessary air change should not happen because of a leaky attic ceiling, attic vents, or even leaky walls. Hence the requirement for an air barrier and controlled mechanical ventilation in all houses regardless of climate.

Having said that, I do not have a problem with relieving some of the moisture load in the house via diffusion. This can be achieved through a roof assembly designed to handle it, such as a vented attic in a moderately cold or mixed climate. It’s important to understand that this is a climate-specific recommendation. In a well insulated attic in a very cold climate (more than 8,000 heating degree days), there is not enough heat loss into an attic from the house to allow for much moisture removal through ventilation. That’s because attic ventilation requires heat loss to remove moisture from attics. Cold air can’t hold much moisture. So ventilating a heavily insulated attic with outside air when it is really cold does not remove moisture. We do not want any moisture to get into an attic in a severely cold climate for this reason. As you move south into regions where it is not so miserably cold, this changes: Hence, the recommendation for a vapor barrier in a severely cold climate but only a vapor retarder in most other locations.

In the old days in severely cold climates, where attics were poorly insulated, it was okay to omit a plastic ceiling vapor barrier. The heat loss from the house warmed the attic sufficiently to allow attic ventilation to remove moisture from the attic. Cold outside air was brought into the attic and warmed up by the escaping heat loss, giving this air the capacity to pick up moisture from the attic and carry it to the exterior. This worked well until we added large quantities of attic insulation. With the added insulation, the attic stayed cold and so did the ventilating air from outside, which was now unable to effectively remove attic moisture. Hence the need to reduce moisture flow into the attic and the need for a vapor barrier.


There’s one other important qualification: Vapor moves in two ways, by diffusion through materials, and by air leakage through gaps and holes in building assemblies. Between the two, air leakage moves far more moisture than vapor diffusion. A vapor barrier in an attic assembly in a severely cold climate with the absence of an air barrier will likely be ineffective. On the other hand, an air barrier (a properly detailed air-tight drywall ceiling, for example) in the absence of a vapor barrier can be effective, since it stops the flow of vapor-laden air. You can’t just install plastic in a ceiling and assume it is also an air barrier. For plastic to be an air barrier, it needs to be continuous, meaning all joints and penetrations must be taped or caulked.

Spray Foam, “Rat Guard” Trim Cutting, and Ceiling Support Spans

This Monday the Pole Barn Guru takes reader questions about spray foam in an attic space, cutting “rat guard” trim, and ceiling joists for a 9′ span between trusses.

DEAR POLE BARN GURU: I am in the process of completing my Hansen building and decided to spray foam the roof and gable ends above the walls. When they came in to do the work I found they had foamed over the ridge vent closing it off. When I questioned this they said that is what you do when foaming the roof and the attic becomes a conditioned space. R14 on the roof does not sound sufficient. My floor is wood 4 feet off the ground. Is this right? Where should I go from here? Thanks ED in MYRTLE BEACH

DEAR ED: Provided you are including your building’s attic area in your conditioned space (not insulating directly above ceiling) then closing off your vented ridge would be correct. I have not been able to find anything printed to verify adequacy of R-14 for roof insulation with closed cell spray foam in Climate Zone 3 (South Carolina), indeed 2009’s IECC (International Energy Conservation Code) used by South Carolina would seem to lead one to believe ceilings require a minimum of R-30 (Please see Table 402.1.1 https://codes.iccsafe.org/content/IECC2009PDF/chapter-4-residential-energy-efficiency).

When you have an opportunity, please send back photos of your building, they would be greatly appreciated.


DEAR POLE BARN GURU: Hello there, for the life of me I cannot figure out how to cut the “Rat Guard trim” at the outside corner! At a 45 degree angle!!!! Please help!!!!! DANIEL in VANDERGRIFT


DEAR DANIEL: In my humble opinion, base trim should be mandatory for steel sided building panels. It keeps creepy, crawly critters from entering your building via open steel panel high ribs.


Direct from Hansen Pole Buildings’ Construction Manual, here are your instructions: https://www.hansenpolebuildings.com/2016/12/cut-install-base-trim-corner/


DEAR POLE BARN GURU: I have a 9 foot span between my trusses on my pole building and want to install steel on my ceiling. Do I need to install 2×4 braces between the trusses for additional support? I am planning on blowing in some insulation once the ceiling is installed. JASON in ROCKFORD

DEAR JASON: While I have heard of builders installing ceiling steel liner panels on trusses spaced even 12 feet apart without any additional support, my personal comfort zone is five feet – meaning, in your case, I would be adding 2×4 ceiling joists between my trusses. Make sure your trusses are designed for at least a three psf (pounds per square foot) ceiling load (truss drawings will show this as BCDL – bottom chord dead load) otherwise they will not be adequate to support weight of a steel ceiling.


Preaching Post Frame Conditioned Spaces – Insulation

Preaching Post Frame Conditioned Spaces – Insulation

We smile and greet each other inside the doorway, sharing pleasantries with friends old and new. Once assembled and comfortably seated upon hard wooden pews, we are relieved to be able to stand for a few minutes whilst singing a hymn or two and listening to announcements. Eventually it becomes pulpit time for me. As I prepare to bring forth fire and brimstone of how to effectively climate control your new (or existing) post frame building, my gaze finds most congregants are ….. fast asleep!

It must be so, for after services, I continue to get asked a variant of this same question I just preached about!

Reader RICK in BRIDGMAN writes:

“I’m building a typical wood frame pole barn for a workshop. Plan is to have a heated 36×40 with a steel liner panel roof, and plywood or combination of plywood steel interior walls. I plan to blow about 10-12” of insulation in the attic area on top of the steel liner ceiling. I plan to put R19 fiberglass in the studded walls before installing the plywood interior wall. I really like the idea of a radiant barrier to help with the summer heat. I had thought about installing single bubble or another radiant type of foil to achieve that. I see that some radiant foils are moisture permeable, and others are not. What would be the best configuration to get a radiant barrier installed with the r-19 batts in the walls, and the blow insulation in the attic? Should the radiant barrier be placed on top of the wall girls and roof purlins prior to installing the roof and exterior wall metal panels, or should the radiant barrier be installed on the posts and trusses before the girls and purlins installed? Should the radiant barrier be installed inside the purlins and girts after the exterior siding and roof is installed? What type of fiberglass should be installed in the walls, craft faced or unfaced with a plastic vapor barrier to the heated side of the building?”

Mike the Pole Barn Guru writes:

So many questions and so many ways to do it wrong. Let’s try for right.

Exterior walls are not a place for a reflective radiant barrier, or for studs.

For your reading pleasure, I have written out my entire post frame building insulation sermon here: https://www.hansenpolebuildings.com/2018/06/pole-barn-insulation-oh-so-confusing/.

Rick’s building will be located in Michigan, where recommended attic insulation happens to be R49 to R60 (approximately 16 to 20 inches of blown in fiberglass). Energy Star attic insulation values for anywhere in America can be viewed: https://www.energystar.gov/index.cfm?c=home_sealing.hm_improvement_insulation_table

Hallelujah and Amen!


Cardboard (or Plastic, Foam, Metal) Eave Baffles

Cardboard (or Plastic, Foam, Metal) Eave Baffles

The model building codes (IBC and IRC – International Building Code and International Residential Code) require enclosed attic spaces, in most cases, to have ventilation. The most efficient ventilation design solution is to have enclosed vented soffits at the eaves as an air intake, and a vented ridge as an air exhaust.

In order for this system to work effectively a minimum of a one inch air space has to be maintained from eave to ridge across the top of the attic insulation. For traditional stud wall frame buildings with trusses or rafters every two feet, this air channel can be maintained by prefabricated eave baffles which block the insulation from tumbling into the soffits. There are numerous materials used for these baffles, each of which has its own good and bad points.

But what about post frame construction? With trusses at a myriad of different spacings, due to engineering design or builder preference, there is not a one size fits anyone solution to maintain airflow.


Energy efficiency is a high priority for new building owners, making arriving at solutions which are as painless as possible a prime directive for post frame designers.

In order to maintain full insulation depth from outside of wall to outside of wall, it is most advantageous to use raised heel trusses (https://www.hansenpolebuildings.com/2012/07/raised-heel-trusses/). Now, how to keep the insulation where it belongs?

High R rigid insulation sheets can be cut to fit between the trusses, extending from the soffit supports to no less than one inch below the roof sheathing. A minimum one inch space must also be left between the inside of the eave strut and the insulation sheet.  Product dependent, of course, the high R boards can offer an R value of approximately six per inch of thickness.

Plywood or OSB (Oriented Strand Board) can also be used as a baffle, however either product is going to be heavier to work with, as well as not affording more than a minimal R value.


Pole Barn Insulation, Part II

Continued from yesterday’s blog:

(1) Storage – if you ever believe anyone might ever in the future desire to climate control then provision should be made for making it easiest to make future upgrades.

At the very least a reflective radiant barrier (single cell rather than wasting the money for the extra approximately 0.5 R from double bubble), an Integral Condensation Control (https://www.hansenpolebuildings.com/2017/03/integral-condensation-control/) or sheathing with 30# felt should be placed between the roof framing and roof steel to minimize condensation.

If a concrete floor is poured (in ANY use building), it should be over a well sealed vapor barrier.

For now we will assume this building is totally cold storage. If it might ever (even in your wildest dreams) be heated and/or cooled include the following in your initial design: Walls should have a Weather Resistant Barrier (https://www.hansenpolebuildings.com/2016/01/determining-the-most-effective-building-weather-resistant-barrier-part-1/) between the framing and the siding. Taking walls one step further would be ‘commercial’ bookshelf wall girts (https://www.hansenpolebuildings.com/2011/09/commercial-girts-what-are-they/).

In the roof – have the trusses designed to support a ceiling load ideally of 10 pounds per square foot (read about ceiling loaded trusses here: (https://www.hansenpolebuildings.com/2016/03/ceiling-loaded-trusses/). Trusses should also be designed with raised heels to provide full depth of future attic insulation above the walls (https://www.hansenpolebuildings.com/2012/07/raised-heel-trusses/).

Make provision for attic ventilation, by having an air intake along the sidewall using enclosed ventilated soffits and exhaust with a vented ridge.

Any overhead doors should be ordered insulated – just a good choice in general as, besides offering a minimal thermal resistance, they are stiffer against the wind.

(2) Equine only use: Same as #1 with an emphasis upon the ventilation aspect.

(3) Workshop/garage and (4) Garage/mancave/house are going to be the same – other than whatever the client is willing to invest in R value, being the major difference.

Adding onto #1 for the walls the low end would be unfaced batt insulation with a 6ml visqueen vapor barrier on the interior. Other options (in more or less ascending price and R values) would be Mineral wool insulation as it is not affected by moisture (https://www.hansenpolebuildings.com/2013/03/roxul-insulation/),  BIBs (https://www.hansenpolebuildings.com/2011/11/bibs/), closed cell spray foam in combination with batts and just the closed cell spray foam (https://www.hansenpolebuildings.com/2016/07/advantages-spray-foam-over-batt-insulation/).

For added R value and a complete thermal break, add rigid closed cell foam boards to the inside of the wall.

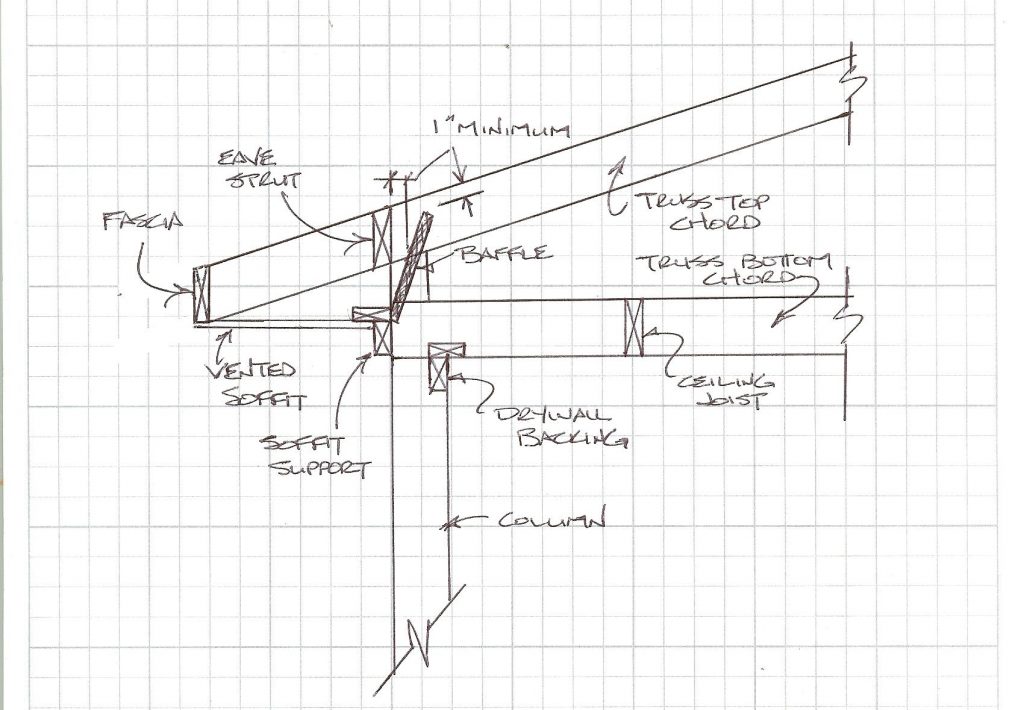
Once a ceiling has been installed, blow in attic insulation.

For (4) a Frost-Protected Shallow Foundation (https://www.hansenpolebuildings.com/2016/11/frost-protected-shallow-foundations/) with sand on the inside rather than a thickened slab is an excellent and affordable design solution.

For insulation solutions which follow the roof line, the best bet is going to be the use of closed cell spray foam, as it solves the potential condensation on the underside of the roofing and does not require ventilation above.

In most cases, the steel trusses fabricated for post frame buildings are either not designed by a registered engineer, are not fabricated by certified welders or both – so it makes it difficult for me to recommend them as part of a design solution.

With scissor trusses, they can be treated the same as a flat ceiling would be, provided the bottom chord slope is not so great as to cause blown in insulation to drift downhill.


Attic Insulation Guide

Pole Barn Guru BlogWelcome to Ask the Pole Barn Guru – where you can ask questions about building topics, with answers posted on Mondays.  With many questions to answer, please be patient to watch for yours to come up on a future Monday segment.  If you want a quick answer, please be sure to answer with a “reply-able” email address.

Email all questions to: PoleBarnGuru@HansenPoleBuildings.com

DEAR POLE BARN GURU: I am building a 24’x32′ pole barn type shop using 5 clerestory trusses in which I will install windows in the verticals for natural light. I want the roof shingled and insulated. Is there a way to frame in roof rafters between the trusses to carry the weight of the roof sheathing and to use batt insulation underneath? SCOTT IN ELLERSLIE

DEAR SCOTT: For sake of discussion, we will assume the trusses have been engineered to carry the weight of all of the materials you will be adding.

In order to use batt insulation as you propose, Code requires there to be at least a one inch air space between the top of the insulation (which must be unfaced) and the underside of the roof sheathing. This space must be vented at eaves and peak, and airflow must not be impeded.

Just off the top of my head (and knowing nothing about how your trusses are constructed), I’d probably look at placing a header at the eave and peak, which would carry 2×12 rafters placed every 24 inches and running the same direction as the trusses. Insulation batts up to 10-1/4 inches thick could then be placed between the rafters.

You should consult with the RDP (Registered Design Professional – architect or engineer) who designed your building, to confirm sizes and connections of members, as well as their adequacy to carry the imposed loads.

Mike the Pole Barn Guru

DEAR POLE BARN GURU: My name is Ben, and my husband and I plan to build a timber pole house in the mountains around Luray, VA. We are still in the planning stages, but are already working on the design stage of the house. I wanted to reach out and see if you offer the type of services we need, even though your website seems like you would be just perfect.

As a quick summary of our needs:

I am a 3d artist and am laying out the space in 3ds max to get an idea for room size, arrangement, and other proportions. However since I am not an architect, I need someone to go over the design, make it useable, point out any problem areas I am unaware of as a non-architect. Also being able to get all the materials cut and shipped to our building site is a huge plus.

Additionally, as we are still researching land, I would like input on what to look for based on our design, and then after land is procured, any adaptations needed for our plan to fit the space (the biggest thing I am worried about, is pile depth for the timber piles to pass code and be structurally sound). We plan on a 2 story building, so it’s likely the max timber height above ground would be around 35 feet for some of the timbers. We also plan to build on a mountain side, so the timber length would vary.

Is this the kind of service you can offer?

Thanks so much for your time,  BEN AND AGUST IN LURAY

DEAR BEN: We can supply columns up to 60′ in length, so you should not have any difficulties with what you have in mind – nor will needing various lengths be a challenge.

Our designs do not incorporate interior non-load bearing walls, as we have found room sizes tend to change greatly once the exterior shell is up and clients get a much better feel for what each room will do, as well as for orientation. Always try to work from the inside out – determine (at least close to) the area of the spaces you will need and then orient these spaces to be most functional for your lifestyle. Then create an envelope which fits around your spaces.

The ultimate location may (and should) play a great deal into the final design. Orientations should be such to take advantage of the most practical approaches to the site, as well as views and exterior living spaces (decks and patios).

Keep in mind – any pricing done now, is based upon where markets are at today. Lumber and steel are commodity items and prone to a great deal of variability which is beyond anyone’s control. Allow plenty of safety cushion in your budget, it is always a pleasant feeling to have more money left over, than having to scramble because things were planned too tight.

Mike the Pole Barn Guru

DEAR POLE BARN GURU: I am interested in pricing for a pole barn/apartment.  I am selling my house and will be purchasing roughly 15 acres of land.  I would like a pole barn constructed on the land.  I intend on building my own home which will take some time.  I would like a two story pole barn, with the upstairs being the finished apartment with somewhere around 900 square feet so I can live on my property while my house is being built.  Is this something that you would be able to do?  Thanks for your time. JEFF IN CINCINNATI

DEAR JEFF: Thank you very much for your interest in a new Hansen Pole Building. We provide post frame (pole barn) building kit packages similar to what you have in mind on a regular basis. You will be contacted shortly by one of our Building Designers to get more detailed information as to your exact needs.

Mike the Pole Barn Guru

Insulation: Foam It or Fiberglass It?

I enjoy Hansen Pole Buildings’ Designers who really like to sink their teeth into a subject.

This morning Rick asks me, “Have you ever done a cost comparison on spray foam roof insulation vs the costs of condensation barrier, ceiling load trusses, joists, drywall ceiling and blown in insulation?”

The entire question was brought about, as Rick really gets his clients to think about how they will be using their buildings.

In order to do a comparison, I just plucked from the air a 40’x60’ building, double trusses every 12’ with a 4/12 roof slope and 12” overhangs. Fairly common, pretty standard.

So, what needs to be done in order to spray foam a pole building?

Spray Foam Insulation
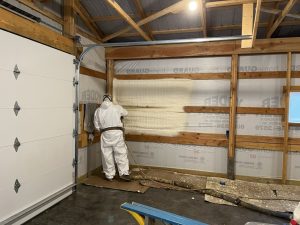
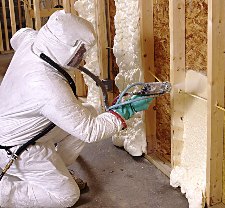
For starters, keep in mind (by Code) spray foam insulation cannot be left exposed, it has to be covered with inflammable material – like gypsum wallboard. Gypsum Wallboard is not as flexible as steel, so it has deflection criteria which mean upsizing the roof purlins from 2×6 to 2×8, or changing the column spacing to 10’ on center(o.c.). In the end, when I priced it out the change to 10’ o.c. was less costly, adding only about $900.

In either case, the truss loading will need to be increased to support the extra weight of the system – the top chord loading for spray foam or the bottom chord to create the dead attic space. Statistically – pretty much a wash in costs.

Due to the run of the roof, the spray version is going to take a little more drywall – call it $50

In the northern ½ of the United States, the recommended minimum attic insulation is R-49.

Spray foam is not inexpensive. With 2×6 purlins on edge, the maximum foam insulation thickness is 5-1/2 inches. At R-7 per inch for closed cell foam, will result in an R 38.5. The going rate for spray foam runs from $1 to $1.25 per square foot (sft), per inch of thickness – plus travel and fuel surcharges. To keep it easy, I will use $1 and ignore the rest. Including the run of the roof, roughly 2520 sft at $5.50 per sft is going to cost $13,860.

Total added costs for spray foam = $14,810

How about fiberglass in a dead attic space?

Increased truss load has previously been covered.

Ceiling framing must be added between trusses to support the wallboard – roughly $1200 including all of the Simpson hangers.

A reflective radiant barrier must be placed between the roof purlins and the roof steel, to prevent condensation, which would then rain on the insulation. $650

And the ridge must be vented. Under $200

According to Lowe’s, to get an R49 with fiberglass would require 74 bags of blow-in insulation at $32.75 a bag for just over $2400.

Total costs for fiberglass = $4450.

In summary, spray foam costs would be roughly 333% of the cost of fiberglass, to get to 78% of the R value. The other downside is with spray foam, the area of the trusses now has to be heated (almost 8000 cubic feet of space) before the area below it is going to feel warm!