Tag Archives: top chord dead load

How to Read Truss Design Drawings

How to Read Truss Design Drawings

This invaluable information is provided compliments of Structural Building Components Association (SBCA). Should you be considering purchasing trusses on your own, it will be to your benefit to familiarize yourself.

Trusses are incredibly efficient structural framing solutions and, consequently, are used in most of today’s light-frame wood construction projects. Many different professions encounter trusses, whether they are builders, framers, code officials, architects, engineers, or involved in another building trade. One of the most comprehensive documents to help understand how a specific truss is designed to perform (and be installed correctly) is its Truss Design Drawing (TDD).

TDDs are generated by the proprietary design software used by a component manufacturer (CM), so the exact layout of a TDD may vary slightly between software providers, but the same information is included regardless. To help individuals read and understand TDDs, SBCA has created a library of brief yet comprehensive videos called, “How to Read Truss Design Drawings.” The goal of this video series is to explore the various aspects of TDDs and give context to explain why the information is important.

Building Your Own Pole Barn Trusses

Wants to Build His Own Pole Barn Trusses

Reader DANIEL in HAMPSHIRE writes:

“Good evening, I was wondering if I could ask for your help? I have a question regarding truss designs and truss spacing. I’m building a pole barn (50ft wide x 112ft long x 12ft tall). Prices of pole barn kits have skyrocketed just as much as steel buildings. Building this size 3 years ago would have cost a third of the price today. I’m building an indoor fish farm. If you like to know more of my back story you can visit www.steelheadsprings.com I don’t want to waste your time reading it here. I spent years collecting investors and putting up my whole life and it turned out its not enough. However, I found a solution, I must build it myself, I must build everything myself. I have good support here however I don’t have a specialist. Every time I speak to an engineer, they tell me it can’t be done. Right now my problem is trusses. Locally, each 3-ply 6x6x14 post columns retails anywhere between 400 and 500 dollars. I laminated mine for just under a $100. Steel brackets to mount said post columns into concrete with hardware retails around $125 each, I sourced a local shop to build mine for $40 each. Steel sheathing for walls and roof was sourced from social media from an out of business contractor for .30$ on the dollar. Currently trusses are outrageously priced! The few local places are pricing them anywhere between $600 and $900 for the 40-footer and between $800 and $1300 for the 50-footer. One building needs 15 trusses and another two need 8 trusses each. Prices just keep going up, so I’m forced to build the trusses myself. So, I turned to the web. I’ve been educating myself on designs and ideal styles that would suit my buildings.  Already have the concrete columns pored. Pillars are 18-inch diameter and 50-inch deep. Brackets are already installed at 8ft on center. I would like to use the saddle style truss and wedge it at the top. I have 20 inches of middle board notched out to accommodate a saddle truss. I want a 4/12 pitch with 8ft o.c. truss spacing and 2ft o.c. purlin spacing. Because I’m going 8ft o.c. truss spacing I must install the purlins upright on its edge. This works perfectly because it gives me plenty of room for insulation to be installed flush with the steel. I have no overhangs and my heel is 10″. I found a company on the web (medeek designs). They design the geometry of the trusses. I basically plug in the lumber and the software does the rest. It designs the truss and with a simple click of the mouse I can get exact dimensions of my tc, bc and the webbing. However, it does not explain what size of lumber I should use to achieve the desired clear span goal. I must go to an online retailer and look up a truss and copy their design to plug in the information. I need your help; my land is in an unincorporated county which basically allows me to do anything that I want. I just must follow simple rules with foundation and snow/wind loads. Top Chord live load is 30psf, Top Chord dead load is 7psf, Bottom Chord live load is zero and Bottom Chord dead load is 10psf. I chose 12ft height because it is just tall enough for my needs and it’s sturdy enough for the wind and snow loads. I almost built 4-ply columns, but I decided to go with three because I would obtain the same rigidity with girts spacing of 24-inches instead of 36-inches. I built a 20-ton gusset plate press, and I used the software to build a sample truss. I tested it to the best of my abilities, and it stood its ground. I watched a few videos where some people installed wooden “gusset” plates as additional support over the steel plates. Some even used glue. I know that I want to over engineer this truss to make sure it stands the time. It leaves a good story for the upcoming generations about how we built this from the ground up. I still recall hearing stories from my grandfather and father how they both built their homes. I will attach a few pictures of the drawings that I have. Both 50-foot and 40-foot trusses should be double fink as this truss is rated for 40-60ft clear span. I was going to use 2×8 for both top chords and bottom chords with 2×4 for the webbing. The 40-footer truss isn’t the problem because the truss only has one cut in the bottom chord at the 20ft mid-point. The 50-footer truss is the big issue. If we assume that 2×8 lumber is strong enough for the construction, where should the bottom chord be spliced/connected as my common sense calls for a one 20ft middle section and two 15ft outer sections. If that is ok, what about the top chord, where should the 20ft board be extended? I’m so sorry for taking so much of your time, I hope this is enough information and I hope it makes sense. Can you please help? Thank you.” 

Mike the Pole Barn Guru:

Let’s start with the disclaimer at www.medeek.com:

The truss designs produced herein are for initial design and estimating purposes only. The calculations and drawings presented do not constitute a fully engineered truss design. The truss manufacturer will calculate final loads, metal plate sizing, member sizing, webs and chord deflections based on local climatic and/or seismic conditions. Wood truss construction drawings shall be prepared by a registered and licensed engineer as per IRC 2012 Sec. R802.10.2 and designed according to the minimum requirements of ANSI/TPI 1-2007. The truss designs and calculations provided by this online tool are for educational and illustrative purposes only. Medeek Design assumes no liability or loss for any designs presented and does not guarantee fitness for use.

Moving forward, Building Codes and ANSI/TPI have had several changes since Medeek put this information out. Most jurisdictions are using 2018 or 2021 versions of Codes and ANSI/TPI 1-2016.

I have previously opined in regards to site built trusses: https://www.hansenpolebuildings.com/2018/12/site-built-roof-trusses/

I spent two decades in management or owning prefabricated metal connector plated wood truss plants. In my humble opinion – attempting to fabricate your own trusses of this magnitude is a foolhardy endeavor, for a plethora of reasons:

1) You want to build trusses only from a fully engineered design, specifying dimensions, grades and species of all wood members, as well as detailing dimensions of all connections. Besides dead and snow loads, design wind speed and exposure need to also be considered. Do NOT try to copy someone’s online design, as it is likely to prove inadequate.

2) It is unlikely you will be able to obtain lumber graded higher than #2, without a special order. A 40 or 50 foot clear span truss with your specified loads is going to need some high grade lumber for chords – expect to see MSR or MEL lumber (read more here: https://www.hansenpolebuildings.com/2012/12/machine-graded-lumber/).

3) You will be unable to purchase steel connector plates of sufficient size and thickness to connect members. This leaves you with having to invest in Struct 1 rated plywood to cut into gussets.

4) Should you have a failure from building your own trusses without an engineered design, your insurance company can easily get themselves out of having to pay your claim.

Per your statement, “I know that I want to over engineer this truss to make sure it stands the time.”

Do yourself a favor and find a way to invest in prefabricated trusses. It will give you peace-of-mind you will not get otherwise.

When Friends Buy Buildings From Others

When Friends Buy Buildings From Others

Long ago, in a galaxy far away……well actually it is in our galaxy.

Jeff and I met roughly 40 years ago, when his mother and my father dated. About 15 years later, I was Jeff’s sponsor when he became a member of Spokane Valley Rotary. In recent years, Jeff invested in a pole building and I was unaware of it until now – when he reached out to me with a challenge.

Jeff writes:

“Hey Mike! I have read the blog a lot and tried my best to understand the insulation issue that seems to get asked of you the most, but I’m just a little slow on understanding. Attached are three pictures of my pole building ceiling that I want to begin insulating. It is 36′ x 40′ with 14′ eaves on a 5×12 pitch. As you can see there is OSB under the steel roofing. The sides are steel from the top down to 4′ where there is OSB and hardiplank siding. Concrete floor. You can see some mold stains from the first year that I did not have a floor poured yet. For the walls I figure I can just use faced fiberglass batt rolled insulation without a vapor barrier then finish with drywall. Not sure about the ceiling. Can I just use rolled insulation? Then drywall or OSB over that? Vapor barrier? Do I need to have the 1″ = 2″ ventilation space between the OSB and the fiberglass? Only one side has the vent opening to the eave, the other side has an open lean-to. Thanks.”

Mike the Pole Barn Guru writes:

If your intent is to insulate between roof purlins with batts, Code requires a minimum one inch air space between insulation and roof deck (in your case OSB) continuous from eave to ridge. There is no way for you to accomplish this, as your building’s purlins block any possible airflow route. Your choice for insulating with a roof plane really comes down to closed cell spray foam. Other issues could be what sort of a dead load your roof system is engineered for. Typically post frame roof trusses are designed for only a five pounds per square foot (psf) top chord dead load with OSB. This would not be adequate to attach OSB, plywood or sheetrock directly to the underside of purlins. Even if trusses have adequate load capacity, your roof purlins appear to be 2×6 and would overly deflect with sheetrock applied – resulting in popped screws and failed taped joints.


In an ideal world, your roof trusses would have been designed for a 10 psf bottom chord dead load. This would be adequate to support a sheetrock ceiling and fiberglass insulation could be blown in on top of it. If this route is taken, you would need to provide adequate ventilation.


A solution could be to reach out to whomever manufactured your building’s roof trusses and inquire about an engineered repair to increase loading. These repair drawings are usually relatively affordable, however repairs often entail a fair amount of time, effort and materials.


As you have no Weather Resistant Barrier (Tyvek or similar) between wall framing and siding, I would recommend using unfaced rock wool or mineral wool batts as they are unaffected by moisture (unlike fiberglass) with a well-sealed 6mil clear visqueen vapor barrier on inside, then your drywall.

Truss Spacing and Design

Truss Spacing and Design for Sheathed Post Frame Roofs

In most instances, there is not a structural or Code requirement for solid roof sheathing (plywood or OSB – Oriented Strand Board) to be placed below through screwed roof steel for post frame buildings. In some cases, clients look upon this as being an easier installation when doing a DIY build. For others, it is about providing a thermal break to eliminate underside of roof steel condensation. And a few look towards minimization of potential hail damage.

Reader CARROLL in PORTER writes:

“ Wanting to build Pole Barn that is about 35’x80’x12′ My question is, if I want to install 1/2″ decking plywood or OSB decking with underlayment and metal panels how far apart will I need the trusses to be center to center or what kind of truss design will I need? I guess it could be a 4/12 or 5/12 pitch if that helps any.”

Provided you have adequate available space, you may want to tweak your footprint dimensions in order to optimize your return for your investment. As steel comes in three foot widths and lumber in two foot lengths, your most cost effective dimensions of length and width will be multiples of six feet. In your instance, I would recommend 36 feet wide and 84 feet long.

With this said, I would place a single truss on each endwall and a two ply truss every 12 feet to align with your sidewall columns. Purlins can be placed on edge, using engineered steel joist hangers, between each set of trusses and spaced every two feet to support your sheathing. Whether plywood or OSB, panels are best installed running up roof from eave to ridge (perpendicular to purlins, parallel with truss spans). If not using synthetic underlayment, you should use 30# asphalt impregnated paper (roofing felt). With Hansen Pole Buildings, we purposefully design all trusses spanning 40 feet or less with a greater than minimum requirement top chord dead load – in order to accommodate those who want to install solid sheathing.


A Case for Minimum Post Frame Truss Loads

A Case for Minimum Post Frame Truss Loads

Portions of this article were written specifically for Component Advertiser, a monthly truss industry publication. However I feel strongly enough about this subject to use my column to pitch it to both my employers and other post frame building kit suppliers and contractors.

In my career I have done about everything imaginable when it comes to post frame (pole) building trusses. I have been blessed to have been able to spend a better portion of over two decades working within or owning prefabricated MPCWT (metal plate connected wood trusses) manufacturing facilities. I have designed, engineered, fabricated and delivered trusses. As a builder, I raised my first set of post frame trusses nearly 40 years ago and many more have followed.

I have also been a provider of post frame building kit packages across most of my adult life. Our industry (post frame buildings) is one where low price, rather than service and quality, drives most sellers and buyers. Sellers, more often than not, have not learned well how to convey value of benefits they offer – instead they live in fear of being a five-spot more than their competitors when it comes to price.

For nearly seven years I have been writing a weekly advice column, “Ask the Pole Barn Guru™”, where I answer post frame building oriented questions from anyone. One repeatedly asked question is in regards to adding ceilings to existing post frame buildings. Most roof trusses for these buildings were not designed to support ceiling loads, generally due to a fear of increasing building price.

Many post frame buildings are constructed in areas where pole buildings are exempt from building permits, or there are little or no structural plans reviews done. This contributes to an attitude of “make it cheap” by encouraging use of minimal loads for trusses.

A great majority of post frame buildings are used as residential accessory buildings – garages, shops, RV parking, man caves, she sheds, etc. Nearly all of these buildings have truss spans of 40 feet or less, so my proposal for voluntary minimum loading requirements for post frame buildings will be directed towards these structures.

Why not apply these minimums to larger span structures? Many wider span buildings are going to be used as horse riding arenas or equipment storage for farming and are never going to have ceilings in them. Costs to design for greater loads, for spans of 50 feet and greater could result in some significant costs. Wide span buildings being used for more humanly occupied (and therefore more critical in protection of human life) purposes are likely to have a Registered Design Professional (architect or engineer) involved, who will specify roof loads based upon building use and function.

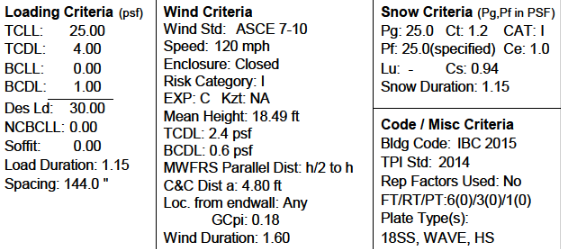
In areas of minimal or no snow, with Pg (ground snow load) values of under 20 psf (pounds per square foot) Top Chord Live Load (TCLL) should be fixed using a minimum of 20. For areas where white stuff has a greater possibility of occurrence 25 psf appears to be a reasonable minimum.

Most post frame buildings have light gauge steel roofing over purlins. Hopefully they also have some sort of minimal weight material between these to minimize or prevent condensation issues. In most instances, total dead loads required in order to support truss weight, condensation control, purlins and roofing will be less than 2.5 psf. There are folks who have ideas not always shared with truss designers – like using OSB or plywood sheathing between purlins and roofing. Also, rooftop solar panels are becoming more and more popular and find their way onto more than a few roofs not designed to support their weight.

My proposal (again for buildings of 40 foot spans and less) would be for a minimum TCDL (Top Chord Dead Load) of five psf. While this does not solve every possible case, it does allow for greater end user flexibility.

Traditionally, most post frame buildings did not have ceilings installed, so a very minimal BCDL (Bottom Chord Dead Load) has been used. Most typically a one psf loading will be selected, more than covering bottom chord lateral bracing and limited lighting. However, as post frame have moved from farms to suburbia, more buildings are getting interior finishes – meaning ceilings. I like to use 10 psf, in cases where I am designing for a drywall covered ceiling with insulation above, however even five psf would handle most ceiling loads.

Load duration – no snow, I am good with 1.25, snow areas 1.15. However, in my humble opinion, if TCLL exceeds 50 psf, chances are snow will be piled on top of these trusses for more than two months across structure’s lifetime and a DOL (Duration of Load) of 1.0 will be most appropriate.

A hidden side benefit to establishing these voluntary minimums will be stronger trusses able to withstand more abuse in handling. Some lumber members will be larger dimension or higher grade material and steel connector plates will increase in size. All of these factors increase probabilities of reduced truss damage.

Hansen VisionNow, I believe, time has come to stop selling price to post frame building clients and sell benefits. Safety becomes easiest to sell – no one wants to live with a fear of their building collapsing and injuring them, their loved ones, or destroying their valued possessions. Flexibility in future use – also an easy sell, if a future building owner decides they want to add a ceiling they can safely do so.

Minimum post frame truss loading benefits all, by raising the overall quality of finished buildings  with a negligible investment.