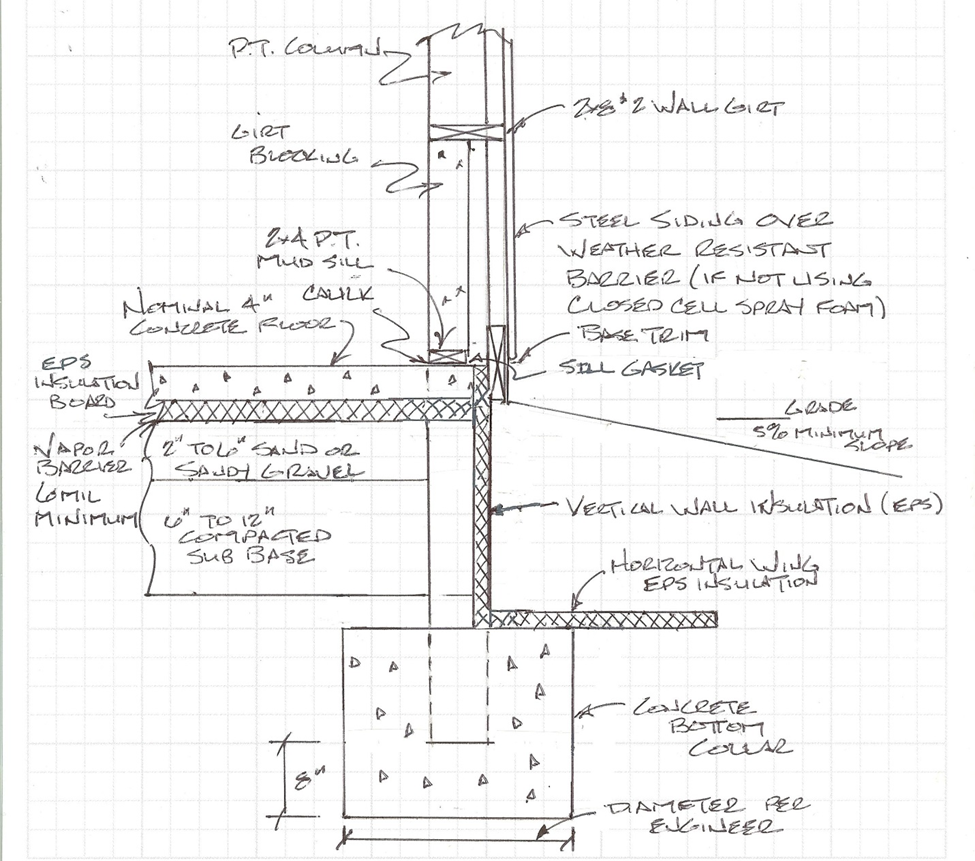
Meeting IRC Slab Edge Thermal Breaks With Post Frame
Reader CHUCK in MUNCIE writes:
“Morning sir, I read your link in your post about post frame buildings for barn houses… one thing I am wondering, is how does the building pass energy code for residential construction, plus the IRC talks about a building being used for residential occupancy needs a thermal break at the foundation wall…. in a conventional post frame building the posts are on footings, and a slab on grade is poured, so how do you provide the thermal break to meet the building code?”
Mike the Pole Barn Guru says:
Post frame construction for residences has no appearance of going away at any time according to my crystal ball. And why should it? Post frame is more economical than stick frame, very DIY user friendly and can be readily super insulated. Here, I previously expounded upon post frame’s residential virtues: https://www.hansenpolebuildings.com/2022/01/why-your-new-barndominium-should-be-post-frame/
Slab edge thermal breaks (slab perimeter insulation) is only required in Climate Zones 3 and greater. You can look up your Climate Zone at chapter-3-re-general-requirements When required, it must be a minimum of R-10 and down two feet (Climate Zones 4 & higher adds a horizontal R-10 component or becomes down four feet).
A common question with rigid foam insulations is how well it resists water. A number of studies show EPS retains less moisture than XPS. A case in point is a side-by-side analysis of these two rigid foam types installed on a commercial building foundation in St. Paul, MN. When extracted and tested after 15 years in service, EPS had 4.8% moisture content by volume, compared to 18.9% for XPS (a four-fold difference). A testing lab also found XPS holds water longer than EPS. After 30 days of drying time, XPS still had elevated moisture of 15.7%, while EPS had dried to 0.7%.
For installations where insulation will be exposed to large amounts of water or frequent wetting, rigid foam insulation is available with water-resistant facers or pre-cut drainage grooves. Insulation with polymeric laminate facers keep water from entering insulation and also provide an added barrier to water wicking or diffusing through.
Moisture resistance is also important for below grade and under-slab insulation, since wet products provide much lower thermal resistance. Side-by-side insulation comparison found EPS retained 94% of its specified R-value, while XPS lost nearly half of its insulating capability over 15 years.
In addition to higher moisture resistance, EPS also is not subject to thermal drift. This means its R-value stays same over time. By comparison, XPS’s manufacturing process uses blowing agents diffusing from foam’s cellular structure over product life, thereby reducing its thermal performance. EPS manufacturers typically warrant 100% of published R-value for 20 years or more, while common XPS warranties cover just 90% of published R-value.
Whether selecting EPS or XPS insulation, to ensure performance, confirm product was manufactured to meet requirements of ASTM C578, Standard Specification for Rigid, Cellular Polystyrene Thermal Insulation. This standard provides a key quality check on rigid insulation.
As insulation becomes increasingly common at slab edges, understanding performance and cost factors of these different materials is important. EPS offers a number of advantages over more commonly installed XPS, including having highest R-value per dollar among rigid insulations, making it a cost effective choice for many jobs.
 DEAR POLE BARN GURU:
  DEAR TONY:
  DEAR LLOYD: There is no structural reason to pour a “rat wall” between columns (
 “PolebarnGuru,
 “Another method for dealing with frost involves wrapping posts with plastic, so that the ice slips when it heaves. I suspect that this will work for a year or two – maybe – but eventually the deterioration of the plastic will bring the whole dream to an end. It seems that filling postholes with uniformly graded 1-1/2-inch crushed stone might work a little better. However, I do admit never having worked with plastic wrap and look forward to hearing about your experience.”


