Tag Archives: radiant heat

Isolating Heated and Unheated Barndominium Concrete Floors

Isolating Heated and Unheated Barndominium Concrete Floors

Loyal reader MIKE in COUPEVILLE writes:

“I see you recently posted a detailed drawing on insulating the perimeter of a pole barn, very helpful. 

https://www.hansenpolebuildings.com/2020/03/meeting-barndominium-slab-requirements/

I’m currently looking at purchasing a large pole barn, it will be 84’x42′ with posts 12′ apart.  I plan to make 2 of the 12’x42′ bays on one end a heated living quarters in the near future.  I’m curious how you would propose to insulate/isolate the 4” slab of the heated living quarter’s side from the unheated shop/garage side.  I’m thinking more 2” high density foam laid vertically basically making them two separate slabs one 24’x42′ for the heated living quarters and the other 60’x42′ for the unheated shop.  The issue I see with this method is it is effectively separating the slabs and I’m assuming the engineering of the building, I’m especially concerned about this because the insulation/break would be the whole 42′ width of the slab and right where the 12′ on center posts are.  Will this method compromise the structural integrity of the building?  Will your engineers call it out in the plans if asked to?  Or is there some other way to insulate the slab between heated and unheated portions of a build? 

Thanks for your time and I’ve enjoyed reading many of your blog posts.”

Mike the Pole Barn Guru responds:

Thank you for being a loyal reader and for your kind words, they are appreciated.

One question I have often asked clients is, “Do you mind if I treat your building as if it was going to be my own”? 


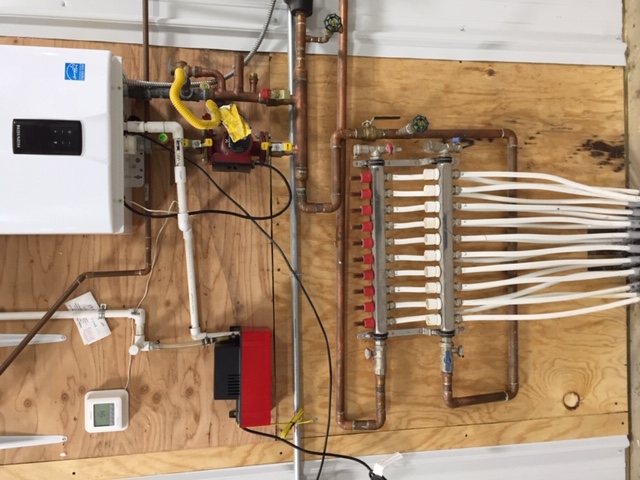
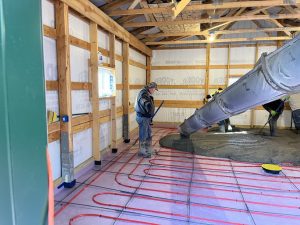
If your building was going to be mine, I would place vertical wall insulation around the building’s entire perimeter. This shop may be unheated today, but it would not take me very many winters of working in it to decide I want heat in it. I would also put rigid insulation under my entire floor surface as well as pex-al-pex tubes for radiant heat – divided into zones so shop and living quarters could be heated independent of each other.


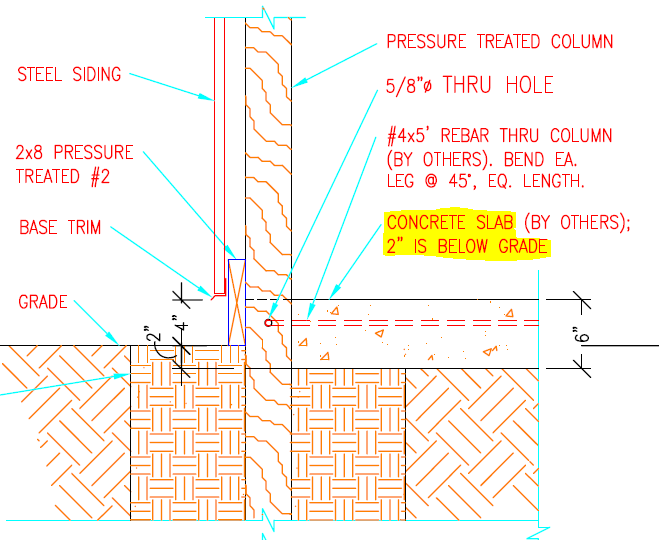
As to your idea of a thermal break across your building’s width, there would be no structural detriment from it as it would (for practical purposes) function as a very large expansion joint. As your building’s weight does not rest upon its slab on grade, your slab’s structural contribution to your overall structure is in reducing wind shear forces having to be transferred from roof surface, through endwalls to ground, creating a constrained condition. https://www.hansenpolebuildings.com/2018/11/importance-of-constrained-posts/

If requested we can have our engineers include this detail within your sealed plans.

Minimizing Excavation in Post Frame Buildings

Minimizing Excavation In Combination With Post-Frame Frost Protected Shallow Foundations

Regular readers of this column recognize a groundswell movement towards energy efficient post frame building design.

Reader (and Mechanical Engineer) DAVID in CONNECTICUT had some thoughts (after reading a volume of my article pages) in regards to FPSF (Frost Protected Shallow Foundations) and radiant in floor heat.

He writes:

Good Morning, Mike!

In regards to this post, I’m having a lot of trouble understanding just how this all fits together…

https://www.hansenpolebuildings.com/2012/09/concrete-slab-3/

Firstly, I have read thru many (if not all) of your blog posts about foundations/slabs, browsed more than 40 pages of 80 blog list pages, as well as plenty of external references.  Thanks for all the info you’ve put up!  So trust me I’m not just trolling and looking for inconsistencies, just trying to get the best understanding possible before building and hoping to condense some of the knowledge that is spread through your blogs.  I‘m a mechanical engineer by trade but my thoughts stray into many other areas!  Because of your focus on engineering, Hansen is a front runner for getting my money.  Also, I thought maybe I could contribute to the evolution of your build process to make things easier for the insulated slab folks here in frost country!  I am in CT, frost and cold are an issue for heating my near-future garage.  I’d like to run PEX in slab, and r10 foam under slab was recommended for max efficiency. How to install PEX Tubing in a concrete slab I’ll also likely be doing at least a partial FPSF at the edges.

In your blogs there seems to be a little bit of conflict on what you recommend for site prep. 

  1. Here, in the “thoughts” section at the bottom,  https://www.hansenpolebuildings.com/2011/11/soil-compaction-how-to/ you recommend the gravel go in after the posts, but that seems to require plenty of back excavation to get the recommended gravel depth.  How is the builder supposed to remove 6+ inches of ground from underneath and not disturb the soil under the skirt board?  Plus, in the case of the people to do have gravel put in, you just spent all that effort putting it in and compacting it now you have to dig it out?
  2. What I read at the “concrete slab -3” link above seems to indicate that I do organic removal, use at least 6”of properly compacted crushed processed stone to bring it back to (or just above) the previous grade, build the structure with skirt/splash board on that grade.  Then for a 4” slab, re-excavate down 2 more inches for the insulation/ vapor barrier.  That might be fine, but you also mention “prior to pouring (concrete),” use 2-6 inches of sand/ sandy gravel below the vapor barrier and 3-4 inches of sand above it.  That would be a minimum of 5 additional inches (+2 for foam= 7”) of internal excavation after building!  Or did you mean the first layer of sandy gravel would go on-grade and be built on?  That’s still 5 total inches of post-build excavation (3 more of sand + 2″ of insulation board).  Something still doesn’t quite add up.  Not to mention the effort/ difficulty of re-leveling and re-tamping the internal excavated surface again!
  3. You specifically mention in several places never to exceed 3.5” up the 2×8 skirt board, which is also fine, but what if we look into deeper slabs and less work to excavate?  What if we did all the gravel/sand down 2” from FINAL grade, and used a 2×10 ground contact skirt board? Then there would be no interior excavating.   I designate “final” grade because the area would be leveled, then building built and 2” backfilled against the skirt.  OR in the case of a FPSF, the vertical insulation would be there anyhow.  If there must be 2” of sandy mix above and below the vapor barrier you could use a 2 x12 skirt, right?

4. Also this article recommends against sand pre-pour.  https://www.concreteconstruction.net/how-to/site-prep/subgrades-and-subbases-for-slabs_o Thoughts on that?

5. Lastly, I had an idea to more easily prep the area for both insulated slabs and FPSF. This also prevents disturbance of the sub-grade area during the install of the FPSF external insulation.  Please see the illustration below.

6. Prep the area with appropriate sub-base compacted gravel but at a lower than “finished grade” level.  This would be an area consisting of the building size plus 3 to 5 feet in each direction.

7. Install the poles and footers.

8. Install the 2 x12 skirt board on surface of the lower than final grade area.

9. Trench the outside for the vertical and horizontal FPSF insulation,

Backfill in lifts, compact, and re-grade the area outside the skirt board insulation.  This supports the subgrade area UNDER the skirt board and behind the insulation so you don’t accidentally leave voids behind it.

THEN you add and compact the material inside the skirt board like sand/ stone-dust, vapor barrier, insulation foam, rebar and PEX tubing.  This prevents weakening of the material under the skirtboard as well, because it’s never disturbed!

Last you pour 4” of concrete leaving a 3.5” reveal and you have the same  post length, siding material and eave height/ clear height as before.

Can you even get 2 x 12s treated that might work in this application?  Is UC-4B needed as it’s not exactly structural, right?  Plus it’s surrounded by foam and well drained soil.

I know this is long, I apologize again, but I appreciate your careful review and answer in advance! 

Thanks, and I can’t wait to hear your thoughts!  Feel free to edit/ take snippets out for another FPSF blog post if it’s helpful.  The post to end all FPSF/ slab prep/ frost blog posts!  Honestly, 80 pages of blog post lists is very cumbersome.  I’m thinking a digest of some kind is in order!

Mike the Pole Barn Guru responds:

Tune in to our next episode for a thrilling (and simple) conclusion!


Vapor Barriers in Post Frame Construction

Purpose of a vapor barriers

Vapor barriers are designed with one purpose: to halt the movement of water vapor and prevent it from getting into the wrong parts of your building assembly. Usually, this means protecting insulation or building materials from moisture damage.

Any material with a U.S. perm rating of less than 0.1 perm is considered a vapor barrier. Materials with higher perm numbers (more permeable) are classified as vapor retarders. Polyethylene plastic sheeting (poly) of 6 mil thickness or greater is typically used as a vapor barrier. Commonly used 6 mil poly is 0.006 inches thick and has a 0.06 perm rating.
It’s important to note the difference between vapor barriers and air barriers. Air barriers, such as Tyvek house wrap, are designed to stop the flow of air, but will allow water vapor to pass through.

Vapor barriers in walls and ceiling

If your post-frame building is insulated, installing a vapor barrier on the inside (warm side) of the insulation will protect your walls and ceiling from moisture. The greater the temperature gradient between the inside of the building envelope and the outside, the more readily the water vapor in the warm, inside air will condense onto a colder surface. For this reason, vapor barriers are most important in cold climates.

For sealing walls and ceilings, 6 mil or 10 mil reinforced poly is typically used. Depending on the building applications, fire-retardant poly may be needed.

Any holes or gaps in the barrier will allow moisture to pass through and render the barrier ineffective. Butyl tape or a butyl-type sealant should be used to affix the vapor barrier to the floor. Any penetrations, such as light outlets and ducting, must be sealed as well. Seal seams with vapor tape and allow for at least 6 inches of overlap.

Interior wall paneling is typically installed on top of the vapor barrier to protect the wall assembly. For ceiling insulation, however, an opaque white poly on the underside of the trusses can provide an attractive finish and brighten up the building interior.

For insulated buildings in the Southern U.S. or other hot-humid climates, vapor barriers are typically installed on the outside of the building envelope, under the exterior siding. Water vapor diffusion is not as big of a concern in these climates, but if the building is going to be air-conditioned, the pressure difference between the warm outside and the cool inside can be significant.

Even in post-frame buildings without insulation, vapor barriers can keep out drafts. If the building has leaks at joints, an interior vapor barrier can help seal the building.

Radiant barriers in post-frame buildings

Reflective InsulationRadiant barriers are designed to reduce radiant heat gain inside a building when the sun heats up exterior walls or roofing. They are made using shiny foil and have high reflectivity. Radiant barriers installed just underneath roofing or exterior walls will make its biggest impact by reducing summer cooling loads in buildings with high sun exposure.

A radiant barrier can double as a vapor barrier, depending on whether it is perforated or non-perforated. Perforated radiant barriers will allow water vapor to pass right through. There are many situations where a perforated radiant barrier is preferable to ensure moisture does not get trapped in the building. In residential attics, for example, a radiant barrier in the attic floor should be perforated so water vapor does not condense in the ceiling.

Vapor barriers under slab

For slabs on grade under post-frame buildings, a vapor barrier should be placed between the concrete slab and the ground. This will prevent water vapor diffusion through the slab, which could lead to cracking, spalling, or pooling of water inside the building.

Poly sheeting to partition space

If one part of the building is going to be used as a workshop, for example, heavy-duty poly sheeting can be used to create a temporary partition to prevent dust, debris, or moisture from entering the other parts of the building.

Purchasing vapor barrier supplies

Polyethylene vapor barriers are available at most stores that stock building materials. However, not all poly sheeting is created equal. Recycled “regrind” polyethylene could contain impurities such as dirt, debris, and moisture, and be more brittle as a result. When possible, purchase virgin polyethylene sheeting

A vapor barrier with a tear or leak will be greatly diminished in effectiveness. Americover offers durable string-reinforced vapor barriers that are made from 100% virgin polyethylene, ensuring maximum integrity and tear-resistance. 6 mil, 10 mil, 15 mil and beyond are available directly from Americover. Remember to pick up necessary sealants such as vapor tape and butyl tape.

Thank you to Tevan Ann Riedel for this guest blog post.

Tevan Ann Riedel

President, Americover

Tevan first founded Tri Synergy, a pioneer in sustainable solutions for the biotech market in 1989. By 1993, the company had expanded its horizons to include plastic sheeting solutions and became Americover.  Serving multiple industries worldwide from agriculture to construction, the company has experienced 20% year-over-year growth for the last 10 years alone. Today, Tevan and the team continue to innovate and develop new sheeting solutions to best leverage modern technology and meet industry demand.

Harnessing Radiant Heat

Welcome to Ask the Pole Barn Guru – where you can ask questions about building topics, with answers posted on Mondays.  With many questions to answer, please be patient to watch for yours to come up on a future Monday segment.  If you want a quick answer, please be sure to answer with a “reply-able” email address.

Email all questions to: PoleBarnGuru@HansenPoleBuildings.com

DEAR POLE BARN GURU: I work for the US Army Corps of Engineers in Toledo Ohio. We need to get a layout and price for a building that is around 35′ X 45′ with 15 foot tall doors at each end to be able to run a boat on a trailer thru it and to be able to use it to work on it and have storage for the survey equipment we use on it. Please send whatever you have that is close to those dimensions that I can send up to the main office for their consideration. Thank You, MITCHELL IN TOLEDO               

DEAR MITCHELL: As a starting point, it would be quickest for you to request a quote by going to: https://www.hansenpolebuildings.com/freequote/. One of our Building Designers will be in contact with you to work out fine details and guide you towards a solution which will best meet with needs and budget.

If this is a project which will have to be put out for bids, our team works with any governmental agency and will product structural plans for bidding, with no upfront investment. Oftentimes, it is most cost effective to split the project up into two portions for bid – the building design and materials delivered to the site in one, the construction labor and any concrete in another. This eliminates the contractor marking up the materials and gives agencies more building for their investment. Mike the Pole Barn Guru

DEAR POLE BARN GURU: Instead of using your free building quote which is different than what I want. Can you quote sketches for me? I can get by with a 30X60, but I wanted to see what the price difference would be to go to a 36X60. Put the total cost down including delivery. What I want is two open bays for equipment storage with a 24′ shop. The inner shop wall will have a man door that enters the shop. I will build the pole barn myself. Can you separate the costs of the inner shop wall and overhead door? I figure if the cost is more than I can do this year I can at least have the shell completed and install the rest at a later date. I hope this isn’t too confusing. I have included my contact information below if you need to contact me. Roof would be 4-12 pitch. All steel with two colors (Black and white). DAN IN OHIO

DEAR DAN: Most certainly we can begin with your sketches. You are after a building which in the bygone days (at least in the Pacific Northwest) was known as a machine shed/shop. They were very popular in the 50’s through 80’s because wind analysis technology had not yet figured out the forces on a three sided building (which the non-shop portion is).

To read more about what happens with three sided buildings: https://www.hansenpolebuildings.com/blog/2014/03/three-sided-building/

Ultimately it would be less expensive to do a fully enclosed pole building.

Mike the Pole Barn Guru

DEAR POLE BARN GURU: I’m planning a 32×64 pole building, metal sides, shingle roof. The building will not be heated. However, I am intrigued by the thought of harnessing the radiant heat in the ground under the slab and allowing this to radiate through the floor into the building during the winter. Is this even a realistic idea? If the slab were insulated vertically around the perimeter to isolate it from the frost and also a perimeter horizontal insulation under the slab (say two to four feet of rigid foam), will this theory work? How would this be done and have you done it successfully in the past? ANDY IN CLARKLAKE

DEAR ANDY: Before I answer your question, a couple of suggestions which will help you get some more bang for your buck.

 #1 Going with either 30’ or 36’ in width and 60’ or 72’ in length will lower your per square foot investment.

#2 Unless you have an HOA which requires a shingled roof, steel is going to be by far more durable and economical. Read more here: https://www.hansenpolebuildings.com/blog/2015/03/shingle-warranties/

 Your idea might work. Basically what you propose to create is in effect a frost-protected shallow foundation (although the columns would extend through the bottom of the slab around the perimeter). Here is a guide which can help you towards this design: https://www.cs.arizona.edu/people/jcropper/desguide.pdf

 It is not something I have tried, so I can’t speak towards the results. I can imagine you would have to do a thorough job of insulating the building itself, in hopes you would be able to retain enough heat to prevent the ground below your slab from also freezing.

Mike the Pole Barn Guru

Hydronic Radiant Floor Heating

When planning the administrative offices of Hansen Pole Buildings, we looked at the most efficient method to heat and cool a building which would have 8000 square feet of finished space. After weighing all of the options, it was determined the answer would be hydronic radiant floor heating, poured within the concrete floor.

Hansen Buildings Admin BuildingOur particular system utilizes a mixture of water and anti-freeze (propylene glycol) as the heat transfer fluid in a closed loop which is recirculated through a series of 16 wells which are 180 feet deep. There, the mixture returns to the 50-55 degree F. temperature of the below frost line ground. For summer cooling, the mixture is merely circulated through the slab. In winter, it is far easier and more efficient to use the geothermal heat pump to heat from this temperature to a comfortable room temperature, than it would be to heat outside air from 40 or more degrees below zero.

The radiant floor heating system is divided into several zones, which can be adjusted independent of each other. This allows for warmer spaces to be created in habited spaces.

Various types of pipes are available specifically for hydronic floor heating and cooling systems and are generally made from polyethylene including PEX.

Hydronic systems can use a single source or combination of energy sources to help manage energy costs. Hydronic system energy source options are boilers or heat pumps. Boilers can be powered by natural gas, coal, oil or waste oil (see https://www.econoheat.com/), electricity, solar thermal, wood or bio-fuels. Heat pumps can be electrical, natural gas, or (as in our case geothermal).

Under floor heating influences the radiant exchange by thermally conditioning the interior surfaces with low temperature long wave radiation. The heating of the surfaces suppresses body heat loss resulting in a perception of heating comfort. This general sensation of comfort is further enhanced through conduction (feet on floor) and through convection by the surface’s influence on air density. Under floor cooling works by absorbing both short wave and long wave radiation resulting in cool interior surfaces. These cool surfaces encourage the loss of body heat resulting in a perception of cooling comfort.

From a personal standpoint, the radiant floor heating and cooling in this building “just feels good” all the time. Despite at least two zones having no floor covering over the concrete, even at 40 below zero the rooms always feel warm in the winter and cool in the summer.

Under floor heating can have a positive effect on the quality of indoor air by facilitating the choice of otherwise perceived cold flooring materials such as tile, slate, terrazzo and concrete. These masonry surfaces typically have very low VOC emissions (volatile organic compounds) in comparison to other flooring options. In conjunction with moisture control, floor heating also establishes temperature conditions which are less favorable in supporting mold, bacteria and dust mites. There is recognition from the medical community relating to the benefits of floor heating especially as it relates to allergens.

Having sufficient insulation beneath the concrete floor, as well as at the perimeter of the slab is essential for ultimate system performance (R-10 expanded polystyrene (EPS) rigid insulation boards). The prediction was it would take about 48 hours to get the system up to a comfortable room temperature; however we found it to take only about eight hours.

The beauty of this system is, we can open one of the large overhead doors when it is far below zero outside….and after closing the door, the area is back to a comfortable temperature nearly immediately!  And talk about HVAC efficiency.  Our heating/cooling bills are amazingly low to where I can definitely vouch for the installer’s prediction of “paying for itself” is not an idle claim.