Tag Archives: pole barn foundation

Foundation Requirements, Stem Walls, and Building on Slab

This week the Pole Barn Guru answers reader questions about the type of foundation and uplift requirements there is for and RV cover and “what not,” building a home on a stem wall or with crawl space, and pluming for a building built on slab.

DEAR POLE BARN GURU: For a 24 x40 x12 pole barn residential use as an RV cover and what not what type of foundation and uplift requirements are there other than the post being set around 4 feet in the ground? STEVE in FORT MCCOY

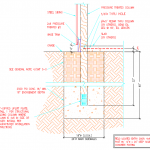
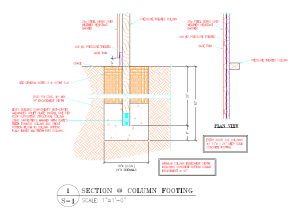
DEAR STEVE: Column embedments and encasements need to be engineered to adequately resist uplift, overturning and gravity and will be determined based upon design wind speed and wind exposure, roof dead loads (plus snow in more northern climates), whether building is enclosed, open or partially enclosed, etc., as well as soil bearing capacity. When columns are effectively constrained by a concrete slab on grade, it helps to potentially reduce depth, diameter and required amount of concrete needed for hole. Due to complexity of these factors, embedment and encasement, as well as any added uplift plates or cleats should only be determined by whatever engineer will be sealing your plans. He or she should also provide verifying sealed calculations to certify adequacy. A consideration – if this will be a roof only structure, Moment (bending) loads on columns are four times as great than on a fully enclosed structure – this results in more concrete being needed for holes.


DEAR POLE BARN GURU: I’m building a post frame building/house. I want to use stem wall or pillars, wet set brackets. Is there a huge cost difference or benefit over the other? Does stem wall, if used, have to be on a footer or does it act as it’s own footer? I want floor to be 1.5′ above grade if that makes a difference. Thank you for your time and input. LONZY in CONWAY

DEAR LONZY: Post frame buildings make for excellent homes! Great choice. My educated guess is your floor is going to be over a crawl space. If so, your top of floor will probably end up being more like two feet above grade, rather than 18 inches. This allows for better access to utilities as well as not requiring all supporting beams and joists to be pressure preservative treated. Concrete stem walls will need to be at least six inches thick and on top of a six inch deep by 12 inch wide concrete footing (for a single story), resulting in a far greater investment in forming and pour (both in materials and labor). Concrete piers are pretty low tech and then sides of your crawl space will consist of (usually) steel siding.


DEAR POLE BARN GURU: What is the best way to plumb a pole barn home. I would like to keep the concrete floors, but I need a way to plumb it without having to jackhammer concrete when there is an issue. NICHOLAS in LOUISVILLE

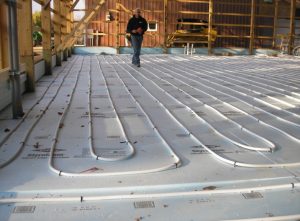
DEAR NICHOLAS: In all reality, chances of a modern plumbing failure under a concrete slab are very, very small. Tens of thousands of homes and apartments are built every year in our country with plumbing under concrete floors, attesting to how rare a failure occurs. Older slab on grade buildings have had challenges from deterioration or perforation of copper pipes or joint issues. Your best prevention is a well-prepared site, as shifting soils are your most likely cause of a plumbing challenge. Remove any expansive soils and compact fill in no greater than six inch lifts. Keep water from being able to run under your home – by grading away from building perimeter at least 10 feet at a 5% slope. Build pad for building up above surrounding property. Use French drains if underground water is suspected. Drain gutters sufficiently away from home. Use PEX for all under slab water lines. All pipes need to be extensively tested for drainage and air pressure in supply lines multiple times during rough-in process prior to slab being poured. Testing should take place once after rough-in is completed and before backfill when dirt is pushed back into trenches to cover pipes. It should be tested once again after backfill has taken place to ensure no damage to pipes, then once again after concrete slab prep has been finished. I have heard of people running their under slab PEX through larger diameter sleeves, however this seems to be an unnecessary expense.

Footings, Mechanical Plans, and Hay Ventilation

This week the Pole Barn Guru answers reader questions about concrete footings for a lean-to addition, how to incorporate plumbing, electrical, and HVAC plans into to process, and proper ventilation for a hay barn.

DEAR POLE BARN GURU: We are putting a 10′ Lean-to on a Steel Framed Building. We will be using 4×6 posts spaced 10′ with 18″ holes. My question is about footings. I was hoping to tamp the bottom of the hole, add a bit of gravel, place post, add quickrete, and back fill. I am hoping to avoid filling the entire hole with concrete to save some money. If there are better ways I am open to them just looking for cost effectiveness, if possible. Thank you! PETE in UNIONVILLE

DEAR PETE: Any building is only as strong as its foundation, so this is not a place to be penny wise and pound foolish. Code requires minimum six inch thick concrete footing, or a Code approved alternative (here is an example https://www.hansenpolebuildings.com/2014/05/footingpad/).

Subject to approval from your building’s engineer, I would recommend supporting your building columns up eight inches from bottom of hole, then monopouring with concrete to give at least an 18 inch total depth of concrete. Done in this fashion, you could pour roughly 10 holes with a yard of premix. Balance of hole above this bottom collar can then be backfilled with compactible material.


DEAR POLE BARN GURU: When I order plans and the pole barn kit from Hansen and work as my own general contractor, how do people generally build HVAC, plumbing, electrical, etc. into the plans to take to the county to acquire permits? Do I have to get plans from those contractors and then take it to a drafter to get drawn up for approval for permits? JOHN in LAPINE

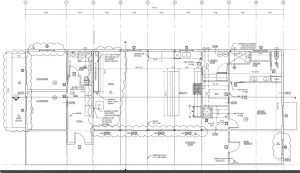
DEAR JOHN: Our floor plan team can add plumbing and electrical for a nominal fee – challenge is, your subcontractors will ignore this entirely. I have always had best results having these subcontract trades submit their own drawings when they apply for their permits (these permits are outside of your structural permit).


DEAR POLE BARN GURU: Have a 24ft x48ft pole barn that we store hay in. The hay is always getting moldy, hay sits on OSB wood which sits on a steel grate platform, 1ft above concrete floor. Barn roof is OSB wood with felt and shingles with a ridge vent. Sides of barn are steel with OSB wood on inside. Am thinking of building a new barn with a hay loft, but was given a suggestion to contact you first for a possible solution. Barn is in northeastern Ohio, very humid in summer. We check the hay before we store it and the moisture level is fine. I even thought of enclosing hay area and putting in a dehumidifier. Any ideas would be appreciated. Thank you, STEVE in NORTH RIDGEVILLE

DEAR STEVE: A hay barn needs proper ventilation to expel moisture from hay respiration. Hay barns are typically dependent on natural ventilation to get air exchange, so proper orientation can be critical. Typically, a hay barn should be oriented so open eave sidewalls are perpendicular to predominant wind direction.

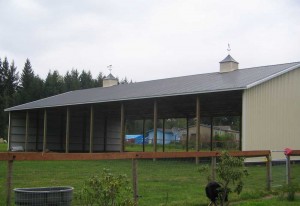
For barns with enclosed sidewalls, enclosed vented sidewall eaves and a vented ridge are critical design elements to allow for passive ventilation. Air enters through eaves and exits through ridge vent with excess moisture.

Choose a location away from swampy areas or at bottom of a hill, as it will require more costly drainage. Gutters or rocked ditches close to sidewalls should be included in planning costs. Hay barn floor should be at least six to eight inches higher than surrounding ground level.

With a concrete slab-on-grade floor, it is crucial to have a well-sealed under slab vapor barrier.

Moving Pole Barns

Moving a Pole Barn
Most of us American adults have, at some time in our lives, visited a county or state fair. Adjunct to these events is the inevitable midway – where carnies (those wonderful and frequently interesting folks) hock their wares and try to interest one and all in a game of chance. Amongst these games is typically one where a rifle of some sorts spews water, air or corks at moving targets allowing the joyous winner to recoup his or her investment into a wonderous prize which is usually worth far less than the price of admission to the game.

Well, I hate to break the news, but the chances of coming out ahead at the midway are better than the chances of coming out ahead on moving a pole barn (aka post frame building).

Reader GEOFF in SNOHOMISH writes:
“I have a pole barn that I want to move. I had plans drawn by an engineer to erect it after I moved it. (required by the county) he looked at the original building, but drew the plans with a full footing and foundation. When I told him that this is a pole building and all the weight is carried on the posts he didn’t get it. Does a pole barn have to have footing and a foundation?”

Mike the Pole Barn Guru responds:
Well Geoff, there are issues going on here much larger than just your question, which I will address first.

Post frame buildings typically have a footing (most usually a concrete pad poured at the bottom of an augured hole) and the foundation is the pressure preservative treated wood column which is typically all or partially encased in concrete. There is most generally no structural reason to have a continuous concrete footing and foundation wall, such as one might see supporting a stick framed building.

I would encourage your engineer to make a modest financial investment into the NFBA (National Frame Building Association) Post-Frame Building Design Manual (read more about it here: https://www.hansenpolebuildings.com/2015/03/post-frame-building-3/).

Now the big picture:
You were lucky to have found a registered professional engineer who was willing to put his career on the line to seal plans for a post frame building which has been taken apart and moved, unless he placed some extreme caveats as to potential damaged materials. Besides this, chances are good the building in question was not built to the current Building Code requirements, and some significant modifications would need to be made in order to upgrade it to currently accepted standards.

The biggest changes involve wind design – where buildings are now required to be designed using Vult for wind speeds, rather than the lower Vasd values. The trusses, if undamaged, should be checked for structural adequacy using the most recent Code.

You have already made some financial investments, you might as well help to educate your engineer, as well as get your moving building up to the modern version of the Code.

Setting Pole Building Posts

We Don’t Always Do Things Perfectly, But We Do Listen

Last summer Hansen Pole Buildings Supplied a pole building kit package to a client who experienced a few challenges and I took the time to address each one of them. This is Part I of a four part response.

First – here is my initial response (same day as received from client) to his initial complaint:

“Mr. xxxxx ~

Thank you very much for taking the time to discuss your issues. Our building kit packages are not only the resulting product of the 16,000+ buildings we have been directly involved in, but also the 100,000+ buildings which have been constructed by builders we have done business with, and (most importantly) valuable feedback from clients just like you.

I will personally be reviewing each of your concerns and responding to them within the next several days. This may very well result in changes to some of our processes, both internally, in our Construction Manual, and with our vendors. We do take all input very seriously.

Please feel free to address any other technical or design issues or concerns directly to me at this email address.

Best regards ~ Mike Momb, Technical Director
Hansen Buildings Technical Support Department”

Here is the email I was responding to:
“On the design flaws, and other issues, here is what I have experienced.

1-The concrete footing on the pole building posts

Standard practice in this area is to have an 8-10 inch concrete pad and the post to be 48″ in the ground.
The concrete collar created some interesting problems.  It is very difficult to place the poles when the bottom of the post is not in contact with anything.
Typically a post is ordered over height and dropped into the hole.  The excess is then cut off.  Suspending the post above the ground was such a time consuming task.  It required each post to be shot with a transit to make sure that it was within the allowable height variation. This took some time.  I know that you recommend leveling the site before the operation gets under way but in my case I had an 18″ drop from front to back and it was not feasible to do the rock work before the posts went into the ground.  It also took a bunch of back breaking work to lift those posts out of the ground and get them suspended and then nailed into supports.
The pendulum effect is very noticeable and a small amount of movement in the bottom of the hole makes a huge difference at the top.  When the concrete gets pumped into the hole it comes in with some force and there was a heck of a time trying to make sure that the concrete did not displace the post at all. (Yes, the posts were staked into the ground.  3 2X6’s for each post, one on the ground, and 2 vertical supports).
Around here the ground water is fairly close to the surface and when digging a hole 36″+deep ground water is going to seep in. There is no way to tell encasement depth when there is water in the hole when the concrete is being pumped in.  I sprayed the posts with Orange paint at the collar height but it was useless.  Once the concrete started flowing you could see nothing as the 4-6 inches of water clouded.  We tried checking it with measuring sticks but could not be sure of the depth.  We ended up just over filling them to make sure there was enough concrete in the hole.
Overall, I think the concrete collar is an unneeded step that does not really aid in the construction process or stability of the building.  If you really believe that it is necessary you can achieve the same thing by putting a couple of sticks of rebar in when pad is poured and gain connection with the rest of the concrete this way.”

My response: I can see how the 18 inch grade change posed a great deal of challenge for you.

Setting the poles is a snapThe Hansen Pole Buildings Construction Manual does address this issue in Chapter 2: “Grade change is ideally checked before placing building order, however this is not often feasible as a practical matter. If grade has not been checked before order placement, do so within 24 hours. Longer posts are far more economical when provided with original lumber delivery.”

Longer pole building posts would have eliminated the delay caused by having to shoot each post in with a transit.

This would also have allowed the column depth to be set as per the installation instructions in Chapter 5, which would have entirely eliminated the “bunch of back breaking work to lift those posts out of the ground and get them suspended and then nailed into supports.”

I’ve personally built more than several buildings – with columns set of top of footings, placed to bottom of the holes and suspended. I frankly like the ease of moving columns into place afforded by them being suspended. When adequately braced, movement (in my experience) has not been an issue.  As recently as this past summer a new self-storage unit was constructed on the Hansen Buildings property by the two owners and myself. We set 125 poles as suspended, and experienced no problems with them shifting, with them adequately braced. Our ground, however, was graded to “level” prior to starting, which was key.

The thickness of the concrete collar is merely the minimum requirement. There is no structural issue with having more concrete in the holes than the minimum.

Structurally the concrete collar makes all of the difference in resisting uplift forces. You can read more here: https://www.hansenpolebuildings.com/blog/2012/02/concrete-collars/

Also read why concrete cookies are not the answer:

https://www.hansenpolebuildings.com/blog/2014/03/concrete-cookies/

Come back tomorrow for part II in my response to this client’s letter…regarding his carport attachment to the main building. Mike the Pole Barn Guru

How to Repair a Sagging Pole Barn

My bride tells me I spend an inordinate amount of time surfing the ‘net. She is probably right, but I surf with a goal in mind – researching topics so there are more satisfied pole building owners!

I stumbled across an interesting video on “How to Fix a Sagging Pole Building” today at: https://wn.com/how_to_fix_a_sagging_pole_building

Now, I know the easiest solution to this problem….DON’T LET IT HAPPEN IN THE FIRST PLACE!!

Yes, I was yelling when I used CAPS!

Inadequate footings beneath columns are one of the banes of my existence. In the name of saving a few dollars in concrete, there are so many wrongs which are never going to be added up together to create a right. Here is one of my previous takes on footings: https://www.hansenpolebuildings.com/blog/2014/08/footings/

There are numerous instances of famous structures which had inadequate foundations. Perhaps the most famous being the Leaning Tower of Pisa (read more at: https://www.hansenpolebuildings.com/blog/2011/11/soil-compaction/)

The old armory in St. Paul, Minnesota actually sank over 20 feet into soft clay!

I spend a lot of time dispelling bad advice found on the ‘net. The video above, includes some of this same bad advice.

sagging-barnThe “star” of the video relates his supposition as to there being either no or inadequate concrete beneath the sinking columns. He also tells us the sagging pole barn is in frost country. His restorative process is all well and good, until he pours what would be otherwise known as a “top collar” around the column. Provided the four sacks of premix adequately bond to the column (read about concrete-to-wood bonding here: https://www.hansenpolebuildings.com/blog/2013/04/pole-barn-post-in-concrete/) a brand new problem has been created – frost heave! https://www.hansenpolebuildings.com/blog/2011/10/pole-building-structure-what-causes-frost-heaves/

Our “star” is planning upon the concrete top collar to only have to hold the post in place until a concrete slab is poured. My prediction – frost heave will cause the concrete slab to crack (or entirely break) at these columns.

The solution should have included excavating to the base of the 6×6 (yes it would have been more work) and providing an adequately sized concrete footing pad below the frost line. Involving a competent engineer, rather than winging it (in my humble opinion), would have been dollars well spent to fix his sagging pole barn!

Concrete: I’m Shrinking

According to TKProduct.com: “Drying shrinkage is an inherent, unavoidable property of concrete. Shrinkage of plain concrete drying is .72 inches per 100 feet from its plastic state to a dried state with 50% relative humidity, this shrinkage will take place when the moisture leaves the concrete.”

old column in concreteNow this research, on my part, was triggered by a recent response to one of my blog posts, where a reader was concerned about columns and concrete encasements shrinking away from each other.

The cause of concrete shrinkage is the drying and curing process itself. Moisture which is integrated into the concrete mixture in its wet form needs to leave the concrete in order for the concrete to dry completely. More specifically, the rate at which water inside the concrete mixture is evaporating into air often exceeds the rate at which the concrete produces “bleed water,” the small puddles of water which appear on the surface of the concrete as it dries and cures. This difference between evaporation and bleed rates is the leading cause of concrete shrinkage.

Keep in mind, the typical concrete column encasement (as least as we or our engineers typically design) has the upper side of the encasement approximately 22 inches below grade, is 18 inches in thickness and most often 18 or 24 inches in diameter.

Contributing factors to shrinkage are an increase in wind velocity (this would come into play for surface level pours), ambient temperature increase and/or a decrease in relative humidity.

Of course at soil depths greater than 30 feet below the surface, soil temperatures are relatively constant and corresponds roughly to the water temperature measured in groundwater wells 30 to 50 feet deep. This “mean earth temperature” can be as low as just above freezing in Northern Minnesota, to the mid 70’s in Florida and Texas.

In any case, the temperature of the soil in the area of concern, is going to remain fairly constant during the curing of the concrete encasement and will be affected minimally by any above surface temperature changes.

To help minimize shrinkage – thoroughly dampen the surface of the excavated hole, prior to backfilling with concrete; minimize the water content of the concrete mixture; keep the surface of the concrete encasement out of direct sun; pour in early morning or late afternoon; spray on an evaporation retarder; place an evaporation barrier over the top of the concrete; and (most importantly) keep the top of the encasement wet.

Concrete has a coefficient of thermal expansion and contraction of about 0.0000055 in./in./°F. After hardening, concrete will contract as a result of cooling after the peak heat of hydration (typically coinciding with drop in ambient temperature at night). A 40°F drop in temperature between day and night can cause about 1/32 inch of contraction in a 10 foot length of concrete. Keeping concrete placement temperatures as low as possible helps to decrease the magnitude of the contraction.

Back to the question at hand….

The shrinkage in 100 feet is 0.72” or in one foot, .0072” (about 1/128th of an inch), from thermal contraction (assuming a 40 degree temperature drop almost two feet below ground surface), one foot would contract about .00313” (about 1/320th of an inch).  I don’t know about you, but I am hard pressed to measure 1/320th of an inch.

From my research, it appears concrete shrinking away from the columns in any sort of significant distance, would be most probably due to one or more of the following conditions occurring: the hole (or top portion thereof) being completely filled with concrete – which would allow the surface to be subjected to temperature and humidity fluctuations and/or the concrete mixture having too much water in it to begin with.

From my 33 years of experience with pole buildings: To date, I have never seen a pole building with posts encased in concrete pull out  of the ground, either with or without the surrounding concrete pier.  I have, however, seen buildings “turn turtle” which were placed on top of concrete cookies in holes, then backfilled with dirt.

Dear Pole Barn Guru: Pole Building Basement Foundation

DEAR POLE BARN GURU:  Can these pole barn kits be placed on a basement foundation? MOTIVATED IN MEXICO MISSOURI

DEAR MOTIVATED: I happen to live on a lake, which is nestled into a mountain valley. For the most part, the parcels of land around the lake tend to be very narrow and very steep (only so much lake frontage exists, therefore the narrow lots). In my case, the lot gains well over 100 feet of elevation from lake to back, over the 250 feet of depth.

 With the lake as my “front” yard, on the back of my lot is a pole building upon which the site had 12 feet of grade change in 40 feet. The solution was to excavate to the lowest point, then construct a foundation on the “high” sides. In my case, we used eight inch insulated Styrofoam blocks, poured with concrete – one wall being 12 feet tall, and the other sides appropriately steeped to match the land contours. Steel brackets engineered to withstand moment (bending) forces were poured into the top of the walls to attach the pole building columns.

 The direct answer to your question is – yes. Whether a full basement, partial basement, or daylight basement (the last being closest to my particular case), pole buildings can be attached to any adequately designed foundation wall. We prefer to use wet set brackets (those embedded in the concrete wall at time of pour) as opposed to dry set brackets (those attached to the concrete wall with bolts) for a sturdier connection, but either one can be used.  Stay motivated and good luck! 


DEAR POLE BARN GURU:  Do you have or know of plans for a pole “cabin”?  I am thinking of something small, 16×16, with four outside poles and one center pole.  The center pole would have a circular stair and have a lookout poach at the very top.  maybe 3 stories. LOOKING FOR A SWEETER HOME IN ALABAMA

DEAR SWEET HOME: There are numerous pole cabin plans available on the internet with prices ranging from free to highly affordable. With building plans, you get what you pay for. I would encourage you to use NONE of them, as they are not Code conforming structures. Why anyone would invest thousands of dollars in materials, plus all of their time, to construct a new building which has a high risk of failure – is totally baffling to me.

What you need is a custom designed pole building plan. This means hiring a RDP (Registered Design Professional – an architect or engineer) to design your building, or to deal with a pole building kit package producer, who can provide engineered plans for your project.

In regards to your particular building, the circular (or spiral) stairs in the center could pose some challenges. From the 2012 IBC (International Building Code) Section 1009.12:

Spiral stairways are permitted to be used as a component in the means of egress only within dwelling units or from a space not more than 250 square feet in area and serving not more than five occupants, or from technical production areas in accordance with Section 410.6. 

A spiral stairway shall have a 71/2-inch minimum clear tread depth at a point 12 inches from the narrow edge. The risers shall be sufficient to provide a headroom of 78 inches minimum, but riser height shall not be more than 91/2 inches. The minimum stairway clear width at and below the handrail shall be 26 inches.”

 From a practicality standpoint, the stairs are going to chew up a space in the center of the proposed cabin of about five feet across. Allowing for the thickness of the exterior walls, this leaves about five feet of usable space between the walls and the stairs. The central stair location might not be the ideal place to put it.

 Given the area of each of the three stories is over 250 square feet, another set of stairs (which is not spiral) would also be required. Which is a good thing…..considering the impossibility of getting a bed, desk, dresser, couch, or most any other piece of furniture up a spiral staircase.

 There is nothing wrong with your basic plan – I’d just suggest you have a company who can do a custom designed pole building give you a quote on what both meets code, and gives you the building of your dreams.