Tag Archives: SIPS

Pole Barn Homes, Pole Barn Home Financing, and Insulation Assistance

This Monday the Pole Barn Guru answers reader questions about pole barn homes, help with finding a lender for a post frame home, and an insulation solution for a gambrel style building.

DEAR POLE BARN GURU: Hello, do you have any information on your pole barn homes? Looking to build in lower Michigan. HOLLY in WHITMORE LAKE

DEAR HOLLY: Thank you for your interest in a new Hansen Pole Buildings’ fully engineered custom designed pole barn (post frame) home. A great source of information to get you started is to visit www.HansenPoleBuildings.com, navigate to upper right corner and type BARNDOMINIUM into SEARCH box, then ENTER. Up will come a plethora of articles relating to pole barn homes. One of our Building Designers will be reaching out to you to assist, as well.


DEAR POLE BARN GURU: Hi, We are in the planning stages for our pole barn house we want to build. My question is about Lenders/financing for a Pole barn home- are there certain lenders that specialize in financing for Pole Barns? We were just going to apply for an FHA construction loan thru Rocket mortgage to cover the Lot purchase and the construction. Does Hansen offer a financing solution? Is there a better choice of lender that we should consider?

Thanks! MICHAEL in SHERMAN

DEAR MICHAEL: While there are lenders who specialize in pole barn home financing, you can use virtually any lender provided you follow the suggestions in this article: https://www.hansenpolebuildings.com/2020/06/things-to-complete-before-going-to-a-barndominium-lender/


DEAR POLE BARN GURU: I have an 80X40 Gambrel roof barn. It has metal on roof. I want to take off the metal and insulate the outside of the roof, to a commercial approved R 30. Should I leave the 2×4 strips going across the roof, insulate in between the 2×4 with closed cell foam and then use sips to make up the rest of the R Value? Or should I just continue with spray foam. Top ridge of roof is close to 40′, will spray foam to get to R30 be too heavy for the roof? I need to insulate the walls on the outside as well, but I can do some insulation on inner building as well. I would like to turn this barn into a commercial gathering space, so codes would need to be enforced. GORDON in GENESEO

DEAR GORDON: Unless there is some issue with your current steel roofing not performing (leaks or rust) I see no reason to remove it. SIPs, while a relatively ‘trick’ design solution, are also very expensive https://www.hansenpolebuildings.com/2020/02/sips-for-barndominiums/. An R-30 SIPs panel will cost roughly $4.66 per square foot and weighs in at a hefty four psf (pounds per square foot). To get to R-30, you could do two inches of closed cell spray foam directly applied to inside of your roof steel, then just over four inches of open cell to it, with a weight of under a pound per square foot – it will be less of an investment and you do not have to remove your existing roof steel.

Regardless of how you insulate, you should have a Registered Professional Engineer evaluate your structure for adequacy as a commercial venue.


SIPS for Barndominiums

It has only been five years since I first opined about using SIPs for post frame building construction: https://www.hansenpolebuildings.com/2015/02/sips/. Since then, post frame homes (frequently referred to as barndominiums) have become quite the rage. Easily half of Hansen Pole Buildings’ inquiries are now for some combination of living space!

I had recently done some further research on SIPs and actually acquired pricing, reader STEPHEN from RAPID CITY was evidently thinking on a like-minded path when he wrote:

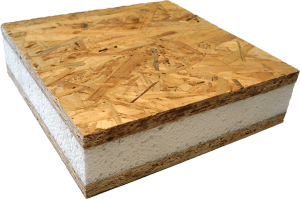
“I am a CAD student at Western Dakota Tech in Rapid City, SD and have been thinking about a way to use post-frame buildings as a cost-effective way to create very energy efficient (essentially passive house level insulation and airtightness) residential housing.  What do you think of the possibility of attaching appropriately sized SIPs to the outside of the posts instead of other sheathing and using their strength to do away with girts all together? I have seen SIPs advertised as being used this way with timber framed or post and beam construction (neither are cheap) but not with post-framed buildings.  The idea would be to have thick enough SIPs to not need internal dimensional lumber in the SIP thereby removing thermal bridges, but having it still be strong enough for racking and wind loads.

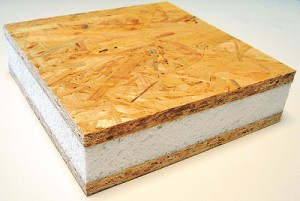
I know that the costs for SIPs mostly comes from the manufacturer having to essentially custom make each piece.  In this application the SIP panels could be made as rectangles that are as wide as your center to center post distance and as tall as is convenient. Any angled pieces for gable ends and any fenestrations could be cut on site, reducing SIP manufacturing costs.  The SIPs also would likely not have to have much dimensional lumber built into the SIP because it is just holding up itself and windows, not the whole building thereby drastically reducing your thermal bridging. You could also foam seal between the SIP panels to provide air sealing (which I believe is standard for SIPs anyway.)

I would think that you could either use thick enough SIPs to provide all of your insulation and just leave the posts exposed on the inside, or you could use a SIP that was just thick enough to, structurally, take the place of girts and sheathing and frame the space between the posts with 2x4s 24” o.c. flush with the inside of the posts and use fiberglass batts in that space.  

The first technique has the advantage of not needing to do any extra internal framing, but you do have to deal with the posts in your living space.  In addition, if you want to run any electrical to the inside face of any of those walls you either have to be ok with running it in conduit on the face of the wall or you are getting back to specially made SIPs with electrical chases.  The advantages of this technique over your suggestion of bookshelf girts and sheet insulation on the interior is that it doesn’t require interior framing (girts or traditional) and no need to glue drywall but the cost of the thick SIPS, even generic ones, might outweigh those advantages.

The second way of doing it does require extra framing and if your outside SIPs are air sealed you would have to be careful about using a moisture barrier on the inside of the wall (like you normally would in a heating climate) as you wouldn’t want to trap moisture in that space.  The advantages of this system over your bookshelf girts and sheet insulation is, again, no gluing of drywall, normal attachment systems for electrical boxes and cables, and the internal framing being slightly cheaper than full 2×6 girts. Again, the cost of the SIPs might make those advantages moot.

Finally, with either style, you could use a traditional (for post-frame buildings) ceiling with blown insulation above and a vented attic space or you could have full roof panel SIPs built with internal structure to span between your trusses, leaving them exposed inside, and get rid of your purlins as well (for both purlins and girts you would probably have to have some temporary bracing while the building is being built.)

What do you think? Have you heard of anyone doing something similar? Does this sound like it would be a viable way to get very high insulation and air sealing on the cheap?”

Mike the Pole Building Guru responds:

Thank you for your well thought out question, it is evident you have read some of my articles. I hope they have been informational, educational and/or entertaining.

I am usually a guy who jumps all over some brand new technology. My construction business had a website back in 1995 when there were only roughly 23,500 world-wide. This was not long after I had erected a post frame shouse (shop/house) for myself, not realizing there was such a thing as a barndominium. My first attempt utilized ICF blocks on two walls and a portion of a third to compensate for digging away a 12 foot grade change.

Getting on track, I have always thought SIPs would be “cool” as in neat, fun and interesting. It has only been recently I have been able to get some solid costs back on their use.  I approached this design solution from an aspect of eliminating all except columns, roof trusses, essential truss bracing and steel skin. I looked at this as applying SIPs to column exteriors and used a 36 foot wide by 48 foot length with 10 foot high walls. In order to span 12 feet between columns and trusses I was looking at R-52 panels. Wholesale raw cost difference (after eliminating typical wall girts and roof purlins) would add nearly $30,000 plus freight to this building. It would also require a crane onsite to place panels and some sophisticated fastening systems to attach SIPs to the framework.  It is relatively easy to achieve similar insulating values and air sealing for far less of a cash outlay.

Can it be done? Yes. Should it be done? Not if return for investment is a consideration.

Anyone who can design an overall cost effective post frame building design solution with SIPs, I am all ears and eyes to hear and read about it. Until then, for those who just want to be neat and different without cost as a factor, it might be a great system.

Insulating a Steel Truss Building

Insulating a Steel Truss Building

Reader JONATHAN in MISSISSIPPI has been planning a building using steel trusses and has insulating questions. He writes:

“I have recently found your blog and I have to say I am on good information overload.  I’ve read your posts on insulation and air barrier more than twice maybe more.  I live in Mississippi so hot and so humid.

My plan is to build a 32×60 using steel trusses 10′ on center and 2×6 purlins and at the 28′ mark I am wanting to put up a wall to cut the space in two, half wood shop half living area. My biggest question is about insulating the roof for both areas the same, which would be a closed/unvented roof (no attic). I am going to put sheeting over the whole building (walls and roof) and use closed cell spray foam for insulation on the roof, filling the entire cavity of the 2×6’s.  On the underside of the 2×6’s I am going to install some seasoned metal for the ceiling. 

My question is, what if anything do I need to install between the metal roofing and the sheeting? Tyvek? 30# roof felt? or would this work https://www.lowes.com/pd/48-in-x-250-ft-1000-sq-ft-Synthetic-Roof-Underlayment/3151833? Does a unvented/closed roof need to breathe any? Because if it doesn’t I really like the synthetic roof underlayment. Or do you have any suggestions?

On the walls I am going to stud vertically between the posts with 2×6’s with sheeting on the outside, cover it with Tyvek, and metal over that. What suggestions do you have on insulating the walls? Do I need an additional vapor barrier on the inside of the walls? I was thinking maybe a thin layer of closed cell foam on the inside and going with mineral wool insulation batts between the studs.

I had a lot more questions than I thought I did, whew! I just want to make sure I am doing it right, without any problems down the road and I am ok with a little overkill and cost to do it. Just wish I could afford/justify SIP panels for the roof.  

Any and all information and guidance is appreciated.”

Mike the Pole Barn Guru writes:
I will first express my concern for your desire to use steel trusses. Unless your provider can furnish engineer sealed drawings showing adequate load carrying capacity for your particular circumstances (you have added dead loads beyond what they are typically designed for, as well as an appropriate wind load) I’d be running away from them. They also should be designed to minimize deflection. I’d want some written proof of these trusses having been third party inspected for quality as well. You are going to be making a significant investment into your new building – no reason to have it fall down around you.

Moving forward. Between roof sheathing and steel roofing you do need to have something. A minimum of 30# felt should be used, although synthetic underlayment would be just fine. You may want to investigate a system including a ventilated roof mat, as it will reduce thermal heat transmission. A weather resistant barrier such as Tyvek would be an absolute wrong product.

For walls, you should create a thermal break between studs and interior. I’d glue two inch closed cell foam boards to stud inside face and then glue 5/8″ gypsum wallboard to foam board inside face. I’d probably fill wall cavity with BIBs insulation rather than closed cell foam and mineral wool batts. This will more fully fill cavity without creating voids.

I have yet to see SIPs as being economically practical. They appear to be expensive enough so as to preclude ever being able to recoup investment costs.


Bad Energy Efficient Pole Barn Advice

Bad Energy Efficient Pole Barn Advice from GreenBuildingAdvisor.com
Long time readers of this blog have seen ample posts about energy efficient post frame (pole barn) buildings. As most are aware, there is as much bad information (maybe more) than good available on the internet. Whilst I’d like to believe Martin Holladay at www.greenbuildingadvisor.com is fairly knowledgeable – when it comes to his answers on this particular subject, he has (in my humble opinion) missed the mark.

Here are a few of Martin’s comments:
“The main problem with insulating a pole barn is creating a good air barrier. There are many opportunities for air leakage: between the insulated sections of the wall and the vertical posts; at the base of the wall (which either meets dirt, gravel, or a concrete slab); and at the intersection of the wall and the insulated ceiling. You should strive for airtightness when you create this assembly. It won’t be easy — but do your best.”

“It’s tough to insulate a pole barn. First, there is the question about the floor. Do you have a slab or gravel? If it’s a gravel floor, it’s hard to air-seal the bottom of the walls. If you have a slab, we’ll need to know your climate zone or location, so we can recommend whether you need a horizontal layer of rigid foam under the slab. Next, you still have issues of how to support the insulation. In most pole barns, you don’t have studs. You have posts and horizontal nailers between the posts. This makes air sealing difficult, and using conventional insulation difficult. The best way to proceed is to work on the exterior side of your structural frame. Again, either SIPs (structurally insulated panels) or nailbase is one approach — and if you use SIPs, you could skip the pole barn structure, and just build a SIP building. Another approach is to install a stud wall on the outside of your pole barn to hold the insulation — but again, this raises the question, why not just build an ordinary building with stud-framed walls if you need it for insulation?”

“I’m afraid that ‘energy efficient pole building’ is an oxymoron. If you want to make a pole building energy-efficient, you pretty much have to build an entirely new building — either inside the pole building or outside the pole building — to create an air barrier and provide somewhere to install the insulation. That’s why people who are interested in energy efficiency don’t choose dirt floors or pole construction. However, if you decide to let go of the idea of energy efficiency, you can certainly build a dirt-floored tiny house with a pole frame.”

Mike the Pole Barn Guru Advises

Maybe the thought of all post frame buildings having dirt floors should be thrown out of the discussion. From experience the only post frame buildings which have dirt “floors” are ones which are always going to be pure agricultural or storage buildings and will never be climate controlled, or they are dwellings with wood floors elevated above a crawl space.

The air barrier issue for post frame construction is resolved the same way a stud framed building would be – utilize a quality building wrap between framing and siding, then insulate between girts (think studs run horizontally). Thermal transference in walls can be reduced by having an interior set of wall girts to support inside finish surfaces such as gypsum wallboard. This is far less material intensive than the double studwall system promoted by some stick frame builders.

Wall insulation for post frame buildings can run the gamut from unfaced fiberglass batts, to BIBs (https://www.hansenpolebuildings.com/2011/11/bibs/), to closed cell spray foam or combinations thereof, just like studwall construction.

Top of wall to insulated ceiling transition is the same for either form of construction. Raised heel trusses (https://www.hansenpolebuildings.com/2012/07/raised-heel-trusses/) allow for full thickness of insulation above the perimeter walls, and should be utilized in any case with a climate controlled building.

For slab on grade applications frost-protected shallow foundations (https://www.hansenpolebuildings.com/2016/11/frost-protected-shallow-foundations/) are a practical solution, with post-frame holding an advantage in not having to have a thickened edge of the concrete floor.

Designing for energy efficiency? Look no further than post frame construction – at the corner where energy savings and cost savings meet!

Insulating a Barndominium

Residential post frame buildings are becoming more and more prevalent as consumers are beginning to realize they can save thousands of dollars in foundation costs and actually build their own beautiful and well insulated barndominium homes.

Steve from Northglenn posed this question:

DEAR POLE BARN GURU: Now that the “Barndominium” style home is more popular than ever, have standards and practices been developed for creating a well insulated/air sealed pole structure?

Particularly, how would you recommend designing well insulated/air sealed pole barn home with cathedral ceiling/exposed joists in climate zone 5b?
I would like at least r49 in the ceiling and r28 in the walls, but the more the better. I would like to avoid spray foam due to the costs, and the steel replacement factor; replacing damaged exterior steel which has been sprayed with foam insulation sounds like a nightmare.

Mike the Pole Barn Guru:

My thought is bookshelf girts with BIBS(blow in blanket insulation), plus 1.5″ of XPS sheathing (fully sealed/taped) outside of the posts, then either attach the steel to the girts through the XPS, or place 2x4s on the XPS and attach the steel to that to maintain an air gap.


The ceiling I am less sure of. How is the ceiling finished if exposed trusses are desired? Is drywall screwed directly to the underside of the girts? If so, what supports the edges of the drywall on the 2′ span between girts? What is the largest girt size that is reasonable? In order to get a r49+, the roof would need 2×12 girts with BIBS plus 1″ of XPS, then steel, or 2×10 girts with BIBS then 2.5″ of XPS.

Have you ever used roof SIPS to get higher R-values? If so, how are they attached to the girts?

What is the best way you recommend to accomplish this?

Thanks! Steve

Dear Steve: Might as well start at the end and work forward.
SIPS – (Structural Insulated Panel System) No, I have never used them. They would provide high R values, however they appear to be extremely expensive. As far as I can surmise, the savings in energy costs will never offset the added cost of the SIPS. I had done some preliminary research on the use of SIPS for post frame. However the people “in the know” never shared the information I needed to be able to write further about them:

SIPS


I would think to use SIPS would require the use of very long screws to attach them to the underlying roof system adequately enough to maintain structural integrity of the building.
For the roof, you are not going to want to place XPS (Extruded Polystyrene rigid foam board such as Owens Corning FOAMULAR®) between the roof purlins and the roof steel, as this will compromise the shear values of the roof steel.
SIP PanelWithout going to the expense of deep I joists or prefabricated parallel chord trusses for roof purlins, the largest readily available dimensional lumber would be 2×12, which even with BIBs is only going to net you about R-45. Plus the upper foot of the roof trusses would then be “buried” by the thickness of the purlins.
If your goal is to have an exposed truss, you might want to look at doing parallel chord scissor trusses to create an attic space in which you could blow in even R-60 insulation, then use a non-structural truss below to create the look you are after. Our friends at Timber Technologies are just one possible source of this type of truss:

(https://www.timber-technologies.com/titan_trusses.phtml)
On the walls, you have the same potential challenge with attempting to place XPS between the girts and the siding, as on the roof. The best results are going to be obtained when as much of a thermal break as possible can be created. Bookshelf girts can provide for a deep insulation cavity, then the XPS panels can be placed on the inside of the girts, and GYB (Gypsum Wall Board) can be installed on the inside of the XPS panels. You will want to have a quality Weather Resistant Barrier between the wall framing and the steel siding. Read more here: https://www.hansenpolebuildings.com/2016/01/determining-the-most-effective-building-weather-resistant-barrier-part-1/
The XPS panels will serve as a vapor barrier on the inside of the walls, so you will not want to have another vapor barrier (such as Visqueen) on the inside of the wall insulation.
Looking for a super insulated new home? Post frame construction is most likely the answer!